Introduction
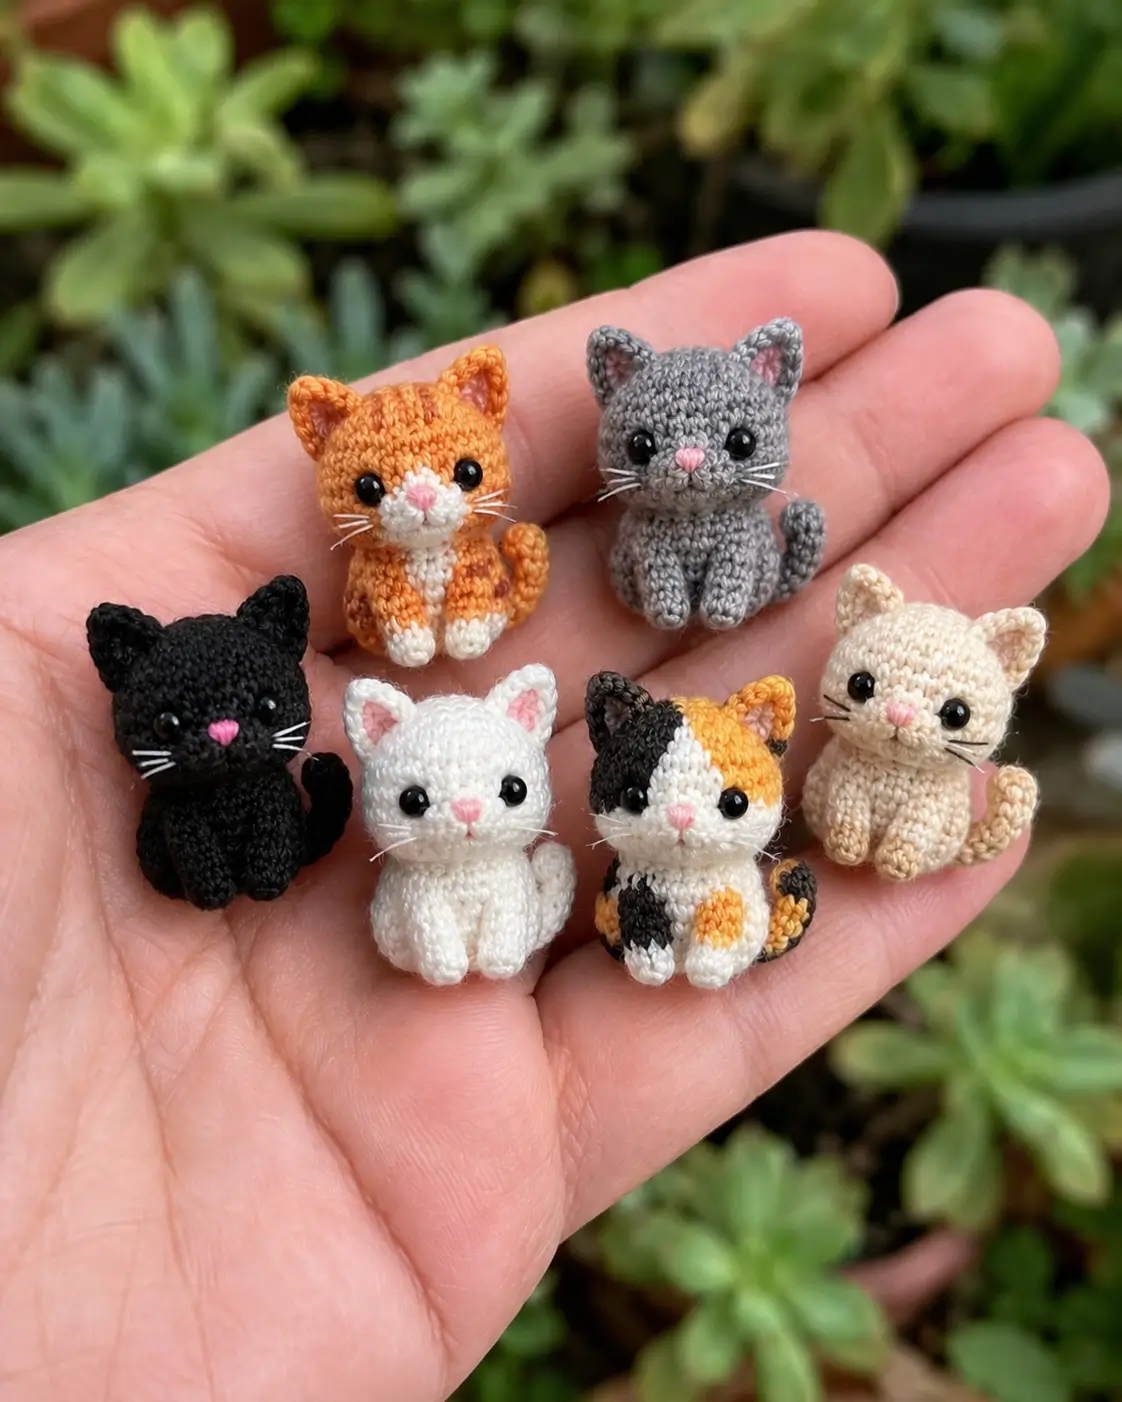
Whisker pads decide the whole face on a cat; flatten them and the kitten disappears. This kitten amigurumi crochet pattern uses sport cotton, a 2.5 mm hook, and 6 mm eyes for a seated miniature around 5 cm tall. The build suits an easy-intermediate maker and uses scrap quantities efficiently. It works well for keychains, shelf miniatures, or color tests before scaling up.
The Design: What Makes This Kitten Different
You need three things for a convincing cat silhouette: a wider head than chest, ears that sit high and narrow, and paws that meet at the front. The maker gets that by keeping the head rounder than the body and by sewing the front legs almost touching, which reads as a seated kitten instead of a teddy-bear body. A second decision sits in the cheek area. Two small circles build the muzzle without pushing the nose too far forward, which keeps the face compact in a mini cat crochet pattern. The third choice is the tail angle. Set too low, it turns into a support prop; set too high, it stiffens the outline. The most common failure on a sitting cat amigurumi is ear spacing that runs too wide, making the face read fox-like instead of feline.
Project Info at a Glance
| Skill Level | Time | Finished Size | Hook | Best For |
|---|---|---|---|---|
| Easy-Intermediate | 1–2 hours | 5 cm | 2.5 mm | Keychains, ornaments, pocket gifts |
Materials and Tools
Yarn
- Main coat color — sport / fine cotton — approx. 7–15 g — Schachenmayr Catania or Premier Cotton Fair
- White contrast for muzzle and paws — sport / fine cotton — approx. 3–4 g — same yarn family for color match
- Pink detail yarn — embroidery floss or matching cotton scrap — small amount — any smooth cotton thread
- Optional coat-marking scraps — orange, black, gray, cream, or brown — small scraps — use the same fiber and weight as the main coat
Tools
- Hook 2.5 mm
- 6 mm safety eyes
- Stuffing
- Tapestry needle
- Stitch markers
- Fine thread or monofilament for whiskers
Abbreviations
MR / sc / inc / dec / sl st / ch / BLO / FLO
Invisible decrease joins the front loops only, which reduces the ridge that standard decreases leave across a small muzzle or shoulder line.
Pattern — Step by Step
Continuous spiral unless noted. The stitch sequence below is original, built to match the photographed kitten proportions while staying inside standard amigurumi count logic.
Head (Make 1)
Yarn: main color
R1: 6 sc in MR (6)
R2: inc ×6 (12)
R3: (sc, inc) ×6 (18)
R4: (2 sc, inc) ×6 (24)
R5: (3 sc, inc) ×6 (30)
R6: sc around (30)
R7: sc around (30)
R8: sc around (30)
R9: sc around (30)
R10: sc around (30)
R11: (3 sc, dec) ×6 (24)
R12: sc around (24)
R13: (2 sc, dec) ×6 (18)
R14: (sc, dec) ×6 (12)
Insert eyes between R7 and R8, 6 stitches apart. Stuff firmly before R14.
R15: dec ×6 (6)
Fasten off. Leave a 12 cm tail.
Body (Make 1)
Yarn: main color
R1: 6 sc in MR (6)
R2: inc ×6 (12)
R3: (sc, inc) ×6 (18)
R4: (2 sc, inc) ×6 (24)
R5: (3 sc, inc) ×6 (30)
R6: sc around (30)
R7: sc around (30)
R8: (3 sc, dec) ×6 (24)
R9: sc around (24)
R10: sc around (24)
R11: (2 sc, dec) ×6 (18)
R12: sc around (18)
R13: (sc, dec) ×6 (12)
Stuff the lower half firmly and the neck area lightly.
R14: dec ×6 (6)
Fasten off. Leave a 15 cm tail.
Front Legs (Make 2)
Yarn: white for first rounds, then main color
R1: 6 sc in MR (6)
R2: inc ×6 (12)
R3: sc around (12)
Change to main color at the last yarn-over of R3 if using white paws.
R4: dec ×6 (6)
R5: sc around (6)
R6: sc around (6)
Stuff only the paw end lightly.
Fasten off. Leave an 8 cm tail.
Back Legs (Make 2)
Yarn: white for first rounds, then main color
R1: 6 sc in MR (6)
R2: inc ×6 (12)
R3: sc around (12)
R4: sc around (12)
Change to main color at the last yarn-over of R4 if using white paws.
R5: dec ×6 (6)
R6: sc around (6)
R7: sc around (6)
Stuff the foot area lightly, then flatten the upper end.
Fasten off. Leave an 8 cm tail.
Ears (Make 2)
Yarn: main color
Row 1: ch 2, 1 sc in 2nd ch from hook, turn (1)
Row 2: ch 1, inc, turn (2)
Row 3: ch 1, inc, sc, turn (3)
Row 4: ch 1, inc, sc, inc, turn (5)
Row 5: ch 1, sc across (5)
Row 6: ch 1, dec, sc, dec (3)
Optional: embroider or duplicate-stitch a pink triangle on the center.
Fasten off. Leave a 10 cm tail.
Cheek Patches (Make 2)
Yarn: white or cream
R1: 6 sc in MR (6)
R2: inc ×6 (12)
Fasten off. Leave a 10 cm tail on each patch.
Tail (Make 1)
Yarn: main color
R1: 6 sc in MR (6)
R2: sc around (6)
R3: sc around (6)
R4: sc around (6)
R5: sc around (6)
R6: sc around (6)
R7: sc around (6)
R8: sc around (6)
Do not stuff. Bend lightly with your fingers before sewing.
Fasten off. Leave a 12 cm tail.
Nose and Whiskers Detail
Yarn: pink embroidery floss and white or black thread
Embroider a small upside-down triangle nose centered where the two cheek patches meet. Add one short vertical line under the nose. Thread 3 whiskers per side through the face, trim each to about 1.2–1.5 cm, and seal the anchor point inside the head with a firm knot.
Optional Coat Markings
Yarn: contrast scraps
For a tabby, add 3 short forehead stripes and 2 body stripes with duplicate stitch. For a calico, work one ear in dark yarn, place one forehead wedge in orange, and add offset body patches after assembly. For a solid black, gray, white, or cream kitten, skip patching and keep the face clean.
Assembly
- Sew the head to the body with the face centered above the widest part of the chest.
- Join the two cheek patches side by side, then sew them low on the face.
- Embroider the nose and mouth after the cheek patches are fixed.
- Add whiskers after the facial embroidery is complete.
- Pin the ears to the head so the inner edges sit about 6 stitches apart.
- Sew the front legs to the front body with their inner edges almost touching.
- Sew the back legs lower and wider than the front legs so the kitten keeps a seated base.
- Curve the tail slightly before attaching it to the lower back.
- Check the front view and adjust paw angle before weaving in the final tails.
- Add tabby stripes or calico patches last, when the silhouette is already locked.
The finished kitten should sit upright without a prop if the back legs are level and the tail is attached slightly above the base centerline.
7 Technical Tips
- Mark every first stitch on the 6-stitch limbs. One missed stitch on a tiny tube shifts the seam visibly by round 4 and twists the paw forward.
- Stop stuffing the head when the sides still compress by about 2–3 mm under thumb pressure. Overpacked heads push the eyes outward and flatten the cheek-patch area.
- Insert the safety eyes before the face closes below 24 stitches. Forcing washers in after that point stretches the fabric and widens the eye gap.
- Keep invisible decreases on the lower half of the body and the back quadrant of the head when possible. Standard two-loop decreases leave a ridge that reads as a seam line on short-haired cats.
- Pin the ears before sewing and measure the spacing. On a 30-stitch head, ears placed farther than about 6 stitches apart make the cat read broader and less kitten-like.
- Sew the front legs with less than one stitch of daylight between them. A gap of 2 or more stitches breaks the tucked-paw silhouette seen in seated kittens.
- Scale the hardware with the yarn, not with habit. If you switch to thread and a 1.5 mm hook, drop to about 3.5 mm eyes or embroider them, because 6 mm hardware overwhelms a 3.1 cm miniature.
Conclusion
This build works because the proportions stay controlled: broad head, narrow chest, touching front paws, short muzzle, and a tail that curves without acting as a kickstand. Save the measurements first, then make one solid-color sample before moving to tabby or calico placement. Post the finished piece on Pinterest with the coat type in the pin title, and upload front, side, and tail views to Instagram for comparison. Use #TinySittingKitten so the variations stay grouped. Which version would you test next in this kitten amigurumi crochet pattern: a narrow orange tabby forehead stripe, or the split-face calico shown in the photo?