Introduction
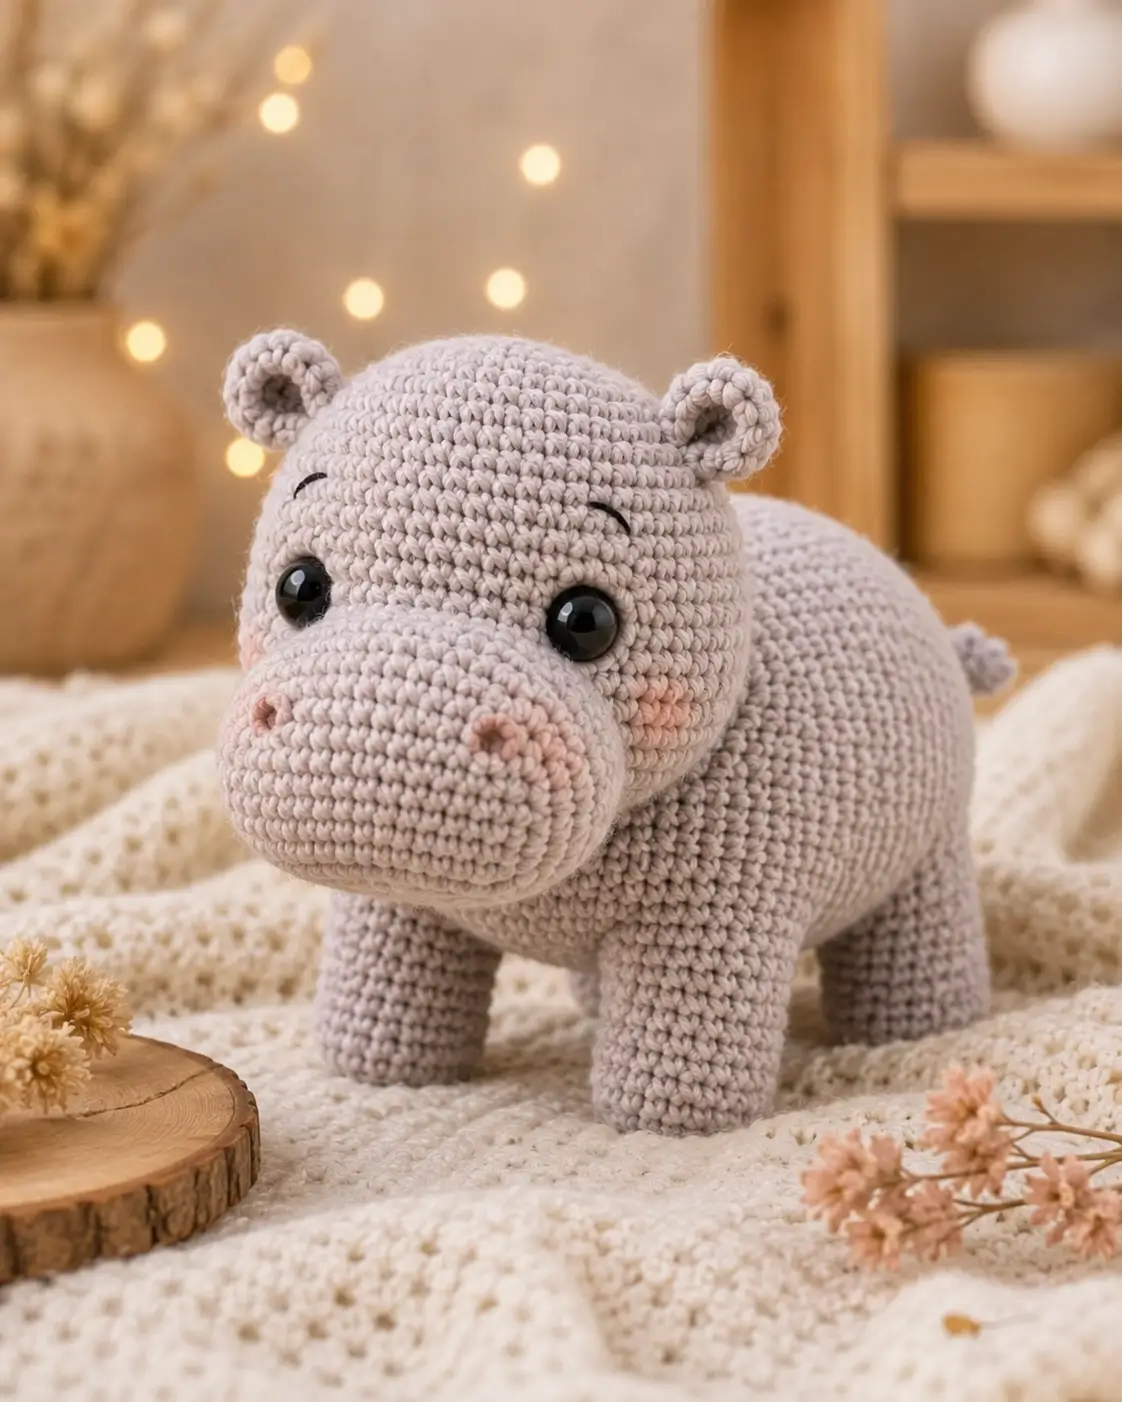
A hippo’s muzzle must read wider than its eyes, or the whole animal becomes a gray bear. This hippo amigurumi crochet pattern builds that width with a separate padded snout, low cylinder legs, and cup ears. Use DK or light worsted yarn with a 3.25 mm hook for an advanced beginner toy about 17 cm high. The shape works as a stable shelf piece because the body sits on four planted legs.
The Design: What Makes This Hippo Different
This design treats the snout as architecture, not decoration. A hippo carries visual weight forward, so the muzzle is crocheted separately, stuffed lightly, then sewn across the lower half of the head to form the broad oval. Cup ears are kept small and high because oversized ears push the figure toward elephant territory. The legs are short cylinders placed under the body, not on the side seam; that placement keeps the crochet hippo toy from rolling. Many makers miss the cheek plane and attach eyes too low. Here the eyes sit above the snout line, while blush circles sit beside it, giving the free hippo amigurumi pattern the same compact face as the reference photo.
Project Info at a Glance
The size, hook, yarn weight, safety eye, and yarn quantity targets follow the closest DK-scale verified reference: Hank the Hippo lists 8-ply cotton, 3.25 mm hook, 9 mm eyes, 70 g main yarn, 4 g accent yarn, 25 cm length, and 17 cm sitting height.
| Skill Level | Time | Finished Size | Hook | Best For |
|---|---|---|---|---|
| Advanced beginner | 5–6 hours, pattern estimate | 17 cm high / 25 cm long | 3.25 mm | Four-leg display toy |
Materials and Tools
Yarn
- Warm light gray — DK / 8-ply cotton or cotton-acrylic — 70 g — Paintbox Cotton DK Misty Grey, YarnArt Jeans pale gray, or similar
- Pale blush pink — DK / 8-ply cotton or cotton-acrylic — 4 g — cheeks and nostrils
- Black embroidery thread — small amount — eyelid arcs
- Optional darker gray — DK / 8-ply cotton or cotton-acrylic — 1 g — tail tuft or nostril shadow
Tools
- Hook 3.25 mm
- 9 mm safety eyes, or embroidered eyes for toys handled by children under 3
- Fiberfill stuffing
- Tapestry needle
- Locking stitch markers
- Sewing pins
- Scissors
Abbreviations
MR = magic ring; sc = single crochet; inc = 2 sc in one stitch; dec = single crochet decrease; sl st = slip stitch; ch = chain; BLO = back loop only; st = stitch; R = round.
An invisible decrease enters the front loops of the next two stitches before completing one single crochet.
Pattern — Step by Step
Continuous spiral unless noted. The large-body plateau is 42 stitches, which suits the wide hippo form in the reference photo.
Head
Yarn: warm light gray — Source: Standard amigurumi math
R1: 6 sc in MR (6)
R2: inc ×6 (12)
R3: (sc, inc) ×6 (18)
R4: (2 sc, inc) ×6 (24)
R5: (3 sc, inc) ×6 (30)
R6: (4 sc, inc) ×6 (36)
R7: (5 sc, inc) ×6 (42)
R8–R15: sc around (42)
R16: (5 sc, dec) ×6 (36)
R17: (4 sc, dec) ×6 (30)
R18: (3 sc, dec) ×6 (24)
R19: (2 sc, dec) ×6 (18)
R20: (sc, dec) ×6 (12)
R21: dec ×6 (6)
Insert eyes between R11 and R12, about 10–11 stitches apart, before closing the head. Stuff firmly, but keep the lower face slightly flatter for the snout seam.
Fasten off. Leave a 25 cm tail for closing.
Body
Yarn: warm light gray — Source: Standard amigurumi math
R1: 6 sc in MR (6)
R2: inc ×6 (12)
R3: (sc, inc) ×6 (18)
R4: (2 sc, inc) ×6 (24)
R5: (3 sc, inc) ×6 (30)
R6: (4 sc, inc) ×6 (36)
R7: (5 sc, inc) ×6 (42)
R8–R19: sc around (42)
R20: (5 sc, dec) ×6 (36)
R21–R22: sc around (36)
R23: (4 sc, dec) ×6 (30)
R24: sc around (30)
R25: (3 sc, dec) ×6 (24)
R26: sc around (24)
R27: (2 sc, dec) ×6 (18)
R28: (sc, dec) ×6 (12)
R29: dec ×6 (6)
Stuff the center harder than the ends so the body stays long instead of ball-shaped.
Fasten off. Leave a 30 cm tail.
Wide Snout
Yarn: warm light gray — Source: Standard amigurumi math
R1: 6 sc in MR (6)
R2: inc ×6 (12)
R3: (sc, inc) ×6 (18)
R4: (2 sc, inc) ×6 (24)
R5: (3 sc, inc) ×6 (30)
R6: (4 sc, inc) ×6 (36)
R7–R9: sc around (36)
R10: (4 sc, dec) ×6 (30)
R11: sc around (30)
Stuff lightly. Press the piece into a horizontal oval before pinning it to the head.
Fasten off. Leave a 35 cm sewing tail.
Front Legs
Make 2. Yarn: warm light gray — Source: Standard amigurumi math
R1: 6 sc in MR (6)
R2: inc ×6 (12)
R3: (sc, inc) ×6 (18)
R4: BLO sc around (18)
R5–R10: sc around (18)
Stuff the lower half firmly and the top half lightly so the leg can sit flat under the chest.
Fasten off. Leave a 25 cm tail on each leg.
Back Legs
Make 2. Yarn: warm light gray — Source: Standard amigurumi math
R1: 6 sc in MR (6)
R2: inc ×6 (12)
R3: (sc, inc) ×6 (18)
R4: BLO sc around (18)
R5–R8: sc around (18)
Back legs are shorter than front legs to keep the hippo’s body slightly forward-heavy.
Fasten off. Leave a 25 cm tail on each leg.
Ears
Make 2. Yarn: warm light gray — Source: Standard amigurumi math
R1: 6 sc in MR (6)
R2: inc ×6 (12)
R3: (sc, inc) ×6 (18)
R4–R5: sc around (18)
R6: (sc, dec) ×6 (12)
Do not stuff. Fold each ear into a cup and pinch the base before sewing.
Fasten off. Leave a 20 cm tail on each ear.
Cheek Patches
Make 2. Yarn: pale blush pink — Source: Standard amigurumi math
R1: 6 sc in MR (6)
R2: inc ×6 (12)
Sl st to close.
Keep these flat. Steam blocking is not needed; finger-flatten the circle before sewing.
Fasten off. Leave a 20 cm tail on each patch.
Tail
Yarn: warm light gray, optional darker gray tuft — Source: Standard amigurumi math
R1: 6 sc in MR (6)
R2: inc ×6 (12)
R3–R4: sc around (12)
R5: dec ×6 (6)
Stuff with only a pinch of fiberfill. Add three short strands of darker gray at the tip if you want a tuft.
Fasten off. Leave a 20 cm tail.
Nostrils and Eyelid Arcs
Yarn: pale blush pink and black embroidery thread — Source: photo-matched detail
Use blush yarn to embroider two U-shaped nostrils on the snout, each spanning 2 stitches wide and 1 round tall. Place them on the upper front third of the snout, 6–7 stitches apart.
Use black embroidery thread for two short eyelid arcs above the eyes. Each arc should span about 4 stitches and sit 1 round above the safety eye.
Do not pull the thread tight. A tight eyelid arc dents the head and tilts the expression.
Accessory Check
Source: photo analysis
No bow, scarf, garment, or carried prop is attached to the toy in the reference image. The dried flowers and wood slice are background styling, not crocheted accessories for the hippo.
Assembly
- Pin the head to the front end of the body with the head centerline angled slightly downward.
- Sew the head to the body through a 7 cm oval contact area, adding stuffing to the neck join before the seam closes.
- Pin the snout across the lower half of the head, with its widest point level with the bottom edge of the eyes.
- Sew the snout on three-quarters of the way, add a thin layer of stuffing, then close the final quarter.
- Attach the cheek patches on both sides of the snout, one round below the eye line.
- Embroider nostrils on the snout and eyelid arcs above the eyes.
- Sew the front legs under the chest, leaving about 4 cm between the inner leg edges.
- Sew the back legs under the rear body, set slightly wider than the front legs for balance.
- Attach ears high on the head between R7 and R10, then sew the tail to the rear center of the body.
- Check that the hippo stands on all four legs, then weave each tail through at least 4 cm of stitches before trimming.
The finished toy is a four-legged gray hippo with a wide muzzle, cheek patches, cup ears, and a small tail.
7 Technical Tips
- Stitch marker drift: If the round start moves more than 2 stitches to one side by R12, the snout may twist after sewing. Shift the marker by working 1–2 extra sc only at the end of a round, then keep the written count unchanged.
- Stuffing firmness: A soft body makes the four legs splay outward after assembly. Pack the body center to medium-firm density, then leave the last 2 cm at the neck softer for sewing.
- Invisible decrease gaps: Front-loop decreases can still leave holes if the hook is too large. For DK yarn, use 3.25 mm or drop to 3.0 mm if white stuffing shows through R20–R29.
- Eye placement timing: Safety eyes must be placed before R18 closes the head enough to block access. Set them between R11 and R12, then view the head with the snout pinned before snapping the backs.
- Velvet tension: Velvet or chenille will enlarge this pattern and blur cheek patch edges. Keep the 42-st plateau, but raise the hook only to the smallest size that lets you see the stitches.
- Pinning symmetry: A 3 mm difference in leg height can make the hippo rock on a flat table. Pin all four legs first, place the toy on a table, and sew only after the body sits level.
- Tail weaving: Short tails can pull free from dense cotton stitches. Weave each yarn end through 4 cm of internal stitches, change direction once, then trim the end close to the surface.
Conclusion
This pattern works because the hippo is built from proportion first: broad snout, small high ears, low legs, and a long body. Check the head with the snout pinned before adding the cheek patches, because that single placement decision controls the whole face. The next practical step is to crochet the head and snout in one session, then leave assembly for a second session when the pins can stay in place. Share the finished hippo on Pinterest and Instagram with #WideMuzzleHippo. When you make this hippo amigurumi crochet pattern, did you keep the snout flat and wide, or did you round it into a softer baby face?









