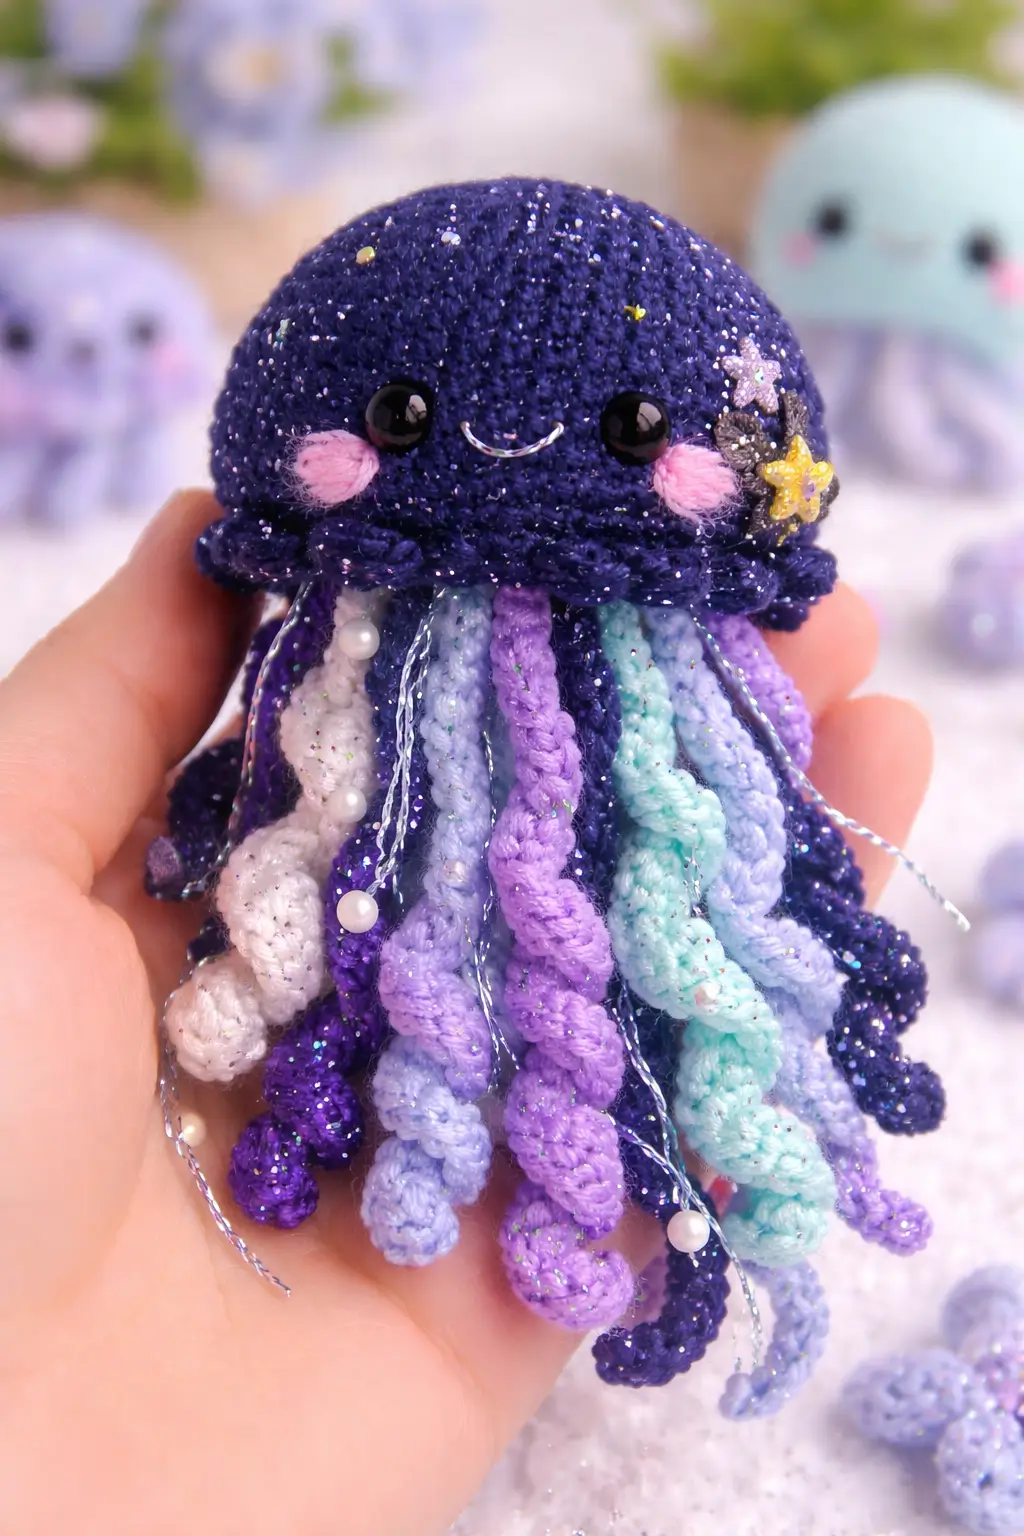
Jellyfish do not have a face centered on a flat plane. That is the first placement problem this jellyfish amigurumi crochet pattern has to solve. The photo-based version uses sparkly DK yarn, a 3.5 mm hook, simple spiral tentacles, and a small domed cap that finishes at about 10 to 12 cm. Skill level: easy to intermediate. It works well as a desk charm, bag display plush, or market make.
The Design: What Makes This Jellyfish Different
This jellyfish is built around three structural choices. First, the cap stays compact at a 30-stitch plateau instead of spreading wide. That keeps the face readable from the front and stops the toy from collapsing into a flat dome. Second, the tentacles alternate in color and length. The variation matters because a jellyfish with identical spirals tends to look heavy at the base and visually static. Third, the embellishment cluster sits off-center rather than directly above an eye line. That placement keeps the smile clear and leaves enough negative space on the cap.
One common mistake with a pastel jellyfish amigurumi is overfilling the cap after the hem round. Too much stuffing pushes the underside open and distorts the ruffle. In a no sew jellyfish crochet pattern, that distortion also shifts the eye line. This version avoids that by closing the underside with a separate inner disk.
Project Info at a Glance
| Skill Level | Time | Finished Size | Hook | Best For |
|---|---|---|---|---|
| Easy to Intermediate | 3-4 hours | 10-12 cm | 3.5 mm | Display plush, gifts, market tables |
Materials and Tools
Yarn
- Deep navy sparkle DK — main cap/body — about 25-30 g — glitter acrylic or cotton blend
- Lavender DK — tentacles — about 10 g — smooth cotton/acrylic blend
- Pale lilac DK — tentacles — about 10 g — smooth cotton/acrylic blend
- Mint DK — tentacles — about 10 g — smooth cotton/acrylic blend
- Icy blue DK — tentacles — about 10 g — smooth cotton/acrylic blend
- White DK — accent tentacle — about 5 g — smooth cotton/acrylic blend
- Pink sport or DK — cheek patches — less than 5 g
- Silver metallic thread — hanging strands — small length
Tools
- Hook 3.5 mm
- Safety eyes 10 mm
- Polyester stuffing
- Tapestry needle
- Stitch markers
- Small pearl beads
- Star sequins or tiny crochet stars
- Black and white embroidery thread
Abbreviations
MR = magic ring, sc = single crochet, inc = increase, dec = invisible decrease, sl st = slip stitch, ch = chain, BLO = back loop only, FLO = front loop only, dc = double crochet.
Use invisible decrease on the closing rounds so the cap keeps a clean curve and the stitch line does not notch under the face.
Pattern — Step by Step
Work in a continuous spiral unless noted.
Head / Cap (Make 1)
Yarn: deep navy sparkle DK
R1: 6 sc in MR (6)
R2: inc x6 (12)
R3: (sc 1, inc) x6 (18)
R4: (sc 2, inc) x6 (24)
R5: (sc 3, inc) x6 (30)
R6: sc around (30)
R7: sc around (30)
R8: sc around (30)
R9: sc around (30)
R10: BLO sc around (30)
R11: (sc 3, dec) x6 (24)
Insert safety eyes between R7 and R8, spaced 8 stitches apart. Embroider smile centered one round below.
Lightly stuff. Do not overpack. Fasten off only after joining to underside body if you prefer sewing directly. Leave 20 cm tail.
Body / Underside Disk (Make 1)
Yarn: deep navy sparkle DK
R1: 6 sc in MR (6)
R2: inc x6 (12)
R3: (sc 1, inc) x6 (18)
R4: (sc 2, inc) x6 (24)
R5: (sc 3, inc) x6 (30)
R6: sc around (30)
This inner disk gives the cap a finished underside and anchors tentacles cleanly.
Fasten off. Leave 25 cm tail for sewing.
Ruffled Hem (Work onto front loops of R10 on cap)
Yarn: deep navy sparkle DK
Round Hem: *(sc, dc, dc) in next stitch, sl st in next stitch* repeat 15 times evenly around.
This shallow shell edge matches the photo better than a wide frill.
Fasten off. Weave in end.
Front Tentacles — Lavender Spiral (Make 2)
Yarn: lavender DK
Ch 26.
Row back: 2 sc in 2nd ch from hook and in each ch across (50)
Fasten off. Leave 20 cm tail.
Front Tentacles — Pale Blue Spiral (Make 2)
Yarn: icy blue DK
Ch 28.
Row back: 2 sc in 2nd ch from hook and in each ch across (54)
Fasten off. Leave 20 cm tail.
Center Tentacles — Purple Spiral (Make 2)
Yarn: lavender-purple DK
Ch 30.
Row back: 2 sc in 2nd ch from hook and in each ch across (58)
Fasten off. Leave 20 cm tail.
Side Tentacles — Mint Spiral (Make 2)
Yarn: mint DK
Ch 28.
Row back: 2 sc in 2nd ch from hook and in each ch across (54)
Fasten off. Leave 20 cm tail.
Dark Accent Tentacles (Make 3)
Yarn: deep navy sparkle DK
Tentacle 1: Ch 24, 2 sc in each chain back (46)
Tentacle 2: Ch 26, 2 sc in each chain back (50)
Tentacle 3: Ch 22, 2 sc in each chain back (42)
Fasten off. Leave 20 cm tail on each.
White Accent Tentacle (Make 1)
Yarn: white DK
Ch 24.
Row back: 2 sc in 2nd ch from hook and in each ch across (46)
Fasten off. Leave 20 cm tail.
Fine Tinsel Strands (Make 5-7)
Yarn: silver metallic thread
Cut lengths between 14 and 18 cm.
These are tied or stitched between tentacles, not crocheted. Keep them sparse.
Cheek Patches (Make 2)
Yarn: pink sport or DK
R1: 6 sc in MR (6)
R2: inc x6 (12)
Sl st to finish.
Fasten off. Leave 15 cm tail.
Star Applique Base (Make 1 small cluster or use sequins)
Yarn: pale lilac or use pre-made star sequins
Ch 2.
Into 2nd ch from hook work: sl st, ch 2, sl st, ch 2, sl st, ch 2, sl st, ch 2, sl st.
Make two or three tiny stars in mixed metallic shades if you want the photo finish.
Fasten off. Leave 10 cm tail.
Pearl Dangles (Make 3)
Thread: sewing thread or metallic filament
Thread one to three small pearl beads per strand. Knot securely at base and end.
Assembly
- Sew the underside disk to the cap, leaving a small gap for final stuffing.
- Add a small amount of stuffing, concentrated in the upper dome rather than the hem.
- Close the remaining gap with whip stitches through both loops of the underside disk.
- Sew the pink cheek patches one stitch below and slightly outside each eye.
- Arrange the longest center tentacles first and stitch them to the underside opening.
- Add the pale blue and mint tentacles between the center spirals to balance color spacing.
- Fill the remaining spaces with dark accent tentacles and the single white tentacle.
- Anchor the metallic tinsel strands between selected tentacles so they hang free.
- Sew or glue the star applique cluster on one upper side of the cap, clear of the eye line.
- Attach the pearl dangles near the side and lower tentacle joins, then weave in all ends.
The finished jellyfish should hang evenly, with the face centered and the underside hidden by tentacle placement.
7 Technical Tips
- Use one stitch marker at the start of every round. Lose that marker at R6 or later and the eye line can drift half a stitch, which is visible on a face this small.
- Keep stuffing firm only in the top two-thirds of the cap. Overfill the lower dome and the hem will flare outward instead of dropping slightly.
- Work invisible decreases tightly on R11. Loose decreases leave small corners that show under sparkle yarn more than expected.
- Install eyes before the underside is fully closed. Pushing posts through a stuffed cap afterward can flatten the dome and misalign the smile.
- Test one spiral tentacle before making the full set. If your tension is loose, 2 sc in each chain may not curl enough, and 3 sc in each chain may be needed for just the metallic yarn version.
- Pin the tentacles in four quadrants before sewing. Random attachment often leaves a gap at the front, and that gap exposes the underside disk.
- Weave tails back through at least 3 cm of neighboring stitches. Short tail burying fails fast on tentacles because the spirals twist under handling.
Conclusion
This photo-based jellyfish amigurumi crochet pattern depends on proportion more than complexity. The compact 30-stitch cap, short ruffled hem, and mixed spiral tentacles do most of the visual work. Keep the embellishment cluster to one side, keep the stuffing high in the dome, and keep the underside covered with layered tentacles. That sequence produces the same galaxy-style look without adding difficult shaping. The next step is simple: make one tentacle set first, place it under the cap, and adjust length before committing to the full palette. Share the result on Pinterest and Instagram with #GalaxyJellyfishPattern. Which side placement looks cleaner on this jellyfish: stars near the right eye, or higher on the cap curve?









