Introduction
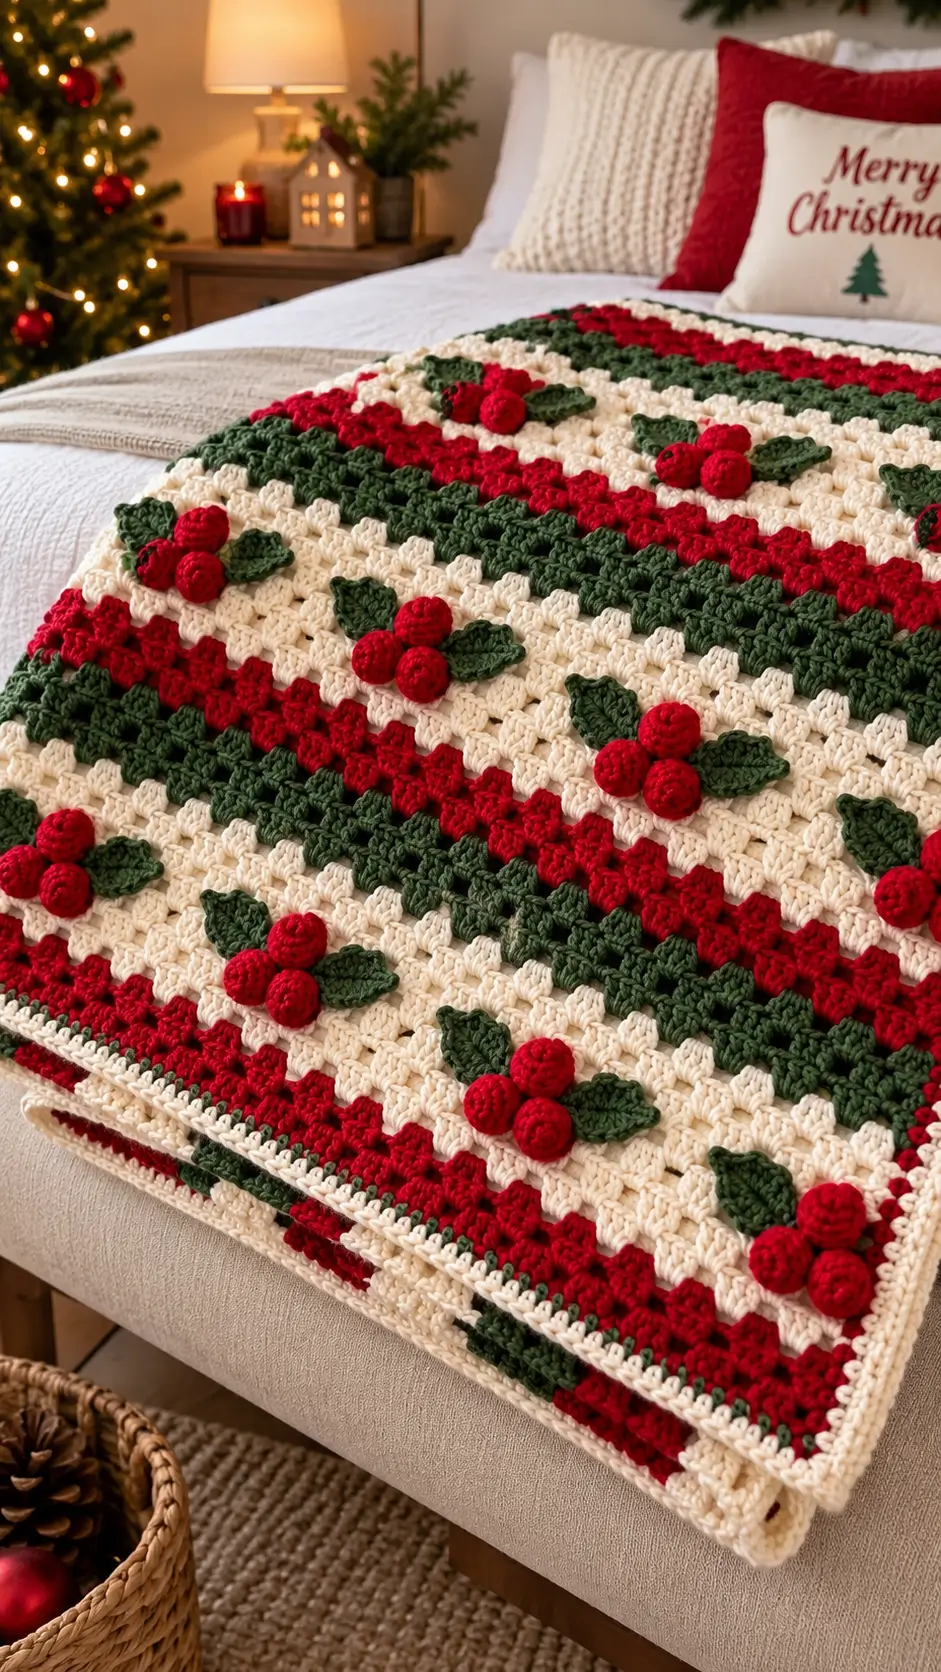
Holly berries sit in threes while paired pointed leaves spread sideways across this blanket, so the appliqué spacing has to be planned before the first cluster is sewn down. This holly Christmas crochet blanket uses Aran yarn, a 4.5 mm hook, dense textured stripes and raised berry motifs at roughly 122 × 157 cm. It suits intermediate crochet work and creates a practical removable seasonal bed throw.
The Design: What Makes This Holly Blanket Different
Three structural choices control the result. First, the red and green sections are worked as horizontal bands rather than isolated colorwork motifs, reducing carried strands across the reverse. Second, each holly cluster is made separately. That allows a maker to position the leaves after blocking and keeps the berries visibly three-dimensional instead of flattening them into the fabric. Third, cream bands create negative space around the appliqués, preventing the red berries from disappearing against the red stripes.
For this Christmas crochet throw pattern, the photographed arrangement is translated into a dense grit-style fabric rather than copied stitch for stitch. The resulting crochet holly blanket remains visually close to the image while having independent construction. A frequent mistake is sewing every holly cluster in the same direction; small rotations produce a less mechanical repeat.
Project Info at a Glance
| Skill Level | Time | Finished Size | Hook | Best For |
|---|---|---|---|---|
| Intermediate | Approx. 35–50 hours | Approx. 122 × 157 cm | 4.5 mm | Bed accent, sofa throw, seasonal display |
The 122 × 157 cm target follows the published size of Little Duck Crochet’s Boughs of Holly Blanket, which also specifies a 4.5 mm hook and Aran yarn.
Materials and Tools
Yarn
The nearest published throw reference uses Paintbox Simply Aran, a 100% acrylic Aran yarn supplied at 201 yards per 100 g. Its published yardage is 3,519–3,823 yards, placing the complete yarn requirement around 1.75–1.90 kg when that exact yarn is used.
- Cream / warm ivory — Aran or #4 medium — plan roughly 800–900 g — Paintbox Simply Aran is a suitable benchmark.
- Dark holly green — Aran or #4 medium — plan roughly 500–600 g — choose a low-sheen yarn so leaf stitch definition remains visible.
- Christmas red — Aran or #4 medium — plan roughly 450–550 g — use the same fiber family as the main yarn.
A commercial Christmas baby-blanket reference confirms that medium-weight acrylic can work well for this color family; its five-color 35 × 34 inch version uses 1,020 g in total.
Tools
- 4.5 mm crochet hook
- Tapestry needle
- Locking stitch markers
- Sharp scissors
- Rust-resistant pins
- Washable blocking mats
- Polyester stuffing, approximately 40–60 g for the berries
- Flexible measuring tape
No safety eyes are required.
Abbreviations
- MR — magic ring
- sc — single crochet
- inc — 2 sc in one stitch
- dec — single-crochet decrease
- sl st — slip stitch
- ch — chain
- hdc — half double crochet
- dc — double crochet
- tr — treble crochet
- BLO — back loop only
- st/sts — stitch/stitches
- RS/WS — right side/wrong side
For an invisible decrease, insert the hook through the front loop of each of the next two stitches, yarn over, draw through both front loops, then complete one single crochet.
Gauge and Sizing
The published Holly Jolly Christmas Blanket gives a useful Aran reference gauge of 13 stitches and 10 rows = 4 inches, worked with a 4.5 mm hook.
The body below starts with 160 working stitches. Because the proposed texture differs from that commercial pattern, make a 20 × 20 cm swatch before committing to the full width. Aim for approximately 13 body stitches per 10 cm after light blocking.
If your swatch is wider, move to a smaller hook or reduce the starting stitch count in pairs. If it is narrower, increase in pairs. Grit-style texture requires an even working stitch count.
Pattern — Step by Step
The blanket itself is worked in turning rows. Only the berries use continuous amigurumi-style rounds.
Blanket Body
Yarn: cream, red and dark green.
With cream, ch 161.
Row 1: In second ch from hook, work (sc, dc). Skip next ch. Repeat (sc, dc) in next ch, skip next ch across. End with 160 sts total. (160)
Row 2: Ch 1, turn. Work (sc, dc) in first sc of previous row, skip next dc; repeat across. (160)
Repeat Row 2 throughout the body while following the color chart below.
15-Row Stripe Repeat
- Rows 1–6: Cream. (160 each row)
- Rows 7–10: Red. (160 each row)
- Rows 11–15: Dark green. (160 each row)
Repeat Rows 1–15 10 times, giving 150 body rows.
Do not cut the yarn after every row. At stripe boundaries, fasten off the old color, join the new color at the first stitch of the next row and leave an 18–20 cm weaving tail.
The red band is deliberately narrower than the green and cream sections. The photograph uses red primarily as a high-contrast divider, while green carries more visual area and the cream sections provide room for the holly motifs.
At the end of Row 150, fasten off.
Border
Yarn: cream with narrow red and green detail.
Join cream in any corner.
Round 1: Ch 1. Work sc evenly around all four sides, placing 3 sc in each corner. On the row ends, distribute stitches consistently rather than forcing one sc into every visible strand. Join with sl st.
Round 2: Ch 1, sc in every st around, placing 3 sc in the center corner stitch at each corner. Join.
Change to green.
Round 3: Ch 1, sc around with 3 sc at each corner. Join.
Change to red.
Round 4: Repeat Round 3.
Change to cream.
Round 5: Repeat Round 3.
Round 6: Ch 1, reverse sc around for a compact corded finish, working one reverse sc in each stitch and treating the corners without extra increases unless the fabric starts to cup.
Fasten off. Leave a 20 cm tail.
Holly Leaves — Make 30
Yarn: dark green.
Foundation: Ch 11.
Working down one side of the chain:
Row 1: Sl st in second ch from hook, sc in next ch, hdc in next, dc in next, tr in next 2 ch, dc in next, hdc in next, sc in next, 3 sc in final ch.
Rotate the work and crochet along the unused loops on the opposite side:
Sc in next ch, hdc in next, dc in next, tr in next 2, dc in next, hdc in next, sc in next, sl st in final ch.
Do not fasten off.
Edging: Ch 2, sl st in second ch from hook to form a small point. Sl st into the next two edge stitches. Repeat the small point at irregular but mirrored intervals along each side, placing a longer ch-3 picot at the outermost tip.
Finish with sl st at the base.
Fasten off. Leave a 25 cm tail for sewing.
A finished leaf in Aran yarn should land around 6–8 cm long depending on tension. The exact dimension is less important than consistency across the set.
Raised Holly Berries — Make 45
Yarn: Christmas red.
Work in a continuous spiral.
R1: 6 sc in MR. (6)
R2: Inc ×6. (12)
R3: Sc around. (12)
R4: Sc around. (12)
R5: Dec ×6. (6)
Insert a very small piece of stuffing before closing. The berry should remain round but compress slightly under a finger.
Fasten off. Leave a 20 cm tail.
Thread the tail through the front loops of the six remaining stitches and pull closed.
This produces a more raised berry than a flat circle. For a flatter result closer to a sewn button, omit one of the 12-stitch plateau rounds.
Holly Clusters — Make 15
Parts: two leaves + three berries.
Cross two leaves at approximately 35–50 degrees, with their bases overlapping by 10–15 mm.
Position three berries over that overlap in a triangular arrangement: two at the lower edge and one slightly higher. Sew each berry through its bottom third only so most of the sphere remains raised above the leaf surface.
Do not sew the leaves to each other around their entire edges. A few stitches through the central overlap are enough and retain the pointed silhouette.
Each complete appliqué should measure about 10–13 cm across with Aran yarn.
Appliqué Placement
The photo uses repeated holly elements across cream bands rather than forming one central wreath.
Lay the finished blanket flat with the long edge vertical. Do not attach a motif until all fifteen have been arranged.
- Left column: approximately 22–27 cm from the left edge.
- Center column: centered around the blanket midpoint.
- Right column: approximately 22–27 cm from the right edge.
Maintain approximately 23–30 cm vertically between neighboring motifs. Shift each successive motif 3–8 cm sideways so the layout does not form rigid straight lines.
Place the majority of clusters over cream bands. A few leaves may overlap the transition into green, but avoid setting the red berry group directly on a red band.
Pin every cluster before sewing the first one.
Optional Flat Berry Patch
If the blanket will be used by a child or needs to tolerate frequent laundering, replace the raised sphere with a flatter disc.
Yarn: red.
R1: 6 sc in MR. (6)
R2: Inc ×6. (12)
R3: (Sc, inc) ×6. (18)
Fasten off. Leave a 20 cm tail.
The flat version cannot reproduce the depth seen in the photo, but it reduces snagging and dries more quickly after washing.
Assembly
- Block the completed blanket body to approximately 122 × 157 cm, checking that all four corners sit square.
- Work the full border before adding appliqués. This fixes the final usable surface area and prevents later placement from drifting too close to the edge.
- Finish all thirty leaves and compare them side by side. Set aside any leaf more than about 10 mm longer or shorter than the group average.
- Finish all forty-five berries, using equal quantities of stuffing so their diameters remain visually consistent.
- Join each pair of leaves at the base with three or four discreet stitches, leaving the pointed ends free.
- Add three berries to every leaf pair in a tight triangular group. Pass the sewing yarn through the lower third of each berry rather than flattening its full surface.
- Arrange fifteen complete motifs over the blanket according to the staggered layout and secure them with rust-resistant pins.
- Sew each leaf around its center vein and lower perimeter. Leave the outer points slightly free so the appliqué retains dimension.
- Turn the blanket over and inspect every attachment point. Weave each tail through at least 5 cm of same-color fabric before reversing direction once.
- Lightly block only the leaf tips after assembly; avoid compressing the berries under heavy mats or weights.
The finished piece is a striped Christmas throw with fifteen raised holly clusters distributed across its light-colored bands.
7 Technical Tips
- Row-marker drift: Place a locking marker in the first stitch of every tenth row. Losing one row inside a six-row cream section changes the entire 15-row stripe repeat and becomes obvious after several color bands.
- Berry overstuffing: Use roughly a pea-sized amount of filling in each 12-stitch berry. Packing the cavity firmly turns the sphere into a hard knob and can pull the blanket surface inward after sewing.
- Visible decrease ridges: Work the final berry decreases through front loops only. A conventional two-loop decrease leaves a thicker bar around a piece only a few centimeters wide.
- Appliqué placement error: Pin all fifteen holly groups before attaching any one permanently. Keep at least 10 cm between the outermost berry and the finished border so clusters do not appear trapped against the edge.
- Tension mismatch: Measure the blanket after Row 30 and compare it with the intended 122 cm width. A difference greater than about 5 cm at that stage is large enough to justify changing hook size or restarting before substantial yarn is committed.
- Leaf distortion during pinning: Put pins through the center and base rather than every point. Pulling each serrated tip flat can stretch one side of the leaf and destroy its mirrored outline.
- Tail migration: Weave appliqué tails for at least 5 cm, reverse direction, then pass through another 2–3 cm of same-color stitches. A short single-direction tail can work out during repeated folding or machine washing.
Construction Notes for Resizing
The blanket body works over an even stitch count. To change the width, add or remove foundation chains in multiples of two while retaining the same textured repeat.
For a smaller lap blanket, target approximately 95–105 cm wide. At a measured 13-stitch-per-10-cm gauge, that is roughly 124–136 working stitches.
For a larger bed throw around 140 cm wide, roughly 182 working stitches is a reasonable starting calculation at the same gauge. Always base the final chain count on your blocked swatch because grit-style fabric contracts differently across yarn fibers.
Length is simpler. Every full color sequence contains 15 rows. Add complete 15-row repeats rather than inserting isolated stripes; this keeps the proportion of cream, red and green stable.
Why the Holly Motifs Are Sewn On Separately
Separate appliqués solve three technical problems.
First, there is no need to carry red or green yarn across the cream fabric. That keeps the reverse cleaner.
Second, the leaves can be rotated after the blanket reaches final dimensions. One cluster may angle toward the top-left while the next points toward the bottom-right. This variation matters because fifteen identical orientations read like a printed grid.
Third, raised berries remain three-dimensional. Integrated bobbles create texture, but they are anchored within the blanket rows and cannot overlap separate leaf shapes as visibly as the photo’s motifs.
The trade-off is finishing time. Thirty leaves and forty-five berries create seventy-five small components before assembly. Batch production works better: make all leaves first, all berries second, then build the fifteen clusters.
Yarn Substitution
Aran acrylic is the closest verified match among comparable full-size holly blankets. A smooth wool-acrylic blend can also work if the gauge is matched. Cotton will make the finished throw heavier and may stretch more under its own weight.
Do not mix a springy acrylic body with very dense mercerized-cotton appliqués unless swatches confirm similar laundering behavior. The leaf units may contract or relax at a different rate.
Color contrast matters more than exact brand. Choose a cream light enough to separate the dark green and red visually, a green dark enough to read as foliage, and a saturated red that does not merge into the cream after photography.
Washing and Blocking
Check the care label of the specific yarn before laundering.
For an acrylic version, secure every appliqué tail before the first wash. Raised berries can trap more water than the blanket body, so reshape them while damp rather than pressing them flat.
Lay the blanket on a large flat surface and bring opposite sides to the same measurement. Square each corner. Pin only where needed.
The holly leaves should lie close to the blanket at their bases while retaining a small amount of lift at the tips. This balance gives the motif depth without leaving long loose edges likely to snag.
Avoid direct high heat on acrylic fibers.
Conclusion
Finish the appliqués before deciding on their permanent positions; fifteen loose holly clusters are much easier to balance across the surface than fifteen partly sewn motifs. For this holly Christmas crochet blanket, the next practical step is a 20 cm Aran swatch with the 4.5 mm hook, followed by a width measurement before buying the full yarn quantity. Photograph the completed throw flat as well as folded so the stripe repeat and berry depth are both visible. Share the finished version on Pinterest and Instagram with #HollyStripeBlanket. If you change one structural detail, would your holly clusters look better with two berries, three berries as photographed, or a larger five-berry grouping?









