Introduction
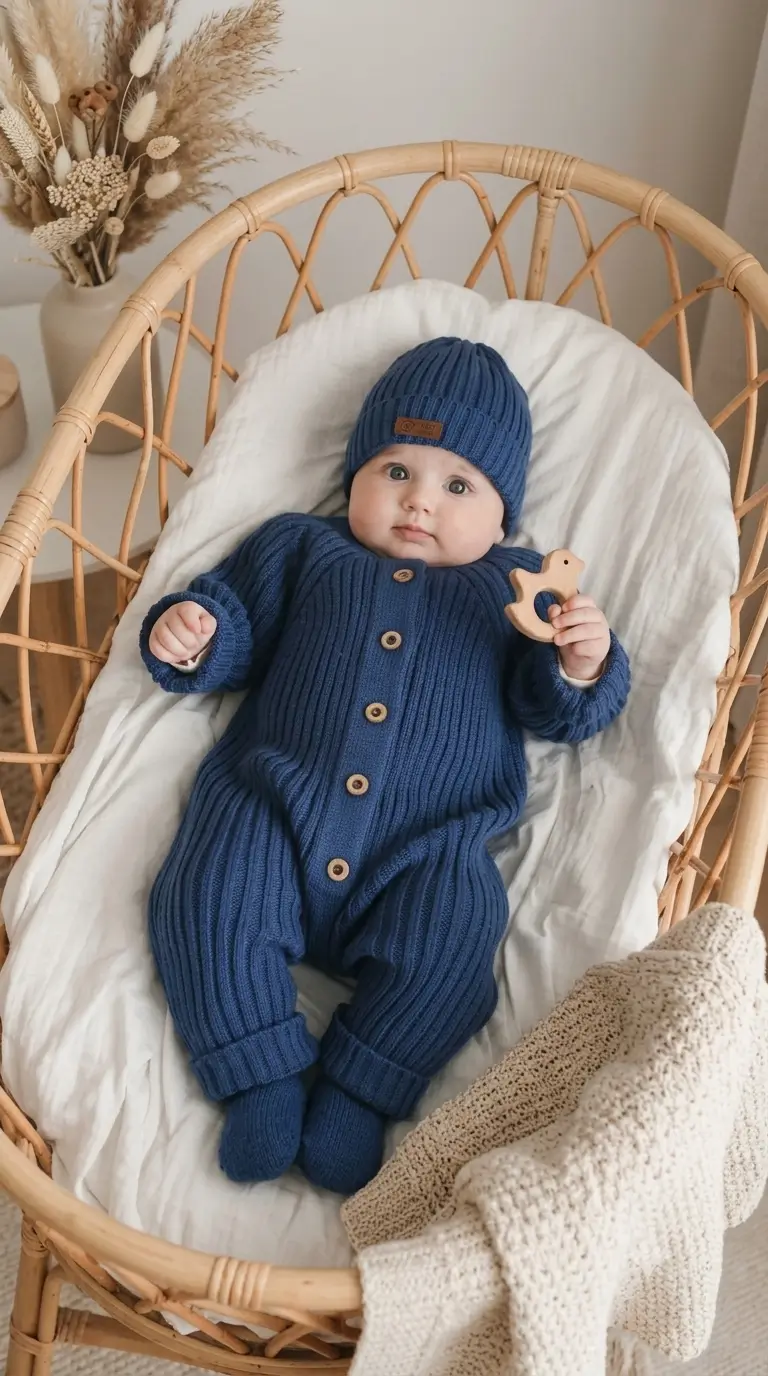
A baby in a ribbed navy romper needs a different crochet structure from a doll wearing a loose dress or simple diaper. This baby doll amigurumi crochet pattern uses medium-weight yarn, a 4 mm hook, and a target finished height of approximately 25–30 cm. The design is intermediate level and includes a rounded head, short infant-style limbs, fitted navy cap, button-detail romper, cheek patches, and a small crochet rattle.
The Design: What Makes This Navy Baby Doll Different
The proportions start with a 36-stitch head rather than a very large doll sphere. That creates enough width for 10 mm eyes while keeping the face compact. Low-set ears reinforce the infant proportions, and the short arms and legs prevent the body from developing an adult doll silhouette.
The baby doll crochet pattern also treats the navy clothing as an important structural element. A fitted body section keeps the torso compact, while a separate front placket adds the vertical button detail visible in the reference image. The close-fitting cap uses a simple ribbed-look border rather than a loose pointed shape.
A common mistake in a newborn amigurumi pattern is making the limbs too long. Even an extra two or three rounds can change the proportions noticeably. Short limbs, broad feet, and a large rounded head produce a more convincing baby-doll profile.
Project Info at a Glance
| Skill Level | Time | Finished Size | Hook | Best For |
|---|---|---|---|---|
| Intermediate | 8–12 hours | Approx. 25–30 cm | 4 mm | Display dolls, handmade gifts, photography props |
Materials and Tools
Yarn
- Navy blue — medium/worsted weight — allow approximately 80–100 g for clothing, hat, and details
- Skin tone — medium/worsted weight — approximately 50 g
- Light peach or blush — small amount for cheek patches
- Tan or light brown — approximately 10–15 g for the crochet rattle and button details
Tools
- 4 mm crochet hook
- 10 mm safety eyes for a display doll
- Polyester fiberfill
- Yarn needle
- Stitch markers
- Scissors
- Sewing pins
- Optional embroidery thread for facial details
Safety note: if the finished doll will be given to a baby or very young child, embroidered eyes are a better choice than detachable safety eyes, buttons, or other small components.
Abbreviations
- MR — magic ring
- sc — single crochet
- inc — increase, 2 sc in one stitch
- dec — decrease
- sl st — slip stitch
- ch — chain
- BLO — back loop only
- FLO — front loop only
For an invisible decrease, insert the hook through the front loops of the next two stitches, yarn over, pull through, then complete the single crochet.
Pattern — Step by Step
Work in a continuous spiral unless another method is stated. Place a stitch marker in the first stitch of every round.
Head
Yarn: skin tone. Construction follows standard six-stitch amigurumi sphere mathematics.
R1: 6 sc in MR (6)
R2: inc ×6 (12)
R3: (1 sc, inc) ×6 (18)
R4: (2 sc, inc) ×6 (24)
R5: (3 sc, inc) ×6 (30)
R6: (4 sc, inc) ×6 (36)
R7–R14: sc around (36)
R15: (4 sc, dec) ×6 (30)
R16: (3 sc, dec) ×6 (24)
R17: (2 sc, dec) ×6 (18)
Insert the eyes between R10 and R11, approximately 7–8 stitches apart. Begin stuffing firmly around the eye backs and outer edges of the head.
R18: (1 sc, dec) ×6 (12)
R19: dec ×6 (6)
Add final stuffing before closing. Fasten off and leave a 25 cm tail if the head will be sewn to the body.
Body
Yarn: navy blue. The 36-stitch maximum creates a medium-size torso.
R1: 6 sc in MR (6)
R2: inc ×6 (12)
R3: (1 sc, inc) ×6 (18)
R4: (2 sc, inc) ×6 (24)
R5: (3 sc, inc) ×6 (30)
R6: (4 sc, inc) ×6 (36)
R7–R11: sc around (36)
R12: (4 sc, dec) ×6 (30)
R13–R15: sc around (30)
R16: (3 sc, dec) ×6 (24)
R17–R19: sc around (24)
R20: (2 sc, dec) ×6 (18)
R21: sc around (18)
R22: (1 sc, dec) ×6 (12)
Stuff the lower body firmly and use slightly less stuffing near the neck so the head can sit flat against the torso.
Fasten off. Leave a 30 cm sewing tail.
Arms / Front Limbs — Make 2
Start with skin tone and change to navy to reproduce the long sleeves.
R1: 6 sc in MR (6)
R2: inc ×6 (12)
R3: (1 sc, inc) ×6 (18)
R4–R5: sc around (18)
R6: (1 sc, dec) ×6 (12)
R7: sc around (12)
Change to navy blue.
R8–R14: sc around (12)
R15: (2 sc, dec) ×3 (9)
R16–R17: sc around (9)
Stuff the hand and lower arm lightly. Leave the upper two rounds almost unstuffed so the arm can rest naturally against the body. Flatten the opening and crochet through both layers with 4 sc. Fasten off with a 20 cm tail.
Back Legs — Make 2
Yarn: navy blue for the romper-style legs. Skin-colored feet can be substituted if a barefoot version is preferred.
R1: 6 sc in MR (6)
R2: inc ×6 (12)
R3: (1 sc, inc) ×6 (18)
R4: (2 sc, inc) ×6 (24)
R5–R6: sc around (24)
R7: (2 sc, dec) ×6 (18)
R8–R12: sc around (18)
R13: (1 sc, dec) ×6 (12)
R14–R17: sc around (12)
Stuff the foot firmly enough to hold its rounded profile. Reduce the amount of stuffing toward the upper leg.
Flatten the top and crochet 6 sc through both layers. Fasten off, leaving a 25 cm sewing tail.
Ears — Make 2
Yarn: skin tone.
R1: 6 sc in MR (6)
R2: inc ×6 (12)
Do not stuff. Fold each circle slightly to form a shallow curved ear. Fasten off with a 15 cm sewing tail.
Cheek Patches — Make 2
Yarn: pale peach or blush.
R1: 6 sc in MR (6)
R2: inc ×6 (12)
Fasten off with a long tail. These circles should remain flat. For a more subtle face, embroider two or three blush stitches instead of attaching full circles.
Navy Baby Hat
Yarn: navy blue.
R1: 6 sc in MR (6)
R2: inc ×6 (12)
R3: (1 sc, inc) ×6 (18)
R4: (2 sc, inc) ×6 (24)
R5: (3 sc, inc) ×6 (30)
R6: (4 sc, inc) ×6 (36)
R7–R12: sc around (36)
R13–R15: sc around in BLO (36)
The BLO rounds create a subtle linear texture near the lower edge. Check the hat on the head before cutting the yarn. If the fit is loose, work the final round with a slightly smaller hook or reduce three evenly spaced stitches.
Fasten off and weave in the tail.
Front Romper Placket
Yarn: navy blue.
Ch 19.
Row 1: starting in the second chain from hook, 18 sc (18)
Row 2: ch 1, turn, 18 sc (18)
Row 3: ch 1, turn, 18 sc (18)
Fasten off with a 25 cm tail. Position the strip vertically down the center front of the body.
Crochet Buttons — Make 5
Yarn: tan or light brown.
Make 5 sc in MR. Join with a sl st to the first sc and close the ring tightly.
Fasten off with a sewing tail. Five embroidered tan circles may be used instead when the doll is intended for a young child.
Rattle Head
Yarn: tan or light brown.
R1: 6 sc in MR (6)
R2: inc ×6 (12)
R3: (1 sc, inc) ×6 (18)
R4: (2 sc, inc) ×6 (24)
R5–R7: sc around (24)
R8: (2 sc, dec) ×6 (18)
R9: (1 sc, dec) ×6 (12)
Stuff firmly to form the rounded top.
R10: dec ×6 (6)
Do not cut the yarn if you want to continue directly into the handle.
Rattle Handle
R11–R18: sc around (6)
Stuff the handle very lightly using small pieces of fiberfill. Fasten off, close the final opening, and weave the tail through the handle.
Optional Nose
Using skin-tone or slightly darker embroidery thread, make two short horizontal stitches centered between the eyes approximately two rounds lower than the eye line. Keep the nose width under 1 cm so it does not dominate the face.
Assembly
- Place the head on the body with the neck centered under the lowest six stitches of the head. Pin it from four directions before sewing.
- Sew the head to the body with small stitches through both pieces. Pass around the neck twice if additional support is needed.
- Position the ears between approximately R10 and R13 of the head. Keep their upper edges slightly below the eye line.
- Attach the cheek patches below and slightly outside the eyes. If embroidered blush is being used, add it after the ears are fixed.
- Sew the arms to each side of the torso around R17–R19. Angle the hands slightly forward rather than letting the arms hang vertically.
- Attach the legs to the lower body with approximately 3–4 stitches between their inner edges. Pin both legs before sewing either one completely.
- Center the navy front placket on the torso. Sew around its outer edge with matching yarn.
- Space the five crochet buttons evenly along the placket. Stitch each one through its center several times, or embroider the button shapes directly onto the garment.
- Fit the hat over the crown and position its lower edge above the ears. Tack it in place at four points if the hat should remain permanently attached.
- Place the rattle against one hand and sew it with two or three hidden stitches in matching yarn. Weave every remaining tail through several interior stitches before trimming.
The completed figure should have a stable rounded head, short infant-style limbs, centered navy placket, fitted cap, and a rattle positioned beside one hand.
7 Technical Tips
- Mark the first stitch of every round. Losing the round boundary by one stitch can move facial placement several millimetres to one side by the time the 36-stitch plateau is reached.
- Control stuffing firmness at the neck. Overfilling the final 12 stitches of the body creates a hard neck mound and can make the head tilt instead of sitting flat.
- Use invisible decreases on exposed surfaces. A standard decrease can leave a visible horizontal bar, particularly on the head between the 30-, 24-, and 18-stitch rounds.
- Place the eyes before closing the head. For 10 mm eyes, test a spacing of 7–8 stitches before locking the washers because a difference of two stitches noticeably changes the facial proportions.
- Check hat tension at 36 stitches. If the cap stretches more than about 1 cm beyond the head circumference when laid flat against it, reduce the final round or switch to a hook 0.5 mm smaller.
- Pin both legs before sewing. A vertical difference of even one round can make one foot sit lower and cause the body to lean when placed on a flat surface.
- Weave attachment tails in different directions. Passing every tail along the same internal path can create a firm ridge under the surface; redirect each tail through at least three separate stitch channels.
Finishing the Navy Baby Doll Amigurumi
Check the figure from the front, back, and both sides before trimming the final yarn tails. The eyes should remain level, the ears should sit at equal heights, and the five front buttons should follow the center line of the torso. Compare both legs at the hip seam and adjust any loose attachment stitches before closing the yarn paths inside the body.
The cap can remain removable for a display doll, although several hidden tack stitches will keep it aligned during handling. The rattle can also be left separate, but attaching it to the hand reproduces the asymmetrical pose more clearly.
For a child-safe version, replace safety eyes and separate crochet buttons with embroidered details. Avoid beads, rigid inserts, bells, or other detachable components.
Conclusion
This baby doll amigurumi crochet pattern combines a 36-stitch head, compact infant proportions, navy romper details, fitted cap, and a small rattle in one coordinated construction. After assembly, the next practical step is to measure the finished doll and record any hook or tension changes used, making a second version easier to reproduce at the same scale. Save the finished project to Pinterest and share the completed doll on Instagram with #NavyBabyDollAmigurumi. If you change one detail in this specific design, would you keep the five-button navy romper or replace it with an embroidered front panel?









