Introduction
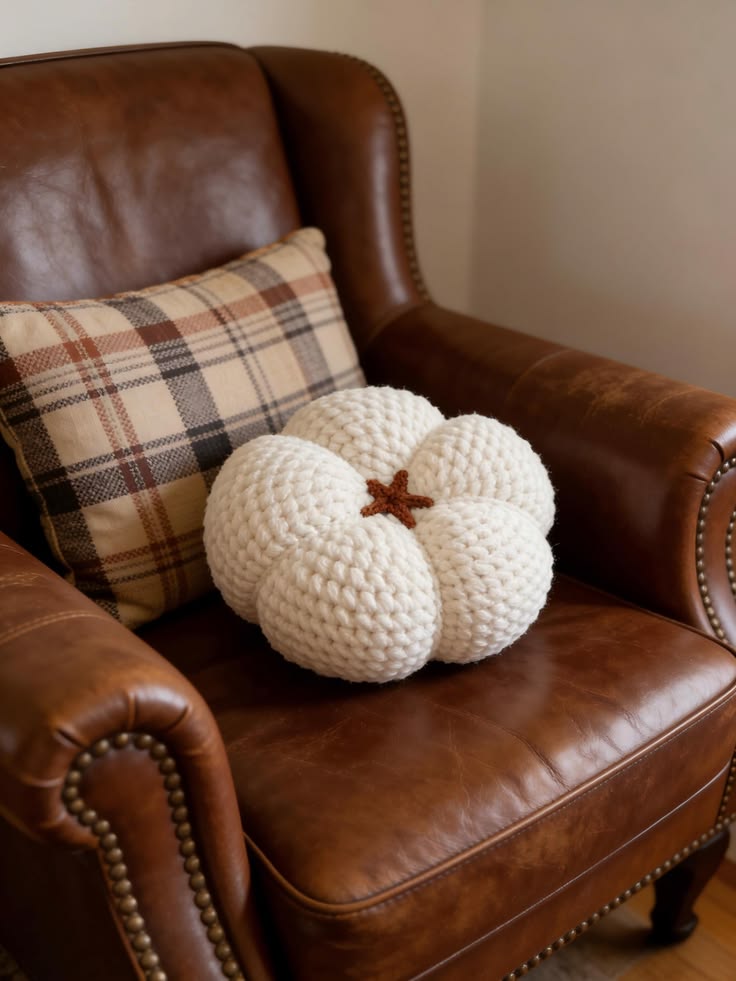
A white pumpkin this broad needs its lobes to carry the silhouette because color contrast contributes nothing. This white pumpkin amigurumi crochet pattern uses super bulky ivory yarn, an 8 mm hook, firm stuffing, and a small brown stem to produce a roughly 28–32 cm-wide decoration. The skill level is intermediate. Its low pillow-shaped profile makes it practical for an armchair, shelf, bench, or floor-level autumn display.
The Design: What Makes This White Pumpkin Different
Three construction choices control this design. First, the pumpkin body reaches a 42-stitch plateau rather than staying narrow; that extra circumference gives the finished chunky crochet pumpkin enough volume to read as a pillow instead of a miniature ornament. Second, the body is deliberately compressed at the crown and base after stuffing. That operation changes a plain sphere into the squat profile visible in the reference.
Six external shaping passes create the broad lobes. They matter more on a white crochet pumpkin because there are no colored stripes to separate sections visually. The brown center remains small so it does not dominate the white body. A frequent failure is overstuffing the center before sculpting. The yarn then pulls against a rigid core and produces shallow channels instead of six distinct sections.
Project Info at a Glance
| Skill Level | Time | Finished Size | Hook | Best For |
|---|---|---|---|---|
| Intermediate | 4–6 hours | Approx. 28–32 cm wide × 25–28 cm high | 8.0 mm | Chair decor, benches, fall displays |
The scale sits close to published large crochet pumpkin pillows measuring roughly 25 × 28 cm.
Materials and Tools
Yarn
- Warm ivory / creamy white — super bulky #6 blanket-style yarn — approximately 400–450 g — Bernat Blanket or another dense super-bulky polyester yarn
- Dark brown — bulky or doubled worsted yarn — approximately 5–10 g — any firm yarn that holds a compact stem
Tools
- 8.0 mm crochet hook
- Polyester stuffing, approximately 450–600 g
- Long upholstery or doll needle, 20–30 cm
- Tapestry needle
- Locking stitch marker
- Six removable markers
- Scissors
- Measuring tape
- Strong matching yarn for sculpting, approximately 5–6 m
No safety eyes are needed because the photographed pumpkin has no face.
Abbreviations
- MR — magic ring
- sc — single crochet
- inc — 2 sc in one stitch
- dec — invisible single-crochet decrease
- sl st — slip stitch
- ch — chain
- BLO — back loop only
- st/sts — stitch/stitches
- R/Rnd — round
For an invisible decrease, insert the hook through the front loop of each of the next two stitches, yarn over, pull through both front loops, then complete one sc.
Pattern — Step by Step
Work the pumpkin body in a continuous spiral unless a section states otherwise.
Pumpkin Body
Yarn: warm ivory. Stitch progression based on standard six-stitch amigurumi expansion.
R1: 6 sc in MR (6)
R2: inc ×6 (12)
R3: (1 sc, inc) ×6 (18)
R4: (2 sc, inc) ×6 (24)
R5: (3 sc, inc) ×6 (30)
R6: (4 sc, inc) ×6 (36)
R7: (5 sc, inc) ×6 (42)
The 42-stitch count is the large-size plateau used for this design.
R8: sc around (42)
R9: sc around (42)
R10: sc around (42)
R11: sc around (42)
R12: sc around (42)
R13: sc around (42)
R14: sc around (42)
R15: sc around (42)
R16: sc around (42)
R17: sc around (42)
R18: sc around (42)
R19: sc around (42)
R20: sc around (42)
R21: sc around (42)
R22: sc around (42)
R23: sc around (42)
Begin stuffing after R18. Keep the upper and lower central zones slightly softer than the outer circumference because those areas must compress during sculpting.
R24: (5 sc, dec) ×6 (36)
R25: (4 sc, dec) ×6 (30)
R26: (3 sc, dec) ×6 (24)
Add the remaining filling. Push more fiberfill toward the six future lobe areas and less directly under the center opening.
R27: (2 sc, dec) ×6 (18)
R28: (1 sc, dec) ×6 (12)
R29: dec ×6 (6)
Fasten off. Leave a 35 cm tail and close the opening through the front loops.
Brown Stem
Yarn: dark brown.
R1: 6 sc in MR (6)
R2: sc around (6)
R3: sc around (6)
R4: sc around (6)
R5: sc around (6)
Do not pack the stem densely. Insert only a small pinch of stuffing if the yarn collapses.
Fasten off. Leave a 25 cm tail for sewing.
Pumpkin Lobe Sculpting
Yarn: strong ivory yarn.
- Cut a 90–100 cm sculpting strand.
- Insert the long needle through the bottom center and exit through the crown.
- Bring the strand down the outside of the pumpkin.
- Re-enter at the bottom center.
- Pull until the first channel sits roughly 20–25 mm below the lobe surface.
- Repeat at one-sixth intervals around the circumference.
- After the sixth channel, pass through the center twice and knot beneath the pumpkin.
- Move stuffing manually if one lobe becomes narrower than the others.
Do not pull one channel to full depth before checking the remaining five. Gradual tightening produces a more even six-section structure.
Crown Compression
Thread approximately 70 cm of ivory yarn through the long needle.
Pass from the bottom center to the crown, move 8–10 mm sideways, then return to the bottom. Tighten until the crown sits approximately 15–20 mm below the highest point of the surrounding lobes. Repeat once if the base also needs flattening.
This compression step creates the depressed central crown seen in the reference.
Stem Base / Star Detail
Yarn: dark brown.
Ch 5.
Starting in the second ch from the hook, sl st in each ch back toward the center.
Repeat the following four more times from the same central point:
Ch 5, sl st in each ch back toward center.
Fasten off, leaving a 20 cm tail.
Arrange the five short arms around the base of the stem. They should extend approximately 2–3 cm across the white crown.
Cheek Patches
Not applicable. The photographed pumpkin is decorative and faceless.
Arms / Front Legs
Not applicable. No limbs are visible in the source image.
Back Legs
Not applicable. The pumpkin rests directly on its lower lobes.
Ears / Wings
Not applicable.
Tail / Snout / Beak / Horn
Not applicable. The brown stem and star-shaped stem base are the only special top features.
Assembly
- Place the closed pumpkin body on a flat surface and rotate it until the most symmetrical side faces forward.
- Run the six sculpting strands from bottom center to crown, spacing them at approximately 60-degree intervals.
- Tighten the channels in two passes rather than completing one channel at a time.
- Compress the crown until the center recess measures about 15–20 mm below the surrounding lobes.
- Press the lower center inward slightly so the pumpkin sits on several lobe surfaces instead of one rounded point.
- Center the brown stem directly over the crown closure.
- Sew the stem through at least six surrounding white stitches, alternating opposite sides to prevent tilting.
- Position the five brown star arms evenly around the stem and tack their ends to the pumpkin surface.
- Hide sculpting knots inside the lower center by passing the needle through 4–5 cm of stuffing before trimming.
- Roll and press each lobe by hand to redistribute small stuffing pockets and confirm that all six grooves remain visible.
The finished pumpkin should have six broad white lobes, a compressed crown, a stable base, and one compact brown center stem.
7 Technical Tips
- Lost round marker: Missing the first stitch on a 42-stitch plateau can shift every decrease and twist the body axis. Place a locking marker in the first stitch of every round and recount at R7, R15, and R23.
- Hard central core: Packing the center as firmly as the outer lobes prevents the crown from collapsing. Leave a roughly 6–7 cm diameter zone beneath the top and bottom slightly softer before the final decreases.
- Visible decrease gaps: Super bulky white yarn makes holes conspicuous when both loops are grabbed loosely. Work each invisible decrease through the two front loops and keep its final loop the same height as an ordinary sc.
- Unwanted face placement: There are no eyes on this model, so eye placement is intentionally omitted. Do not insert safety eyes unless converting the design into a character pumpkin.
- Blanket-yarn tension drift: A difference of even 3–4 mm in stitch height can make one side of a 42-stitch round bulge. Measure the body after R15 and correct hand tension before completing the remaining plateau rounds.
- Crooked lobe channels: Sculpting by eye alone often creates one narrow section and one oversized section. Pin six points around the crown at roughly 60-degree intervals before pulling any shaping strand tight.
- Exposed woven tail: A short structural tail can work loose when the pillow is handled. Pass every shaping and stem tail through at least 5 cm of dense stuffing and crochet fabric, reverse direction once, then trim.
Conclusion
Measure the finished body before permanently tightening the sculpting strands; a target width near 28–32 cm keeps the proportions close to the photographed chair-sized pumpkin. After shaping, check all six channels from above and correct any lobe that is visibly narrower before attaching the stem. The next practical step is to make a second version one yarn size smaller and compare the resulting width-to-height ratio. Save this white pumpkin amigurumi crochet pattern to Pinterest, and share the completed project on Instagram with #ChunkyWhitePumpkin. For this specific design, would you keep the six broad lobes shown here, or divide the same white body into eight narrower pumpkin sections?









