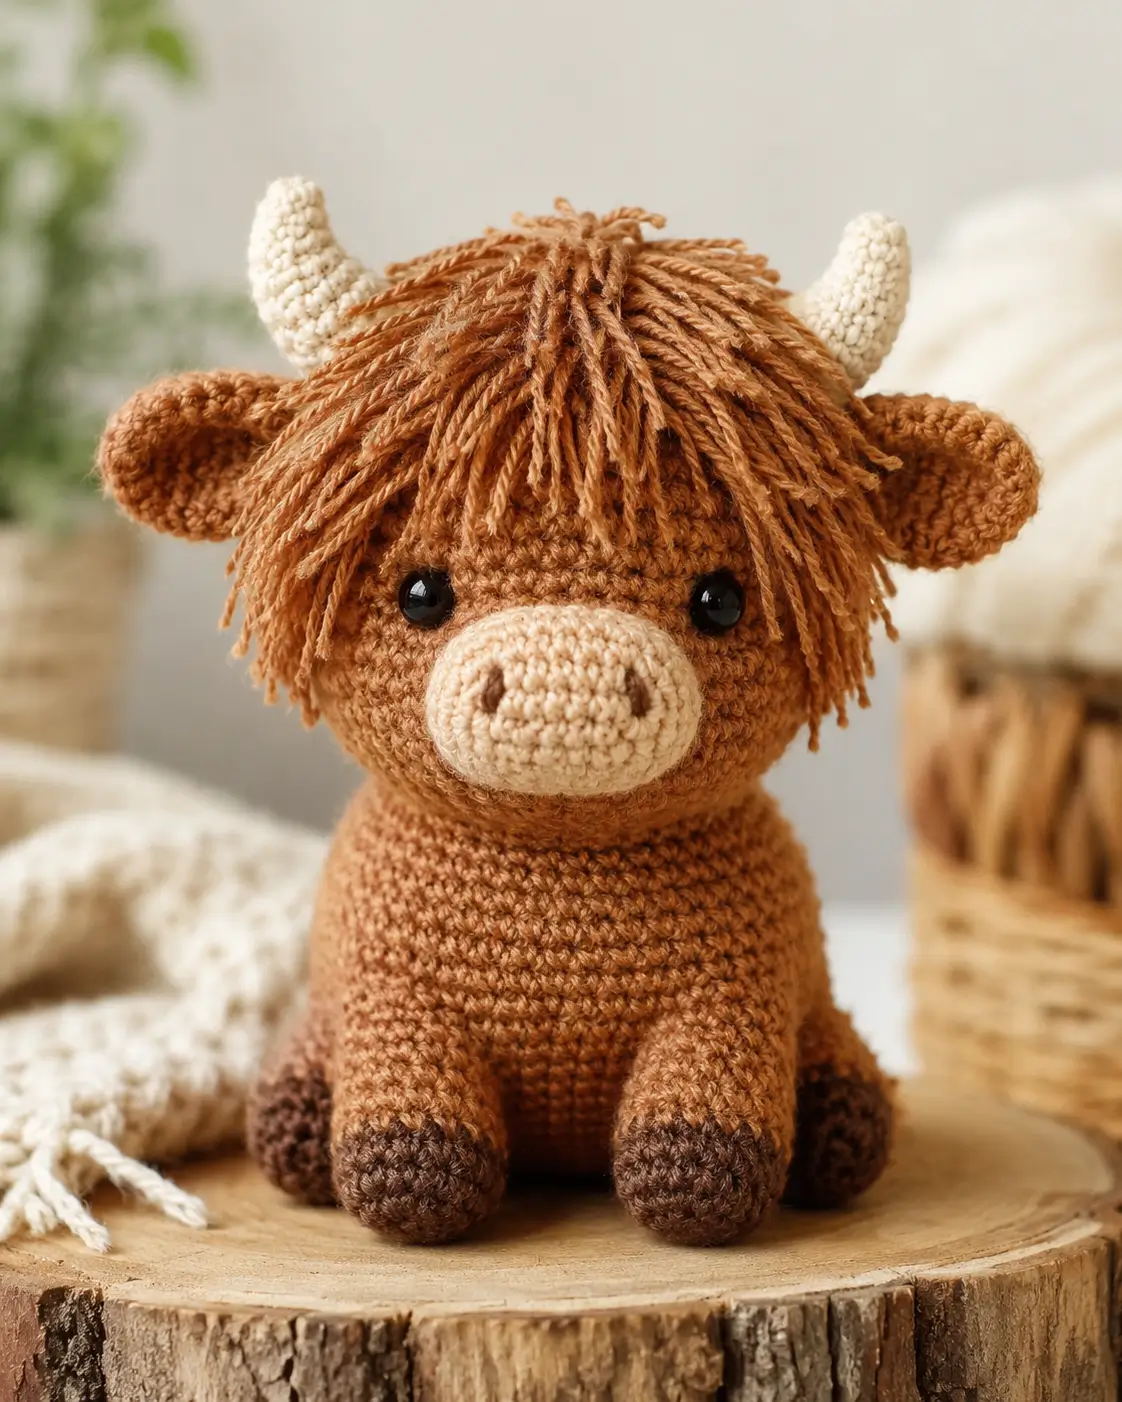
Highland cows hide half the face behind a fringe. That is the first engineering problem in this Highland cow amigurumi crochet pattern. You need a muzzle that projects far enough, horns that clear the hairline, and a seated body that stays upright. This version uses aran-weight yarn, a 4.0 mm hook, and a medium 25 cm target size for an intermediate build that works well as shelf decor or a nursery gift.
The Design: What Makes Highland Cow Different
The structure is not generic cow anatomy with longer hair added later. A Highland cow needs a wider forehead so the fringe can sit forward without exposing the crown. The muzzle also has to project more than on a standard dairy-cow amigurumi, otherwise the hair drops into the eye line and the face reads flat. In this crochet highland cow layout, the horns stay short and slightly curved so they clear the bangs instead of competing with them.
A common maker mistake is attaching the eyes before testing fringe depth. You look at the bare head, place the eyes wide, then add yarn strands and lose the expression. In a strong highland cow crochet pattern, the face is planned from the muzzle outward, not from the eye sockets inward. That is where many step-by-step posts stay thin: they show the photo, but they do not explain why the proportions hold once the hair is attached.
Project Info at a Glance
| Skill Level | Time | Finished Size | Hook | Best For |
|---|---|---|---|---|
| Intermediate | 8–10 hours | 25 cm | 4.0 mm | Shelf decor, nursery gift, farm-animal set |
Materials and Tools
Yarn
- Ginger brown — aran weight — 150 g — Stylecraft Special Aran or similar
- Dark brown — aran weight — 25 g — for hoof tips
- Cream/beige — aran weight — 15 g — for muzzle and horns
- Pink — scraps — optional for cheek patches
Tools
- Hook 4.0 mm
- Safety eyes 18–20 mm for the medium published size; use 14 mm if scaling down closer to a small DK version
- Polyester stuffing
- Tapestry needle
- Stitch markers
- Small amount of dark yarn for nostrils
Abbreviations
MR = magic ring, sc = single crochet, inc = increase, dec = invisible decrease, sl st = slip stitch, ch = chain, BLO = back loop only.
Invisible decrease is used on visible shaping rounds because it reduces bulk and keeps the muzzle and head lines cleaner than a standard two-stitch decrease.
Pattern — Step by Step
Continuous spiral unless noted. The pattern below is an original medium-size interpretation built from standard amigurumi math and the visual structure in the reference photo.
Head (Make 1)
Yarn: ginger brown
R1: 6 sc in MR (6)
R2: inc x6 (12)
R3: (1 sc, inc) x6 (18)
R4: (2 sc, inc) x6 (24)
R5: (3 sc, inc) x6 (30)
R6: (4 sc, inc) x6 (36)
R7–13: sc around (36)
Place safety eyes between R9 and R10, 8 sts apart, but test fringe depth first.
R14: (4 sc, dec) x6 (30)
R15: (3 sc, dec) x6 (24)
R16: (2 sc, dec) x6 (18)
Stuff firmly. The head must resist the weight of the fringe.
R17: (1 sc, dec) x6 (12)
R18: dec x6 (6)
Fasten off. Leave 25 cm tail.
Body (Make 1)
Yarn: ginger brown
R1: 6 sc in MR (6)
R2: inc x6 (12)
R3: (1 sc, inc) x6 (18)
R4: (2 sc, inc) x6 (24)
R5: (3 sc, inc) x6 (30)
R6–11: sc around (30)
R12: (3 sc, dec) x6 (24)
R13: sc around (24)
R14: (2 sc, dec) x6 (18)
Stuff lower half firmly and upper half slightly softer so the head can seat into the neck line.
R15: sc around (18)
R16: (1 sc, dec) x6 (12)
R17: dec x6 (6)
Fasten off. Leave 25 cm tail.
Front Legs (Make 2)
Yarn: dark brown, then ginger brown
R1: 6 sc in MR (6)
R2: inc x6 (12)
R3–4: sc around in dark brown (12)
Change to ginger brown.
R5–10: sc around (12)
Stuff lower half only.
Flatten and sc through both layers 6 sts to close.
Fasten off. Leave 20 cm tail.
Back Legs (Make 2)
Yarn: dark brown, then ginger brown
R1: 6 sc in MR (6)
R2: inc x6 (12)
R3: (1 sc, inc) x6 (18)
R4–5: sc around in dark brown (18)
Change to ginger brown.
R6–9: sc around (18)
Stuff firmly at the base; keep top soft for shaping.
Flatten and sc through both layers 8 sts to close.
Fasten off. Leave 20 cm tail.
Ears (Make 2)
Yarn: ginger brown
R1: 6 sc in MR (6)
R2: inc x6 (12)
R3: (1 sc, inc) x6 (18)
R4–5: sc around (18)
R6: (1 sc, dec) x6 (12)
R7: sc around (12)
Flatten lightly.
Fasten off. Leave 18 cm tail.
Horns (Make 2)
Yarn: cream/beige
R1: 6 sc in MR (6)
R2: sc around (6)
R3: (2 sc, inc) x2 (8)
R4–5: sc around (8)
R6: (3 sc, inc) x2 (10)
R7: sc around (10)
Stuff very lightly or leave unstuffed for softer curve.
Fasten off. Leave 18 cm tail.
Muzzle / Snout (Make 1)
Yarn: cream/beige
Ch 8.
R1: 6 sc, 3 sc in last ch, 5 sc on opposite side, inc (16)
R2: inc, 5 sc, 3 inc, 5 sc, 2 inc (22)
R3: (1 sc, inc), 5 sc, (1 sc, inc) x3, 5 sc, (1 sc, inc) x2 (28)
R4: sc around (28)
R5: sc around (28)
Lightly stuff before sewing. Embroider nostrils 5 sts apart.
Fasten off. Leave 30 cm tail.
Cheek Patches (Make 2)
Yarn: pale pink or blush beige
R1: 6 sc in MR (6)
R2: inc x6 (12)
Sl st to first stitch.
Fasten off. Leave 12 cm tail.
Fringe Hair (Make 1 set)
Yarn: ginger brown
Attach yarn between the horn placements.
For long front strands:
Row 1: ch 18, sl st in 2nd ch from hook and in each ch back to head, sl st in next head st; repeat 14 times.
For shorter crown strands:
Row 2: ch 12, sl st in 2nd ch from hook and in each ch back, sl st in next head st; repeat 10 times.
Trim the fringe so the center falls to the top of the eyes and the side strands clear the muzzle.
Tail (Make 1)
Yarn: ginger brown with dark tip optional
Ch 8.
Starting in 2nd ch from hook, sl st in each ch back (7)
Fasten off. Leave 18 cm tail.
Assembly
- Sew the head to the body with the muzzle centered and slightly angled upward.
- Attach the muzzle to the lower half of the head, covering roughly rounds 10–14 of the face area.
- Insert and lock the safety eyes before fully closing the head if you have not already done so.
- Sew the ears to the sides of the head, slightly behind the eye line.
- Sew the horns above and a little behind the ears so the fringe can drop between them.
- Attach the front legs to the lower front body, 6 stitches apart.
- Attach the back legs to the lower sides and tilt them forward so the toy sits instead of rolling back.
- Sew the tail to the center back, low on the body.
- Add the cheek patches just below the outer eye corners if you want a softer face finish.
- Knot, trim, and comb the fringe forward; then weave all tails through filled sections, changing direction twice.
The finished Highland cow should sit flat with the muzzle projecting ahead of the fringe line.
7 Technical Tips
- Mark the center front before attaching the muzzle. A snout that drifts even 2 stitches left or right makes the horns look uneven later.
- Do not overfill the top third of the body. Too much stuffing here forces the head upward and removes the tucked-neck look visible in seated cow patterns.
- Use invisible decreases on all exposed shaping rounds. Standard decreases leave ridges that show under smooth aran yarn, especially on the head.
- Test eye placement with three temporary fringe strands clipped in place. Eyes that look correct on a bald head can disappear once the bangs drop.
- Keep the hoof section firmer than the upper leg. Soft feet flatten outward and the toy loses its seated stance.
- Pin horns and ears together before sewing either one permanently. On this character, 3–5 mm of placement error is visible because the fringe frames both parts.
- Weave fringe tails through at least two filled paths inside the head. Loose anchoring lets the bangs split at the center after handling.
Conclusion
This Highland cow amigurumi crochet pattern works because the silhouette is handled in the right order: muzzle projection first, seated body second, fringe last. The verified reference range puts medium Highland cow projects around 25 cm with aran yarn and a 4.0 mm hook, which is a useful checkpoint while you build. Finish one sample, photograph it from front and side, then compare the fringe depth before writing up your final notes. Share the result on Pinterest and Instagram with #HighlandCowPattern. One question remains useful for revisions: did your horns still show clearly once the center bangs were trimmed?









