Introduction
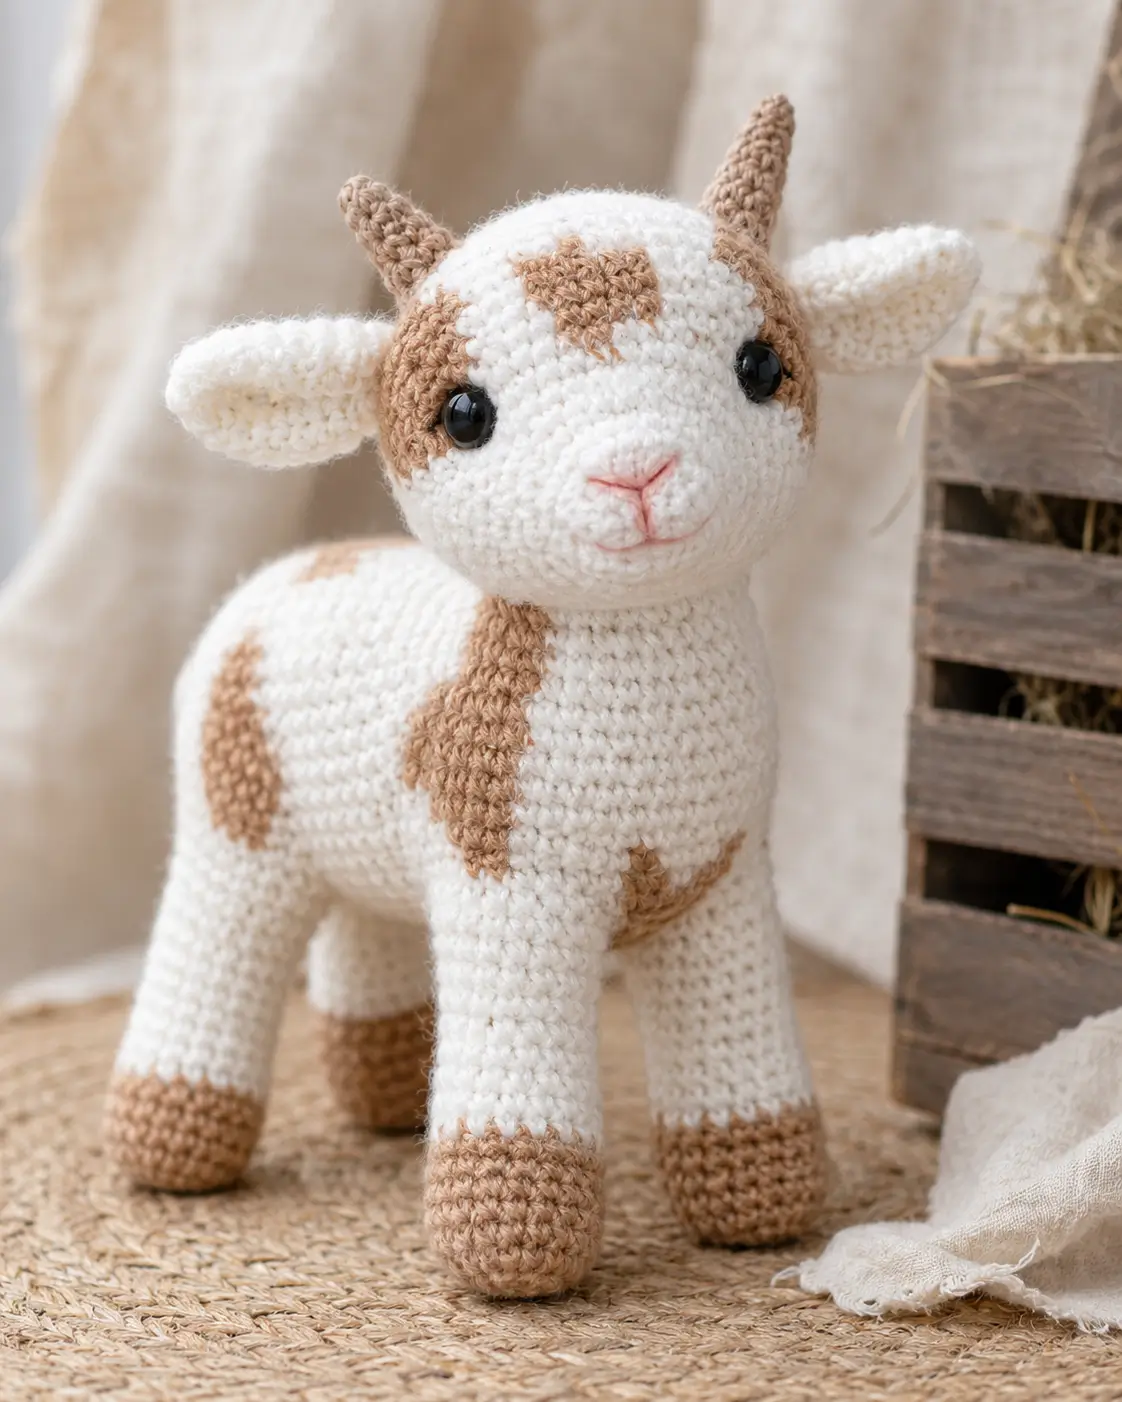
Goat horns sit behind wide side ears, so the head cannot be a plain sphere. This goat amigurumi crochet pattern uses worsted yarn, a 3.5–4.0 mm hook, 12 mm eyes, and medium construction for a 20–26 cm farm animal. Materials stay simple: cream yarn, tan accents, stuffing, needle, and markers. Make it as a nursery shelf prop or farm-themed market sample.
The Design: What Makes Patch-Horn Goat Different
A horned goat needs three separate focal zones: ears, horns, and muzzle. Wide ears sit low and slightly outward because goat heads read wrong when the ears are placed like bear ears. The muzzle stays oval, not pointed, so the embroidered mouth can form the small split upper lip. Brown patches are sewn after the head and body are stuffed, which gives cleaner color edges than carrying yarn through every round. A common mistake is placing horns at the crown center; that makes the animal look like a calf. For a crochet goat amigurumi, horns should sit behind the eye line. This baby goat crochet pattern also keeps the legs separate, because the standing pose needs flat hooves and a firm base.
Project Info at a Glance
| Skill Level | Time | Finished Size | Hook | Best For |
|---|---|---|---|---|
| Intermediate | 6–8 hours | 20–26 cm | 3.5–4.0 mm | Farm animal crochet pattern, display toy, market sample |
Materials and Tools
Yarn
- Cream — worsted / aran — 100 g — Yarn and Colors Baby Fabulous 002 Cream or similar 50 g balls
- Caramel tan — worsted / aran — 50 g — Yarn and Colors Baby Fabulous 005 Clay or similar
- Darker tan for hooves and horns — worsted / aran — 25–50 g — Yarn and Colors Baby Fabulous 028 Soil or similar
- Soft pink — small length — embroidery yarn for nose
- Black — small length — embroidery yarn or eye detail thread
Tools
- Hook 3.5 mm or 4.0 mm
- 12 mm safety eyes
- Polyester stuffing
- Yarn needle
- Long doll needle
- Stitch markers
- Sewing pins
- Scissors
Safety eyes are not suitable for toys meant for children under 3; embroidered eyes are the safer substitute for that age group.
Abbreviations
- MR = magic ring
- sc = single crochet
- inc = 2 sc in one stitch
- dec = invisible decrease
- sl st = slip stitch
- ch = chain
- BLO = back loop only
- FO = fasten off
Invisible decrease means working through the front loops of the next two stitches before finishing one single crochet decrease.
Pattern — Step by Step
Continuous spiral unless noted. Count every round before moving to the next part.
Head
Make 1. Yarn: cream.
R1: 6 sc in MR (6)
R2: inc ×6 (12)
R3: (sc, inc) ×6 (18)
R4: (2 sc, inc) ×6 (24)
R5: (3 sc, inc) ×6 (30)
R6: (4 sc, inc) ×6 (36)
R7–R13: sc around (36)
R14: sc around (36)
R15: sc around (36)
Place face patches before locking the eyes. Insert eyes between R10 and R11, about 8 stitches apart, through the head and patch layers.
R16: (4 sc, dec) ×6 (30)
R17: (3 sc, dec) ×6 (24)
R18: (2 sc, dec) ×6 (18)
Stuff firmly at the cheeks and crown, less firmly at the lower front where the muzzle sits.
R19: (sc, dec) ×6 (12)
R20: dec ×6 (6)
Fasten off. Leave a 20 cm tail and close the hole.
Body
Make 1. Yarn: cream.
R1: 6 sc in MR (6)
R2: inc ×6 (12)
R3: (sc, inc) ×6 (18)
R4: (2 sc, inc) ×6 (24)
R5: (3 sc, inc) ×6 (30)
R6: (4 sc, inc) ×6 (36)
R7–R18: sc around (36)
Keep the body oval by stuffing in small pieces, not one hard clump.
R19: (4 sc, dec) ×6 (30)
R20: sc around (30)
R21: (3 sc, dec) ×6 (24)
R22: sc around (24)
R23: (2 sc, dec) ×6 (18)
Fasten off. Leave a 30 cm tail for attaching the head.
Front Legs
Make 2. Yarn: darker tan for hoof, cream for leg.
R1: 6 sc in MR with darker tan (6)
R2: inc ×6 (12)
R3: (sc, inc) ×6 (18)
R4: BLO sc around (18)
R5: sc around (18)
R6: (sc, dec) ×6 (12)
Change to cream on the final stitch of R6.
R7–R18: sc around (12)
Stuff the hoof and lower 4 cm only; leave the top section flatter for sewing.
Fasten off. Leave a 25 cm tail.
Back Legs
Make 2. Yarn: darker tan for hoof, cream for leg.
R1: 6 sc in MR with darker tan (6)
R2: inc ×6 (12)
R3: (sc, inc) ×6 (18)
R4: BLO sc around (18)
R5: sc around (18)
R6: (sc, dec) ×6 (12)
Change to cream on the final stitch of R6.
R7–R16: sc around (12)
Stuff the hoof and lower half. Back legs can be 2 rounds shorter than front legs to set the body angle.
Fasten off. Leave a 25 cm tail.
Ears
Make 2. Yarn: cream.
R1: 6 sc in MR (6)
R2: inc ×6 (12)
R3: (sc, inc) ×6 (18)
R4–R6: sc around (18)
R7: (sc, dec) ×6 (12)
R8: sc around (12)
Do not stuff. Flatten each ear, fold the base in half, and sew the base closed. Fasten off with a 20 cm tail.
Horns
Make 2. Yarn: caramel tan or darker tan.
R1: 6 sc in MR (6)
R2–R4: sc around (6)
R5: inc ×6 (12)
R6–R8: sc around (12)
Stuff the base only. Fasten off and leave a 25 cm tail.
Muzzle / Snout
Make 1. Yarn: cream.
R1: 6 sc in MR (6)
R2: inc ×6 (12)
R3: (sc, inc) ×6 (18)
R4–R5: sc around (18)
Stuff lightly. Fasten off with a 30 cm tail. Embroider a pink V-shaped nose across the top center and add one vertical stitch below it.
Cheek / Eye Patches
Make 2. Yarn: caramel tan.
R1: 6 sc in MR (6)
R2: inc ×6 (12)
R3: (sc, inc) ×6 (18)
Sl st to finish (18)
Fasten off. Leave a 20 cm sewing tail. Shape one patch slightly taller by tugging the tail upward before sewing.
Forehead Patch
Make 1. Yarn: caramel tan.
R1: 6 sc in MR (6)
R2: inc ×6 (12)
R3: (sc, inc) ×6 (18)
Sl st to finish (18)
Fasten off. Leave a 20 cm tail. Pinch the lower edge while sewing to make the spot look irregular instead of perfectly round.
Body Spots
Make 3. Yarn: caramel tan.
R1: 6 sc in MR (6)
R2: inc ×6 (12)
R3: (sc, inc) ×6 (18)
Sl st to finish (18)
Fasten off. Leave 20 cm tails. Sew one spot on the rear side, one near the shoulder, and one narrow patch down the chest.
Short Tail
Make 1. Yarn: cream with tan tip.
R1: 6 sc in MR with tan (6)
R2: sc around (6)
Change to cream.
R3–R4: sc around (6)
Do not stuff. Fasten off with a 15 cm tail.
Mini Hay Bale Display Prop
Make 1, optional. Yarn: straw tan.
Ch 9.
R1: sc in 2nd ch from hook and across (8)
R2–R16: ch 1, turn, sc across (8)
Make two panels. Sew three sides, add light stuffing, and close the fourth side. Wrap two darker tan yarn bands around the rectangle and knot them underneath.
Assembly
- Pin the head to the front top of the body, with the muzzle area facing slightly downward. Sew around twice before knotting.
- Sew the muzzle to the lower front of the head between R9 and R14. Add extra stitches at the lower edge so it does not tilt.
- Attach the cheek patches before final eye locking if safety eyes are not yet secured. Keep the patch centers aligned with the eye posts.
- Sew the forehead patch between the horns, starting 2 rounds above the eye line. Let the lower point lean slightly to one side.
- Place horns 4 stitches apart and 2 rounds behind the forehead patch. Sew around each horn base twice.
- Attach ears to the sides of the head, just behind and below the horns. Angle them outward rather than upward.
- Sew front legs under the chest, about 3 rounds apart. Check that both hooves touch the table before knotting.
- Sew back legs under the rear body, slightly wider than the front legs. This supports the long oval body.
- Add body spots after the limbs are attached. Sew only through the outer fabric so stuffing does not pull outward.
- Attach the short tail at the back center, weave all ends at least 15 cm through the body, and trim.
The completed goat stands on four hooves with tan horns, side ears, a rounded snout, and sewn coat patches.
7 Technical Tips
- Eye placement failure mode: crossed gaze. Place 12 mm eyes about 8 stitches apart, then view the head from the front before locking washers.
- Horn failure mode: forward tilt. Pin each horn 2 rounds behind the eye line and sew around the base twice.
- Stuffing failure mode: square muzzle. Use a grape-sized amount of stuffing in the snout; hard packing turns the muzzle into a block.
- Leg failure mode: rocking base. Set all four hooves on a flat table before final stitches, then adjust one leg at a time.
- Patch failure mode: puckered circles. Sew patches with loose whip stitches every other stitch; tight stitches pull dents into the head.
- Invisible decrease failure mode: diagonal scars. Work decreases through front loops only, and spread each decrease evenly around the round.
- Tail weaving failure mode: loose horns after handling. Bury each horn tail through the head for at least 15 cm before trimming.
Conclusion
Patch-Horn Goat works because the construction separates shape from marking: first the stable cream body, then the tan face and coat patches. That order keeps the anatomy readable and gives you room to correct eye placement, horn angle, and hoof contact before the final knots. Save the project photo for Pinterest, then post the finished goat on Instagram with the side view included so the horns and ears are visible. Use the hashtag #PatchHornGoat. For the next version, adjust one detail only: should the forehead patch stay heart-shaped, or should it become a longer Boer-goat stripe? Final keyword: goat amigurumi crochet pattern.









