Introduction
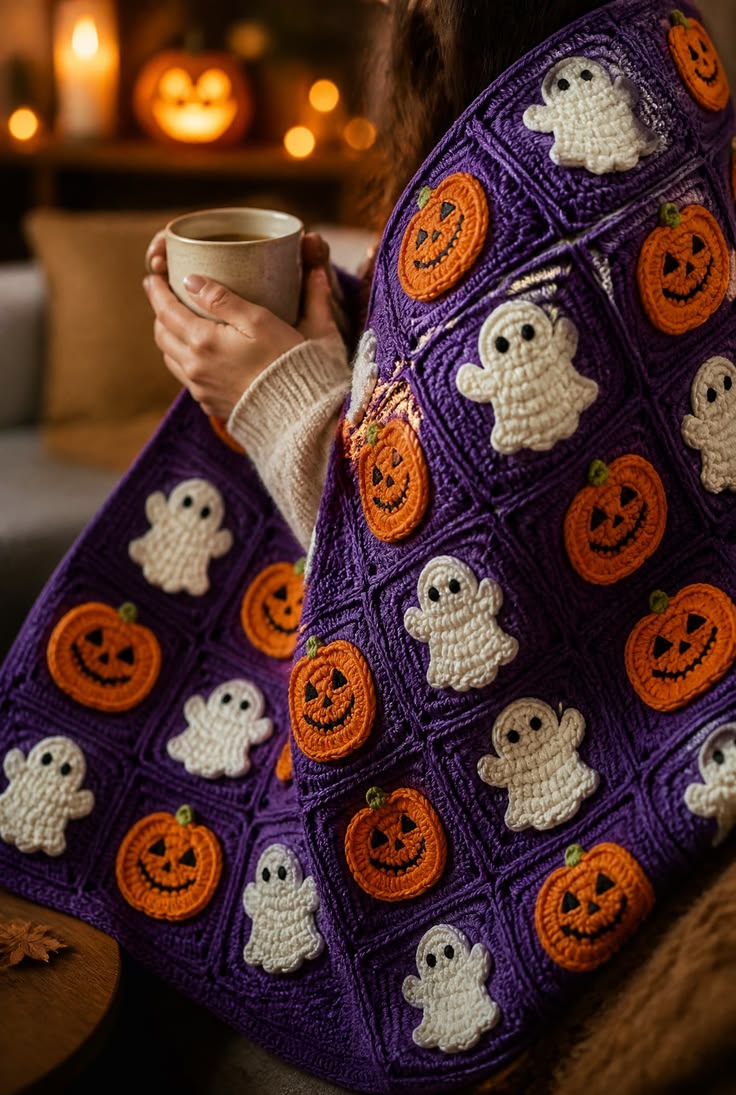
A cream ghost and an orange Jack-o’-lantern must occupy nearly the same visual area or this checkerboard starts leaning before the squares are even joined. This Halloween granny square blanket crochet pattern uses worsted yarn with 5 mm and 4 mm hooks to make an approximately 90 × 105 cm throw. Forty-two purple squares carry alternating ghost and pumpkin appliqués for an intermediate modular blanket.
The Design: What Makes This Halloween Blanket Different
The entire background stays deep purple, so the checkerboard is created by the appliqués rather than alternating square colors. That decision keeps the joining seams visually quiet and gives the cream ghosts and orange pumpkins maximum contrast. Each motif is worked separately with a smaller hook, then sewn onto a blocked square before assembly. Ghosts are taller and narrower; pumpkins are shorter and wider. Their finished areas are therefore balanced instead of their measurements being identical. A six-column by seven-row layout provides 42 squares, split evenly between the two motifs. The common failure in a ghost granny square blanket of this type is joining squares before the appliqués are attached. Sewing onto an assembled blanket pulls on surrounding seams and makes consistent motif placement much harder.
Project Info at a Glance
| Skill Level | Time | Finished Size | Hooks | Best For |
|---|---|---|---|---|
| Intermediate | 28–36 hours | Approx. 90 × 105 cm | 5.0 mm + 4.0 mm | Halloween throws, lap blankets and seasonal sofa decor |
Materials and Tools
Yarn
- Deep aubergine purple — worsted / Aran #4 — approximately 600–700 g — 42 background squares, joining and border.
- Warm cream — worsted / Aran #4 — approximately 110–140 g — 21 ghost appliqués.
- Pumpkin orange — worsted / Aran #4 — approximately 100–130 g — 21 Jack-o’-lantern appliqués.
- Black — worsted / Aran #4 — approximately 20–30 g — ghost eyes and pumpkin faces.
- Olive green — worsted / Aran #4 — approximately 10–15 g — pumpkin stems.
Use one yarn line for the purple squares whenever possible. Small differences in worsted-yarn diameter become significant after 42 motifs are joined, especially when one square is expected to match the next within a few millimeters.
Tools
- 5.0 mm crochet hook — purple squares and border
- 4.0 mm crochet hook — ghost and pumpkin appliqués
- Yarn needle
- Scissors
- Stitch markers
- Blocking mats
- Rust-resistant blocking pins
- Measuring tape
Abbreviations
- MR — magic ring
- ch — chain
- sc — single crochet
- hdc — half double crochet
- dc — double crochet
- tr — treble crochet
- sl st — slip stitch
- inc — increase
- dec — decrease
- BLO — back loop only
An invisible decrease is worked through the front loops of the next two stitches before one single crochet is completed through both loops.
Pattern — Step by Step
Make all 42 purple squares before beginning the appliqués. Blocking the complete square batch at one time gives you a fixed target for every ghost and pumpkin.
Purple Granny Square — Make 42
Yarn: deep aubergine purple — original reconstruction using standard solid-granny geometry.
R1: In MR, ch 3, 2 dc, ch 2, 3 dc, ch 2, 3 dc, ch 2, 3 dc, ch 2. Join with sl st.
You now have four sides and four corner spaces.
R2: Sl st to first corner. Ch 3, dc in same corner, ch 2, 2 dc in same corner. Dc in every stitch across the side. In each remaining corner work (2 dc, ch 2, 2 dc). Continue around and join.
R3: Sl st to corner. Work (2 dc, ch 2, 2 dc) in the corner, then 1 dc in every stitch across each side. Repeat the same corner treatment at all four corners. Join.
R4: Repeat R3.
R5: Repeat R3.
Do not fasten off yet.
Target approximately 13–14 cm square before the finishing round.
Purple Square Finishing Round
Yarn: deep aubergine purple.
Ch 1.
Sc in every dc across the first side.
In each corner ch-2 space work (sc, ch 1, sc).
Continue around all four sides.
Join with sl st and fasten off.
Target approximately 14–15 cm square after light blocking.
Block All 42 Squares
Pin every purple square to the same dimensions before making the appliqués.
A practical target is approximately 14 cm square if your gauge matches the reconstruction.
Measure from edge to edge in both directions.
Reject or rework any square that differs from the target by more than approximately 5 mm.
Do not stretch a small square aggressively to match larger ones. That creates different fabric density and makes the final seams irregular.
Cream Ghost Head
Yarn: warm cream.
R1: 6 sc in MR (6)
R2: inc ×6 (12)
R3: (sc, inc) ×6 (18)
Do not fasten off.
The lower six to eight stitches of this circle become the top edge of the ghost body.
Cream Ghost Body
Continue directly from the head.
Row 1: ch 1, sc in next 8 stitches of the head. (8)
Turn.
Row 2: ch 1, inc, 6 sc, inc. (10)
Turn.
Row 3: ch 1, sc across. (10)
Turn.
Row 4: ch 1, inc, 8 sc, inc. (12)
Turn.
Row 5: ch 1, sc across. (12)
Turn.
Row 6: ch 1, sc, hdc, dc, sl st, dc, hdc, sc, sl st, dc, hdc, sc, sl st.
The changing stitch heights form the uneven lower ghost edge.
Fasten off with a 30 cm sewing tail.
Target approximately 7.5–8.5 cm high from head top to lower edge.
Ghost Left Arm
Yarn: warm cream.
Join yarn at the left side of Body Row 3.
Ch 5.
Starting in the second chain, sl st, sc, hdc, sc.
Sl st back into the body.
Fasten off.
Ghost Right Arm
Repeat the left arm on the opposite side.
Angle this arm slightly upward or downward so the ghost is not perfectly symmetrical.
The finished arm should project approximately 2–2.5 cm from the body.
Ghost Eyes
Yarn: black.
Thread approximately 25 cm onto a yarn needle.
Make two compact vertical satin stitches on the head.
Target each eye at approximately 5–6 mm high.
Leave approximately 12–15 mm between the eye centers.
Repeat until you have 21 complete ghosts.
Orange Pumpkin Appliqué
Yarn: pumpkin orange.
Ch 9.
R1: Starting in second ch, sc in next 7, 3 sc in final chain. Rotate the foundation. Sc in next 6 along the opposite side, 2 sc in final chain. Join. (18)
R2: ch 1, inc, 5 sc, inc ×3 across the rounded end, 5 sc, inc ×3. Join. (24)
R3: ch 1, (sc, inc), 5 sc, (sc, inc) ×3, 5 sc, (sc, inc) ×2, sc. Join. (30)
R4: ch 1, sc around, placing 2 additional sc evenly across each rounded end if the oval needs more width.
Fasten off with a 35 cm sewing tail.
Target approximately 7–8 cm wide × 6–7 cm high.
Pumpkin Rib Lines
Yarn: matching orange or a slightly darker orange.
Thread approximately 30 cm onto a needle.
Work one curved surface line from the upper center to the lower center, about 10–12 mm left of the vertical midpoint.
Add a matching line on the right.
Make two shorter outer lines if stronger rib definition is needed.
Do not tighten the lines enough to fold the appliqué.
Green Pumpkin Stem
Yarn: olive green.
Ch 5.
Starting in the second chain, sl st, sc, hdc, sc.
Fasten off with a 15 cm tail.
Sew the lower 8–10 mm behind the pumpkin’s upper center.
Jack-o’-Lantern Eyes
Yarn: black.
Thread black yarn onto a needle.
Make one small triangular eye on each side of the pumpkin center.
Target approximately 8–10 mm across for each triangle.
Leave roughly 15–20 mm between their inner edges.
Jack-o’-Lantern Nose
Work a smaller black triangle on the vertical center line.
Target approximately 6–8 mm across.
Its lower point should face downward.
Jack-o’-Lantern Mouth
Embroider a curved black line approximately 4–5 cm wide.
Add three short triangular or rectangular black sections above and below the line, leaving orange gaps between them.
The grin should read as a carved face rather than one solid black crescent.
Repeat until you have 21 complete pumpkins.
Check Motif Scale Before Assembly
Place one ghost and one pumpkin on separate blocked squares.
The ghost should measure roughly 8–9 cm high, while the pumpkin should be roughly 7–8 cm wide.
Leave at least 20–25 mm of visible purple around the largest parts of each appliqué.
The motifs do not need equal dimensions. They need comparable visual weight.
If your pumpkin looks much smaller, add one relaxed sc edging round. If the ghost dominates, omit the longest arm chain or shorten its lower body by one row.
Attach the Ghost Appliqués
Center one ghost on each of 21 purple squares.
Place the head approximately 25–30 mm below the square’s upper edge.
Pin through the head, both sides and lower body before sewing.
Sew around the outer silhouette using cream yarn.
Keep attachment stitches approximately 7–10 mm apart.
Leave the final 5–8 mm of each arm free if you want a slight dimensional lift.
Attach the Pumpkin Appliqués
Center one pumpkin on each remaining purple square.
Position the upper stem about 20–25 mm below the square edge.
Sew the orange oval around its perimeter first.
Use attachment stitches approximately 7–10 mm apart.
Sew the green stem afterward so its upper half can remain slightly raised.
Place the finished square flat after sewing. If its center contracts, loosen several attachment stitches before moving to the next motif.
Blanket Layout
Arrange the 42 squares into 6 columns × 7 rows.
Start Row 1:
Ghost – Pumpkin – Ghost – Pumpkin – Ghost – Pumpkin.
Start Row 2:
Pumpkin – Ghost – Pumpkin – Ghost – Pumpkin – Ghost.
Continue alternating those two row sequences through Row 7.
This produces 21 ghost squares and 21 pumpkin squares.
Photograph the complete layout before stacking the squares for joining. That reference prevents two matching motifs from being joined side by side accidentally.
Joining the Squares
Yarn: deep aubergine purple.
Use a flat slip-stitch join or mattress stitch.
Join the six squares of each row first.
Check that all appliqués face the same direction.
After seven horizontal strips are complete, join those strips from top to bottom.
Do not pull the joining yarn tighter than the finishing round of each square.
Measure after every second row is attached. A six-square strip should remain close to its original blocked length rather than contracting several centimeters.
Blanket Border — Round 1
Yarn: deep aubergine purple.
Join at any blanket corner.
Ch 1.
Sc evenly around all four sides.
Work (2 sc, ch 2, 2 sc) in each corner.
At every square-to-square seam, skip any redundant joining loop that would cause the border to flare.
Join with sl st.
Blanket Border — Round 2
Ch 2.
Hdc in every stitch around.
In each corner ch-2 space work (2 hdc, ch 2, 2 hdc).
Join with sl st.
Blanket Border — Round 3
Ch 1.
Sc in every stitch around.
In each corner work (sc, ch 2, sc).
Join and fasten off.
For a heavier frame like the photograph, repeat Rounds 2 and 3 once more.
Assembly
- Crochet all 42 purple squares through the finishing round and block every square to approximately the same 14–15 cm measurement.
- Make 21 cream ghost appliqués and keep their finished height within approximately 8–9 cm.
- Make 21 orange Jack-o’-lantern appliqués approximately 7–8 cm wide and add their green stems and black faces.
- Pin every ghost and pumpkin to an individual square before sewing, leaving at least 20–25 mm of visible purple around the motif.
- Sew all appliqués with relaxed stitches approximately 7–10 mm apart and recheck square dimensions afterward.
- Arrange the squares in a 6 × 7 checkerboard with alternating ghost and pumpkin motifs.
- Join each six-square horizontal row first and confirm that every motif remains upright.
- Join the seven completed strips vertically, keeping the seams flat and the square corners aligned.
- Work three purple border rounds, adding the corner increases specified in each round.
- Block the completed blanket to approximately 90 × 105 cm, correct any distorted seams and weave all remaining yarn tails into matching colors.
The completed blanket should show a continuous purple grid with 21 cream ghosts and 21 orange Jack-o’-lanterns alternating across the surface.
7 Technical Tips
- Squares finish at different sizes: A 5 mm difference becomes several centimeters across six joined motifs. Block every background square to the same measurement before attaching any appliqué.
- Square centers pucker after sewing: Appliqué stitches have been pulled tighter than the background fabric. Keep attachment stitches roughly 7–10 mm apart and stop tightening when the motif first lies flat.
- Ghosts look larger than pumpkins: Comparing only height gives a misleading result because ghosts are narrow and pumpkins are wide. Target roughly 8–9 cm ghost height against 7–8 cm pumpkin width and compare occupied surface area.
- Checkerboard breaks during joining: One square has been stacked or rotated out of sequence. Photograph the full 6 × 7 layout before joining and work from that reference row by row.
- Joining seams become ridged: Slip stitches pulled tightly shorten the shared square edge. Keep the join relaxed and reject any six-square strip that contracts by more than approximately 15 mm from its blocked length.
- Pumpkin faces distort: Black embroidery pulled too firmly compresses the orange oval. Keep facial yarn resting on the surface and leave at least 4–6 mm of orange between neighboring mouth sections.
- Border begins waving: Too many stitches have been added at seams or corners. Skip redundant seam loops and use only the stated corner increases before evaluating the blanket flat again.
Changing the Blanket Size
This Halloween granny square blanket crochet pattern scales by changing the number of squares rather than altering individual motifs. Keeping each block the same size preserves both checkerboard rhythm and appliqué proportion.
For a smaller lap blanket, use 5 columns × 6 rows for 30 squares. Make 15 ghosts and 15 pumpkins, then alternate the starting motif on every row.
For a larger throw, use 7 columns × 8 rows for 56 squares. That layout requires 28 ghost squares and 28 pumpkin squares.
A full-size blanket can use 8 × 10 or more, but yarn requirements rise quickly. Calculate the average yarn used by your first four completed squares before buying the remainder of the main purple color.
Choosing the Purple Background
Deep aubergine works because both cream and orange remain readable against it. Black backgrounds reduce the visibility of Jack-o’-lantern facial details, while pale lavender changes the stronger Halloween contrast shown in the reference.
Plum, blackberry and dark violet are useful alternatives.
Keep every background square in one shade if you want the seams to disappear visually. Using several purples can work, but it changes the blanket from a two-motif checkerboard into a more complex patchwork.
If dye lots differ, distribute the shades intentionally across the layout rather than using one lot for half the blanket and another for the remaining half.
Changing the Ghost Expressions
The cream ghost shape can remain identical while the black embroidery changes.
For a surprised ghost, replace the two simple eyes with two taller ovals and add a small round mouth.
For sleepy ghosts, embroider two short horizontal curves instead.
Keep facial details small. Large black features start competing with the white silhouette and reduce the clean contrast against purple.
If making all 21 ghosts individually expressive, maintain the same eye placement zone so the blanket still looks coordinated from a distance.
Changing the Pumpkin Faces
The pumpkins can also vary without changing their orange bases.
Alternate triangular and crescent-shaped eyes.
Use two or three different grin arrangements across the 21 motifs.
Keep the black surface coverage similar on every pumpkin. One nearly black face beside a lightly embroidered one creates an unexpected dark patch in the checkerboard.
The green stems should remain approximately the same size because they help align the pumpkins vertically inside their purple squares.
Finishing and Blocking
Block the blanket after the border is complete rather than trying to correct individual joins with steam while assembly is still underway.
Pin the four corners first.
Measure opposite sides and adjust until they differ by no more than approximately 1–2 cm.
Then pin the square-to-square seam intersections along the perimeter.
Do not stretch the center aggressively. The appliqués already add extra yarn mass, and severe blocking can distort their shapes.
After drying, lift each free ghost arm and pumpkin stem away from the background so the slight dimensional effect remains visible.
Conclusion
Block the purple squares before making 42 appliqués because every later placement depends on that finished measurement. Your next step is to crochet four test squares, confirm their blocked dimensions and make one ghost plus one pumpkin to check visual scale. Once those two motifs occupy comparable areas, continue the complete batch. Share the finished Halloween granny square blanket crochet pattern project on Pinterest with the full checkerboard visible, then post close views of the appliqués on Instagram using #GhostPumpkinGrannyBlanket. For this blanket specifically, would you keep all 42 backgrounds purple or insert a few black squares around the outer rows?









