Introduction
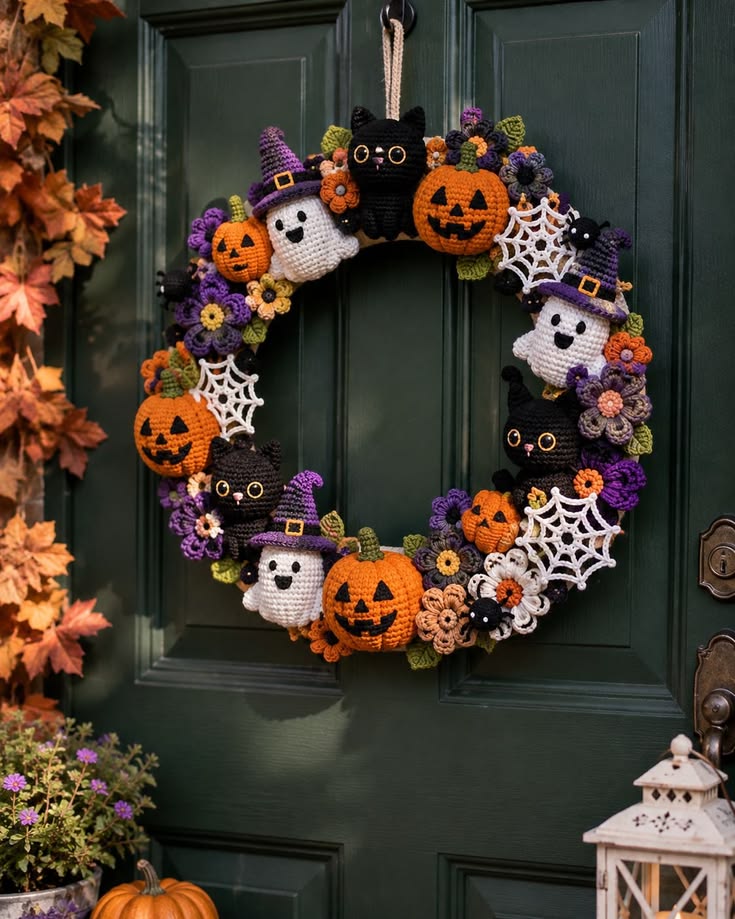
Three white ghosts and three black cats cannot share one wreath evenly unless the orange pumpkins carry the visual weight between them. This Halloween crochet wreath pattern uses a 30 cm ring, worsted and DK yarn, and 3–4 mm hooks to create an approximately 38–42 cm door decoration. Pumpkins, spider webs, flowers and leaves fill the spaces between the six main amigurumi characters.
The Design: What Makes This Halloween Wreath Different
The ring is treated as a full 360-degree composition rather than a base with one decorative cluster at the bottom. Large cream ghosts and black cats alternate around the circumference, while orange Jack-o’-lanterns provide repeated high-contrast anchors between them. Three white spider webs break up the heavier stuffed motifs because their open structure shows the purple background through the stitches. Flowers and leaves operate as fillers, covering joins and correcting gaps after the main pieces are pinned. The character sizes deliberately vary: the largest pumpkins are wider than the cats, while ghosts remain taller but flatter. That difference keeps the crochet Halloween door wreath from looking like repeated identical ornaments. A common assembly error is permanently sewing the first large motif before the complete ring has been planned. Later pieces then accumulate on one side and the wreath becomes visually unbalanced.
Project Info at a Glance
| Skill Level | Time | Finished Size | Hooks | Best For |
|---|---|---|---|---|
| Intermediate–Advanced | 24–32 hours | Approx. 38–42 cm outer diameter | 4.0 mm cover; 3.0–3.5 mm motifs | Halloween doors, walls and seasonal displays |
Materials and Tools
Yarn
- Deep purple — worsted / Aran #4 — approximately 130–160 g — wreath cover, joins and hat accents.
- Pumpkin orange — DK or light worsted — approximately 90–110 g — Jack-o’-lanterns and flowers.
- Black — DK or light worsted — approximately 70–90 g — cats, spiders, facial details and witch hats.
- Warm cream — DK or light worsted — approximately 60–80 g — ghosts and spider webs.
- Olive green — DK or light worsted — approximately 25–35 g — pumpkin stems and leaves.
- Violet, peach and mustard — DK or light worsted — approximately 35–45 g combined — layered flowers.
Use a firmer yarn for the stuffed motifs than for the flowers. The cats, pumpkins and ghosts need compact fabric, while petals and leaves benefit from enough flexibility to overlap neighboring pieces.
Tools
- 30 cm / 12-inch wreath form
- 4.0 mm crochet hook for the cover
- 3.0–3.5 mm crochet hook for amigurumi and appliqués
- 6–10 mm safety eyes or black embroidery yarn
- Polyester fiberfill
- Long yarn needle
- Stitch markers
- Dressmaking pins
- Scissors
- Measuring tape
Embroidered facial features are useful on a door decoration because no plastic eye backs need to be hidden against the wreath form.
Abbreviations
- MR — magic ring
- sc — single crochet
- inc — increase
- dec — decrease
- sl st — slip stitch
- ch — chain
- hdc — half double crochet
- dc — double crochet
- tr — treble crochet
- BLO — back loop only
An invisible decrease is worked through the front loops of the next two stitches before completing one single crochet through both loops.
Pattern — Step by Step
Make every major motif before permanent wreath assembly. The final arrangement depends on comparing actual finished sizes rather than relying only on written dimensions.
Purple Wreath Cover
Yarn: deep purple.
Measure the circumference around the thickness of your wreath form.
For a typical 30 cm foam ring approximately 5 cm thick, begin with:
Foundation: ch 19.
Row 1: starting in second ch, hdc across. (18)
Rows 2 onward: ch 1, turn, hdc BLO across. (18)
Continue until the strip wraps around the full outer circumference of the wreath without stretching heavily.
Target approximately 88–94 cm of length for a typical 30 cm form, but measure the actual ring before fastening off.
Leave a 150 cm sewing tail.
Attach the Wreath Cover
Wrap the purple strip around the ring with the ribbed side facing outward.
Bring the long edges together along the back.
Whipstitch through matching row-edge positions.
Rotate the cover occasionally so the seam stays centered on the rear surface.
Join the two short ends only after the complete ring is enclosed.
The purple cover should remain taut enough that it cannot rotate freely around the wreath form.
Ghost Body — Make 3
Yarn: warm cream — standard six-stitch amigurumi shaping.
R1: 6 sc in MR (6)
R2: inc ×6 (12)
R3: (sc, inc) ×6 (18)
R4: (2 sc, inc) ×6 (24)
R5: (3 sc, inc) ×6 (30)
R6: sc around (30)
R7: sc around (30)
R8: sc around (30)
R9: sc around (30)
R10: (3 sc, dec) ×6 (24)
R11: sc around (24)
R12: sc around (24)
Stuff lightly.
R13: work around the lower edge: (sl st, skip 1, 5 dc in next st, skip 1) repeat to create a wavy hem.
Fasten off with a 35 cm attachment tail.
Target approximately 8–10 cm high.
Ghost Arms — Make 6
Yarn: warm cream.
Ch 6.
Starting in second chain: sl st, sc, hdc, sc, sl st.
Fasten off with a 15 cm tail.
Sew one arm on each side of every ghost around R9–R10.
Ghost Faces
Yarn: black.
Embroider two oval eyes between R6 and R7.
Keep the centers approximately 12–15 mm apart.
Add a small round or smiling mouth approximately 8–10 mm below the eyes.
Vary the mouth slightly between the three ghosts if desired.
Witch Hat — Make 3
Yarn: black and violet.
R1: 6 sc in MR (6)
R2: sc around (6)
R3: (2 sc, inc) ×2 (8)
R4: sc around (8)
R5: (3 sc, inc) ×2 (10)
R6: sc around (10)
R7: (4 sc, inc) ×2 (12)
R8: sc around (12)
R9: (sc, inc) ×6 (18)
R10: (2 sc, inc) ×6 (24)
Change to violet.
R11: sc around (24)
Change back to black.
R12: (3 sc, inc) ×6 (30)
Fasten off.
Flatten the brim slightly and sew one hat onto each ghost.
Hat Buckles — Make 3
Yarn: mustard.
Ch 8 and join into a small rectangle using sl st.
Sew centrally across the violet hat band.
Black Cat Body — Make 3
Yarn: black.
R1: 6 sc in MR (6)
R2: inc ×6 (12)
R3: (sc, inc) ×6 (18)
R4: (2 sc, inc) ×6 (24)
R5: sc around (24)
R6: sc around (24)
R7: sc around (24)
R8: sc around (24)
R9: (2 sc, dec) ×6 (18)
R10: sc around (18)
R11: (sc, dec) ×6 (12)
R12: dec ×6 (6)
Stuff lightly and close.
Target approximately 7–8 cm high before ears.
Cat Ears — Make 6
Yarn: black.
R1: 6 sc in MR (6)
R2: (sc, inc) ×3 (9)
R3: sc around (9)
Flatten.
Fasten off with a sewing tail.
Sew two ears to the top of every cat.
Cat Eyes
Use 6–8 mm safety eyes or embroidery.
Place the eyes approximately 12–14 mm apart.
Embroider a tiny pink or orange nose below them.
Add two or three short whisker lines on each side.
Cat Tail — Make 3
Yarn: black.
Ch 15.
Starting in second chain, sl st through the first five chains, sc through the next five and hdc through the final four.
Fasten off.
Curve the tail beside the body and sew only its base plus one middle contact point.
Large Jack-o’-Lantern — Make 3
Yarn: pumpkin orange.
R1: 6 sc in MR (6)
R2: inc ×6 (12)
R3: (sc, inc) ×6 (18)
R4: (2 sc, inc) ×6 (24)
R5: (3 sc, inc) ×6 (30)
R6: sc around (30)
R7: sc around (30)
R8: sc around (30)
R9: (3 sc, dec) ×6 (24)
R10: (2 sc, dec) ×6 (18)
R11: (sc, dec) ×6 (12)
R12: dec ×6 (6)
Stuff lightly and close.
Use a long orange strand to make five or six exterior shaping passes from top to bottom.
Target approximately 7–8 cm across after sculpting.
Small Jack-o’-Lantern — Make 2
Yarn: pumpkin orange.
R1: 6 sc in MR (6)
R2: inc ×6 (12)
R3: (sc, inc) ×6 (18)
R4: sc around (18)
R5: sc around (18)
R6: (sc, dec) ×6 (12)
R7: dec ×6 (6)
Stuff lightly, close and sculpt into five sections.
Target approximately 5–6 cm across.
Pumpkin Stems — Make 5
Yarn: olive green.
Ch 6.
Starting in second chain: sl st, sc, hdc, sc, sl st.
Fasten off with a sewing tail.
Attach one at the top of each pumpkin.
Jack-o’-Lantern Faces
Yarn: black.
Embroider two triangular eyes and one small triangular nose.
Add a curved mouth with three or four orange tooth gaps.
Keep all black embroidery relaxed so the pumpkin does not collapse around the face.
Spider Web — Make 3
Yarn: warm cream.
R1: in MR, work (sc, ch 5) ×6. Join.
R2: sl st into first ch-5 space, sc, ch 7 in each of the six spaces. Join.
R3: sl st into first ch-7 space, sc, ch 9 in each space. Join.
R4: sl st into first ch-9 space, sc, ch 11 in each space. Join.
Fasten off.
Stretch the six spokes gently into a web approximately 8–10 cm across.
Web Support Spokes
Thread cream yarn onto a needle.
Make six straight surface lines from the center ring to the outermost chain round.
Tack each line where it crosses the intermediate rounds.
This produces the radial web structure visible in the reference.
Small Spider — Make 3
Yarn: black.
R1: 6 sc in MR (6)
R2: inc ×6 (12)
R3: sc around (12)
R4: dec ×6 (6)
Stuff minimally and close.
For each leg, ch 5 and sl st back through the chain.
Make eight legs around the body.
Target approximately 3–4 cm total width.
Large Layered Flower — Make 6
Yarn: violet, orange, peach or cream.
R1: 6 sc in MR (6)
R2: in each stitch work (sl st, ch 3, 2 dc, ch 3, sl st).
Fasten off.
Target approximately 4–5 cm across.
Small Flower — Make 8
Yarn: mixed accent colors.
R1: 5 sc in MR (5)
In each stitch work (sl st, ch 2, dc, ch 2, sl st).
Fasten off.
Target approximately 2.5–3 cm across.
Flower Centers
Yarn: mustard, black or orange.
R1: 6 sc in MR (6)
R2: inc ×6 (12)
Fasten off.
Sew one circle into the center of each large flower.
Leaves — Make 14
Yarn: olive green.
Ch 7.
Starting in second chain: sl st, sc, hdc, dc, hdc, sc.
Work 3 sc into the final point.
Rotate and work back along the opposite side:
sc, hdc, dc, hdc, sc, sl st.
Fasten off with a sewing tail.
Use the leaves behind flowers, pumpkins and character heads.
Plan the Wreath Before Sewing
Place the covered ring flat on a table.
Mark twelve approximate clock positions with removable stitch markers.
Begin with the six character motifs.
Position the three ghosts roughly around 10 o’clock, 2 o’clock and 7 o’clock.
Place the black cats between them around 12 o’clock, 4 o’clock and 8 o’clock.
Do not sew yet.
Add the three large pumpkins around approximately 1 o’clock, 6 o’clock and 9 o’clock.
Fit the two smaller pumpkins into remaining open spaces.
Position the Spider Webs
Place the three cream webs where the ring needs visual openness.
Useful positions are around 3 o’clock, 5 o’clock and 9–10 o’clock.
The web edges may overlap adjacent flowers or leaves by approximately 10–15 mm.
Do not hide more than one-third of a web beneath another motif.
The radial structure should remain readable from normal viewing distance.
Use Flowers as Gap Fillers
After the characters, pumpkins and webs are pinned, inspect the purple spaces between them.
Place large flowers in gaps wider than approximately 5 cm.
Use small flowers when the opening is closer to 2–4 cm.
Slide olive leaves behind petals and characters before sewing the flowers.
Rotate neighboring flowers so their petals do not form repeated identical directions around the ring.
Attach the Major Characters
Start with the three ghosts and three cats.
Sew each character through its rear surface rather than around the complete visible edge.
Use at least four attachment zones per character: top, bottom and both sides.
For pieces heavier than approximately 20 g, add a fifth concealed attachment through the center back.
Check the wreath vertically after attaching every second character.
Attach the Pumpkins
Sew each pumpkin to the ring through two lower lobes and the upper rear section.
Do not sew through only the stem.
The larger pumpkins need at least three firm attachment points.
Keep the Jack-o’-lantern faces directed outward rather than toward the wreath center.
Attach the Spider Webs
Tack each web to the purple cover through all six outer spoke points.
Add one stitch near the center only if the web lifts excessively.
Do not pull the outer points until the chain loops distort.
The web should remain flat but visibly open.
Add the Spiders
Place one black spider near or partly over each web.
Sew only the body to the wreath.
Leave several legs free so the spider retains dimensional texture.
Keep the spider width under approximately 4 cm so it does not obscure the web behind it.
Attach Flowers and Leaves
Work around the ring one gap at a time.
Sew leaves first because their bases should disappear beneath flowers or character edges.
Attach each flower through its center and one or two inner petal points.
Leave most petal tips unsupported.
This creates the layered depth visible throughout the reference wreath.
Hanging Loop
Yarn: warm cream or beige.
Ch 45.
Starting in the second chain, sl st through every chain.
Fasten off.
Fold the cord in half.
Sew both ends firmly to the rear of the wreath at 12 o’clock.
Target a finished hanging loop approximately 12–15 cm long.
Assembly
- Cover the 30 cm wreath form with the purple BLO hdc strip and keep the seam centered on the rear.
- Make all three ghosts, three cats, five pumpkins, three webs and three spiders before positioning anything permanently.
- Pin the six main character motifs around the complete ring, alternating light ghosts with dark cats to distribute visual weight.
- Add the five orange pumpkins between characters and point every face outward toward the viewer.
- Position the three white spider webs in gaps where the wreath needs open negative space rather than another stuffed motif.
- Pin all large flowers and leaves behind neighboring motifs before sewing the filler pieces.
- Sew the ghosts, cats and pumpkins first using at least three to five hidden attachment points per stuffed piece.
- Attach webs and spiders next, leaving the outer chain spaces and several spider legs free.
- Sew the remaining flowers and leaves over visible joins and add the hanging loop at the rear 12 o’clock position.
- Hang the wreath vertically, correct any heavy or empty section, then weave every remaining yarn tail through matching rear stitches.
The completed wreath should maintain a clear central opening while characters, pumpkins, webs, flowers and leaves cover nearly the complete outer ring.
7 Technical Tips
- Wreath rotates on the form: A cover more than about 10 mm larger than the ring circumference can move after hanging. Fit the purple strip firmly around the form and close the rear seam without leaving loose fabric.
- One side hangs lower: Stuffed motifs have accumulated unevenly around the circumference. Weigh or compare the three main quadrants and move one pumpkin or cat before permanently attaching the filler flowers.
- Ghosts tilt forward: One stitch at the back works like a hinge. Use at least four attachment zones spread over approximately 4–5 cm of the rear ghost surface.
- Pumpkins rotate sideways: Sewing only through the green stem cannot control a stuffed orange body. Attach each large pumpkin through at least two lower lobes plus one upper rear point.
- Spider webs sag: Fewer than six perimeter anchor points leave the chain rounds unsupported. Tack all six spoke ends to the ring while keeping the outer diameter around 8–10 cm.
- Flowers become flat discs: Sewing every petal to the purple cover removes the layered texture. Fix each flower mainly through its center and leave at least two-thirds of the petal edges free.
- Central opening becomes crowded: Motifs projecting more than roughly 4–5 cm inward can close the ring visually. Shift stuffed pieces outward and reserve the inside edge mainly for leaves, petals and web points.
Scaling the Wreath
This Halloween crochet wreath pattern can be adapted to other ring diameters without changing every motif. For a 25 cm form, use two ghosts, two cats, three pumpkins and two webs rather than trying to fit the complete reference set.
For a larger 35–40 cm wreath, keep all motifs at the written scale and increase the number of flowers and leaves. The extra circumference should be filled with smaller decorative pieces rather than simply enlarging every amigurumi character.
Measure the actual ring before making the purple cover. Foam, straw and wire wreath forms with the same outer diameter can have very different tube thicknesses, which changes the cover width.
Controlling the Color Balance
Purple covers most of the background, so orange, cream and black need to repeat at regular intervals. Avoid placing two large orange pumpkins next to a cluster of several orange flowers.
Spread the three ghosts around the ring so cream appears in separate quadrants. Use the three spider webs as additional white accents between them.
Black cats provide the darkest masses. Positioning them between cream ghosts prevents either value from dominating one side.
Olive leaves work as transition pieces between purple and orange. They also separate flowers from pumpkins when similar warm colors would otherwise merge.
Changing the Character Mix
You can simplify the wreath while keeping the same structure. Replace one black cat with a fourth ghost for a lighter version, or substitute a bat for one pumpkin if you want more black around the ring.
The important measurement is occupied space. A replacement motif should cover roughly the same 7–10 cm area as the piece it replaces.
Do not remove several large motifs without increasing flowers or webs. Exposed purple sections larger than about 6 cm interrupt the dense style shown in the reference.
Flower Placement Strategy
Do not make all flowers before testing the major layout. The correct number depends on the actual gaps left by your individual gauge.
Begin with six large flowers and eight small flowers.
Pin those around the ring after all characters are positioned.
If a purple opening wider than approximately 3 cm remains, make another small flower or pair of leaves rather than forcing an existing motif sideways.
This staged method keeps the main characters aligned while still producing the densely filled botanical edge.
Finishing the Wreath
Hang the finished wreath for several hours before burying the final assembly tails. Gravity can reveal balance problems that are not visible when the ring lies flat.
Check the 12, 3, 6 and 9 o’clock positions first.
The central opening should remain approximately circular.
Rotate any cat or pumpkin whose face turns toward the ring center.
Lift flower petals and spider legs away from the purple surface after the final attachment stitches are secure.
Finally, inspect the hanging loop. Its two attachment points should sit several centimeters apart on the rear cover rather than pulling from one narrow stitch.
Conclusion
Make the six largest characters before committing to any final wreath layout because they determine where every pumpkin, web and flower can fit. Your next step is to cover the 30 cm ring, crochet one ghost, one cat and one large pumpkin, then pin those test pieces to confirm the scale before producing the complete motif batch. Add flowers only after every major component has a fixed position. Share the finished Halloween crochet wreath pattern project on Pinterest with the entire ring visible, then post close views of the characters on Instagram using #GhostCatHalloweenWreath. For this wreath specifically, would you keep the three black cats or replace one with a purple witch?









