Introduction
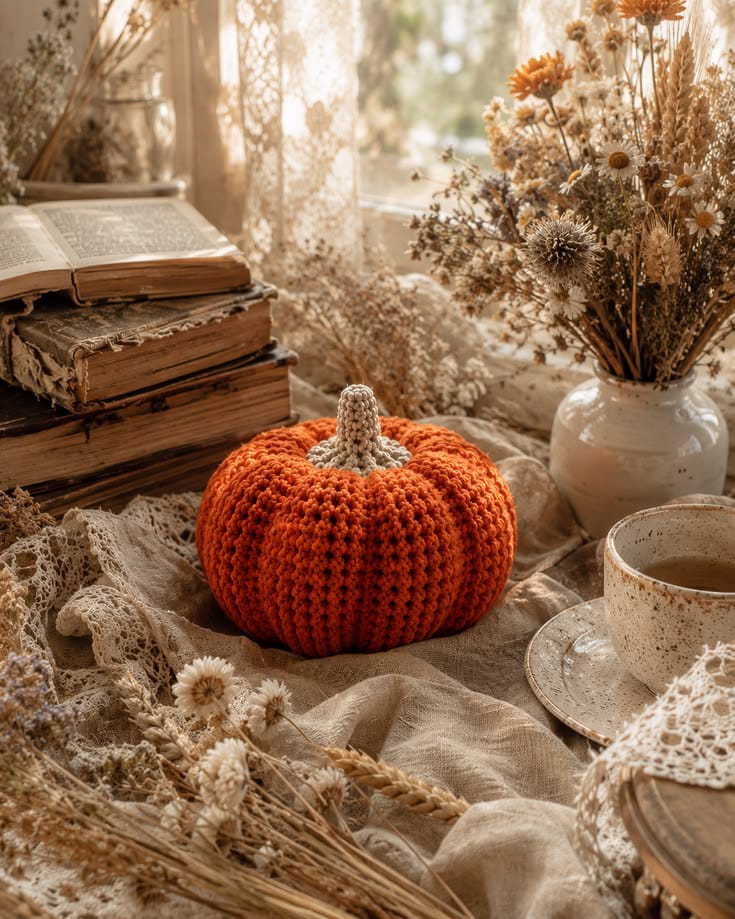
A pumpkin this low and wide will turn into a ball if its center receives the same stuffing pressure as its ribs. This squat ribbed crochet pumpkin pattern uses Aran yarn and a 5 mm hook to make an approximately 18–21 cm decoration. Dense orange ribbing, eight broad lobes, a recessed crown and a short cream stem reproduce the easy-intermediate structure shown in the reference.
The Design: What Makes This Ribbed Pumpkin Different
The body starts as a flat back-loop half-double-crochet panel, but its proportions are chosen for width rather than height. An 18-stitch row produces a relatively short body wall, while 42 rows supply enough circumference for the stuffed tube to spread into a low pumpkin. Narrow crochet ridges form automatically when every row is worked through the back loop. Eight larger shaping channels are added later, grouping those small ribs into broad lobes. The crown is compressed more deeply than on a conventional round pumpkin, which lowers the center and gives the short cream stem a clear attachment point. A common problem in a textured crochet pumpkin is adding too much filling beneath the top closure. The gathered crown then remains domed and the finished object reads as a ribbed ball rather than a squat pumpkin.
Project Info at a Glance
| Skill Level | Time | Finished Size | Hook | Best For |
|---|---|---|---|---|
| Easy–Intermediate | 4–6 hours | Approx. 18–21 cm diameter × 17–20 cm including stem | 5.0 mm | Fall tables, shelf displays and seasonal centerpieces |
Materials and Tools
Yarn
- Deep burnt orange — Aran / medium #4 — approximately 90–110 g — pumpkin body and structural shaping strands.
- Warm oatmeal / beige — Aran / medium #4 — approximately 10–15 g — short stem and crown disc.
Choose a smooth yarn with enough body to keep the ribbing visible after stuffing. Very soft yarn can flatten under the shaping strands, while a noticeably stiff fiber can make gathering the 42 row ends difficult.
Tools
- 5.0 mm crochet hook
- Polyester fiberfill — approximately 150–190 g
- Long tapestry or doll needle
- Standard yarn needle
- Eight removable stitch markers
- Dressmaking pins
- Scissors
- Measuring tape
Abbreviations
- MR — magic ring
- ch — chain
- sc — single crochet
- hdc — half double crochet
- inc — increase
- dec — decrease
- sl st — slip stitch
- BLO — back loop only
An invisible decrease is worked through the front loops of the next two stitches before one single crochet is completed through both loops.
Pattern — Step by Step
The pumpkin body is worked flat. Foundation length determines body height, while the number of ribbed rows determines circumference.
Orange Body Panel
Yarn: deep burnt orange — original reconstruction based on standard ribbed-pumpkin geometry.
Foundation: ch 19.
Row 1: Starting in the second chain from the hook, hdc across. (18)
Ch 1 and turn. The turning chain does not count as a stitch.
Row 2: hdc BLO across. (18)
Ch 1 and turn.
Rows 3–42: hdc BLO across. (18)
Fasten off with approximately 100 cm of orange yarn remaining for seaming.
Target relaxed panel dimensions: approximately 11–13 cm high × 50–56 cm long. Measure without stretching the ribs.
Check the Panel Before Assembly
Count several rows across the panel. Every row should contain 18 hdc.
Place the rectangle on a flat surface and compare the two long edges. They should remain parallel from end to end.
A dropped stitch narrows the panel gradually and produces an uneven gathered crown once the tube is closed.
Measure the width of the complete 42-row fabric.
The rectangle needs considerably more circumference than height because the final pumpkin is deliberately squat.
If the panel is shorter than approximately 50 cm at your gauge, add BLO rows until it reaches the target measurement.
Joining the Body Tube
Bring Row 1 and Row 42 together.
Keep the raised rib texture facing outward.
Pin the upper stitch, center stitch and lower stitch before sewing.
Use mattress stitch or a relaxed whipstitch to join all 18 corresponding positions.
Pull the seam only until the edges meet.
A seam tighter than the neighboring ribs creates one narrow vertical groove that cannot be corrected easily after stuffing.
Closing the Bottom
Thread approximately 100 cm of orange yarn onto a long needle.
Pass the needle through one point at the end of every row around the first open edge.
The opening contains 42 row ends.
Pull the gathering yarn in three or four stages.
Stop first at approximately 25 mm, redistribute the folds, then tighten to about 10–12 mm.
Cross the center several times with the yarn needle.
Push the gathered knot approximately 5–7 mm into the pumpkin body.
Secure the tail on the inside.
Stuffing the Pumpkin
Add fiberfill against the outer wall first.
Work around the complete circumference until each rib has support underneath it.
Place smaller quantities through the central core.
Keep the middle approximately 15–20 percent softer than the outside wall.
The stuffed tube should already spread outward before the upper opening is closed.
Press the top and bottom together with both hands.
You should still be able to reduce the body height by approximately 20–25 mm without excessive force.
If the body barely moves, remove some central filling.
Closing the Crown
Run a new orange strand through all 42 upper row ends.
Pull gradually until the opening measures approximately 25 mm.
Add the final small portions of stuffing around the outer crown.
Avoid placing a firm ball of fiberfill directly beneath the center.
Tighten the opening to approximately 10–12 mm.
Do not cut the yarn after securing it temporarily because the same region must be compressed vertically.
Vertical Compression
Thread the crown yarn through a long needle.
Pass directly through the center of the pumpkin and exit at the bottom closure.
Return along the same axis.
Pull gradually until the pumpkin loses approximately 20–25 mm of height.
The side wall should expand outward while the top and bottom centers move inward.
Target a body height of approximately 11–13 cm before adding the stem.
Secure the compression yarn beneath the pumpkin but leave the tail accessible until the lobe shaping is complete.
Mark Eight Broad Lobes
The BLO fabric creates many narrow raised lines. The reference also shows a smaller number of broad pumpkin sections.
View the pumpkin from directly above.
Place eight stitch markers around the widest circumference at approximately 45-degree intervals.
Pair opposite markers:
1 with 5.
2 with 6.
3 with 7.
4 with 8.
Measure neighboring sections before shaping.
Move any marker if two adjacent widths differ by more than approximately 10 mm.
Sculpting Groove 1
Yarn: matching burnt orange.
Cut approximately 180 cm of yarn.
Anchor it beneath the bottom center.
Bring the strand over the exterior through the first marked position.
Insert at the crown center.
Pass the needle through the pumpkin and exit underneath.
Pull until the groove sits approximately 8–11 mm below the fullest neighboring ribs.
Leave the strand temporarily unsecured.
Sculpting Groove 2
Work the groove directly opposite the first one.
Use the same bottom-to-crown route.
Match groove depth visually rather than pulling both strands with the same physical force.
Different stuffing density can require slightly different tension.
Sculpting Grooves 3 and 4
Move to the second opposing marker pair.
Form Groove 3.
Rotate the pumpkin 180 degrees and form Groove 4.
Set the body on a hard table.
If one side sits lower, redistribute a small amount of filling before continuing.
Sculpting Grooves 5 and 6
Repeat the process on the third opposite pair.
Keep the shaping strands between existing raised ribs whenever possible.
Do not bury a strand directly through the top of a prominent crochet rib.
The structural groove should group several narrow ribs into one broad lobe.
Sculpting Grooves 7 and 8
Complete the final pair.
View all eight sections from above.
Adjust individual strands until neighboring lobes differ by no more than approximately 10–12 mm in width.
Secure the shaping yarn beneath the pumpkin.
Bury each orange tail through the stuffed center.
Deepen the Crown Recess
The reference has a pronounced central depression surrounding the stem.
Cut approximately 70 cm of orange yarn.
Enter through the upper center and exit through the bottom center.
Return through the same path.
Pull until the crown sits approximately 15–20 mm below the highest point of the surrounding lobes.
Stop before the opening becomes narrower than about 12 mm.
The stem base needs a flat recessed area rather than a tightly puckered hole.
Short Cream Stem
Yarn: warm oatmeal / beige.
R1: 6 sc in MR (6)
R2: sc around (6)
R3: sc around (6)
R4: sc around (6)
R5: sc around (6)
R6: sc around (6)
R7: sc around (6)
R8: sc around (6)
R9: (2 sc, inc) ×2 (8)
R10: sc around (8)
R11: (3 sc, inc) ×2 (10)
R12: sc around (10)
R13: (4 sc, inc) ×2 (12)
Stuff R8–R13 lightly. Leave the upper half almost empty so the stem remains narrow rather than becoming a rigid cylinder.
Fasten off with a 35 cm sewing tail.
Target approximately 4.5–5.5 cm of visible height.
Stem Base Disc
Yarn: warm oatmeal / beige.
R1: 6 sc in MR (6)
R2: inc ×6 (12)
R3: (sc, inc) ×6 (18)
Fasten off with a 25 cm tail.
This flat circle conceals the gathered center and spreads the stem attachment across several orange lobes.
Shape the Stem
The stem in the reference is short and mostly upright.
Do not create a dramatic bend.
Pinch the final three rounds slightly toward one side if you want a natural irregularity.
A shift of approximately 5–10 degrees is enough.
Keep the lower half vertical so the stem appears anchored rather than hinged.
Attach the Stem Base
Center the 18-stitch beige disc over the recessed crown.
Pin four opposite points first.
Sew through the outer round of the disc and into several neighboring orange ribs.
Do not attach only through the gathered center.
The completed disc should remain flat against the crown without pulling the eight lobe channels inward.
Attach the Stem
Place the 12-stitch lower stem opening at the center of the beige disc.
View the pumpkin from the front and side.
Sew around the lower 15–18 mm of the stem.
Take several stitches through both the base disc and orange crown.
Check the stem after every quarter of the circumference.
If it begins leaning from the base, loosen the most recent stitches and correct the alignment before continuing.
Assembly
- Complete the 18-stitch by 42-row orange panel and measure approximately 11–13 cm high by 50–56 cm long before joining.
- Match the short edges through all 18 stitch positions and seam them without tightening the join more than the BLO fabric.
- Gather the 42 lower row ends to approximately 10–12 mm and recess the closure 5–7 mm into the body.
- Stuff around the outer circumference first while keeping the central core approximately 15–20 percent softer.
- Gather the upper opening to approximately 10–12 mm and compress the pumpkin vertically by about 20–25 mm.
- Mark eight lobe positions at roughly 45-degree intervals around the widest circumference.
- Sculpt the grooves as four opposite pairs and stop around 8–11 mm of visible valley depth.
- Deepen the crown recess to approximately 15–20 mm while preserving enough central width for the stem base.
- Sew the 18-stitch cream base disc over the crown and attach the short stem through its lower 15–18 mm.
- Set the pumpkin on a hard surface, correct any rocking or uneven lobes and weave all remaining yarn tails through the stuffed interior.
The finished pumpkin should display a low broad body, eight rounded lobes, dense narrow crochet ribs, a deeply recessed crown and one compact cream stem.
7 Technical Tips
- Pumpkin becomes too tall: Excess body height or insufficient circumference creates a cylinder. Keep the panel around 11–13 cm high while targeting approximately 50–56 cm of relaxed length.
- Rib texture flattens: Too much stuffing stretches the unused front loops until they lose relief. Stop filling while the pumpkin can still compress approximately 20–25 mm vertically.
- Lobes turn into narrow wedges: Structural yarn pulled deeper than about 11 mm creates sharp valleys. Target approximately 8–11 mm of groove depth and adjust opposite grooves as pairs.
- Crown remains domed: Dense fiberfill beneath the top closure prevents the center from sinking. Keep the central core 15–20 percent softer and compress the crown to approximately 15–20 mm below the lobe tops.
- Bottom rocks: The gathered closure is projecting farther down than the surrounding lobes. Push it inward about 5–7 mm and move a small amount of filling toward the lowest broad sections.
- Stem tilts from its base: A narrow tube sewn only through the gathered hole acts like a hinge. Attach the lower 15–18 mm through the separate 18-stitch base disc and several orange ribs.
- Seam remains obvious: A whipstitch pulled tighter than the surrounding ribbing narrows one section. Match all 18 positions and keep the joined edge within approximately 5 mm of the width of neighboring ribs.
Why the Panel Is Wider Than a Typical Pumpkin
The reference pumpkin has a pronounced squat profile. That shape requires more circumference relative to height than a taller decorative pumpkin.
A panel close to three times its height can produce a conventional round form. This reconstruction pushes the ratio farther by keeping the height around 11–13 cm while extending the relaxed length toward 50–56 cm.
After gathering, the excess circumference moves outward rather than upward.
Vertical compression strengthens that effect.
If your individual yarn produces a much denser fabric, work additional rows until the tube spreads visibly before the crown is closed. Measurements are more useful than forcing a fixed row count after changing yarn brands.
Adjusting the Pumpkin Size
For a smaller version, begin with ch 15–16 and work approximately 32–36 BLO rows. Keep the finished panel length around four times its relaxed height if you want the same squat silhouette.
For a larger table pumpkin, begin with ch 23–25 and continue until the panel reaches approximately 65–72 cm long.
Increase stuffing gradually when scaling up.
The lobe count can remain at eight because the reference relies on broad sections rather than numerous narrow segments.
Scale the cream stem more slowly than the body. A very large stem can dominate the crown, while a compact stem preserves the low pumpkin profile.
Controlling BLO Ribbing
Work every hdc after Row 1 into the back loop only.
The unused front loop forms the raised line that runs across the flat panel and turns vertically after the seam is closed.
If one row is accidentally worked through both loops, a visible break appears in the finished texture.
Correct that row immediately rather than disguising it with a sculpting strand later.
Maintain the same turning tension throughout all 42 rows.
A tight edge chain shortens one side of the rectangle and can create a spiral after seaming.
Stuffing for a Squat Pumpkin
The outer 3–4 cm of the body should contain most of the structural filling.
Press fiberfill beneath each rib rather than packing it directly into one central mass.
The center acts more like a compressible hinge between the upper and lower surfaces.
After half the filling has been added, press the two centers toward one another.
If the body refuses to flatten, remove central stuffing before continuing.
Once both gathered ends are closed, add no more filling. Final shape changes should come from redistribution and sculpting rather than forcing extra fiberfill into the crown.
Finishing the Pumpkin
A stuffed ribbed pumpkin does not need aggressive wet blocking. The raised texture depends partly on the elasticity of the crochet fabric.
Shape each lobe by hand after the eight sculpting strands are secure.
Press outward beneath the fullest part of each section and inward along its neighboring valleys.
Rotate the pumpkin after every adjustment.
Opposite lobes should differ by no more than approximately 10–12 mm in visible width.
Check the stem last. Its lower half should remain upright, while the tip can shift slightly to keep the handmade irregularity visible.
Conclusion
Control the center before adding more stuffing because the low silhouette depends on compression rather than a tightly packed sphere. Your next step is to finish the 18-stitch by 42-row panel, check its relaxed dimensions and pin the seam before gathering either end. Form all eight lobes only after the body reaches its final compressed height. Share the completed squat ribbed crochet pumpkin pattern project on Pinterest with an overhead view that shows the crown depth, then post the short-stem profile on Instagram using #SquatRibbedCrochetPumpkin. For this pumpkin specifically, would you keep the oatmeal stem or use dark brown for stronger contrast?









