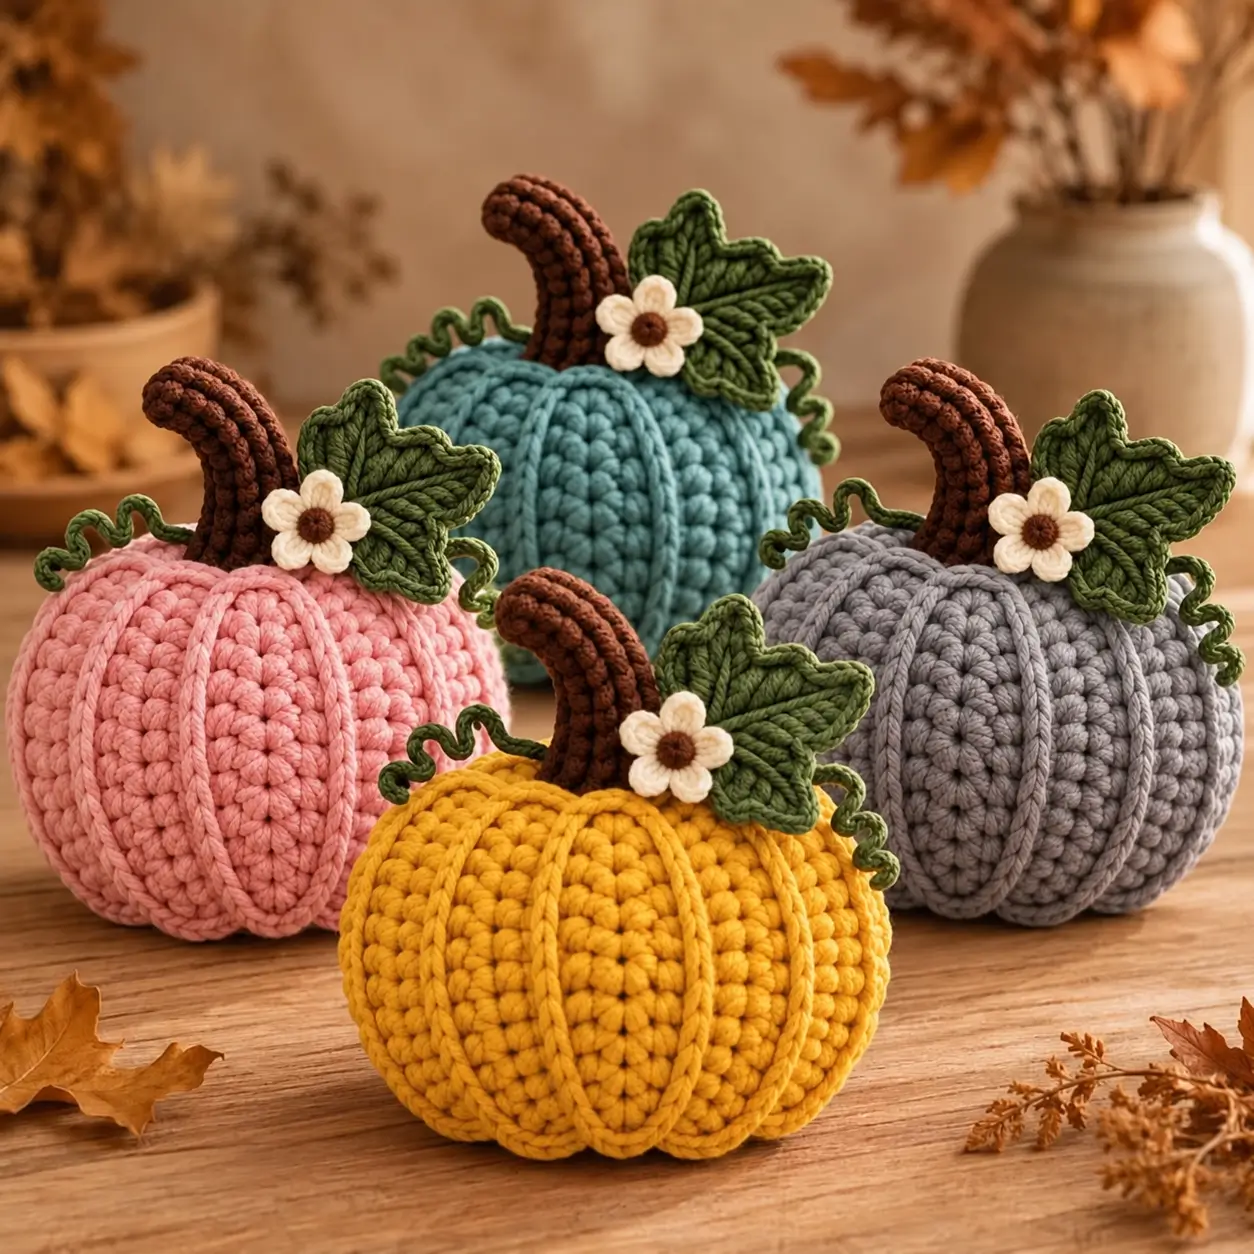
Four pumpkin colors share the same oversized brown stem, five-lobed leaf and tiny cream flower, so the topper rather than the body color identifies this coordinated set. This chunky crochet pumpkin pattern uses super-bulky yarn, a 9 mm hook, eight pronounced ribs, a curved stem, green vine and botanical decorations. The finished pumpkin targets approximately 18–21 cm across. Make one for autumn décor or repeat the construction in several muted colors.
The Design: What Makes These Chunky Pumpkins Different
The body is a compact stuffed sphere that is divided into eight lobes after closing. External shaping creates deeper channels than color or surface texture alone, which is particularly important with thick yarn.
The topper combines three recognizable elements: a curved brown stalk, a broad green leaf and a small cream flower. Curly vines fill the remaining space without covering the body. This gives the ribbed crochet pumpkin a detailed top while leaving most of its silhouette visible.
The four-color arrangement also demonstrates how one construction can form a coordinated crochet pumpkin set. Mustard, blush, teal and gray change the appearance without altering stitch counts. A frequent mistake is stuffing too firmly before segmentation. A rigid body resists compression, leaving shallow grooves instead of the rounded ribs shown in the reference.
Project Info at a Glance
| Skill Level | Time | Finished Size | Hook | Best For |
|---|---|---|---|---|
| Intermediate | 3–5 hours each | Approx. 18–21 cm wide | 9 mm body / 5 mm details | Autumn tables, shelves and centerpiece sets |
The finished measurement is a design target for this photo-inspired construction. Published #6 super-bulky pumpkin patterns vary substantially in finished dimensions. Yarn, hook, stuffing and shaping tension will change the final size.
Materials and Tools
Yarn for One Pumpkin
- Main color: #6 super-bulky yarn — approximately 100–130 g
- Chocolate brown: #4 worsted yarn — approximately 20–25 g
- Olive green: #4 worsted yarn — approximately 25–30 g
- Cream: #4 worsted yarn — approximately 5 g
- Dark brown: small quantity for the flower center
- Strong matching yarn: approximately 4–5 m for shaping the ribs
Published chunky pumpkin patterns use #6 super-bulky yarn with 9 mm hooks. One three-size pattern lists 53 yards for a small pumpkin, 64 yards for medium and 141 yards for large, demonstrating how quickly yarn requirements change with size.
Suggested Body Colors
- Mustard yellow — Pumpkin 1
- Blush pink — Pumpkin 2
- Muted teal — Pumpkin 3
- Soft gray — Pumpkin 4
Tools
- 9 mm crochet hook for the pumpkin body
- 5 mm crochet hook for stem, leaf, flower and vine
- Polyester fiberfill — approximately 150–220 g per pumpkin
- Long upholstery or doll needle
- Tapestry needle
- Locking stitch marker
- Scissors
- Measuring tape
Abbreviations
- MR — magic ring
- sc — single crochet
- hdc — half double crochet
- dc — double crochet
- tr — treble crochet
- inc — increase
- dec — invisible decrease
- sl st — slip stitch
- ch — chain
- BLO — back loop only
- FLO — front loop only
- sts — stitches
Work an invisible decrease through the front loops of the next two stitches before completing one single crochet. This reduces large gaps while closing the stuffed pumpkin.
Chunky Crochet Pumpkin Pattern
The following instructions form an original photo-inspired construction. Work the body in a continuous spiral. The decorative stem, flower, leaf and vine are made separately and attached after the pumpkin has been segmented.
Chunky Pumpkin Body — Make 1 Per Pumpkin
Yarn: #6 super-bulky in mustard, blush, teal or gray.
R1: 6 sc in MR. (6)
R2: Inc ×6. (12)
R3: (1 sc, inc) ×6. (18)
R4: (2 sc, inc) ×6. (24)
R5: (3 sc, inc) ×6. (30)
R6: (4 sc, inc) ×6. (36)
R7: (5 sc, inc) ×6. (42)
R8: Sc around. (42)
R9: Sc around. (42)
R10: Sc around. (42)
R11: Sc around. (42)
R12: Sc around. (42)
R13: Sc around. (42)
R14: Sc around. (42)
R15: Sc around. (42)
R16: Sc around. (42)
R17: Sc around. (42)
R18: Sc around. (42)
R19: (5 sc, dec) ×6. (36)
R20: (4 sc, dec) ×6. (30)
R21: (3 sc, dec) ×6. (24)
Begin stuffing. Place small portions around the outside first rather than filling the center immediately.
R22: (2 sc, dec) ×6. (18)
R23: (1 sc, dec) ×6. (12)
Add the final stuffing. The body needs to hold its shape but still compress under firm pressure.
R24: Dec ×6. (6)
Fasten off with a 30 cm tail. Pass the tail through the remaining six front loops and pull the opening closed.
Shaping the Eight Pumpkin Ribs
The body should resemble a slightly flattened ball before segmentation.
Cut approximately 3 m of strong yarn in a color matching the pumpkin.
Thread the yarn onto a long upholstery needle.
Insert the needle through the bottom center and bring it out through the top center.
Carry the yarn down the outside of the pumpkin. Insert the needle through the bottom center again and bring it back through the top.
Pull until a shallow groove appears.
Repeat this process at approximately equal intervals until the body is divided into eight sections.
Establish every groove before tightening any single section to its final depth.
Make a second pass around the pumpkin and gradually increase the tension. The yarn should sink between the lobes without cutting through the crochet fabric.
Secure the shaping strand at the bottom center and bury the tail inside the stuffing.
Optional Raised Rib Detail
The photographed pumpkins show narrow raised lines along the deepest segment divisions. Add this detail after the main shaping is complete.
Join matching yarn at the bottom center.
Surface slip stitch along one groove toward the top center.
Fasten off.
Repeat along all eight grooves.
Keep the surface stitches loose. Tight slip stitches shorten the outside of the pumpkin and can distort the body.
Curved Brown Stem
Yarn: chocolate brown worsted. Use the 5 mm hook.
R1: 6 sc in MR. (6)
R2: Inc ×6. (12)
R3: BLO sc around. (12)
R4: Sc around. (12)
R5: Sc around. (12)
R6: Sc around. (12)
R7: 8 sc, 4 sl st. (12)
R8: 8 sc, 4 sl st. (12)
R9: Sc around. (12)
R10: 7 sc, 5 sl st. (12)
R11: 7 sc, 5 sl st. (12)
R12: Sc around. (12)
R13: (1 sc, dec) ×4. (8)
R14: 5 sc, 3 sl st. (8)
R15: 5 sc, 3 sl st. (8)
R16: Sc around. (8)
R17: Dec ×4. (4)
Fasten off and close the upper opening.
Stuff the lower half lightly. Leave the curved upper section almost unstuffed so the stalk can bend naturally.
Leave a 30 cm tail at the base for attachment.
Five-Lobed Green Pumpkin Leaf — Make 1
Yarn: olive green worsted.
The reference leaf is broader and more angular than a simple oval pumpkin leaf, so this version uses five points.
Ch 7.
Center lobe: Starting in second ch from hook, work sl st, sc, hdc, dc, tr, tr.
Ch 4.
First side lobe: Starting in second ch, work sc, hdc, dc. Sl st into the side of the center lobe.
Ch 5.
Second side lobe: Starting in second ch, work sc, hdc, dc, tr. Sl st into the leaf base.
Repeat the two side lobes on the opposite side of the center lobe.
Work one round of sc around the complete outer edge.
At the tip of each lobe work (sc, ch 2, sc).
Fasten off with a 30 cm sewing tail.
Leaf Veins
Join olive yarn at the base of the leaf.
Surface slip stitch toward the tip of the center lobe.
Add one branch from the center line toward each side lobe.
Repeat until all five points have a visible vein.
Do not pull the surface stitches tightly. The leaf should remain broad and nearly flat.
Cream Five-Petal Flower — Make 1
Yarn: cream with dark-brown center.
With dark brown:
R1: 5 sc in MR. (5)
Change to cream.
R2: In each stitch work (sl st, ch 3, 2 dc, ch 3, sl st). (5 petals)
Fasten off with a 20 cm tail.
Shape the petals into rounded ovals rather than stretching them into points.
Large Curly Green Vine — Make 1
Yarn: olive green.
Ch 28.
Starting in the second chain from the hook, work 3 sc in every chain.
The repeated increases force the strip to curl into a spiral.
Fasten off with a 20 cm tail.
A published pumpkin topper pattern uses the same principle: multiple stitches are placed into each foundation chain to make the vine curl.
Short Curly Vine — Make 1
Ch 18.
Starting in the second chain, work 3 sc into every chain.
Fasten off with a 20 cm tail.
Use this shorter spiral on the opposite side of the leaf if the top arrangement needs additional balance.
Positioning the Stem
Find the top center where all eight shaping grooves converge.
Position the stem so the broad base covers this meeting point.
The stalk should lean slightly toward one side rather than standing vertically. Rotate it until the crocheted curve is visible from the intended front.
Thread the long brown tail through a tapestry needle.
Sew around the complete base, passing through both the stem and several body stitches.
Make a second attachment pass before knotting the yarn and burying the tail.
Positioning the Large Leaf
Place the green leaf against one side of the stem base.
In the reference, the leaf extends outward horizontally enough that its individual lobes remain visible.
Sew the lower third of the leaf to the pumpkin.
Add one hidden attachment stitch near the center vein if necessary.
Leave the outer half of each lobe free from the body. Sewing every edge down removes the raised botanical appearance.
Adding the Cream Flower
Place the cream flower between the brown stem and green leaf.
The flower should cover part of the seam without hiding the entire leaf base.
Sew through the brown center several times.
Add one small stitch through the base of two opposite petals if the flower rotates.
Leave the remaining petal edges free.
Positioning the Curly Vines
Place one spiral on each side of the stem-and-leaf arrangement.
Attach the first 2–3 cm of each vine near the top of the pumpkin.
Leave most of the spiral unattached so the curls project away from the body.
If the vine hangs too far down one rib, tack one additional curl approximately halfway along its length.
Avoid attaching every loop. The spiral needs some movement to remain visually distinct from the pumpkin ribs.
Making the Four-Color Pumpkin Set
Repeat the same body instructions four times using mustard, blush pink, muted teal and soft gray.
Keep the brown stem, olive leaf and cream flower consistent across all four pumpkins. Repeating those topper colors makes the separate body colors read as one coordinated collection.
For matching sizes, use the same yarn line and hook for every body.
Weigh the remaining yarn after completing the first pumpkin. That measurement gives a more reliable estimate for the other three than relying on skein size alone.
If the four pumpkins will be displayed together, vary the stem curves slightly rather than making every stalk point in exactly the same direction.
Changing the Pumpkin Size
The large version reaches a 42-stitch plateau:
6 → 12 → 18 → 24 → 30 → 36 → 42.
For a smaller pumpkin, stop at 30 stitches and work approximately seven plateau rounds before decreasing.
For a medium pumpkin, stop at 36 stitches and work approximately nine plateau rounds.
For the large version, use the complete 42-stitch sequence and approximately eleven plateau rounds.
Keep the increase and decrease progression symmetrical. Randomly adding rounds to only one end changes the center of the body and can produce a pear-shaped pumpkin.
Adjusting the Pumpkin Height
Width is controlled mainly by the maximum stitch count. Height is controlled by the number of straight rounds between the increase and decrease sections.
Remove two plateau rounds for a flatter pumpkin.
Add two rounds for a taller body.
Make adjustments in pairs where possible. This keeps the widest part near the vertical center.
The reference pumpkins are noticeably wider than they are tall, so avoid adding enough straight rounds to create a near-spherical body.
Assembly
- Crochet the pumpkin body through R24, stuff it evenly, close the final six stitches, and massage the fiberfill into a low rounded shape.
- Mark eight approximately equal positions and use a long matching strand to create the deep external ribs.
- Add optional surface slip stitches along the grooves if a raised rib line matching the reference is desired.
- Crochet the brown stem, lightly stuff its lower section, shape the curve, and sew it over the top-center opening.
- Make the five-lobed green leaf, add the raised veins, and attach only its lower third beside the stem.
- Crochet the cream five-petal flower and sew its brown center between the stem and leaf.
- Make the long green spiral vine and attach its base near one side of the topper.
- Add the shorter spiral on the opposite side and tack only enough of each vine to control its position.
- Inspect all eight ribs and retighten any groove that became shallow while the topper was attached.
- Bury every yarn tail inside the body, flatten the bottom by hand, and adjust the stem, leaf and vines before display.
The finished pumpkin should have eight rounded lobes, a clearly curved brown stem, one broad green leaf, one cream flower and visible spiral tendrils.
Creating Deep, Even Pumpkin Ribs
External shaping works only when the body remains compressible.
After stuffing, press the top toward the bottom. The pumpkin should compress several centimeters without feeling rigid.
Use temporary stitch markers to divide the circumference into quarters first. Add another marker halfway between each pair, producing eight reference points.
Form shallow grooves at all eight positions.
Once the spacing is correct, tighten each strand in sequence.
Do not pull one groove to full depth before forming the next. That shifts stuffing away from the tightened section and makes equal segmentation more difficult.
Keeping the Bottom Flat
A decorative pumpkin needs a stable base. Too much stuffing directly at the bottom center creates a rounded contact point that makes the finished piece rock.
Before closing, move some stuffing away from the lower center and toward the outside wall.
After segmentation, place the pumpkin on a table and press down gently.
If it still rocks, push the bottom center inward with both thumbs while supporting the outer ribs.
The shaping strands running through the center help retain this shallow indentation.
Getting a Clean Stem Curve
The stem uses shorter slip stitches on one side and taller single crochet stitches on the other. Repeating that imbalance causes the tube to bend.
Keep the slip-stitch sections aligned from one shaping round to the next.
If those short sections drift around the circumference, the stem will twist rather than curve in one direction.
For a stronger hook shape, replace one additional single crochet with a slip stitch in R10, R11, R14 and R15.
For a straighter stalk, work those rounds entirely in single crochet.
7 Technical Tips for Chunky Crochet Pumpkins
- Count every 42-stitch plateau round. Super-bulky stitches can hide an accidental increase, and one extra stitch shifts the decrease sequence. Check the count at least every second straight round.
- Leave the stuffed body compressible by approximately 3 cm. A rigid pumpkin cannot form deep segment channels. Remove a small amount of fiberfill before increasing shaping tension if the grooves remain shallow.
- Mark all eight ribs before tightening. A spacing error of only a few centimeters becomes obvious once the lobes project outward. Establish four quarter marks first, then divide each quarter in half.
- Keep surface rib stitches loose. Tight slip stitches shorten the groove from bottom to top and distort the pumpkin. The surface chain should rest against the channel rather than pulling it together.
- Stuff only the lower half of the stem. Dense fiberfill in the final 4–5 cm prevents the stalk from holding its curve. The upper section needs to remain flexible.
- Sew only the lower third of the leaf. Attaching every lobe to the pumpkin removes its raised profile. Leave the outer portions free and use one hidden center stitch only when additional control is required.
- Attach spiral vines at two points or fewer. Sewing every curl flat converts the vine into a textured strip. Anchor the base and, if required, one middle loop while leaving the remaining spiral free.
Yarn and Hook Selection
Super-bulky yarn produces the large rounded stitches visible in this style of pumpkin. Published chunky patterns provide useful benchmarks: The Unraveled Mitten specifies #6 yarn and a 9 mm hook for three sizes, while another wide-ribbed pumpkin pattern also uses super-bulky yarn with a 9 mm hook.
A published 13-inch-circumference pumpkin uses approximately 30 yards of #6 yarn. Another pattern lists 53, 64 and 141 yards across three sizes. These differences show why yarn quantities should be treated as construction-specific rather than universal.
If substituting bulky #5 yarn, reduce the hook until the fabric is dense enough to conceal the stuffing. Expect the finished pumpkin to be smaller unless the stitch count is changed.
Leaf and Vine Construction
Pumpkin toppers frequently use separately crocheted leaves and spiral vines. A published stem, leaf and vine pattern uses worsted-weight yarn with a 5 mm hook and constructs its leaf by working along both sides of a foundation chain.
The same source creates its vine by chaining 15 and placing three single crochets into each chain for most of the length. Crowding several stitches into one chain forces the strip to curl.
This photo-inspired version uses that established curling principle but lengthens the foundation chain to suit the larger pumpkin.
Color Planning for a Four-Pumpkin Collection
Choose body colors with similar saturation if the pumpkins will be displayed together. The photographed palette combines mustard yellow, blush pink, muted blue-green and soft gray rather than four equally intense colors.
Repeat the same brown stem on every pumpkin. Do the same with the olive foliage and cream flowers.
That repetition creates visual continuity while allowing each pumpkin body to remain distinct.
For a warmer collection, replace teal and gray with terracotta and cream. A cooler arrangement can use sage, dusty blue, lavender and pale gray.
The pattern construction remains unchanged.
Alternative Topper Arrangements
The stem, leaf, flower and vine do not have to occupy identical positions on every pumpkin.
Place the leaf to the right of the stem on the first pumpkin and to the left on the second.
Allow the long vine to fall toward the front on one version and toward the side on another.
Rotate the curved stems slightly so the collection does not appear mechanically repeated.
Keep the cream flower close to the stem base in every arrangement. Repeating that small focal point ties the variations together.
Finishing
Place the completed pumpkin on a flat table and inspect all eight lobes from above. Each segment should occupy approximately the same portion of the circumference.
Check the stem attachment next. The base should remain fixed when the upper stalk is gently moved.
Lift each leaf lobe and confirm that the sewing stitches are concentrated near the base.
Inspect the flower center from the front. It should cover the transition between the brown stem and green leaf without hiding either component.
Finally, reshape the spiral vines with your fingers and press the pumpkin base flat. No wet blocking is required for the stuffed body.
Conclusion
This design combines an oversized 42-stitch body, eight shaped ribs, a curved brown stem, five-lobed green leaf, cream flower and spiral vines in one repeatable autumn project. Crochet and segment the first body before making all four toppers; its actual size determines the best scale for the leaf and stem. Once that sample is balanced, repeat it in mustard, blush, teal and gray for the coordinated set. Save this chunky crochet pumpkin pattern to Pinterest or share the finished collection on Instagram with #BotanicalChunkyPumpkins. For this exact four-pumpkin palette, which body color would you place at the front of the display: mustard, pink, teal or gray? “`1









