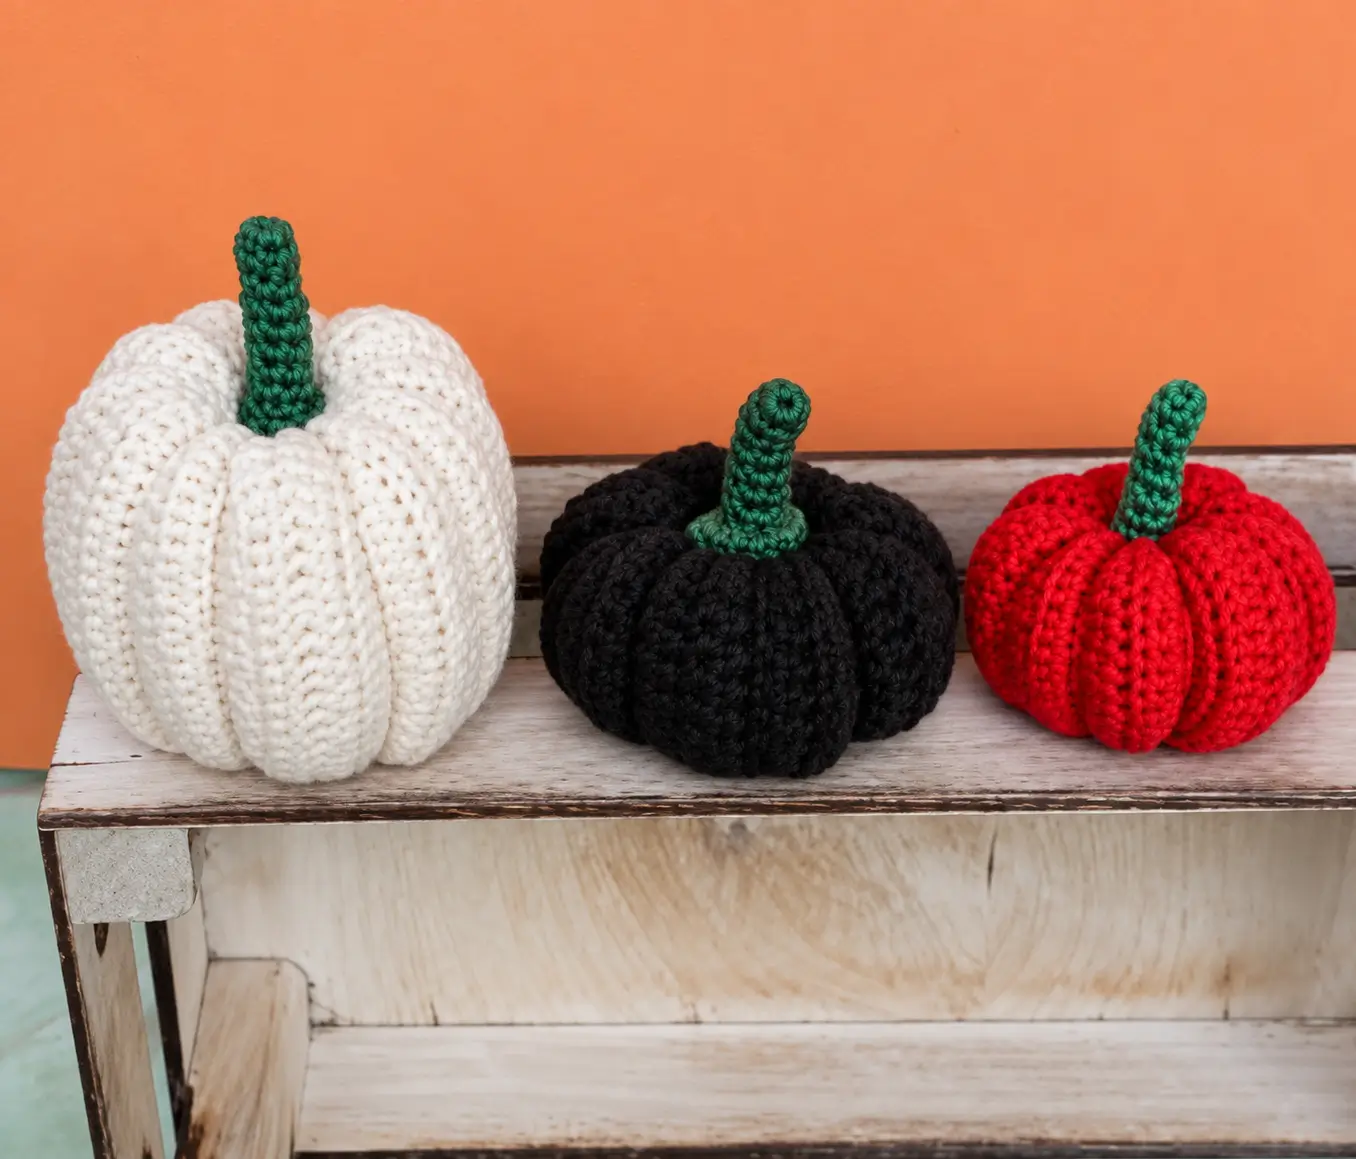
These pumpkins get their shape from deep vertical ribs rather than complicated colorwork. This free crochet pumpkin pattern makes three coordinating sizes in white, black and red, each finished with a narrow green stem. The project uses worsted-weight yarn, a 4 mm hook and firm stuffing. Make one size or work the complete set for Halloween, autumn table displays and shelf decorations.
What Makes These Crochet Pumpkins Different
The photograph shows three distinct proportions rather than one pumpkin repeated at different scales. The white pumpkin is tall and substantial, the black version is broad and low, and the red pumpkin is smaller with a conventional rounded profile. Those differences matter. Changing only the stitch count would enlarge or reduce every dimension equally, while changing the number of plain rounds controls height independently.
Each crochet pumpkin also has pronounced vertical grooves. The body is crocheted as a smooth stuffed form first, then long strands are pulled from top to bottom to divide it into six sections. This produces cleaner ribs than trying to build every groove directly into the stitch pattern.
The main failure point is sculpting tension. Pull one strand much tighter than the others and the pumpkin tilts, flattens or develops sections of unequal width.
Project Info at a Glance
| Version | Skill Level | Approx. Size | Hook | Yarn |
|---|---|---|---|---|
| Small Red | Beginner+ | 10–12 cm wide | 4 mm | Worsted #4 |
| Medium Black | Beginner+ | 14–16 cm wide | 4 mm | Worsted #4 |
| Large White | Beginner+ | 18–21 cm wide | 4 mm | Worsted #4 |
Finished measurements depend on yarn, hook, stuffing density and sculpting tension. Treat the dimensions as targets and measure the first completed pumpkin before batch-making additional pieces.
Materials and Tools
Yarn
- White — worsted-weight #4 — approximately 100–130 g for the large pumpkin.
- Black — worsted-weight #4 — approximately 70–90 g for the medium pumpkin.
- Red — worsted-weight #4 — approximately 40–60 g for the small pumpkin.
- Green — worsted-weight #4 — approximately 5–10 g per stem.
Tools
- 4 mm crochet hook
- Polyester fiberfill
- Long tapestry needle
- Locking stitch marker
- Scissors
- Optional pins for marking rib positions
Abbreviations
- MR — magic ring
- sc — single crochet
- inc — 2 sc in one stitch
- dec — invisible decrease
- sl st — slip stitch
- ch — chain
- BLO — back loop only
- st/sts — stitch/stitches
An invisible decrease is made through the front loops of the next two stitches before completing them as one single crochet. This keeps the decrease rounds flatter before the pumpkin is sculpted.
Free Crochet Pumpkin Pattern
Work all three pumpkin bodies in continuous spirals. Do not join at the end of each round unless specifically stated. Move the stitch marker to the first stitch of every new round.
Small Red Pumpkin
Yarn: red — worsted weight.
R1: 6 sc in MR (6).
R2: inc ×6 (12).
R3: (sc, inc) ×6 (18).
R4: (2 sc, inc) ×6 (24).
R5: (3 sc, inc) ×6 (30).
R6–R12: sc around (30).
R13: (3 sc, dec) ×6 (24).
R14: (2 sc, dec) ×6 (18).
Begin stuffing. Fill the lower outside edge first, then add fiberfill toward the center.
R15: (sc, dec) ×6 (12).
Add the final stuffing before the opening becomes too narrow.
R16: dec ×6 (6).
Fasten off, leaving a 90–100 cm tail. Thread the tail through the front loops of the remaining six stitches and close the opening.
Medium Black Pumpkin
Yarn: black — worsted weight.
R1: 6 sc in MR (6).
R2: inc ×6 (12).
R3: (sc, inc) ×6 (18).
R4: (2 sc, inc) ×6 (24).
R5: (3 sc, inc) ×6 (30).
R6: (4 sc, inc) ×6 (36).
R7–R14: sc around (36).
R15: (4 sc, dec) ×6 (30).
R16: (3 sc, dec) ×6 (24).
Stuff firmly but keep the body compressible enough for sculpting.
R17: (2 sc, dec) ×6 (18).
R18: (sc, dec) ×6 (12).
Check the stuffing around the outer perimeter. Fill any hollow sections before closing.
R19: dec ×6 (6).
Fasten off, leaving a 110 cm tail for closing and sculpting.
Large White Pumpkin
Yarn: white — worsted weight.
The white pumpkin is taller than the other two. Its additional plain rounds create height without making the base excessively wide.
R1: 6 sc in MR (6).
R2: inc ×6 (12).
R3: (sc, inc) ×6 (18).
R4: (2 sc, inc) ×6 (24).
R5: (3 sc, inc) ×6 (30).
R6: (4 sc, inc) ×6 (36).
R7: (5 sc, inc) ×6 (42).
R8–R19: sc around (42).
R20: (5 sc, dec) ×6 (36).
R21: (4 sc, dec) ×6 (30).
R22: (3 sc, dec) ×6 (24).
Begin stuffing. Use small pieces of fiberfill rather than inserting one large clump.
R23: (2 sc, dec) ×6 (18).
R24: (sc, dec) ×6 (12).
Add the final stuffing. Keep the center slightly softer than the outer sections because the sculpting strands must pass through it several times.
R25: dec ×6 (6).
Fasten off, leaving a 130–150 cm tail.
How to Sculpt the Pumpkin Ribs
The photograph shows approximately six prominent pumpkin sections on each piece. Complete the body before adding these grooves.
Thread the long body-color tail onto a tapestry needle. Insert the needle through the bottom center and bring it out through the exact top center.
Carry the yarn down the outside of the pumpkin. Insert the needle into the bottom center again and bring it back through the top.
Pull gradually until a defined groove appears.
Rotate the pumpkin approximately 60 degrees and repeat. Continue until the body is divided into six approximately equal sections.
Check the pumpkin from directly above before securing the yarn. If one section is noticeably wider, release that sculpting strand slightly and redistribute the spacing.
Make an additional pass through a shallow groove if required. Knot the yarn securely at the top center, where the stem will conceal it.
Green Pumpkin Stem
The reference pumpkins use narrow green stems rather than conventional brown stems. Make the stem longer for the white pumpkin and slightly shorter for the red version.
Small Green Stem
For the red pumpkin.
R1: 6 sc in MR (6).
R2–R7: sc around (6).
Fasten off, leaving a 20 cm sewing tail.
Medium Green Stem
For the black pumpkin.
R1: 6 sc in MR (6).
R2–R9: sc around (6).
Fasten off with a 20 cm tail.
Large Green Stem
For the white pumpkin.
R1: 6 sc in MR (6).
R2–R12: sc around (6).
Fasten off, leaving a 25 cm sewing tail.
Insert a small amount of fiberfill into each stem if the yarn is soft. Do not pack it firmly; an overstuffed six-stitch tube becomes noticeably wider than the stem shown in the reference.
Attaching the Stem
- Complete all six pumpkin grooves before positioning the stem.
- Place the stem directly over the top-center point where the sculpting strands intersect.
- Pin the stem vertically and inspect the pumpkin from the front and both sides.
- Thread the stem tail through the tapestry needle and sew around all six stitches at the stem base.
- Make a second sewing pass around the base if the stem moves more than approximately 5 mm when pushed sideways.
- Pass the remaining yarn through the pumpkin body and bring the needle out several centimeters away from the stem.
- Pull lightly, trim the yarn and allow the cut end to retract inside the pumpkin.
- Redistribute the stuffing by rolling the pumpkin gently between both hands.
- Check that all six ribs have similar depth and correct any shallow section before final display.
- Place the three pumpkins together and adjust the stems so their height differences remain visible.
The finished set should contain one tall white pumpkin, one broad black pumpkin and one compact red pumpkin, each with six sculpted sections and a narrow green stem.
How to Make the Pumpkin Taller or Flatter
The plateau rounds determine much of the final proportion. Keep the maximum stitch count unchanged when modifying height.
For a taller pumpkin, add two to four plain rounds before beginning the decreases. This increases vertical height while retaining approximately the same maximum circumference.
For a flatter pumpkin, remove two or three plain rounds. Stuff the center slightly less firmly, then increase the sculpting tension gradually to draw the top and bottom inward.
Do not add increase rounds merely to make a pumpkin taller. Additional increases change circumference first and can produce an oversized sphere rather than the elongated white form shown in the photograph.
Making Deep Pumpkin Grooves
Deep ribs require a balance between stuffing density and sculpting tension. If the body is packed until completely rigid, the exterior strands must carry excessive tension to produce a visible indentation. That can stretch individual stitches at the top and bottom.
Instead, fill the pumpkin until the surface is smooth but still compressible. Each sculpting strand should sink into the body without exposing fiberfill between stitches.
For the large white pumpkin, a second pass through each groove may be required because the longer body distributes the tension across a greater distance. Keep the second pass directly over the first so the rib remains narrow and defined.
7 Technical Tips for Crochet Pumpkins
- Prevent visible stuffing: If white fiberfill shows between stitches, reduce the hook from 4 mm to 3.5 mm. Do not compensate by pulling every stitch excessively tight, because inconsistent tension distorts the decrease rounds.
- Control stitch-count errors: Count the full plateau round every three rounds. The small, medium and large versions must remain at 30, 36 and 42 stitches respectively until their decrease sections begin.
- Avoid a lopsided base: Spread stuffing into the outer edge before filling the center. A dense central lump can push the magic-ring starting point outward and prevent the pumpkin from sitting level.
- Keep six equal ribs: Mark six positions around the pumpkin before sculpting if visual spacing is difficult. Adjacent grooves should be separated by approximately 60 degrees when viewed from above.
- Prevent excessive flattening: Measure the pumpkin height before sculpting. If tightening the grooves reduces the height by more than approximately 15%, release some tension before securing the yarn.
- Stop the stem leaning: Sew through every stitch around the six-stitch stem base. A stem positioned even 5–8 mm away from the center becomes noticeable on the tall white pumpkin.
- Hide the sculpting tail: After knotting, pass at least 5 cm through the stuffed body before trimming. Cutting immediately beside the knot can allow the yarn end to emerge as the pumpkin is handled.
Color Variations
| Pumpkin | Body Color | Stem | Maximum Stitch Count |
|---|---|---|---|
| Small | Red | Green | 30 sts |
| Medium | Black | Green | 36 sts |
| Large | White | Green | 42 sts |
The white, black and red combination works particularly well for Halloween because it avoids the standard all-orange palette while preserving an obvious pumpkin silhouette. For a conventional autumn version, substitute burnt orange, mustard and cream without changing the stitch counts.
Finishing the Three-Pumpkin Set
Finish the smallest pumpkin first and use it to check hook size, stuffing density and sculpting tension before starting the larger pieces. Record the finished diameter after the ribs are tightened, because sculpting changes both width and height. When all three are complete, position the tall white pumpkin beside the lower black and red versions so their different proportions remain apparent.
This free crochet pumpkin pattern can also be expanded into a larger display by repeating the 30-, 36- and 42-stitch constructions in additional colors. Keep the same green stems for visual continuity, or substitute brown for a traditional autumn palette. Share the finished trio on Pinterest or Instagram with #CrochetPumpkinTrio. Which proportion would you repeat for a larger set: tall white, broad black or compact red?









