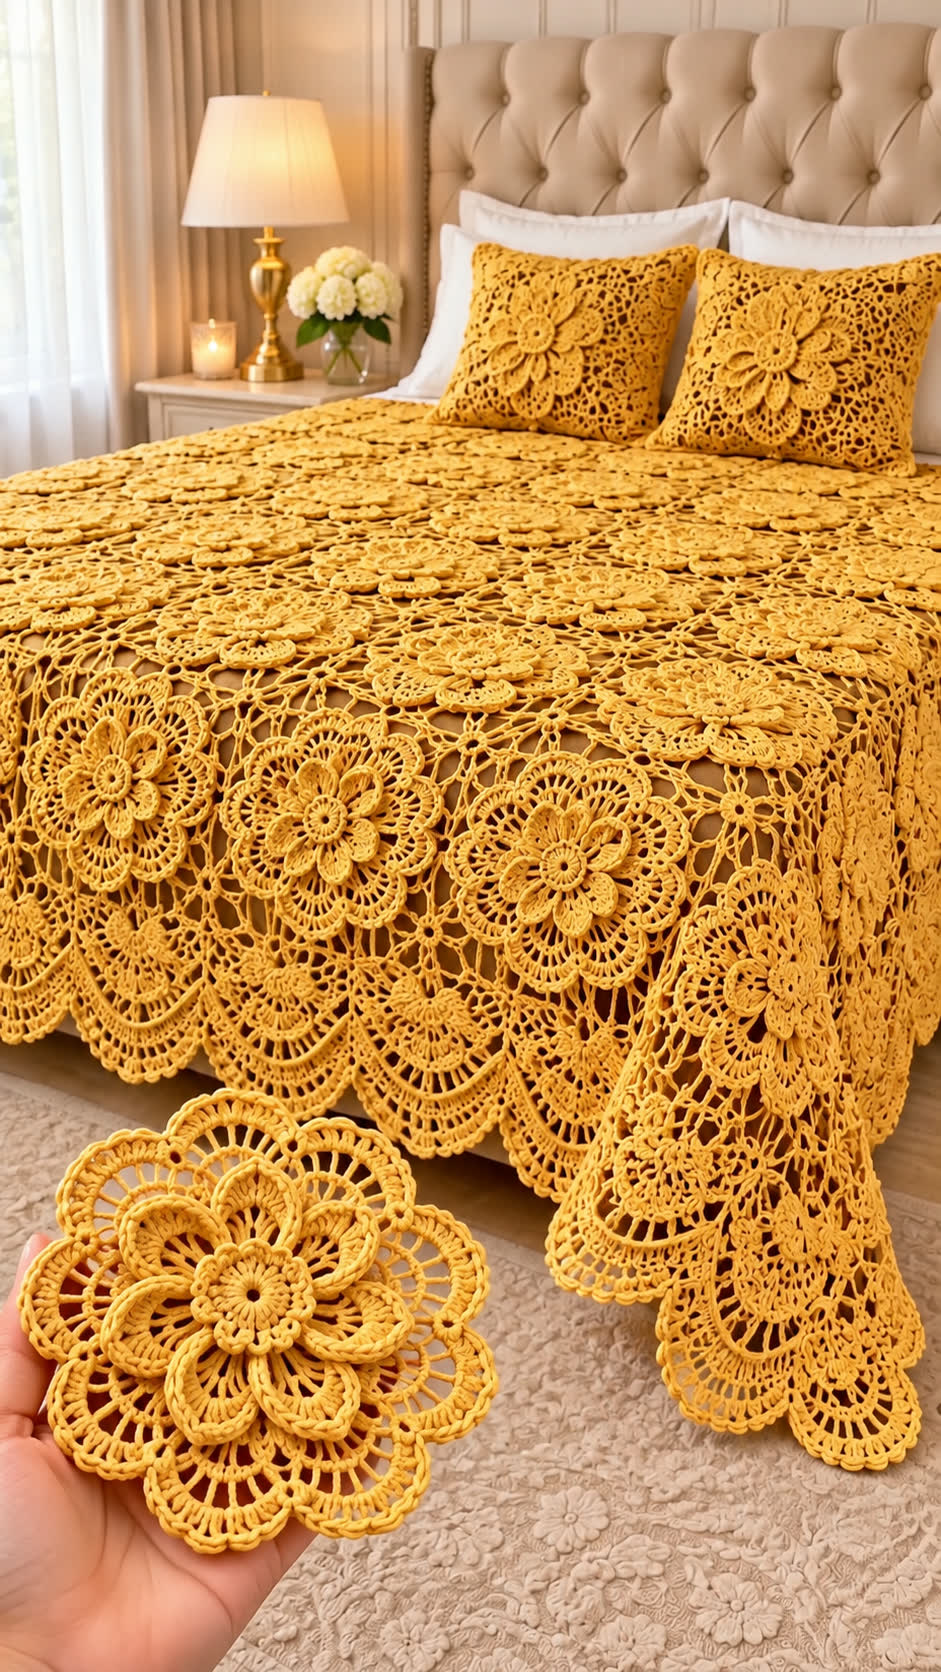
Golden Yellow Floral Crochet Bedspread Pattern with Matching Pillow Covers
Pattern type: Original, photo-inspired reconstruction
Skill level: Intermediate to advanced
Terminology: US crochet terms
Construction: Joined floral lace motifs with applied dimensional flowers
Introduction
The raised flower medallions on this golden yellow bedspread require two different structures: a flat lace foundation and a separate dimensional flower. This floral crochet bedspread pattern combines both using cotton yarn, a 3.5 mm crochet hook, and joined square motifs. Designed for intermediate to advanced crocheters, the project can be resized for different beds. Its modular construction also allows individual sections to be repaired without replacing the entire cover. This pattern is an original interpretation of the photographed design and has not been tested on a physical sample — please crochet one motif first and adjust the stitch counts to your yarn and gauge.
The Design: What Makes This Floral Bedspread Different?
The photographed bedspread uses repeated golden flower medallions surrounded by an interconnected openwork structure. Its distinctive appearance comes from the contrast between raised petals and relatively flat lace.
For this reconstruction, the main design has three components. First, an eight-petal flower is crocheted separately, creating the layered center. Second, a square lace foundation supports the flower and supplies regular joining points. Third, a scalloped crochet border finishes the outer edges without hiding the central motifs.
Separating the flowers from the foundations helps control fabric thickness. Raised flowers need space to retain their shape, while the underlying squares must remain flat enough to join evenly.
A common mistake when making a crochet flower blanket is attaching dimensional flowers before checking the foundation gauge. This can distort the joins. Complete and block the foundation squares first, then sew on the flowers.
Project Information at a Glance
| Feature | Details |
|---|---|
| Project | Floral crochet lace bedspread and two pillow covers |
| Skill level | Intermediate–advanced |
| Estimated time | 100–180 hours, depending on dimensions |
| Target size | Approximately 220 × 240 cm, adjustable |
| Suggested hook | 3.5 mm |
| Suggested yarn | DK cotton, weight category 3 |
| Main color | Golden yellow / mustard |
| Construction | Joined square lace motifs |
| Flower style | Dimensional eight-petal appliqué |
| Terminology | US crochet terms |
These are design targets rather than measurements verified from the photograph. Make a complete sample square and measure it after blocking before calculating the final quantity.
Materials and Tools
Yarn
For a substantial bedspread, use a cotton yarn that holds stitch definition. Mercerized cotton produces a defined lace structure, while a matte cotton yarn gives the flowers a softer outline.
- Golden yellow DK cotton: Main motifs, flower appliqués, joins, and edging. Begin with a sample skein and calculate the total from your measured gauge.
- Matching golden yellow cotton: Reserve additional yarn from the same dye lot for two pillow fronts and finishing.
- Optional deeper mustard cotton: Small amount for contrasting flower centers.
Suitable yarn lines to investigate include DROPS Muskat and other smooth DK cotton yarns. Check the actual meterage and recommended hook range on the selected yarn label.
Tools
- 3.5 mm crochet hook, adjusted after sampling
- Tapestry needle for attaching flowers and weaving tails
- Locking stitch markers for marking corners
- Scissors
- Measuring tape
- Digital kitchen scale for measuring yarn consumption
- Blocking mats and rustproof pins
- Two pillow inserts, approximately 45 × 45 cm if desired
- Optional cotton backing fabric for pillow covers
How Much Yarn Will You Need?
Yarn consumption cannot be determined reliably from a photograph. A densely layered flower uses more yarn than a flat lace motif of the same diameter. The safest method is to make and weigh one complete foundation square, one dimensional flower, and one sample join.
Use the following calculation:
Estimated yarn in grams = (foundation weight + flower weight) × number of motifs + joining and border allowance + pillow yarn.
For example, if a completed square and flower weigh 24 g and the layout requires 120 motifs, the main motifs consume approximately 2,880 g. Add a measured allowance for joining, the border, and pillow covers. This example is not a claim about the photographed bedspread.
Purchase yarn from one dye lot where possible. Color differences become particularly visible across large, single-color lace projects.
Crochet Abbreviations
| Abbreviation | Meaning |
|---|---|
| MR | Magic ring |
| ch | Chain |
| sc | Single crochet |
| hdc | Half double crochet |
| dc | Double crochet |
| tr | Treble crochet |
| sl st | Slip stitch |
| sp | Space |
| st | Stitch |
| rep | Repeat |
| RS | Right side |
| WS | Wrong side |
| BLO | Back loop only |
| FLO | Front loop only |
All rounds in this pattern are joined unless stated otherwise. Beginning chains do not count as stitches unless specifically indicated.
An invisible decrease is made by inserting the hook through the front loops of the next two stitches and completing one single crochet; it is primarily useful for three-dimensional amigurumi rather than the flat lace construction used here.
Golden Yellow Floral Crochet Bedspread Pattern — Step by Step
Important: The following is an original construction method inspired by the photograph. It produces a coordinated floral lace design but has not been physically sample-tested. Work one complete motif and check the shape, stitch counts, and finished dimensions before committing to the full bedspread.
Part 1: Crochet Flower Center (Make One per Motif)
Yarn: Golden yellow DK cotton.
Hook: 3.5 mm.
Method: Joined rounds.
Round 1: Make a magic ring. Ch 1, work 6 sc into the ring. Pull tight and join with a sl st. (6 sc)
Round 2: Ch 1, work 2 sc in each stitch around. Join. (12 sc)
Round 3: Ch 1, work 2 sc in each stitch around. Join. (24 sc)
Round 4: Ch 1, repeat [sc in next 2 stitches, 2 sc in next stitch] eight times. Join. (32 sc)
Round 5: Ch 1, repeat [sc in next 3 stitches, 2 sc in next stitch] eight times. Join. (40 sc)
Fasten off, leaving a 20 cm sewing tail. The flat center will support eight raised petals. Mark every fifth stitch around Round 5 to identify the petal positions.
Part 2: Raised Flower Petals (Make Eight per Flower)
Each petal is crocheted separately and sewn to the center. This avoids crowding the center stitches and allows the petals to overlap slightly.
Row 1: Ch 7. Starting in the second chain from the hook, work sc, hdc, dc, dc, hdc, sc. (6 stitches)
Row 2: Ch 1, turn. Work sc, hdc, 2 dc in each of the next 2 stitches, hdc, sc. (8 stitches)
Row 3: Ch 1, turn. Work sc in each of the next 2 stitches, hdc in each of the next 4 stitches, sc in each of the last 2 stitches. (8 stitches)
Row 4: Ch 1, turn. Work sc in each stitch across. (8 stitches)
Fasten off, leaving a 15 cm tail.
Position the narrow end of each petal against the marked center points. Sew through the first two rows of each petal, leaving the outer ends unattached so they rise above the foundation.
For a more layered appearance, make a second set of eight petals using a smaller hook or fewer rows. Attach the second layer between the petals of the first layer.
Part 3: Square Openwork Lace Foundation
The photographed bedspread contains many floral medallions connected by lace. This reconstruction uses a square foundation to make alignment and sizing easier.
Round 1: Make a magic ring. Ch 1, work 6 sc into the ring. Join. (6 sc)
Round 2: Ch 1, work 2 sc in each stitch. Join. (12 sc)
Round 3: Ch 1, work 2 sc in each stitch. Join. (24 sc)
Round 4: Ch 1, repeat [sc in next 3 stitches, 2 sc in next stitch] six times. Join. (30 sc)
Round 5: Ch 1, repeat [sc in next 4 stitches, 2 sc in next stitch] six times. Join. (36 sc)
Round 6: Ch 1, repeat [sc in next 5 stitches, 2 sc in next stitch] six times. Join. (42 sc)
Round 7: Ch 1, work sc in each stitch around. Join. (42 sc)
Round 7 establishes a stable circular center. The square shaping begins in the next round.
Round 8: Ch 1, sc in the first 5 stitches, then work [sc, ch 2, sc] in the next stitch. Repeat the following sequence three times: sc in the next 9 stitches, [sc, ch 2, sc] in the next stitch. Sc in the remaining 7 stitches and join.
This creates four ch-2 corner spaces. Count the stitches and confirm that each corner lies at a regular interval before proceeding.
Round 9: Sl st to the first corner space. Work [3 dc, ch 2, 3 dc] into the corner. Work ch 2, skip 3 stitches, sc in the next stitch repeatedly toward the next corner, adjusting the final chain space to fit. Repeat the corner treatment around the square. Join.
Round 10: Work [3 dc, ch 2, 3 dc] into each corner space. Along each side, work alternating ch-3 spaces and sc anchors into the previous round’s chain spaces. Join.
Round 11: Work sc evenly around the square, placing [sc, ch 2, sc] into each corner. Maintain an equal number of anchors on opposite sides. Join.
Round 12: Repeat the openwork arrangement from Round 10, maintaining four corners and equal side spacing. Fasten off with a 20 cm tail.
Rounds 9–12 are adaptable lace shaping instructions, not fixed-count tested rounds. If the square cups, ruffles, or develops uneven sides, revise the anchor spacing on the sample before repeating the motif.
Part 4: Attach the Dimensional Flower
Place the completed flower over the circular center of the lace square. Align the flower center with the foundation center.
- Thread the sewing tail through a tapestry needle.
- Stitch through the back of the flower center and the corresponding foundation stitches.
- Secure the center with several evenly spaced stitches.
- Leave the outer petals free.
- Weave the tail into the wrong side of the foundation.
The flower should remain centered when the square is lifted. If the foundation curls upward, the attachment stitches are too tight.
Part 5: Make the Bedspread Motifs
Complete one full motif, including the raised flower. Block it, allow it to dry, and record its width and height.
For a target bedspread measuring approximately 220 × 240 cm, divide each target dimension by the corresponding blocked motif dimension. Round the results to whole motifs and account separately for the border.
For example, if a joined motif contributes 20 cm to the width and length, an 11 × 12 layout produces a central panel of approximately 220 × 240 cm before the outer border. That arrangement requires 132 foundation squares and 132 flowers.
This is an illustrative calculation. Your actual layout may use fewer or more motifs depending on the gauge and the desired drop over the bed.
Part 6: Join the Crochet Motifs
Arrange the completed squares on a clean, flat surface. Keep all flowers facing upward and align the corner spaces.
For a sewn join, place two squares with right sides together. Thread a tapestry needle with matching yarn and sew through corresponding edge stitches, using a loose whip stitch. Avoid pulling the seam shorter than the motif edge.
Alternatively, use a join-as-you-go method. On the final lace round of a new motif, replace selected free chain spaces with slip-stitch connections to the corresponding chain spaces of the neighboring motif.
Whichever method you choose, test a two-by-two arrangement before joining the full panel. The four-way intersection should lie flat, and the diagonal openings should remain symmetrical.
Join squares into horizontal rows first. Connect the completed rows afterward, checking the dimensions after every second row.
Part 7: Decorative Scalloped Crochet Border
The photographed bedspread has a deep, ornate border with repeating fan-shaped sections. The following border is a simpler photo-inspired variation that can be expanded to create a deeper drop.
Border Round 1: Attach yarn at an outer corner. Work sc evenly around the assembled bedspread, placing additional stitches where needed to keep the corners flat. Join.
Border Round 2: Ch 1, sc in the first stitch. Repeat [ch 5, skip 3 stitches, sc in the next stitch] around. Adjust the final repeat at each corner to maintain even spacing. Join.
Border Round 3: Sl st into the first ch-5 space. Work [sc, hdc, 5 dc, hdc, sc] in each ch-5 space around. Join.
Border Round 4: Work sc evenly across the shell edges, adding a ch-3 picot at the center of each shell. Join and fasten off.
For a deeper lace edge, add one or more openwork rounds before the shell round. Make a sample section first because the extra rounds can alter the drape and corner geometry.
Block the border with the scallops evenly spaced. Avoid stretching the chain arches beyond the dimensions established by the sample.
Matching Golden Yellow Crochet Pillow Covers
The two pillows in the photograph repeat the same flower-and-lace arrangement on a smaller rectangular surface. Their visual consistency comes from using the same yarn, motif proportions, and raised petal structure.
Step 1: Measure the Pillow Inserts
For a 45 × 45 cm insert, plan a front panel close to the insert dimensions. A slightly smaller cover can produce a fuller pillow, but openwork lace should not be stretched excessively.
Step 2: Crochet the Pillow Front
Make enough square foundations to cover the required width and height. Arrange the squares with the dimensional flowers facing outward.
Join the motifs using the same technique as the bedspread. Measure the panel after blocking.
Step 3: Add a Backing
Cut a cotton fabric backing to the desired finished dimensions, including seam allowance. An envelope-style closure allows the pillow insert to be removed for cleaning.
For a fully crocheted cover, make a second flat panel without raised flowers and join three sides before adding a button or envelope closure.
Step 4: Finish the Edges
Work one round of sc around the crochet front if needed to stabilize the perimeter. Sew the crochet panel to the backing without pulling the lace out of shape.
Insert the pillow and check that the flower centers remain centered on the visible surface. Repeat for the second pillow.
Assembly: 10 Steps for a Consistent Finish
- Complete the sample: Crochet one foundation square, one flower center, and eight petals.
- Check the gauge: Block the sample and measure its finished dimensions.
- Calculate the layout: Determine the number of motifs needed for the bedspread and two pillows.
- Make the foundations: Crochet the required number of lace squares and sort them by size.
- Prepare the flowers: Crochet all centers and petals, keeping the petal dimensions consistent.
- Attach the flowers: Sew each flower to its foundation center, leaving the outer petals free.
- Arrange the panel: Place the motifs in rows and check the overall dimensions.
- Join the motifs: Connect the squares using the selected sewing or join-as-you-go technique.
- Add finishing details: Crochet the scalloped border and assemble the matching pillow covers.
- Block and inspect: Weave in all yarn ends, block the completed pieces, and check every join.
The completed project consists of a joined floral lace bedspread and two coordinated decorative pillow covers.
7 Technical Tips for Better Crochet Lace
- Mark every corner. Place a locking stitch marker in each ch-2 corner space; an unmarked corner can shift the square shaping by one stitch and produce unequal sides.
- Check the blocked gauge. Measure at least three points across the sample; a difference greater than 5 mm between corresponding sides indicates that the foundation needs adjustment.
- Control flower attachment tension. If the foundation puckers beneath a flower, loosen the sewing stitches and distribute them over a wider area.
- Maintain consistent yarn tension. A sudden change in hook tension can alter the length of ch-5 arches, creating irregular openings in the lace.
- Pin before joining. Use at least four corner pins on each sample square when comparing dimensions; joining unblocked motifs can create diagonal distortion.
- Protect the petal shape. Attach only the inner portion of each raised petal; sewing the entire petal flat removes the dimensional effect.
- Secure the yarn tails. Weave each tail through several neighboring stitches and reverse direction once; a short, single-direction tail may work loose during washing.
How to Adjust the Bedspread for Different Bed Sizes
The modular construction allows the project to be adapted without rewriting the flower pattern. The main requirement is an accurate measurement of the joined motif, rather than the isolated square.
| Bed Type | Example Target Cover Size |
|---|---|
| Single | 150 × 220 cm |
| Double | 200 × 230 cm |
| Queen | 220 × 240 cm |
| King | 260 × 260 cm |
These are example project dimensions, not universal bedding standards. Measure the mattress width, mattress length, and desired drop before selecting a target size.
If the joined motif contributes 18 cm per side, divide the target width and length by 18. Round to the nearest practical whole-number layout. Add or subtract border width to refine the final measurement.
A large bedspread can become heavy when made from cotton. Consider the finished weight as well as the dimensions, particularly if the bedspread will be used as a daily cover rather than a decorative layer.
Washing, Blocking, and Care
Follow the washing instructions supplied with the chosen yarn. Test the care method on the sample motif before washing the completed project.
For cotton lace that permits wet washing, use a gentle detergent and avoid aggressive twisting. Support the fabric when lifting it from water because a wet bedspread can be considerably heavier than a dry one.
Lay the bedspread flat to dry, arranging the flower medallions and scalloped border into their intended positions. Do not hang a heavy wet lace bedspread from a narrow line; the weight may stretch the openwork joins.
If the flowers flatten during storage, reshape the petals while the fabric is slightly damp. Keep direct heat away from the yarn unless its care label specifically permits ironing or steaming.
Frequently Asked Questions
Is this the exact pattern shown in the photograph?
No. The instructions are an original reconstruction based on visible design elements. The original stitch chart, yarn specification, and motif counts are not available from the photograph.
Can beginners make this floral crochet bedspread?
The project is better suited to crocheters who already understand joined rounds, lace chain spaces, gauge measurement, and motif joining. A beginner can practice the individual flower before attempting the complete bedspread.
Which yarn is best for a floral lace bedspread?
Smooth cotton yarn is a practical choice because it displays the openwork stitches clearly. Fine crochet thread produces lighter, more delicate lace, while DK cotton creates larger and heavier motifs.
Can I use a different hook size?
Yes. Changing the hook size affects motif dimensions, yarn consumption, and drape. Make a new sample and recalculate the layout whenever you change the hook or yarn.
How do I stop the crochet flowers from curling?
Check the petal stitch counts, reduce overly tight attachment stitches, and block a sample. Some curvature is intentional in raised petals, but the foundation should remain flat.
Should I join the motifs before adding the flowers?
Either order can work. Attaching flowers to individual squares makes the placement easier to inspect, while joining flat foundations first reduces the bulk handled during assembly.
Can I make the pillow covers without making the bedspread?
Yes. The pillow covers use the same square foundation and dimensional flower. Make a panel to match the chosen insert and attach a suitable backing.
Conclusion
This golden yellow bedspread design depends on consistent motif dimensions, controlled petal attachment, and balanced lace joins. Begin with one complete sample rather than purchasing yarn for the entire project immediately. Measure the blocked foundation, weigh the finished flower, and test a four-motif join before calculating the final layout. Once the measurements are stable, repeat the components for the bedspread and matching pillows.
Save this floral crochet bedspread pattern on Pinterest for project planning, or share photographs of your completed motifs on Instagram using #GoldenFloralBedspread. Record your hook size and blocked gauge alongside the photographs so other makers can compare results. Would you keep all the flower centers golden yellow, or add a darker mustard center to each medallion?









