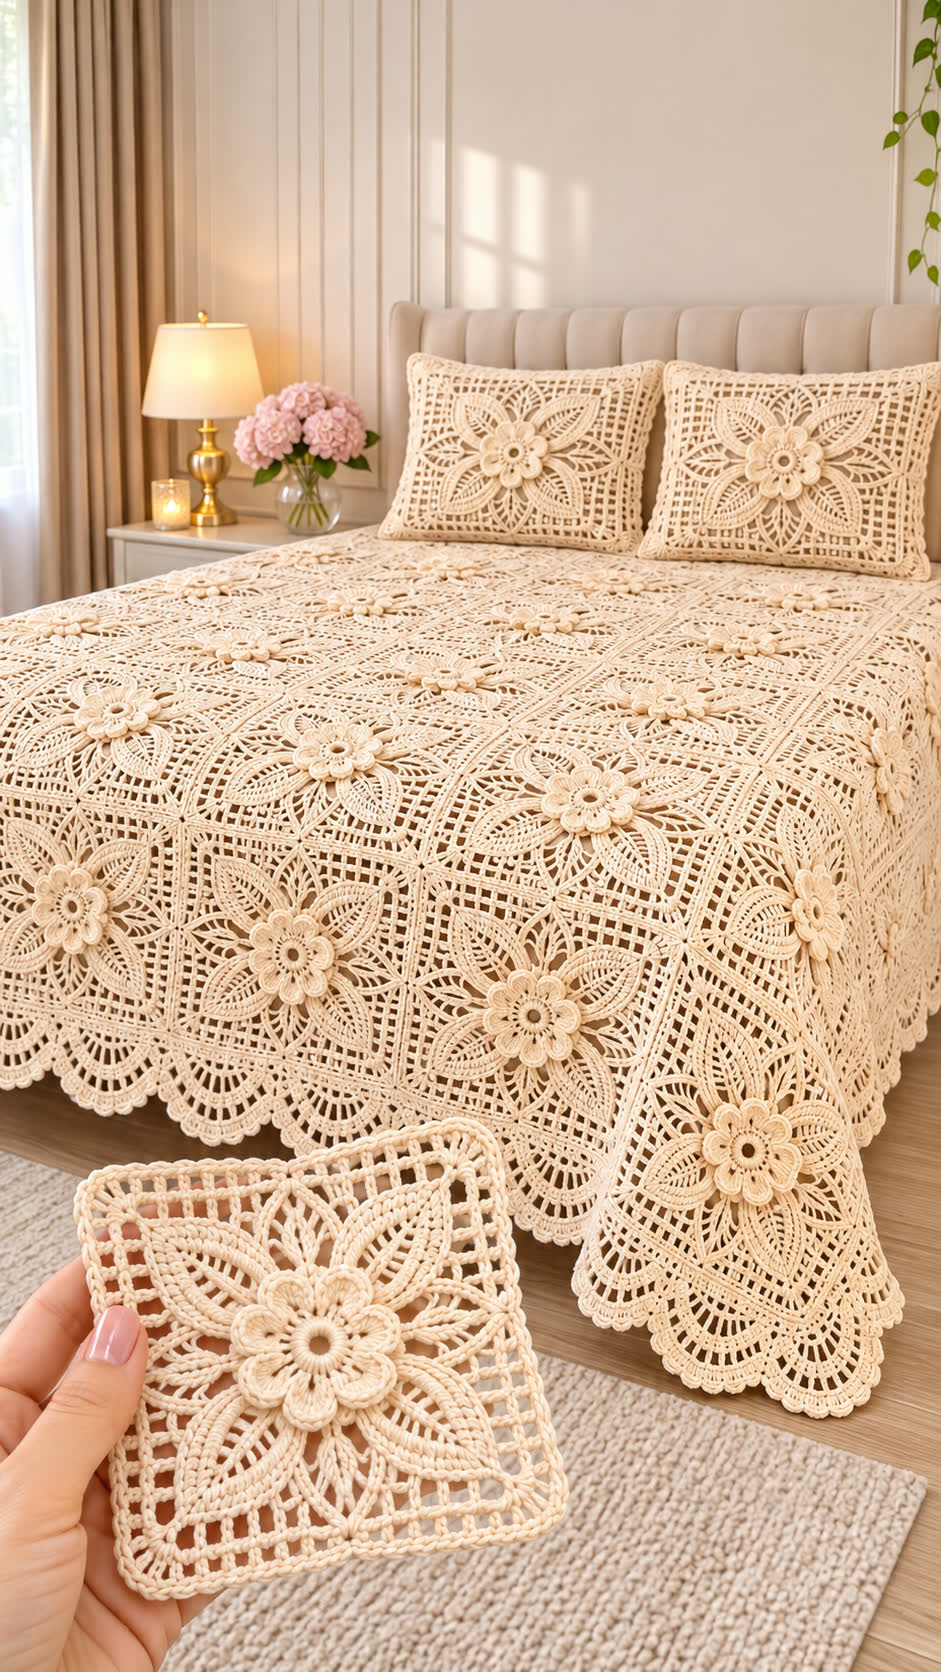
Crochet Flower Bedspread Pattern – Floral Lace Blanket and Matching Pillows
Skill Level: Intermediate to Advanced | Technique: Joined Floral Motifs | Terminology: US Crochet Terms
Introduction
Each raised flower in this ivory bedspread is framed by open lace, creating a repeating pattern of petals and geometric squares. This crochet flower bedspread pattern uses cotton yarn, a 3 mm hook, and joined motifs to produce a decorative bed covering with matching pillow covers. Designed for intermediate crocheters, the project allows you to adjust the dimensions by changing the number of squares while keeping the floral design consistent. This pattern is an original interpretation of the photographed design and has not been tested on a physical sample — please crochet one motif first and adjust the stitch counts to your yarn and gauge.
The Design: What Makes This Floral Bedspread Different
The defining feature of this floral crochet bedspread is the relationship between its raised flower centers and the openwork surrounding them. Instead of using a flat granny-square flower, the design positions dimensional petals above a separate lace foundation. This creates visible relief without adding heavy padding.
The second structural decision is the square framework. Four evenly spaced corners transform the circular flower into a repeatable unit, making it possible to join dozens of motifs into a rectangular crochet lace blanket pattern.
Finally, the scalloped perimeter softens the straight edges of the assembled squares. The border also conceals minor differences between joined motifs.
A common mistake is joining squares before blocking them. Even a small variation in motif width can cause the finished bedspread to ripple, twist, or develop uneven edges.
Project Information at a Glance
| Specification | Details |
|---|---|
| Project | Floral crochet bedspread and two pillow covers |
| Skill Level | Intermediate to Advanced |
| Construction | Joined square motifs |
| Yarn | Fine 4-ply cotton, approximately fingering weight |
| Hook | 3.0 mm, adjustable for gauge |
| Target Square Size | Approximately 18 × 18 cm after blocking |
| Suggested Layout | 12 squares wide × 13 squares long |
| Estimated Bedspread Size | Approximately 226 × 244 cm with a 5 cm border |
| Matching Pillows | Two 45 × 45 cm pillow covers |
| Estimated Time | 80–150 hours, depending on speed |
| Pattern Status | Original image-inspired design; not sample-tested |
Gauge warning: The 18 cm square is a target, not a measured result from a completed sample. Crochet one motif, block it, and measure it before calculating your final bedspread size.
Materials and Tools
Yarn
Choose a smooth cotton yarn that gives clear stitch definition. A single ivory shade closely follows the photographed design.
- Ivory or cream cotton yarn: Fine 4-ply or fingering-weight cotton, approximately 2,500–3,500 g as an initial purchasing estimate for the bedspread and pillow fronts.
- Additional matching cotton: Reserve approximately 200–350 g within your yarn budget for joining, repairs, and decorative borders.
- Suggested yarn types: Mercerized cotton, smooth cotton crochet yarn, or tightly spun cotton suitable for lace.
- Optional contrasting yarn: 25–50 g of beige or pale gold for flower centers if you prefer a two-color variation.
These quantities are estimates rather than verified consumption figures. Weigh a finished motif and calculate the total based on the actual number of squares, then add 10–15% for joining, edging, and variation.
Tools
- 3.0 mm crochet hook, or the size needed for the target gauge.
- 2.5 mm crochet hook for optional firmer flower centers.
- Tapestry needle for joining and weaving in yarn ends.
- Locking stitch markers for identifying corners and joining points.
- Measuring tape for checking motif dimensions.
- Blocking mats and rustproof pins for shaping squares.
- Sharp scissors for trimming yarn ends.
- Two 45 × 45 cm pillow inserts with suitable fabric backing and closure materials.
Crochet Abbreviations
| Abbreviation | Meaning |
|---|---|
| MR | Magic ring |
| ch | Chain |
| sc | Single crochet |
| hdc | Half double crochet |
| dc | Double crochet |
| tr | Treble crochet |
| sl st | Slip stitch |
| sp | Space |
| st | Stitch |
| sk | Skip |
| rep | Repeat |
| BLO | Back loop only |
| RS | Right side |
| WS | Wrong side |
Invisible decreases are primarily used for shaped stuffed crochet pieces and are not required for this flat lace construction.
Pattern – Step by Step
Important: Work the motif in joined rounds unless otherwise specified. Beginning chains count as stitches only where stated. This is an original proposed construction inspired by the reference photograph, not an exact reproduction.
Part 1: Raised Flower Center (Make One per Square)
Yarn: Ivory cotton. Use a 3.0 mm hook.
Round 1: Make a magic ring. Ch 1, work 6 sc into the ring, tighten and join with sl st to the first sc. (6 sc)
Round 2: Ch 1, work 2 sc in each stitch around. Join. (12 sc)
Round 3: Ch 1, work 1 sc in the first stitch and 2 sc in the next stitch. Repeat six times. Join. (18 sc)
Round 4: Ch 1, work 1 sc in each of the next two stitches and 2 sc in the next stitch. Repeat six times. Join. (24 sc)
The center should form a compact circle. Keep the working yarn attached for the first petal layer.
Part 2: Rounded Flower Petals
Work six petals around the central circle.
Round 5: Repeat the following six times: sl st in the next stitch, ch 3, work 3 tr in the same stitch, ch 3, sl st in the same stitch, then sl st in each of the next three stitches.
You should have six raised petal groups, with each petal anchored at one of six evenly spaced stitches around the 24-stitch center.
Fasten off, leaving a 15 cm tail for securing the flower.
Petal adjustment: If the petals overlap too tightly, replace the three treble crochet stitches with three double crochet stitches. If they lie too flat, use a smaller hook for the flower center and the original hook for the petals.
Part 3: Openwork Foundation Behind the Flower
Yarn: Ivory. Attach a new strand behind the flower at one petal anchor.
Round 6: Work 1 sc into the back of a petal anchor, ch 6. Repeat at each of the remaining five anchors, making one sc and one ch-6 span at each anchor. Join to the first sc. (6 sc, 6 ch-6 spaces)
Round 7: Sl st into the first ch-6 space. Work (3 dc, ch 3, 3 dc) in each of the six chain spaces. Join with sl st to the first dc. (36 dc, 6 ch-3 spaces)
Round 8: Sl st into the first ch-3 space. Work (2 sc, ch 5, 2 sc) in each of the six ch-3 spaces. Join. (24 sc, 6 ch-5 spaces)
These rounds create a circular lace frame beneath the flower. Keep the petals positioned on the right side while the foundation remains behind them.
Part 4: Transform the Flower Into a Square
The photograph contains large square lace sections surrounding each central flower. The following rounds create a simplified geometric interpretation.
Round 9: Join yarn into any ch-5 space. Work (3 dc, ch 2, 3 dc) into that space to form corner one. Work 3 dc in the next ch-5 space, then (3 dc, ch 2, 3 dc) in the following space for corner two. Continue around, alternating corner groups and side groups across the six spaces, but do not join this round as a square yet.
Shaping note: Six evenly distributed foundation spaces cannot form four symmetrical corners by the simple alternating method above. For a mathematically balanced square, use the separate four-corner transition below instead of Round 9.
Four-Corner Transition
Attach yarn into one ch-5 space. Work 3 sc in each of the six spaces, joining with a sl st. (18 sc)
Next, ch 1 and work 2 sc in each of the 18 stitches. Join. (36 sc)
Mark four evenly spaced points, each separated by nine stitches.
At each marked point, work (2 dc, ch 2, 2 dc). Between corners, work 1 dc into each of the eight unmarked stitches. Join at the end of the round. (48 dc, 4 ch-2 corner spaces)
You now have a four-corner foundation that can be expanded using standard square-building rounds.
Part 5: Open Lace Square Frame
Frame Round 1: Work (2 dc, ch 2, 2 dc) into each corner space. Along each side, work 1 dc in each existing dc. Join.
Frame Round 2: Work (2 dc, ch 2, 2 dc) in each corner space. Along each side, repeat ch 1, skip 1 stitch, dc in the next stitch. Join.
Frame Round 3: Work the same corner group in each corner space. Along the sides, work dc into each dc and dc into each ch-1 space from the previous round. Join.
Frame Round 4: Work (2 dc, ch 2, 2 dc) in each corner space. Along each side, repeat ch 2, skip 2 stitches, sc in the next stitch, adjusting the final repeat to maintain the corner positions.
Frame Round 5: Work the same corner groups. Across each side, place 2 dc into each ch-2 space and 1 dc into each sc. Join.
Repeat the open and solid frame rounds as required until the blocked square reaches the target size. Keep four corners aligned and record the exact repeat counts for your sample.
Testing note: The square transition and variable mesh repeats above are design instructions, not a fully graded stitch-count chart. A physical sample is needed to confirm flatness and the exact side counts before making the full bedspread.
Part 6: Optional Raised Leaf Details
The photograph shows long, pointed lace shapes radiating outward from the flowers. Add the following optional leaves for a closer visual interpretation.
Leaf 1: Ch 12. Starting in the second chain from the hook, work 1 sc, 1 hdc, 2 dc, 3 tr, 2 dc, 1 hdc, and 1 sc. Ch 1.
Rotate the chain and work along the opposite side: 1 sc, 1 hdc, 2 dc, 3 tr, 2 dc, 1 hdc, and 1 sc. Join with sl st.
Leaf 2: Repeat the same instructions.
Make six leaves for each motif if you want a full radial arrangement, or four leaves for a simplified version.
Leave a 20 cm yarn tail on each leaf. Sew the narrow ends near the flower center and secure the outer tips to the square frame.
Do not pull the sewing stitches tightly enough to distort the open lace.
Part 7: Decorative Flower Center
For an additional raised flower layer, crochet a small circular accent separately.
Round 1: Work 6 sc in a magic ring. Join. (6)
Round 2: Work 2 sc in every stitch. Join. (12)
Round 3: Repeat (sl st in next stitch, ch 2, 2 hdc in the same stitch, ch 2, sl st in the same stitch, sl st in the next stitch) six times.
Fasten off and leave a 20 cm tail. Sew the small flower over the original center, keeping the petals evenly distributed.
How Many Crochet Squares Do You Need?
The number of squares depends on the size of your bed and the dimensions of your blocked motif. For the suggested 18 cm square, the following arrangements provide useful planning examples.
| Project | Layout | Squares | Approximate Panel Size Before Border |
|---|---|---|---|
| Small Throw | 6 × 8 | 48 | 108 × 144 cm |
| Large Throw | 8 × 10 | 80 | 144 × 180 cm |
| Bedspread | 12 × 13 | 156 | 216 × 234 cm |
For the 12 × 13 arrangement, a 5 cm border on all four sides brings the estimated dimensions to 226 × 244 cm. Actual measurements depend on the finished motif size, joining method, and border gauge.
To calculate a custom layout, divide the desired panel width by your blocked motif width. Repeat for the length, then round to whole squares.
Joining the Floral Crochet Squares
There are several ways to join a crochet flower square motif. For this bedspread, a flat sewn join gives the most controlled result.
Recommended Method: Mattress Stitch
- Block every square to the same width and height.
- Arrange the motifs on a large flat surface.
- Check that all flowers face the same direction.
- Thread a tapestry needle with matching cotton yarn.
- Place two squares side by side with their right sides facing upward.
- Catch the corresponding edge loops alternately from each square.
- Draw the joining yarn through without puckering the fabric.
- Complete each horizontal row before joining the rows together.
- Weave the joining ends into the back of the work.
- Measure the completed panel before adding the border.
Mattress stitch is particularly useful for openwork crochet because it produces a less prominent seam than a raised single crochet join.
Scalloped Crochet Border Pattern
The reference photograph includes a wide decorative border with repeated fan-shaped scallops. This simplified border creates a similar finishing effect.
Border Round 1: Foundation
Join yarn at any corner. Work 1 sc into each available edge stitch or suitable edge space, distributing stitches evenly along the sides.
At each corner, work 3 sc into the corner space. Join with a slip stitch.
Border Round 2: Openwork
Ch 1, sc in the first stitch. Repeat (ch 3, skip 2 stitches, sc in the next stitch) around the perimeter.
At corners, use additional chain space as needed to prevent pulling.
Border Round 3: Shell Foundation
Sl st into the first ch-3 space. Work 5 dc into the space, then sc into the next ch-3 space.
Repeat around, adjusting the spacing at corners so that the shells remain evenly distributed.
Border Round 4: Decorative Scallops
Work 1 sc into the first shell, then ch 3. Work 1 sc between the third and fourth dc of the same shell.
Continue across the remaining shells, using the chain loops to create a rounded decorative edge.
Fasten off and weave in the ends.
Border note: This is a flexible border recipe. The number of repeats depends on the perimeter stitch count, so the corners and final repeats must be adjusted on the sample before the full-size border is worked.
Matching Crochet Pillow Covers
The two matching pillows repeat the same floral design on a smaller rectangular surface. Their raised flower centers and lace frames visually connect them to the bedspread.
Step 1: Make the Pillow Front
For a 45 × 45 cm pillow, make a four-square panel using the same motif pattern. Arrange the squares in a 2 × 2 grid.
With 18 cm motifs, the panel measures approximately 36 × 36 cm before edging. Add a frame to bring the panel to the desired dimensions, or increase the square size by adding more lace rounds.
Step 2: Join the Squares
Place the four squares with their flower centers facing upward. Sew the two top squares together and repeat for the bottom pair.
Join the two rows, aligning the central intersection.
Step 3: Add the Outer Frame
Join ivory yarn at one corner. Work a round of single crochet around the panel, adding extra stitches at the corners.
Continue with double crochet rounds or openwork mesh until the front reaches the required dimensions.
Step 4: Prepare the Pillow Back
Cut two overlapping cotton fabric panels for an envelope-style closure, allowing for seam allowances and overlap. Alternatively, use a matching ready-made pillow cover as a backing.
Because the lace is open, a fabric backing helps prevent the pillow insert from showing through unevenly and reduces stretching.
Step 5: Attach the Front and Back
Position the crochet front against the fabric backing. Secure the edges with pins or clips, then hand-sew or machine-sew using a suitable seam allowance.
Insert the pillow and check that the flower motif remains centered.
Repeat the process for the second matching pillow.
Assembly: Final 10-Step Checklist
- Complete and block one sample flower square.
- Measure and weigh the sample to calculate the project requirements.
- Make the required number of matching floral motifs.
- Secure all flower centers and optional leaves.
- Block every square to the selected measurements.
- Arrange the squares in the planned bedspread layout.
- Join the squares into rows and connect the rows.
- Work the foundation and scalloped border rounds.
- Construct the two coordinating pillow covers.
- Weave in all yarn ends, inspect seams, and block the finished pieces.
The completed project consists of a joined floral lace bedspread with a decorative border and two matching pillow covers.
7 Technical Tips for Better Results
- Control motif size. A difference of 3 mm per square can accumulate across a row of 12 motifs, so measure every blocked square against the same template.
- Mark the corners. Place stitch markers at all four corners during the square-building rounds; misplaced corners can create a diamond-shaped motif.
- Maintain even lace tension. Loose chain spaces can produce stretched openings, particularly when the bedspread hangs over the mattress edge.
- Check flower attachment points. Secure each raised flower at multiple points so the center does not twist or lift excessively during washing.
- Block before joining. Joining unblocked squares can create rippled seams that remain visible after the border is added.
- Pin the pillow front. Pin all four corners and the center of each edge before attaching the backing to prevent the lace panel from shifting.
- Weave in long tails. Work each yarn tail through several stitch paths on the wrong side; short, unsecured tails can loosen under repeated laundering.
Common Crochet Bedspread Problems and Solutions
Why Are My Crochet Squares Curling?
Curling usually indicates that the outer rounds are too tight relative to the flower center. Try a slightly larger hook for the lace frame, or adjust the corner increases.
Why Is My Flower Not Raised Enough?
The flower may be flattening because the petals are too short or the attachment stitches are too tight. Use taller stitches for the petals and secure only the necessary anchor points.
Why Does the Bedspread Ripple After Joining?
Rippling can result from inconsistent motif sizes, excessive joining tension, or an overcrowded border. Measure the squares individually and check that the seam length matches the original edges.
Can I Use Acrylic Yarn Instead of Cotton?
Yes, but acrylic changes the drape and blocking behavior. Cotton generally produces more defined openwork and dimensional petals, while acrylic may create a softer, less structured surface.
How Should I Wash a Floral Crochet Bedspread?
Follow the yarn manufacturer’s care label. For a large cotton lace piece, gentle washing and flat drying are generally safer than aggressive agitation or high heat.
How to Customize the Design
Change the Bedspread Dimensions
Use fewer motifs for a decorative throw or add more rows for a larger bed. Keep the same motif orientation throughout the project.
Change the Flower Colors
A monochromatic ivory design emphasizes the texture of the stitches. Pale pink, sage green, or beige flower centers can create a different appearance without changing the basic construction.
Make the Lace More Open
Increase the number of chain spaces in the square frame while maintaining four stable corners. Test the adjustment on a single square before applying it to the complete bedspread.
Create a Heavier Coverlet
Use a thicker cotton yarn and an appropriately sized hook. Remember that thicker yarn increases both the motif dimensions and the finished weight of the bedspread.
Frequently Asked Questions
Is This Crochet Flower Bedspread Pattern Suitable for Beginners?
The project is better suited to intermediate crocheters. The flower centers are manageable, but the transition from a circular flower to a square lace frame requires careful stitch placement and consistent tension.
How Much Yarn Is Needed for a Queen-Size Crochet Bedspread?
Yarn requirements vary considerably with the motif size, yarn thickness, and density of the decorative stitches. The suggested 2,500–3,500 g is a planning allowance, not a tested requirement. Weigh one completed square and calculate the total before purchasing all the yarn.
Can I Make the Pillow Covers Without Making the Bedspread?
Yes. The floral square motif can be used independently for cushion fronts, table runners, or decorative panels. A pillow cover is also a useful smaller project for testing the design.
What Is the Best Yarn for a Vintage Crochet Lace Bedspread?
Fine cotton yarn is a practical choice because it provides stitch definition and responds well to wet blocking. Mercerized cotton can produce a slightly firmer, more polished surface.
How Do I Keep the Scalloped Border Flat?
Distribute the foundation stitches evenly and avoid crowding too many shell groups into a short edge. Work a small border sample first to confirm the repeat spacing.
Conclusion
The finished bedspread combines raised floral centers, open lace squares, and a scalloped perimeter in a coordinated ivory design. Its modular construction allows you to adjust the overall dimensions without changing the main decorative motif. Before beginning a full-size version, complete one square, confirm the four-corner shaping, measure the blocked gauge, and calculate the yarn required for your selected layout.
This crochet flower bedspread pattern also provides a starting point for matching pillow covers and smaller decorative pieces. Save the project on Pinterest or share your finished motifs on Instagram using #CrochetFlowerBedspread. Would you keep the six raised petals in each flower, or add a second layer for a fuller floral center?









