Introduction
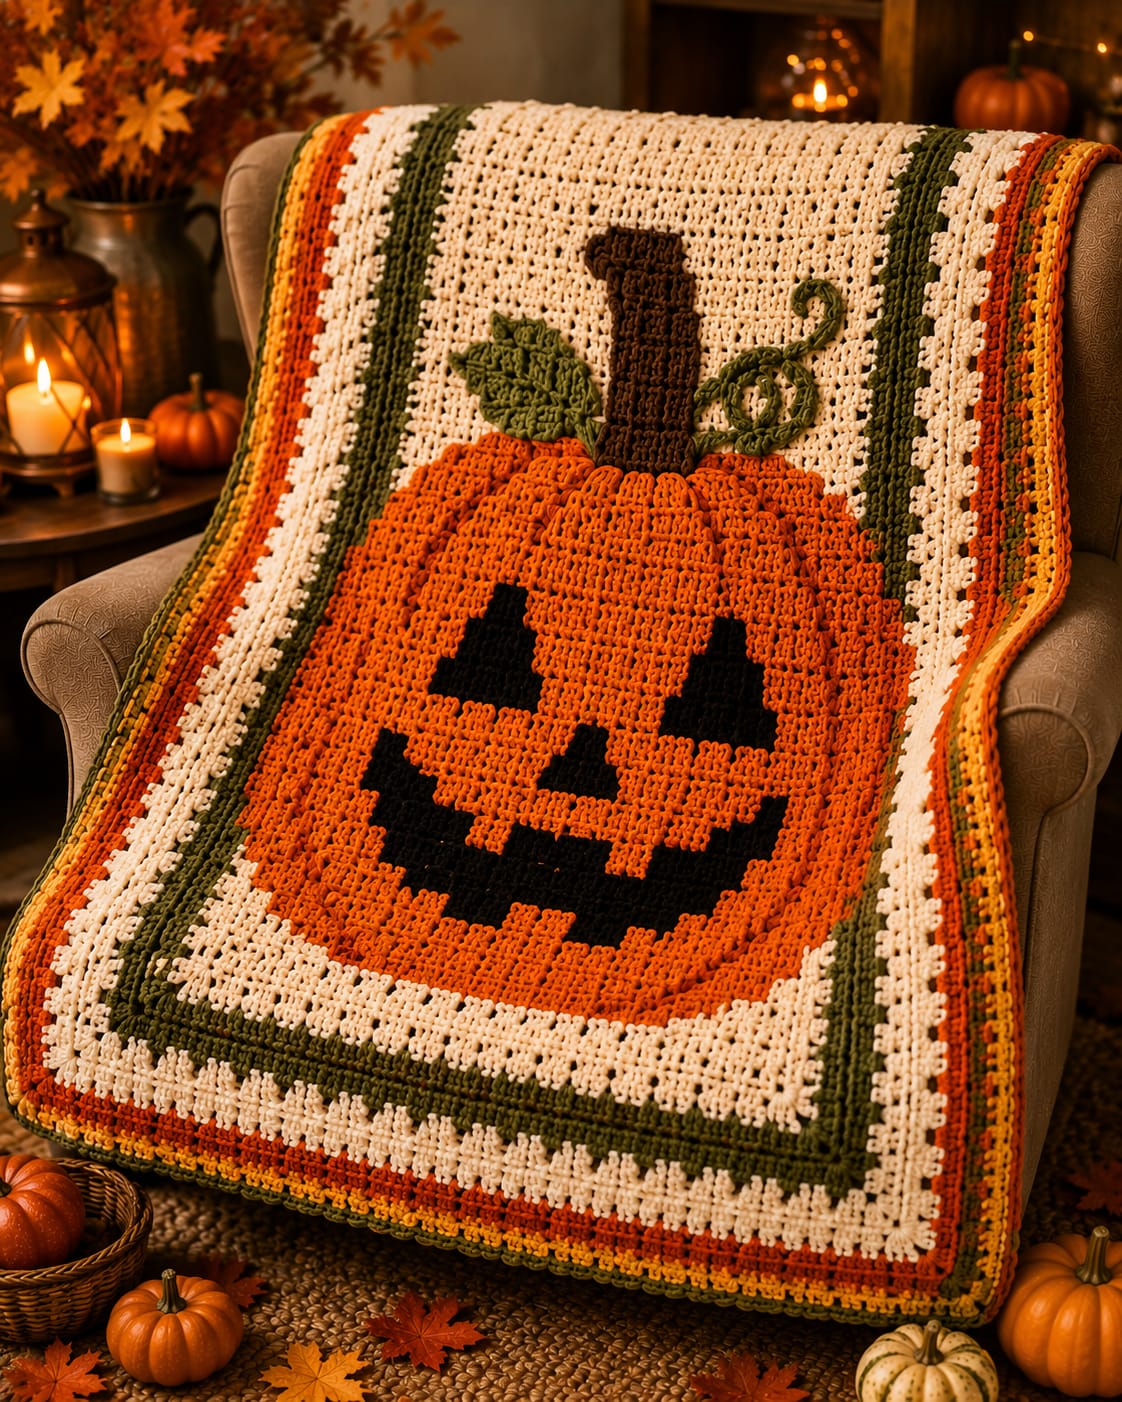
A Jack-o’-lantern wider than two sofa cushions makes a five-stitch eye error impossible to disguise. This giant jack o lantern crochet blanket pattern uses worsted yarn with a 5 mm hook to make an approximately 112 × 145 cm throw. A cream openwork field, oversized orange pumpkin, black face, brown stem and green vine create an intermediate Halloween project with one dominant focal motif.
The Design: What Makes This Giant Pumpkin Different
The blanket uses one oversized pumpkin instead of repeating dozens of small Halloween motifs. That choice makes proportion the primary technical issue. The orange panel occupies most of the lower-middle field, while a tall brown stem and green leaf extend into the cream space above it. Black eyes, nose and mouth are worked as separate flat pieces, which makes their placement easier to correct than embedded colorwork on a panel this large. The cream background stays visually quiet so the pumpkin face remains dominant, while olive, rust and mustard border stripes repeat the botanical colors at the perimeter. One common failure in a pumpkin face crochet throw is attaching the orange panel too tightly. A large appliqué can shrink the cream background locally and create waves several centimeters beyond its edge.
Project Info at a Glance
| Skill Level | Time | Finished Size | Hooks | Best For |
|---|---|---|---|---|
| Intermediate | 32–42 hours | Approx. 112 × 145 cm | 5.0 mm field / 4.5 mm details | Halloween sofa throws, seasonal displays and wall blankets |
Materials and Tools
Yarn
- Warm cream — worsted / Aran #4 — approximately 850–1,000 g — background field and cream border sections.
- Pumpkin orange — worsted / Aran #4 — approximately 450–550 g — giant pumpkin panel and outer accents.
- Black — worsted / Aran #4 — approximately 90–120 g — eyes, nose and mouth.
- Dark olive green — worsted / Aran #4 — approximately 120–160 g — leaf, tendril and border.
- Chocolate brown — worsted / Aran #4 — approximately 60–80 g — tall pumpkin stem and narrow border detail.
- Mustard gold — worsted / Aran #4 — approximately 40–55 g — outer harvest stripe.
- Rust orange — worsted / Aran #4 — approximately 40–55 g — secondary border stripe.
Use yarns with similar twist and thickness. The orange panel is broad enough that even a small gauge difference between orange and cream becomes visible after attachment.
Tools
- 5.0 mm crochet hook for the blanket field, pumpkin and border
- 4.5 mm crochet hook for face pieces, stem, leaf and tendril
- Yarn needle
- Long tapestry needle
- Stitch markers
- Dressmaking pins
- Blocking mats
- Rust-resistant blocking pins
- Scissors
- Measuring tape
Abbreviations
- MR — magic ring
- ch — chain
- sc — single crochet
- hdc — half double crochet
- dc — double crochet
- tr — treble crochet
- inc — increase
- dec — decrease
- sl st — slip stitch
- BLO — back loop only
An invisible decrease is worked through the front loops of two neighboring stitches before completing one single crochet through both loops.
Pattern — Step by Step
Make the blanket field first and block it to its working dimensions. Build the pumpkin separately, position the complete face on the orange panel, then sew the large motif to the cream background.
Main Cream Blanket Field
Yarn: warm cream — original reconstruction based on the proportions visible in the supplied image.
Foundation: ch 146.
Row 1: starting in the second chain, sc across. (145)
Row 2: ch 3, turn, dc across. (145)
Row 3: ch 1, turn, sc across. (145)
Row 4: ch 3, turn, dc in next 3 stitches, ch 1, skip 1 stitch; repeat across, finishing with dc as needed while maintaining 145 working positions.
Row 5: ch 1, turn, sc across, placing one sc into every ch-1 space. (145)
Rows 6–184: repeat Rows 2–5.
Fasten off.
Target after blocking and before border: approximately 101–104 cm wide × 132–136 cm long.
Block the Background
Pin the four corners first.
Mark the center of the top and bottom edges.
Measure the width at the top, middle and bottom.
Keep those three measurements within approximately 10 mm.
Mark the blanket vertical center with removable stitch markers.
Giant Pumpkin Panel
Yarn: pumpkin orange — original reconstruction.
Foundation: ch 100.
Row 1: starting in the second chain, sc across. (99)
Rows 2–8: ch 1, turn, sc across. (99)
Row 9: dec, 95 sc, dec. (97)
Rows 10–15: sc across. (97)
Row 16: dec, 93 sc, dec. (95)
Rows 17–22: sc across. (95)
Row 23: dec, 91 sc, dec. (93)
Rows 24–29: sc across. (93)
Row 30: dec, 89 sc, dec. (91)
Rows 31–52: sc across. (91)
Row 53: inc, 89 sc, inc. (93)
Rows 54–59: sc across. (93)
Row 60: inc, 91 sc, inc. (95)
Rows 61–66: sc across. (95)
Row 67: inc, 93 sc, inc. (97)
Rows 68–73: sc across. (97)
Row 74: inc, 95 sc, inc. (99)
Rows 75–82: sc across. (99)
Fasten off with a long orange sewing tail.
Target blocked size: approximately 72–78 cm wide × 61–66 cm high.
Round the Pumpkin Corners
Join orange yarn at one upper corner.
Sc around the entire panel.
Work three sc into the lower and upper turning corners.
On each of the four broad corner areas, replace several single crochets with slip stitches to soften the rectangular appearance.
Join and fasten off.
Add Vertical Pumpkin Ribs
Use long orange surface slip-stitch lines rather than stuffing.
Mark five vertical channels across the front.
Place the center channel on the exact pumpkin midpoint.
Position the remaining four approximately 11–13 cm apart.
Surface slip stitch from about 25 mm above the lower edge to approximately 25 mm below the upper edge.
Keep each line relaxed.
Left Eye
Yarn: black.
Ch 22.
Row 1: starting in second chain, 21 sc. (21)
Row 2: dec, 17 sc, dec. (19)
Row 3: dec, 15 sc, dec. (17)
Row 4: dec, 13 sc, dec. (15)
Row 5: dec, 11 sc, dec. (13)
Row 6: dec, 9 sc, dec. (11)
Row 7: dec, 7 sc, dec. (9)
Row 8: dec, 5 sc, dec. (7)
Row 9: dec, 3 sc, dec. (5)
Row 10: dec, sc, dec. (3)
Row 11: dec across remaining stitches as neatly as possible to form the point.
Fasten off with a 35 cm tail.
Right Eye
Repeat the left eye.
Position the Eyes
Pin the two triangles approximately 20–24 cm apart at their inner edges.
The upper points should sit on the same horizontal line.
Keep both eyes about 18–21 cm below the upper pumpkin edge.
Do not sew them yet.
Triangular Nose
Yarn: black.
Ch 14.
Row 1: 13 sc. (13)
Row 2: dec, 9 sc, dec. (11)
Row 3: dec, 7 sc, dec. (9)
Row 4: dec, 5 sc, dec. (7)
Row 5: dec, 3 sc, dec. (5)
Row 6: dec, sc, dec. (3)
Row 7: reduce to a single point.
Fasten off.
Pin the nose on the pumpkin center line approximately 12–14 cm below the eye line.
Large Jack-o’-Lantern Smile
Yarn: black.
Ch 61.
Row 1: starting in second chain, 60 sc. (60)
Rows 2–6: ch 1, turn, 60 sc. (60)
Fasten off.
This forms the main mouth strip.
Upper Smile Corner — Make 2
Ch 12.
Row 1: 11 sc.
Rows 2–5: sc across.
Fasten off.
Sew one block to each end of the main mouth strip at an upward angle.
Lower Tooth Block — Make 3
Ch 9.
Row 1: 8 sc.
Rows 2–5: sc across.
Fasten off.
Place two tooth blocks upward from the lower mouth edge and one downward from the upper mouth edge so the black smile has the stepped Jack-o’-lantern shape visible in the reference.
Shape the Smile
Pin the assembled black mouth approximately 9–11 cm below the nose.
Raise each outer end by approximately 25–35 mm.
Keep the center nearly horizontal.
Measure from the center line to each mouth end before sewing.
Sew the Face to the Pumpkin
Begin with the nose because it establishes the vertical center.
Sew the eyes next.
Check both eye-to-nose distances before completing the outer eye edges.
Attach the smile last.
Use black yarn and small perimeter stitches spaced approximately 8–10 mm apart.
Chocolate Brown Stem
Yarn: chocolate brown.
Ch 17.
Row 1: starting in second chain, 16 sc. (16)
Rows 2–30: ch 1, turn, sc across. (16)
Fasten off with a 40 cm tail.
Target approximately 12–14 cm wide × 22–25 cm high depending on gauge.
Shape the Stem
Fold approximately 25 mm of the upper corner toward one side.
Tack the fold on the rear with brown yarn.
Place the lower 25–35 mm behind the orange pumpkin panel.
Sew the stem to the pumpkin before attaching the combined unit to the blanket.
Large Green Leaf
Yarn: dark olive green.
Ch 25.
Starting in the second chain work:
sl st, 2 sc, 3 hdc, 5 dc, 6 tr, 4 dc, hdc, sc.
Work 3 sc in the final chain.
Return along the opposite side in mirrored stitch order.
Fasten off with a 35 cm tail.
Target approximately 16–19 cm long.
Leaf Vein
Use a slightly darker olive strand.
Surface slip stitch from the leaf base to approximately 12 mm below the tip.
Add two short diagonal veins on each side.
Curled Green Tendril
Yarn: dark olive green.
Ch 46.
Starting in the second chain, work 2 sc into each of the first 12 chains.
Work 3 sc into each of the next 20 chains.
Work 2 sc into each remaining chain.
The piece will curl automatically.
Fasten off with a 20 cm tail.
Assemble the Pumpkin Crown
Position the leaf to the viewer’s left of the stem.
Place the tendril to the viewer’s right.
Sew only the lower third of the leaf to the pumpkin so the tip remains free.
Tack the tendril at three points while leaving the loops dimensional.
Position the Complete Pumpkin
Spread the cream blanket field flat.
Center the pumpkin horizontally.
Place its lower edge approximately 18–22 cm above the lower inner border area.
The stem and tendril should extend into the upper cream field without reaching the top border.
Pin the orange panel every 6–8 cm around its perimeter.
Attach the Giant Pumpkin
Use matching orange yarn.
Sew through the orange perimeter and the cream background approximately every 12–15 mm.
Work one quarter of the circumference at a time.
After each quarter, lay the blanket flat and check the cream area for waves.
Do not pull the attachment seam tightly.
Secure the Stem and Leaf to the Blanket
Add several concealed brown tacks through the stem.
Keep the upper folded portion slightly raised.
Attach the green leaf through its central vein and base only.
Tack the tendril at approximately three or four points.
Border Round 1 — Dark Olive
Join olive at one corner.
Sc evenly around the complete blanket.
Work (2 sc, ch 2, 2 sc) in every corner.
Join.
Border Round 2 — Dark Olive
Hdc in every stitch.
At each corner work (2 hdc, ch 2, 2 hdc).
Join.
Border Round 3 — Cream
Join cream.
Repeat sc, ch 1, skip 1 along every straight side.
At each corner work (sc, ch 2, sc).
Border Round 4 — Rust Orange
Join rust in a ch-1 space.
Sc in every sc and every ch-1 space.
Work (sc, ch 2, sc) in each corner.
Border Round 5 — Olive
Join olive.
Hdc around the full perimeter.
Work (2 hdc, ch 2, 2 hdc) at each corner.
Border Round 6 — Mustard Gold
Join mustard.
Sc in every stitch.
At each corner work (sc, ch 2, sc).
Final Pumpkin-Orange Edge
Join pumpkin orange.
Repeat sl st in next stitch, ch 2, sc in same stitch, skip 1 around.
Adjust by one stitch only near corners when the repeat requires alignment.
Fasten off.
Assembly
- Crochet the 145-stitch cream field through 184 rows, block it and mark both vertical and horizontal centers.
- Make the 99-stitch orange pumpkin panel, block it to approximately 72–78 cm wide and add five relaxed vertical rib lines.
- Crochet two black triangular eyes, one triangular nose and the stepped mouth pieces, then pin the complete face before sewing.
- Attach the black facial pieces to the orange pumpkin while checking equal spacing from the vertical center line.
- Crochet the brown stem, shape its upper bend and sew its lower edge behind the pumpkin crown.
- Make the large olive leaf and curled tendril, then attach their bases around the stem while leaving the outer sections partly free.
- Center the complete pumpkin unit on the blocked cream field and pin around the perimeter every 6–8 cm.
- Sew the orange pumpkin to the cream background using relaxed attachment stitches approximately 12–15 mm apart, then add separate stem and leaf tacks.
- Work the olive, cream, rust, olive and mustard border sequence followed by the narrow pumpkin-orange textured edge.
- Block only the cream field and border, then reshape the leaf, tendril, stem and pumpkin rib lines after the blanket is dry.
The completed blanket should show one oversized centered Jack-o’-lantern with a symmetrical black face, prominent brown stem and green botanical details framed by a wide harvest-colored border.
7 Technical Tips
- Orange pumpkin creates waves in the cream field: The appliqué seam is shorter than the background. Space attachment stitches approximately 12–15 mm apart and loosen the seam if the surrounding cream rises more than about 5 mm.
- One eye looks lower: The triangular pieces were measured from the pumpkin edge instead of the face center line. Mark a horizontal eye line and keep the two upper points within approximately 3 mm of it.
- Smile looks tilted: One outer mouth corner is positioned farther from the center than the other. Measure from the nose center to both mouth ends before sewing and keep the difference below approximately 5 mm.
- Pumpkin ribs distort the face: Surface slip stitches are too tight. Work the five rib lines with the panel lying flat and stop if one channel shortens the orange fabric by more than approximately 5 mm.
- Stem falls forward: Only its lower edge is attached. Add two concealed brown tacks 25–40 mm above the pumpkin crown while leaving the bent stem tip free.
- Green leaf cups inward: The surface vein is shorter than the leaf body. Keep the vein relaxed and stop approximately 12 mm before the leaf tip.
- Outer border flares: Side-edge stitches have accumulated before the color changes. Check each long side in 20 cm sections and remove surplus stitches before working the mustard round.
Why One Giant Pumpkin Works
The design depends on scale rather than repetition. A field of small pumpkin blocks would divide the blanket into many equal focal points. Here, nearly all visual weight is concentrated in one orange shape.
That structure also makes the cream background important.
The negative space above and beside the pumpkin prevents the face from filling the entire throw. It leaves room for the brown stem, olive leaf and tendril while allowing the multicolor border to remain separate from the central motif.
Why the Face Is Made Separately
Embedded tapestry colorwork could produce the same black shapes, but separate pieces provide more control at this size.
The eyes can be shifted several centimeters before sewing.
The nose can be centered after the pumpkin rib lines are visible.
The mouth can be curved upward without rewriting an entire graph.
For this giant jack o lantern crochet blanket pattern, adjustable face placement is useful because the central motif occupies most of the viewer’s attention.
Controlling the Pumpkin Proportions
Keep the orange panel wider than it is high.
A width near 75 cm and height around 64 cm gives the broad squash-like proportions visible in the reference.
If your yarn creates a taller panel, remove several straight rows before the lower expansion begins.
If the panel finishes too narrow, add several stitches to the foundation rather than aggressively stretching it during blocking.
Changing the Face
The supplied image uses classic triangular eyes and a wide stepped grin.
For a sharper Halloween expression, angle the eye points inward by approximately 10 degrees.
A simpler face can omit the tooth blocks and use one curved black strip.
Keep the nose small relative to the eyes. Enlarging all three facial components equally can make the center of the pumpkin look crowded.
Changing the Pumpkin Color
Orange provides the strongest classic Jack-o’-lantern result.
A cream pumpkin with black facial pieces creates a ghost-pumpkin version.
Rust works for a darker harvest palette.
Olive can produce a gourd variation, but the green leaf should then change to a contrasting shade such as mustard or brown so it remains visible against the crown.
Changing the Blanket Size
For a smaller lap throw, reduce the field to approximately 121 stitches and 150 rows, then scale the pumpkin to about 60 cm wide.
A larger bed throw can expand the field beyond 170 stitches while keeping the pumpkin close to 75 cm if more cream negative space is wanted.
When scaling both pieces together, preserve roughly the same ratio: the pumpkin occupies about two-thirds of the usable inner width.
Changing the Border
The reference uses several narrow harvest-colored stripes rather than one thick solid frame.
Olive creates the strongest separation from the cream field.
Rust and orange repeat the pumpkin color, while mustard adds a lighter accent.
For a simpler version, use two olive rounds, two orange rounds and one final cream round.
Keep every additional round flat before adding another color.
Keeping the Large Appliqué Flat
Pinning density matters more on a 75 cm pumpkin than on a small motif.
Use perimeter pins every 6–8 cm.
Add temporary pins along the central rib line.
Sew one quarter at a time and check the blanket after each section.
If the cream fabric begins pulling toward the pumpkin, remove the most recent stitches rather than continuing around and attempting to correct the distortion later.
Final Blocking
Pin all four blanket corners.
Mark the midpoint of every side and keep both diagonals close in length.
Do not press heavily over the black facial pieces or green leaf.
Shape the border while the central pumpkin rests naturally.
After drying, lift the leaf edge and tendril loops by hand.
Check the black smile from several feet away because small asymmetries are easier to see at that distance.
Conclusion
Center the face before attaching the orange panel because the pumpkin becomes much harder to reposition once its perimeter is sewn to the cream field. Your next step is to block the background, make the 99-stitch pumpkin panel and test both black eye triangles against its center line before adding the smile. Keep the attachment seam relaxed and the green details partly free. Share the finished giant jack o lantern crochet blanket pattern project on Pinterest with the full pumpkin visible, then post the face and curled vine on Instagram using #GiantJackOLanternBlanket. For this pumpkin specifically, would you keep the classic black smile or give it sharper teeth?









