Introduction
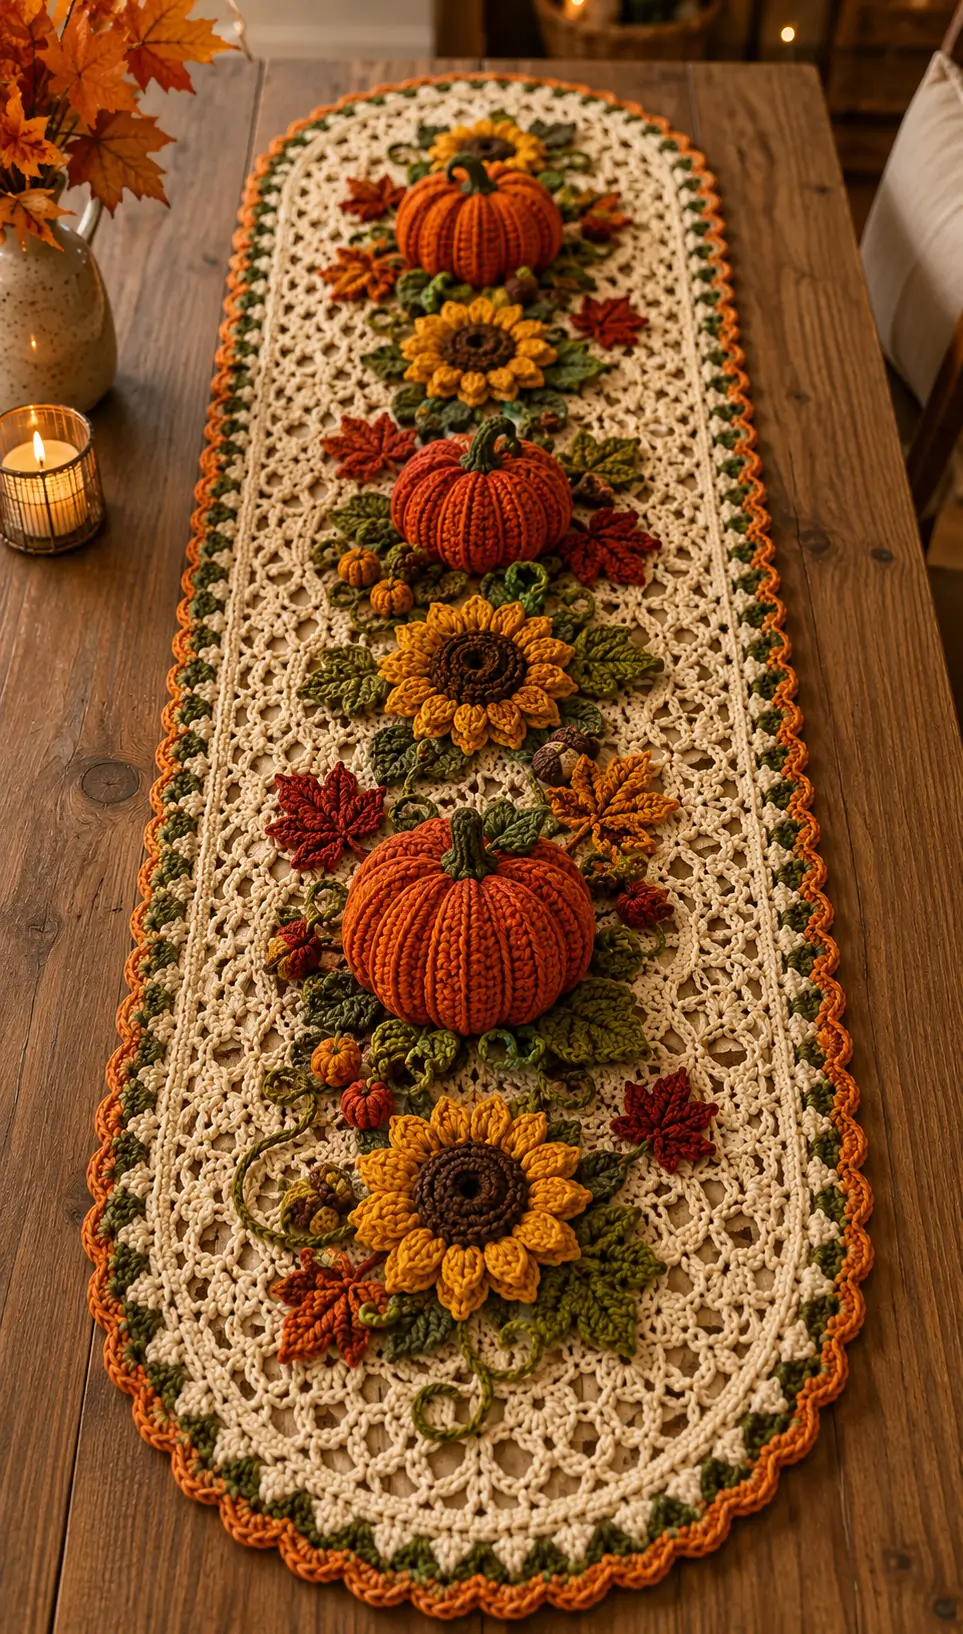
Three stuffed pumpkins rising from a lace runner change the construction problem completely: the base has to carry weight without buckling. This crochet pumpkin table runner pattern combines a cream openwork foundation with sculpted pumpkins, sunflowers, leaves, and vines. Work it in worsted cotton with a 4 mm hook for an advanced-beginner-to-intermediate project around 33 × 183 cm. The modular layout also allows damaged appliqués to be replaced separately.
The Design: What Makes This Harvest Runner Different
The first structural decision is separation. The lace base is worked as a flat fabric, while each pumpkin, sunflower, leaf, and vine is made independently and sewn down afterward. That keeps the runner flat enough for table placement even when the central decoration is strongly dimensional.
Second, the three main pumpkins are spaced along the longitudinal centerline rather than clustered at one end. This distributes mass across the runner and gives the fall crochet table runner a repeat that reads correctly from either side of the table.
Third, the sunflower motifs overlap foliage rather than sitting directly on bare lace. The leaves create a transition between open mesh and dense appliqué. A common mistake in a sunflower crochet table runner is attaching every motif through only one layer of mesh. Heavy pumpkins can stretch those attachment points. Stitch through several neighboring posts instead.
Project Info at a Glance
| Skill Level | Time | Finished Size | Hook | Best For |
|---|---|---|---|---|
| Advanced beginner/intermediate | 18–26 hours | Approx. 33 × 183 cm | 4.00 mm | Autumn dining tables, sideboards, Thanksgiving displays |
The dimensions, hook recommendation, and general worsted-cotton specification are based on a comparable full-length pumpkin table runner pattern.
Materials and Tools
Yarn
- Cream/ivory — worsted #4 cotton — approximately 508 g for a runner near 183 cm long.
- Pumpkin orange — worsted #4 cotton — approximately 40–80 g for the raised pumpkins and border.
- Mustard yellow — worsted #4 cotton — approximately 30–40 g for three layered sunflowers.
- Dark brown — worsted #4 cotton — approximately 15–20 g for sunflower centers and small harvest details.
- Olive green — worsted #4 cotton — approximately 40–60 g for leaves, stems, border sections, and tendrils.
- Rust/red — worsted #4 cotton — approximately 20–30 g for maple-style leaves.
- Dark green — worsted #4 cotton — approximately 10–15 g for pumpkin stems.
Tools
- 4.00 mm crochet hook
- Polyester fiberfill
- Tapestry needle
- Stitch markers
- Sharp scissors
- Rust-resistant blocking pins
- Blocking mats
- Optional 2.5–3.5 mm hook for tighter small appliqués
No safety eyes are required.
Abbreviations
- MR — magic ring
- sc — single crochet
- inc — 2 sc in the same stitch
- dec — single-crochet decrease
- sl st — slip stitch
- ch — chain
- hdc — half double crochet
- dc — double crochet
- tr — treble crochet
- BLO — back loop only
- FLO — front loop only
- st/sts — stitch/stitches
For an invisible decrease, insert the hook under the front loops of the next two stitches, draw up a loop, then complete one single crochet through those loops.
Pattern — Step by Step
The pumpkin pieces are worked in continuous spirals unless noted. Mark the first stitch of every round.
Lace Runner Base
Yarn: cream
Foundation: Ch 66.
Row 1: Dc in 6th ch from hook, *ch 2, skip 2 ch, dc in next ch* across. Turn.
Row 2: Ch 3, *2 dc in next ch-2 space, ch 1, skip next dc* across, dc in final turning chain. Turn.
Row 3: Ch 5, dc in next ch-1 space, *ch 2, dc in next ch-1 space* across. Turn.
Row 4: Ch 3, 2 dc in each ch-2 space across, dc in final stitch. Turn.
Repeat Rows 3–4 until the center panel measures approximately 173 cm, leaving room for the outer border to reach about 183 cm total.
Work one round of sc evenly around the entire rectangle. Place 3 sc into each corner.
Fasten off only after the edge lies flat.
Because yarn gauge varies, measure length rather than relying on a fixed row total.
Large Pumpkin — Make 3
Yarn: pumpkin orange
R1: 6 sc in MR (6)
R2: inc ×6 (12)
R3: (sc 1, inc) ×6 (18)
R4: (sc 2, inc) ×6 (24)
R5: (sc 3, inc) ×6 (30)
R6: (sc 4, inc) ×6 (36)
R7: sc around (36)
R8: sc around (36)
R9: sc around (36)
R10: sc around (36)
R11: sc around (36)
R12: sc around (36)
R13: (sc 4, dec) ×6 (30)
R14: (sc 3, dec) ×6 (24)
R15: (sc 2, dec) ×6 (18)
Stuff firmly enough to hold a dome while leaving the lower surface slightly flatter than a free-standing pumpkin.
R16: (sc 1, dec) ×6 (12)
R17: dec ×6 (6)
Fasten off. Leave a 60 cm tail.
Thread the tail through the center from bottom to top. Wrap it around the outside and return through the center. Repeat at six evenly spaced positions to compress the sphere into pumpkin ribs. Tie the shaping thread beneath the pumpkin.
Pumpkin Stem — Make 3
Yarn: dark green
R1: 6 sc in MR (6)
R2: sc around BLO (6)
R3: sc around (6)
R4: sc around (6)
R5: sc around (6)
Fasten off. Leave a 20 cm tail and sew to the pumpkin crown.
Sunflower Center — Make 3
Yarn: dark brown
R1: 6 sc in MR (6)
R2: inc ×6 (12)
R3: (sc 1, inc) ×6 (18)
R4: (sc 2, inc) ×6 (24)
Sl st to the next stitch and fasten off.
Sunflower Petals — Make 3 Flower Sets
Yarn: mustard yellow
Join yellow to any stitch on the brown center.
For each petal: ch 6, sc in second ch from hook, hdc in next ch, dc in next 2 ch, hdc in final ch, sl st into the next center stitch.
Repeat around all 24 center stitches to create 24 petals.
For a fuller layered appearance, add a second petal round behind the first. Work 12 longer petals, spacing each anchor approximately two center stitches apart.
For each longer petal: ch 7, sc, hdc, dc 3, hdc; sl st behind the next pair of center stitches.
Fasten off. Leave 35 cm for sewing.
Olive Leaves — Make 12–18
Yarn: olive green
Ch 10.
Working down one side of the chain: sl st in second ch, sc, hdc, dc 3, hdc, sc, sl st.
Ch 2 at the tip.
Work up the opposite side: sl st, sc, hdc, dc 3, hdc, sc, sl st.
Fasten off. Leave 20 cm for sewing.
For larger leaves, start with ch 13 and insert three additional dc into the middle section.
Rust Maple-Style Leaves — Make 6
Yarn: rust/red
R1: 6 sc in MR (6)
R2: inc ×6 (12)
Do not continue increasing as a circle.
Work five points around the ring. For each point:
Ch 7, sl st in second ch, sc in next, hdc in next, dc in next, tr in next, dc in final ch, sl st into the next two stitches of R2.
Repeat until five leaf points have been formed.
Ch 8 for the stem, then sl st back along the chain.
Fasten off. Leave 20 cm.
Mini Pumpkins — Make 6–9
Yarn: alternate orange and mustard
R1: 6 sc in MR (6)
R2: inc ×6 (12)
R3: (sc 1, inc) ×6 (18)
R4: sc around (18)
R5: sc around (18)
R6: (sc 1, dec) ×6 (12)
Add a small pinch of stuffing.
R7: dec ×6 (6)
Fasten off with a 35 cm tail.
Run the tail around the exterior three or four times to divide each mini pumpkin into lobes. Add a short green embroidered stem.
Curled Vines — Make 6–10
Yarn: olive green
Ch 25.
Work 3 sc in the second ch from the hook and 3 sc in every remaining chain.
The chain will coil naturally.
Fasten off with a 15 cm tail. Sew down only the first and last 2–3 cm so the center remains curled above the runner.
Acorn-Style Harvest Motifs — Make 4–6
Yarn: brown for nut, green or rust for cap
Nut
R1: 6 sc in MR (6)
R2: inc ×6 (12)
R3: sc around (12)
R4: sc around (12)
R5: dec ×6 (6)
Add a small pinch of stuffing. Fasten off.
Cap
R1: 6 sc in MR (6)
R2: inc ×6 (12)
Sl st around once for a firmer edge. Sew over the top third of the nut.
Two-Color Scalloped Border
Yarn: olive green and pumpkin orange
Join green at any corner.
Green round: sc around the runner, spacing stitches evenly and working 3 sc into each corner.
Change to orange.
Orange round: *skip 1 st, 5 dc in next st, skip 1 st, sl st in next st* around.
At each corner, adjust the skipped stitches by one stitch if needed so a shell lands close to the corner center.
Fasten off and weave tails through at least 5 cm of neighboring stitches.
Assembly
- Block the cream runner base to approximately 33 × 183 cm, or to the dimensions that fit the intended table.
- Position the first large pumpkin on the longitudinal centerline near the lower third of the runner.
- Place the second pumpkin near the center and the third near the upper third, checking that all three align before sewing.
- Sew each pumpkin down through its lower quarter only, catching several mesh posts so its weight is distributed across the lace.
- Arrange one sunflower between each major pumpkin zone, with additional foliage behind the petals rather than over them.
- Attach olive leaves in groups of three to five, rotating each group so the veins do not all point in the same direction.
- Sew the rust maple-style leaves into open gaps, especially near the outer edges of the central motif band.
- Add mini pumpkins and acorn-style pieces after the major motifs are fixed; these should fill gaps rather than alter the main spacing.
- Anchor the curled vines at both ends while leaving the coils free between attachment points.
- Turn the runner over, secure loose tails, trim only after every knot has been drawn into neighboring stitches, and complete final blocking around the scalloped edge.
The finished runner should lie flat along its perimeter while the pumpkins and flower centers remain raised.
7 Technical Tips
- Stitch-marker drift: Move the marker immediately after the first stitch of every pumpkin round. A one-stitch drift at R13 will shift all six decreases and produce a visibly twisted dome.
- Stuffing firmness: Stop adding fiberfill when the pumpkin holds its shape under light finger pressure but the base can still flatten by roughly 10–15 mm. Overfilling makes the runner rock on the table.
- Invisible-decrease gaps: Use front-loop invisible decreases on R13–R17 of each pumpkin. Standard decreases can leave six visible holes per reduction round.
- Placement timing: Pin all three large pumpkins before sewing the first one. A centerline error of even 2–3 cm becomes obvious across a 183 cm runner.
- Lace tension: If the base begins narrowing after several repeats, measure every 20 cm. A cumulative loss of one mesh repeat can pull the finished runner into a trapezoid.
- Sunflower pinning: Use at least four pins per flower before attachment—one at 12, 3, 6, and 9 o’clock. Sewing one side first without pinning can rotate the petal layer by 10–15 degrees.
- Tail weaving: Take every load-bearing pumpkin tail through at least 5 cm of base stitches in two directions. A short tail can work loose when the runner is folded for storage.
Conclusion
Finish this runner by blocking the lace first, then checking every raised motif from both long sides of the table. The next practical step is to measure the intended tabletop and alter the plain center repeats before attaching any pumpkins; that keeps the motif spacing proportional rather than forcing the border to compensate later. Photograph the completed crochet pumpkin table runner pattern from directly above for Pinterest, then post a side-angle image on Instagram to show the depth of the stuffed pumpkins and layered sunflowers. Use #PumpkinSunflowerTableRunner when sharing. Would you keep all three pumpkins orange, or change the middle pumpkin to cream or olive green?









