Introduction
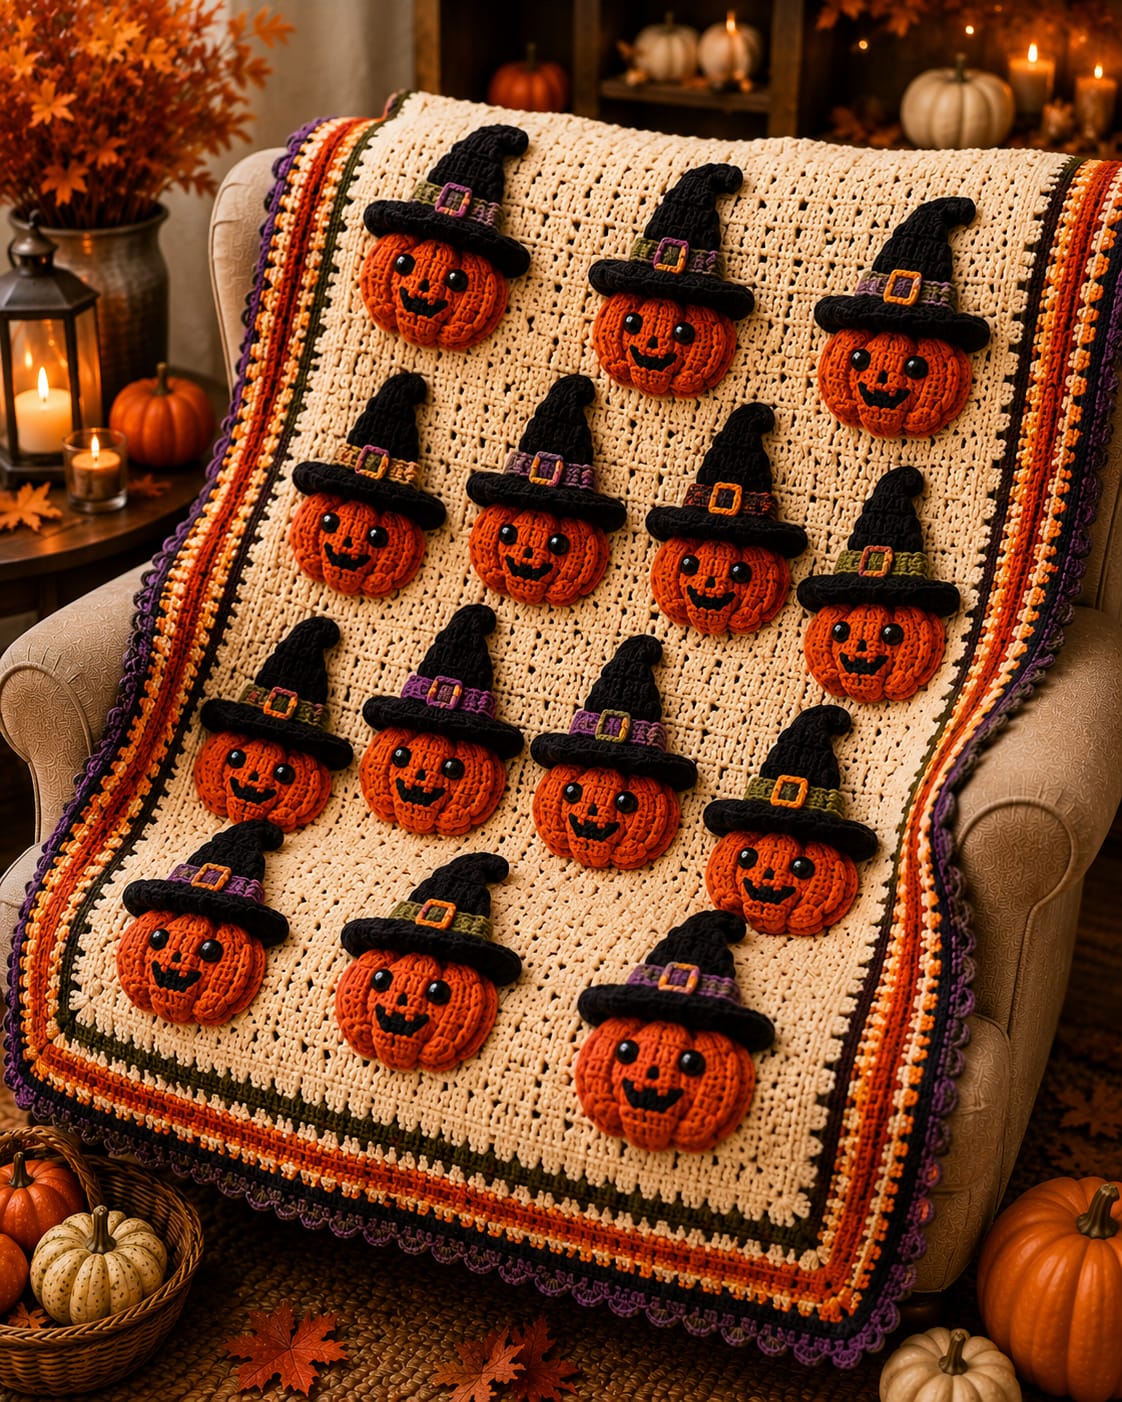
Fourteen witch hats create fourteen chances for a brim to slide across a Jack-o’-lantern eye. This witch pumpkin crochet blanket pattern uses worsted yarn with 5 mm and 3.5 mm hooks to make an approximately 110 × 142 cm throw. A cream openwork field, shallow orange pumpkin faces, black pointed hats and multicolor Halloween edging create an intermediate appliqué project.
The Design: What Makes This Witch Pumpkin Blanket Different
The blanket uses fourteen complete character motifs rather than repeating plain pumpkins. Each orange body reaches a 42-stitch plateau, producing enough width for two dark eyes, a small nose and a curved embroidered grin. Shallow filling creates pumpkin relief without giving the throw the weight of fourteen stuffed decorations. Every black hat is made separately so the brim can overlap the pumpkin crown while the pointed section remains flat against the cream field. Purple, olive and rust hat bands interrupt the repeated black-and-orange palette. One recurring problem in a Halloween pumpkin applique blanket is sewing the hat to the pumpkin before checking the full motif on the background. A brim positioned even 10 mm too low can partially cover the eyes once the pumpkin is attached and compressed against the blanket.
Project Info at a Glance
| Skill Level | Time | Finished Size | Hooks | Best For |
|---|---|---|---|---|
| Intermediate | 38–48 hours | Approx. 110 × 142 cm | 5.0 mm field / 3.5 mm motifs | Halloween throws, seasonal chair blankets and wall displays |
Materials and Tools
Yarn
- Warm cream — worsted / Aran #4 — approximately 850–1,000 g — openwork blanket field and cream border accents.
- Pumpkin orange — worsted / Aran #4 — approximately 340–400 g — fourteen dimensional pumpkin bodies and border.
- Black — worsted / Aran #4 — approximately 260–320 g — fourteen witch hats, facial embroidery and border.
- Deep purple — worsted / Aran #4 — approximately 25–30 g — selected hat bands and outer scallops.
- Moss / olive green — worsted / Aran #4 — approximately 25–30 g — selected hat bands and border.
- Rust / brown — worsted / Aran #4 — approximately 20–30 g — selected hat bands and border.
- Gold / mustard — worsted / Aran #4 — approximately 15–20 g — fourteen buckles.
Keep the orange and black yarns close in thickness. A heavier black yarn makes the hat brim curl toward the pumpkin face and adds unnecessary weight to the upper half of every motif.
Tools
- 5.0 mm crochet hook for the blanket field and border
- 3.5 mm crochet hook for pumpkins, hats and buckles
- 10–12 mm safety eyes — 28 total
- Polyester fiberfill — approximately 100–140 g
- Long tapestry needle
- Standard yarn needle
- Stitch markers
- Dressmaking pins
- Blocking mats
- Rust-resistant pins
- Scissors
- Measuring tape
Embroidered eyes can replace plastic hardware when hard detachable components are not suitable for the intended use of the blanket.
Abbreviations
- MR — magic ring
- ch — chain
- sc — single crochet
- hdc — half double crochet
- dc — double crochet
- inc — increase
- dec — decrease
- sl st — slip stitch
- BLO — back loop only
An invisible decrease is worked through the front loops of two neighboring stitches before completing one single crochet through both loops.
Pattern — Step by Step
Complete and block the cream field first. Make one complete witch-pumpkin unit next and test its scale before batching the remaining thirteen motifs.
Main Cream Blanket Field
Yarn: warm cream — original reconstruction based on the proportions visible in the supplied image.
Foundation: ch 157.
Row 1: starting in the second chain, sc across. (156)
Row 2: ch 3, turn, dc across. (156)
Row 3: ch 1, turn, sc across. (156)
Row 4: ch 3, turn, dc in next 3 stitches, ch 1, skip 1; repeat the four-stitch rhythm across, finishing with dc stitches as required to retain 156 working positions.
Row 5: ch 1, turn, sc across, working one sc into each ch-1 space. (156)
Rows 6–174: repeat Rows 2–5.
Fasten off.
Target before border: approximately 100–104 cm wide × 130–134 cm long after blocking.
Block and Mark the Motif Field
Pin the cream rectangle flat.
Mark four horizontal motif levels.
Use a staggered arrangement of three pumpkins, then four, then four, then three.
Keep neighboring motif centers approximately 24–27 cm apart.
Leave at least 8–10 cm between the outer motifs and the future border.
Dimensional Jack-o’-Lantern Pumpkin — Make 14
Yarn: pumpkin orange — original reconstruction using standard six-stitch amigurumi math.
R1: 6 sc in MR (6)
R2: inc ×6 (12)
R3: (sc, inc) ×6 (18)
R4: (2 sc, inc) ×6 (24)
R5: (3 sc, inc) ×6 (30)
R6: (4 sc, inc) ×6 (36)
R7: (5 sc, inc) ×6 (42)
R8: sc around (42)
R9: sc around (42)
R10: sc around (42)
R11: sc around (42)
R12: sc around (42)
R13: sc around (42)
R14: (5 sc, dec) ×6 (36)
R15: sc around (36)
R16: (4 sc, dec) ×6 (30)
R17: (3 sc, dec) ×6 (24)
R18: (2 sc, dec) ×6 (18)
R19: (sc, dec) ×6 (12)
R20: dec ×6 (6)
Insert 10–12 mm eyes between R10 and R11, approximately 7–8 visible stitches apart. Do not install the eyes until the proposed hat brim has been pinned temporarily above them.
Add a small amount of filling around the outside wall.
Keep the center softer than a freestanding amigurumi pumpkin.
Fasten off and close the final six stitches.
Flatten the Pumpkin
Press the upper and lower centers toward one another.
The pumpkin should broaden to approximately 13–15 cm while remaining only about 15–20 mm deep before blanket attachment.
Remove filling if the motif springs back into a ball.
Sculpt the Pumpkin Ribs
Cut approximately 100 cm of matching orange yarn.
Pass the needle through the center from front to back.
Wrap the strand around the outside and return through the center.
Repeat at six evenly spaced positions.
Pull each wrap only far enough to create a 3–4 mm valley.
The six channels should remain visible after the pumpkin is laid flat.
Jack-o’-Lantern Nose
Yarn: black.
Ch 5.
Row 1: starting in second chain, 4 sc. (4)
Row 2: ch 1, turn, dec ×2. (2)
Row 3: ch 1, turn, dec. (1)
Fasten off with a 15 cm tail.
Pin the triangle between and slightly below the eyes.
Jack-o’-Lantern Smile
Yarn: black.
Ch 18.
Fasten off with a 30 cm tail.
Curve the chain upward into a grin approximately 6–7 cm wide.
Pin the center first, then both ends.
Add three small vertical stitches to create square tooth interruptions.
Finish the Pumpkin Face
Sew the nose below the eye midpoint.
Attach the smile approximately 15–18 mm beneath the nose.
Keep the mouth tension relaxed.
Check that the black facial details remain centered on one broad front lobe rather than disappearing into the sculpted valleys.
Black Witch Hat Crown — Make 14
Yarn: black — original tapered flat-panel construction.
Ch 3.
Row 1: starting in second chain, 2 sc. (2)
Row 2: ch 1, turn, inc, sc. (3)
Row 3: ch 1, turn, sc across. (3)
Row 4: ch 1, turn, sc, inc, sc. (4)
Row 5: sc across. (4)
Row 6: inc, 2 sc, inc. (6)
Rows 7–8: sc across. (6)
Row 9: inc, 4 sc, inc. (8)
Rows 10–11: sc across. (8)
Row 12: inc, 6 sc, inc. (10)
Rows 13–14: sc across. (10)
Row 15: inc, 8 sc, inc. (12)
Rows 16–17: sc across. (12)
Row 18: inc, 10 sc, inc. (14)
Rows 19–20: sc across. (14)
Row 21: inc, 12 sc, inc. (16)
Rows 22–24: sc across. (16)
Fasten off with a 30 cm tail.
Curve the Hat Point
Fold the upper 4–5 cm slightly toward one side.
Use two or three concealed black tacking stitches to hold the curved point.
Keep the bend shallow rather than folding the tip sharply.
Witch Hat Brim — Make 14
Yarn: black.
Ch 36.
Row 1: starting in second chain, 35 hdc. (35)
Row 2: ch 1, turn, inc, 33 hdc, inc. (37)
Row 3: ch 1, turn, hdc across. (37)
Fasten off with a 35 cm tail.
Target brim width approximately 17–19 cm.
Attach Crown to Brim
Center the 16-stitch lower hat crown on the brim.
Allow the brim to extend evenly on both sides.
Sew through the crown base and center region of the brim.
Keep both outer brim ends free for approximately 20–25 mm.
Colored Hat Band — Make 14
Yarn: purple, olive or rust.
Ch 22.
Row 1: starting in second chain, 21 sc. (21)
Row 2: ch 1, turn, 21 sc. (21)
Fasten off with a 20 cm tail.
Wrap the strip around the lower crown directly above the brim.
Overlap the ends at the back.
Hat Band Color Plan
Use five purple bands.
Make five olive-green bands.
Work four rust or brown bands.
Distribute the colors through all four motif rows rather than grouping one color together.
Gold Buckle — Make 14
Yarn: gold / mustard.
Ch 10.
Join into a ring without twisting.
Sc once around the chain loop.
Fasten off.
Shape into a small rectangle approximately 15–18 mm wide.
Sew over the front center of the colored band.
Attach Hat to Pumpkin
Pin the hat brim approximately 10–15 mm above the safety-eye posts.
The brim may overlap the top of the orange pumpkin, but it should not touch either eye.
Sew through the middle 60–70 percent of the brim.
Leave both brim tips unattached for slight relief.
Add two concealed stitches from the lower hat crown into the pumpkin top.
Check One Complete Witch Pumpkin
Place the finished motif on the blocked cream blanket.
Target an overall height of approximately 23–26 cm from the bottom pumpkin lobe to the hat point.
The pumpkin should measure roughly 13–15 cm wide.
The hat brim can extend 1–2 cm beyond each side of the pumpkin.
If the motif is larger, reduce the brim before making the remaining thirteen hats.
Batch the Remaining Motifs
Make all orange pumpkins first.
Sculpt all fourteen bodies before adding faces.
Next make twenty-eight eye placements, fourteen noses and fourteen smiles.
Produce the black hat crowns as one batch, followed by brims, colored bands and buckles.
This sequence makes dimensional differences easier to identify.
Lay Out the Four Motif Rows
Row 1: three witch pumpkins.
Row 2: four witch pumpkins.
Row 3: four witch pumpkins.
Row 4: three witch pumpkins.
Offset the three-motif rows so their pumpkins sit approximately halfway between the four-motif columns.
Rotate hat tips slightly left or right for variation while keeping every face upright.
Attach the Pumpkins to the Blanket
Pin the bottom pumpkin center first.
Add pins at the top and both widest side points.
Sew through the rear pumpkin perimeter at approximately 10–12 mm intervals.
Leave the middle ribs free.
Stop after half the perimeter and check the cream field for puckering.
Attach the Hat Points to the Blanket
The brim is already secured to the pumpkin.
Use black yarn to add two or three small blanket tacks along the pointed crown.
Do not sew the complete crown edge.
Leaving sections free preserves the raised hat silhouette.
Check the Four-Row Composition
Spread the blanket flat.
Confirm that no brim crosses a neighboring pumpkin.
Keep at least approximately 30–40 mm of cream field between adjacent motifs.
Compare all hat points from several feet away.
Correct any motif leaning more than about 10 degrees before adding the border.
Border Round 1 — Olive Green
Join olive yarn at one corner.
Sc evenly around.
Work (2 sc, ch 2, 2 sc) in each corner.
Join.
Border Round 2 — Warm Cream
Join cream.
Hdc in every stitch.
Work (2 hdc, ch 2, 2 hdc) in each corner.
Border Round 3 — Pumpkin Orange
Join orange.
Repeat sc, ch 1, skip 1 along each straight edge.
At corners work (sc, ch 2, sc).
Border Round 4 — Chocolate Brown
Join brown into a ch-1 space.
Sc in every stitch and ch-1 space.
At each corner work (sc, ch 2, sc).
Border Round 5 — Pumpkin Orange
Join orange.
Hdc evenly around.
At corners work (2 hdc, ch 2, 2 hdc).
Border Round 6 — Cream Accent
Join cream.
Repeat sc, ch 1, skip 1 around the complete perimeter.
At each corner work (sc, ch 2, sc).
Purple Scalloped Outer Edge
Join deep purple.
Repeat:
skip 1 stitch, 5 dc in next stitch, skip 1 stitch, sl st in next stitch.
Continue around all four sides.
Alter the spacing by one stitch near a corner only when required to keep a shell centered there.
Fasten off.
Assembly
- Crochet the 156-stitch cream blanket field through 174 rows, block it and mark the staggered three-four-four-three motif arrangement.
- Make fourteen 42-stitch orange pumpkin bodies, lightly fill them, close them and flatten every piece to approximately 13–15 cm wide.
- Sculpt six shallow channels into each pumpkin, then install the 10–12 mm eyes and add the black triangular nose and curved smile.
- Crochet fourteen tapered black hat crowns and fourteen 35-to-37-stitch brims, then connect each crown to its brim.
- Make fourteen colored bands in purple, olive or rust and attach one rectangular gold buckle to the front of each band.
- Pin every completed hat above its pumpkin face, keeping the brim approximately 10–15 mm above the eye posts, then sew the central brim section in place.
- Arrange three motifs in the first row, four in the second, four in the third and three in the fourth, staggering the outer rows between the four-motif columns.
- Sew each pumpkin around its rear perimeter and add two or three small black tacks to the hat crown while leaving the dimensional centers and brim tips free.
- Work the olive, cream, orange, brown, orange and cream border rounds followed by the deep-purple scalloped outer edge.
- Block the cream field and perimeter without flattening the pumpkins or hats, then reshape every lobe, brim and curved hat point by hand.
The completed blanket should display fourteen raised Jack-o’-lantern faces in a staggered four-row composition, each topped by a separate black witch hat with a colored band and buckle.
7 Technical Tips
- Hat brim covers an eye: The brim is positioned too low on the pumpkin crown. Maintain approximately 10–15 mm between the lower brim edge and each safety-eye post before sewing.
- Pumpkin makes the cream field pucker: The attachment thread is tighter than the blanket fabric. Keep perimeter tacks approximately 10–12 mm apart and loosen them if the background rises more than about 5 mm.
- One pumpkin becomes much deeper: The fourteen bodies contain inconsistent filling. Keep pre-attachment depth around 15–20 mm and remove stuffing when a motif rises more than approximately 4 mm above the batch average.
- Witch-hat point folds sharply: Too much of the upper crown has been tacked into a forced bend. Curve only the upper 4–5 cm and hold it with two or three relaxed concealed stitches.
- Hat brim curls toward the face: Black-yarn tension is tighter than the crown. Block each finished brim near 17–19 cm and leave the outer 20–25 mm on both sides free during attachment.
- Four-motif rows become crooked: Centers were judged from pumpkin edges rather than fixed blanket marks. Set center markers approximately 24–27 cm apart before pinning any complete motif.
- Purple scalloped edge waves: Shells are packed into too few base stitches. Maintain the skip-1, 5-dc, skip-1 sequence and alter spacing only beside a corner when alignment requires it.
Why the Pumpkins Stay Shallow
A freestanding pumpkin can be packed firmly because it supports itself on a table. A blanket appliqué has a different job.
Fourteen fully stuffed pumpkins would create substantial weight and make the cream field sag between motifs.
Shallow filling keeps enough relief to define the orange lobes while allowing the blanket to fold over an armchair.
Most padding belongs near the outer pumpkin wall. Keep the center comparatively soft so the body can flatten against the background.
Why the Hat Is Constructed Separately
The black witch hat is wider than the pumpkin crown, so integrating both parts into one stuffed piece would make face placement difficult.
A separate hat provides three controls: brim height, crown angle and band color.
You can place the finished black hat on a completed pumpkin, move it several millimeters in either direction and check the eye clearance before sewing.
This modular approach is central to the witch pumpkin crochet blanket pattern because the hat carries nearly half of each motif’s total height.
Controlling the Four-Row Layout
Alternating three and four motifs would create a conventional staggered arrangement, but the image uses a broad center with two four-motif rows.
That concentrates more pumpkin faces through the middle of the blanket.
The three-motif top and bottom rows provide greater cream space around the border.
Before sewing, place all fourteen motifs on the blocked field and view the composition from several feet away.
Do not attach them one at a time without testing the complete layout.
Changing the Hat-Band Colors
Purple gives the strongest Halloween contrast with orange.
Olive ties the hats into the fall border.
Rust produces a warmer harvest version.
You can use one color for all fourteen bands, but changing the band every few motifs breaks up the repeated black hats without altering the pumpkin bodies.
Keep the gold buckle consistent so all fourteen hats still read as one coordinated motif set.
Changing the Pumpkin Faces
The reference uses similar smiling faces rather than fourteen radically different expressions.
Small variation can come from mouth curvature and tooth placement.
Keep the eye spacing consistent.
Move the nose no more than a few millimeters from the vertical center line.
If multiple different expressions are used, retain the same hat dimensions so the blanket does not become visually irregular in both face and silhouette at once.
Changing the Blanket Size
A smaller lap blanket can use nine motifs arranged three by three.
A larger throw can use sixteen motifs in a four-by-four layout.
For eighteen motifs, arrange four, five, five and four.
Resize the cream field before changing the pumpkin itself.
The photographed scale works because each complete pumpkin-and-hat unit occupies roughly one-quarter of the blanket width while still leaving visible cream space around it.
Batching Fourteen Motifs
Complete all pumpkins before beginning the hats.
That sequence lets you compare body widths and face placement as one group.
Next work every crown, then every brim.
Add the bands and buckles after the black pieces are standardized.
Finish with complete motif assembly.
Working by component is faster to audit and makes one unusual hat or pumpkin easier to identify before attachment.
Controlling the Safety-Eye Placement
Do not judge the eyes against the pumpkin alone.
Temporarily pin a finished hat in place first.
The eyes should remain completely visible beneath the brim, with approximately 10–15 mm between the posts and lower brim edge.
If the hat has to sit unusually high to clear the eyes, move the eyes down before fastening the washers.
After the hardware is locked, correcting vertical eye placement is no longer practical.
Keeping the Border Flat
The border contains several color changes and a final scalloped edge, so small stitch-count errors can accumulate.
Lay the blanket flat after every two rounds.
If the edge begins to flare, correct the current round rather than expecting the scallops to absorb the excess.
Keep the purple shells relatively shallow so they frame the Halloween motifs without increasing the blanket width dramatically.
Final Blocking
Pin the four corners first.
Continue along the long edges and mark the midpoint of every side.
Do not place a blocking cloth or heavy object over the raised pumpkins.
Let the cream field and multicolor perimeter settle flat.
After drying, lift the pumpkin lobes and brim tips with your fingers.
Adjust each pointed crown so its curve remains visible from the front.
Inspect the four motif rows for alignment before weaving any final structural tails deeper into the blanket.
Conclusion
Finish one complete pumpkin-and-hat unit before batching the remaining thirteen because eye clearance and brim width control the final motif scale. Your next step is to block the cream field, make one 42-stitch pumpkin and test a 17–19 cm hat brim approximately 10–15 mm above the eyes. Keep the pumpkin padding shallow and the hat crown partly free. Share the finished witch pumpkin crochet blanket pattern project on Pinterest with all fourteen faces visible, then post a hat-and-buckle close-up on Instagram using #WitchPumpkinBlanket. For this blanket specifically, would you keep the mixed purple, olive and rust hat bands or make all fourteen bands purple?









