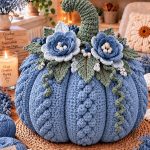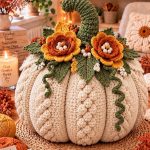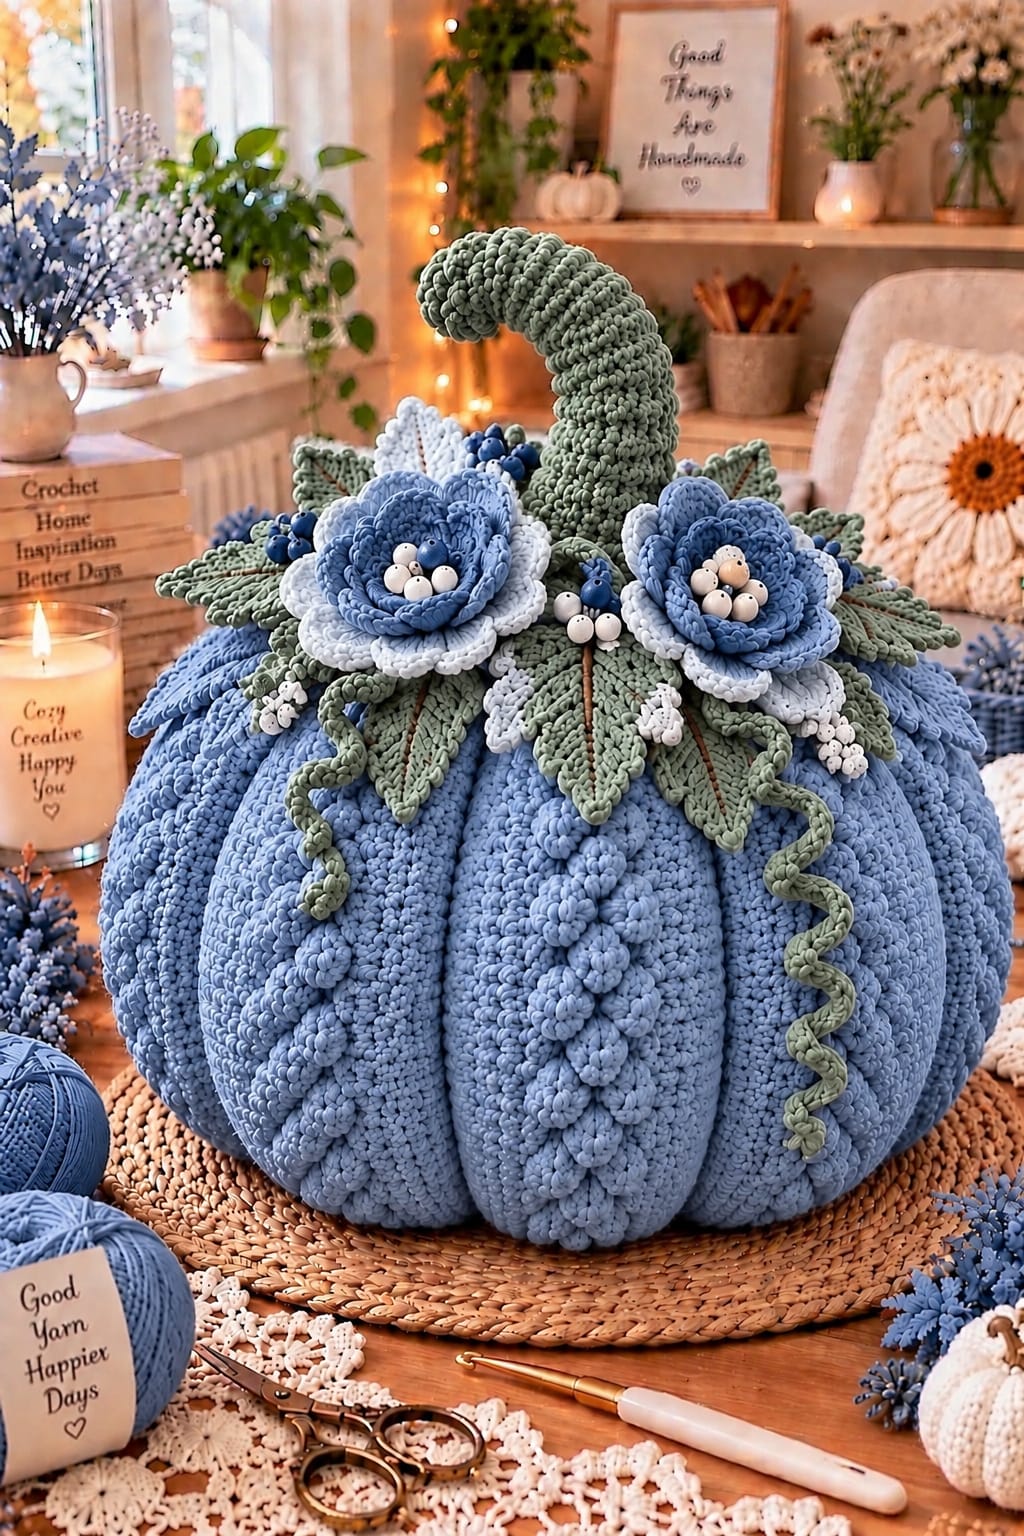
A dusty-blue pumpkin this wide needs pronounced channels to stop the body reading as a plain stuffed sphere. This giant blue crochet pumpkin pattern recreates the photographed design with a large sculpted body, curved sage stem, layered blue-and-white flowers, pointed foliage, berry clusters, raised botanical trails and hanging spiral vines. The photo-inspired target is approximately 40–45 cm wide and 50–55 cm high.
The Design: What Makes This Blue Pumpkin Different
The pumpkin combines three different types of dimension. First, external sculpting strands divide the oversized blue body into ten substantial ribs. Second, small raised blue motifs travel vertically down selected front lobes, emphasizing their length without hiding the underlying crochet. Third, the crown spreads outward with layered flowers and pointed leaves before rising into a tall curved stem.
Color placement is equally important. Dusty blue dominates the body and flower centers, sage controls the stem and foliage, while pale blue-white petals and cream berries create small areas of contrast. The main construction mistake with a floral crochet pumpkin of this scale is making the crown too narrow. Large flowers and leaves need to extend across several ribs to balance the oversized body.
Project Info at a Glance
| Skill Level | Estimated Time | Finished Size | Body Hook | Yarn |
|---|---|---|---|---|
| Intermediate | 17–23 hours | Approx. 40–45 cm wide × 50–55 cm high | 7–8 mm | Super Bulky #6 and Bulky #5 |
These measurements are reconstruction targets estimated from the photograph rather than measurements taken directly from the pictured object. Actual dimensions depend on yarn construction, hook size, stuffing density and sculpting tension.
Materials and Tools
Yarn
- Dusty blue — Super Bulky #6 — approximately 800–950 g for the pumpkin body
- Sage green — Super Bulky #6 — approximately 130–170 g for the large curved stem
- Sage green — Bulky #5 — approximately 180–230 g for leaves and vines
- Dusty blue — Bulky #5 — approximately 140–180 g for flowers and raised body motifs
- Pale blue or icy blue — Bulky #5 — approximately 100–130 g for outer flower petals and accent leaves
- Warm cream — Bulky #5 — approximately 70–100 g for flower centers and berry clusters
- Deep navy blue — Bulky #5 — approximately 30–50 g for dark berry accents
Tools
- 7–8 mm crochet hook for the pumpkin body
- 6 mm crochet hook for the stem
- 4.5–5.5 mm crochet hook for flowers, leaves, berries and vines
- Polyester fiberfill — approximately 1–1.4 kg
- Long upholstery needle
- Large tapestry needle
- Locking stitch markers
- Rust-resistant pins
- Sharp scissors
- Tape measure
Abbreviations
- MR — magic ring
- ch — chain
- sc — single crochet
- hdc — half double crochet
- dc — double crochet
- tr — treble crochet
- inc — increase
- dec — decrease
- sl st — slip stitch
- BLO — back loop only
- FLO — front loop only
- st/sts — stitch/stitches
For an invisible decrease, insert the hook through the front loops of the next two stitches and complete one single crochet through both; this reduces the gaps that can appear during the closing rounds.
Gauge and Finished Measurements
Target approximately 9–10 single crochet stitches per 10 cm using the super-bulky body yarn. Gauge is less important than fabric density, but the finished crochet must resist opening when the pumpkin is firmly stuffed.
After sculpting, the body should measure approximately 40–45 cm across. The flower and foliage arrangement can extend 5–10 cm beyond the body at the widest points. Including the curved stem, target an overall height of approximately 50–55 cm.
Pattern — Step by Step
Oversized Dusty-Blue Pumpkin Body
Yarn: dusty-blue Super Bulky #6. Work continuously in a spiral and mark the first stitch of every round.
R1: 6 sc in MR. (6)
R2: inc ×6. (12)
R3: (sc, inc) ×6. (18)
R4: (2 sc, inc) ×6. (24)
R5: (3 sc, inc) ×6. (30)
R6: (4 sc, inc) ×6. (36)
R7: (5 sc, inc) ×6. (42)
R8: (6 sc, inc) ×6. (48)
R9: (7 sc, inc) ×6. (54)
R10: (8 sc, inc) ×6. (60)
R11: (9 sc, inc) ×6. (66)
R12: (10 sc, inc) ×6. (72)
R13: (11 sc, inc) ×6. (78)
R14: (12 sc, inc) ×6. (84)
R15–R32: Sc in every stitch around. (84)
The long 84-stitch plateau creates the oversized circumference needed for the broad, low pumpkin shown in the image.
R33: (12 sc, dec) ×6. (78)
R34: (11 sc, dec) ×6. (72)
R35: (10 sc, dec) ×6. (66)
R36: (9 sc, dec) ×6. (60)
Begin stuffing. Fill around the outer wall first rather than packing the center immediately.
R37: (8 sc, dec) ×6. (54)
R38: (7 sc, dec) ×6. (48)
R39: (6 sc, dec) ×6. (42)
R40: (5 sc, dec) ×6. (36)
Continue stuffing firmly around the circumference. Keep the central vertical core slightly softer so the sculpting yarn can pull the body inward.
R41: (4 sc, dec) ×6. (30)
R42: (3 sc, dec) ×6. (24)
R43: (2 sc, dec) ×6. (18)
R44: (sc, dec) ×6. (12)
R45: dec ×6. (6)
Fasten off with a 30 cm tail. Pass the tail through the front loops of the remaining six stitches, pull closed and secure.
Sculpting the Ten Pumpkin Ribs
Cut a long doubled strand of matching dusty-blue yarn. Approximately 300–350 cm gives enough working length for a large body.
Insert a long upholstery needle through the bottom center and exit through the crown. Carry the strand down the outside of the pumpkin and return through the bottom center.
Pull gently to establish the first groove.
Repeat until the circumference has been divided into ten sections. Do not fully tighten the first few channels while the remaining positions are still unmarked.
View the pumpkin from directly above. Adjust the strands until all ten ribs appear reasonably equal.
Make a second pass through each channel, increasing tension gradually. The final grooves should be deep enough to separate the lobes without crushing the stuffing.
Raised Blue Botanical Motifs — Make 15–18
Yarn: dusty-blue Bulky #5.
R1: 6 sc in MR. (6)
R2: inc ×6. (12)
R3: *Sl st in next st, ch 3, 3 hdc in next st, ch 3, sl st in next available st.* Repeat around to form six rounded lobes.
Fasten off with a 20 cm sewing tail.
Make enough motifs to decorate approximately three prominent front ribs.
Attaching the Raised Trails
Pin four to six motifs vertically along one front lobe. Begin below the crown and continue toward the lower third of the body.
Maintain approximately 1–2 cm between neighboring motifs.
Sew through the center and one upper edge of each motif. Leave most of the lobes unattached so the surface remains visibly raised.
Repeat on two additional ribs. Slightly offset the starting heights so the three trails do not appear mechanically identical.
Tall Curved Sage Stem
Yarn: sage-green Super Bulky #6.
R1: 6 sc in MR. (6)
R2: inc ×6. (12)
R3: (sc, inc) ×6. (18)
R4: BLO sc around. (18)
R5–R9: Sc around. (18)
R10: 13 sc, sl st in next 5 sts. (18)
R11: Sc around. (18)
R12: 12 sc, sl st in next 6 sts. (18)
R13–R14: Sc around. (18)
R15: 11 sc, sl st in next 7 sts. (18)
R16–R18: Sc around. (18)
R19: (sc, dec) ×6. (12)
R20–R26: Sc around. (12)
R27: 8 sc, sl st in next 4 sts. (12)
R28–R31: Sc around. (12)
R32: dec ×6. (6)
Stuff the lower 10–12 cm firmly. Reduce the stuffing progressively toward the tip so the upper stem can bend into the broad hook shape shown in the photograph.
Fasten off, close the final opening and leave a long sewing tail.
Large Layered Blue Flower — Make 2
The photographed flowers combine pale outer petals with deeper dusty-blue inner layers.
Pale Blue Outer Petal Layer
Yarn: pale icy blue.
R1: 6 sc in MR. (6)
R2: inc ×6. (12)
R3: (sc, inc) ×6. (18)
R4: Create six ch-7 loops evenly around the center.
R5: Into each loop work (sc, hdc, 3 dc, 3 tr, 3 dc, hdc, sc).
Fasten off.
Dusty-Blue Middle Petal Layer
Join dusty-blue yarn behind the outer petals.
Create six ch-6 loops distributed evenly around the flower.
Into each loop work (sc, hdc, 3 dc, 2 tr, 3 dc, hdc, sc).
Fasten off.
Dusty-Blue Inner Petal Layer
Join dusty blue close to the center.
Create six ch-5 loops.
Into each loop work (sc, hdc, 3 dc, tr, 3 dc, hdc, sc).
Fasten off with a 35 cm tail.
Turn the inner petals upward before attaching the center pieces. A finished large flower should measure approximately 13–16 cm across.
Small Pale Blue Flower — Make 1
R1: 6 sc in MR. (6)
R2: inc ×6. (12)
Create six ch-5 loops.
Into each loop work (sc, hdc, 3 dc, tr, 3 dc, hdc, sc).
Create six ch-4 loops closer to the center.
Into each loop work (sc, hdc, 3 dc, hdc, sc).
Fasten off with a 30 cm tail.
Cream Flower Center Bobbles — Make 12–14
Yarn: warm cream Bulky #5.
R1: 6 sc in MR. (6)
R2: Sc around. (6)
R3: dec ×3. (3)
Add a tiny piece of yarn scrap for filling if necessary.
Fasten off and close.
Arrange five or six cream bobbles in each large flower center.
Blue Flower Center Bobbles — Make 6
Repeat the cream bobble pattern using dusty-blue or medium-blue yarn.
Mix one or two blue bobbles among the cream pieces in each flower. Keep the center asymmetrical rather than arranging every bobble in a rigid circle.
Large Sage Leaves — Make 10
Yarn: sage-green Bulky #5.
Foundation: Ch 17.
Beginning in the second chain from the hook work:
Sl st, sc, hdc, dc, tr in next 6 chains, dc, hdc, sc.
Work 3 sc into the final chain.
Rotate the work and continue along the opposite side of the foundation:
Sc, hdc, dc, tr in next 6 chains, dc, hdc, sc, sl st.
Work one round of sc around the leaf. At the point work (sc, ch 2, sc).
Surface sl st along the foundation chain to create the prominent center vein.
Fasten off with a 30 cm sewing tail.
Medium Sage Leaves — Make 8
Ch 13.
Use the large-leaf construction but reduce the longest treble section to four stitches.
Finish with a ch-2 point and a surface slip-stitch center vein.
Fasten off with a 25 cm tail.
Small Sage Leaves — Make 6
Ch 9.
Beginning in the second chain work sl st, sc, hdc, dc in next 2 chains, hdc, sc.
Work 3 sc in the final chain.
Mirror the sequence along the opposite side.
Add a final sc edging and work (sc, ch 2, sc) at the point.
Fasten off.
Pale Blue Accent Leaves — Make 4
Use pale-blue yarn and the medium-leaf instructions.
Place these leaves close to the large flowers rather than around the full circumference. Their purpose is to connect the pale outer petals to the foliage layer.
Deep Blue Berries — Make 12
Yarn: deep navy or medium blue.
R1: 6 sc in MR. (6)
R2: Sc around. (6)
R3: dec ×3. (3)
Add a tiny amount of yarn scrap if required.
Fasten off with a sewing tail.
Cream Berries — Make 12
Repeat the same three-round berry pattern with cream yarn.
Arrange cream and blue berries in compact groups of three to five pieces.
Long Sage Corkscrew Vines — Make 2
Ch 52.
Starting in the second chain from the hook, work 3 sc into every chain.
For a tighter lower curl, work 4 sc into every third chain across the final 12 chains.
Fasten off with a 25 cm tail.
Short Sage Corkscrew Vines — Make 2
Ch 28.
Starting in the second chain, work 3 sc into every chain.
Fasten off with a 20 cm tail.
Arranging the Floral Crown
Place the curved stem into the center of the crown first. Its bend should remain visible above the flowers rather than disappearing behind them.
Arrange five large sage leaves across the front half and five around the back and sides. Their pointed ends should project beyond the flowers.
Add the medium leaves between these larger pieces. Use small leaves to fill narrow gaps close to the stem.
Position the two large blue flowers across the front. One can sit approximately 2–3 cm higher than the other to avoid a rigid symmetrical line.
Tuck the pale-blue accent leaves behind the flowers. Add berry clusters last so they remain visible rather than becoming buried under the foliage.
Creating the Correct Flower Depth
Do not sew every petal to the pumpkin.
Secure the flower through its center and through the bases of two or three inner petals. The pale outer layer should remain mostly free.
Angle the outer petals away from the center. Lift the middle dusty-blue layer slightly, then turn the innermost petals upward around the cream-and-blue bobbles.
This creates three distinct levels instead of one flat crocheted disk.
Assembly
- Stuff and close the dusty-blue pumpkin body, then divide it into approximately ten deep ribs using doubled matching yarn.
- Position the curved sage stem at the crown and sew through several lower stem rounds so the large upper section remains stable.
- Arrange the ten large sage leaves around the stem and attach each at the base plus a second point approximately 2–3 cm toward the tip.
- Add the medium, small and pale-blue accent leaves between the large foliage pieces while keeping the pointed tips visible.
- Position the two large layered blue flowers across the front of the crown and secure their centers and inner petal bases.
- Add the smaller pale-blue flower and sew the cream-and-blue bobbles into the recessed centers of the large blooms.
- Attach compact cream and dark-blue berry clusters between the flowers, stem and foliage.
- Sew the raised dusty-blue botanical motifs down approximately three front-facing pumpkin ribs.
- Attach the long and short sage corkscrew vines beneath the foliage, securing only the upper 1–2 cm of each vine.
- Weave all remaining tails into matching stitches, separate the flower layers, reshape the leaf points and adjust the stem into one continuous curve.
The finished piece should show ten broad blue ribs beneath a wide botanical crown, with the sage stem rising clearly above the layered blue flowers.
7 Technical Tips
- Shallow rib failure: Keep the central core approximately 15–20% softer than the outer body. A completely rigid center prevents the sculpting strands from sinking deeply into a 40–45 cm pumpkin.
- Unequal lobes: Mark all ten sculpting positions before the final tightening pass. Adjacent channels that differ by more than approximately 2–3 cm create noticeably unequal front ribs.
- Visible stuffing: Stretch the blue fabric over your fingers before filling the body. If white fiberfill is visible through the stitches, reduce the body hook by approximately 0.5–1 mm.
- Stem leaning at the base: Stuff the lowest 10–12 cm firmly and sew through multiple lower rounds. The crown should not depend on a single attachment point to support the curved stem.
- Flat flower failure: Leave most of each 13–16 cm flower perimeter unsewn. Attaching every outer petal removes the layered profile visible between the pale and dusty-blue sections.
- Leaf rotation: Anchor every large sage leaf at two points at least 2 cm apart. One stitch at the base allows a heavy leaf to twist underneath the flowers.
- Stretched corkscrew vines: Attach only the top 1–2 cm of each spiral. Sewing farther down the vine pulls the coils against the pumpkin and reduces their diameter.
Making the Blue Ribs Deeper
Deep sculpting begins during stuffing rather than after the body has been closed. Pack the outer circumference firmly but leave a softer column through the vertical center.
Make the first sculpting pass with moderate tension. After all ten sections are visible, return to the first groove and tighten the channels incrementally.
Alternate between opposite sides of the pumpkin. Tightening several neighboring ribs consecutively can pull the entire body off center.
If one front channel remains too shallow, make an additional pass directly through that existing groove.
Stuffing the Oversized Body Evenly
Add fiberfill in small portions. Large compressed pieces create hard areas that resist sculpting.
Build the lower perimeter first and rotate the pumpkin after every few handfuls.
Before closing the final rounds, place the pumpkin on a flat surface. It should settle onto a broad base rather than balancing on the bottom center.
If the body rocks, remove some stuffing from the central underside and move it outward into the lower lobes.
Shaping the Curved Sage Stem
The stem in the reference design bends progressively rather than forming a right angle.
The slip-stitch sections shorten one side of the crochet tube and encourage this arc. Stuff the lower portion firmly, then reduce the density as the stem rises.
Shape the finished stem with both hands.
If additional curvature is needed, sew several hidden stitches between rounds on the inside of the bend. Tightening those stitches shortens one edge and holds the arc more securely.
Keeping the Blue Palette Defined
The body, inner flower petals and raised motifs all belong to the same color family, so value differences matter.
Use a medium dusty blue for the body. Select a slightly deeper blue for some flower details and berries, then use pale icy blue around the outer petals.
Cream should remain limited to the flower centers and small berry groups.
The sage foliage acts as the strongest color break between the blue body and blue flowers.
Positioning the Raised Botanical Trails
Do not decorate every rib. Leaving several lobes plain makes the raised trails easier to see.
Three decorated front ribs provide enough repetition for the photographed effect.
Begin each trail beneath the foliage and finish before reaching the lowest curve of the pumpkin.
Rotate individual motifs slightly rather than placing every lobe in exactly the same orientation.
Creating Pointed Sage Foliage
Keep the foundation chain loose enough that the leaf can lie flat.
The tallest stitches belong near the center of the leaf, while shorter stitches taper toward both ends.
Work the ch-2 point tightly enough to remain defined.
Add the surface slip-stitch vein only after the leaf shape is complete. If that vein causes the leaf to fold in half, remove it and repeat with looser tension.
Berry Cluster Placement
Use groups of three to five berries rather than distributing individual balls evenly around the crown.
Place dark-blue clusters against pale petals or sage leaves for contrast.
Cream berries show most clearly against dusty-blue flowers and green foliage.
Keep the berry groups below the highest point of the flower petals so they remain secondary details.
Making a Medium Blue Pumpkin
Stop the body increases at 60 stitches instead of 84.
Work approximately 12–14 rounds at 60 stitches, then decrease by six stitches per round until closed.
Use eight sculpting channels.
Reduce the crown to two flowers, six large leaves, four medium leaves and one long corkscrew vine.
Shorten the stem by approximately six rounds.
Making a Small Tabletop Pumpkin
Stop increasing at 42 stitches.
Work approximately 9–11 rounds without increases before beginning the decrease sequence.
Use six or eight sculpting channels.
Add one layered blue flower, four medium sage leaves, several berries and one short spiral vine.
For this smaller version, Bulky #5 yarn can replace the super-bulky body yarn.
Alternative Blue Color Combinations
For a softer palette, combine powder blue, eucalyptus green and ivory.
A darker version can use navy for the pumpkin, forest green for the stem and foliage, and silver-blue outer petals.
For stronger contrast, pair denim blue with olive leaves and warm cream flowers.
A winter-oriented variation can combine pale blue, cool gray-green and snow white while retaining the same structural pattern.
Keep the body as the dominant color regardless of palette so the sculpted pumpkin form remains the primary element.
Care and Storage
Move the pumpkin by supporting the body from underneath. Do not lift it by the curved stem, flowers or leaves.
Follow the yarn manufacturer’s care instructions. Spot cleaning is practical for an oversized stuffed decoration because the dense body can take considerable time to dry after full washing.
Store the pumpkin in a container large enough to protect the curved stem.
Avoid compressing the flowers beneath other seasonal decorations. If the vines flatten during storage, rewind them gently around a finger to restore the spiral.
Final Finishing Check
Place the completed pumpkin at eye level and inspect the silhouette from the front.
The stem should rise clearly above the floral crown. Both large flowers need visible pale outer petals and darker inner layers.
Check that several pointed sage leaves extend beyond the flower edges.
Rotate the pumpkin and inspect all ten sculpted channels. Tighten only the ribs that have visibly relaxed.
Finish by separating the raised blue body motifs and allowing the two long sage vines to hang freely over separate lobes.
Conclusion
Complete the 84-stitch body and establish all ten channels before attaching any decoration. Next, make the curved sage stem and one 13–16 cm layered flower, then pin both components in place to confirm the scale of the crown. Build outward with pointed foliage, add the second flower and berry clusters, and finish with raised blue trails and loose corkscrew vines. Keep the central stuffing slightly softer so the sculpted channels remain pronounced. Save this giant blue crochet pumpkin pattern to Pinterest or share the finished version on Instagram with #BlueFloralCrochetPumpkin. For this blue pumpkin, would you use icy-blue outer petals or switch them to cream for stronger contrast?