Introduction
A maple leaf needs five recognizable lobes before the first cream vein can make sense. This crochet maple leaf coaster pattern recreates that geometry with worsted cotton, a 4 mm hook, shaped points, contrast edging, and surface-crochet veins. Expect a finished piece around 12–15 cm wide depending on tension. The project suits intermediate crocheters and produces a flat, washable table layer for mugs and seasonal place settings.
The Design: What Makes This Maple Leaf Different
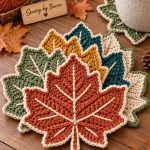
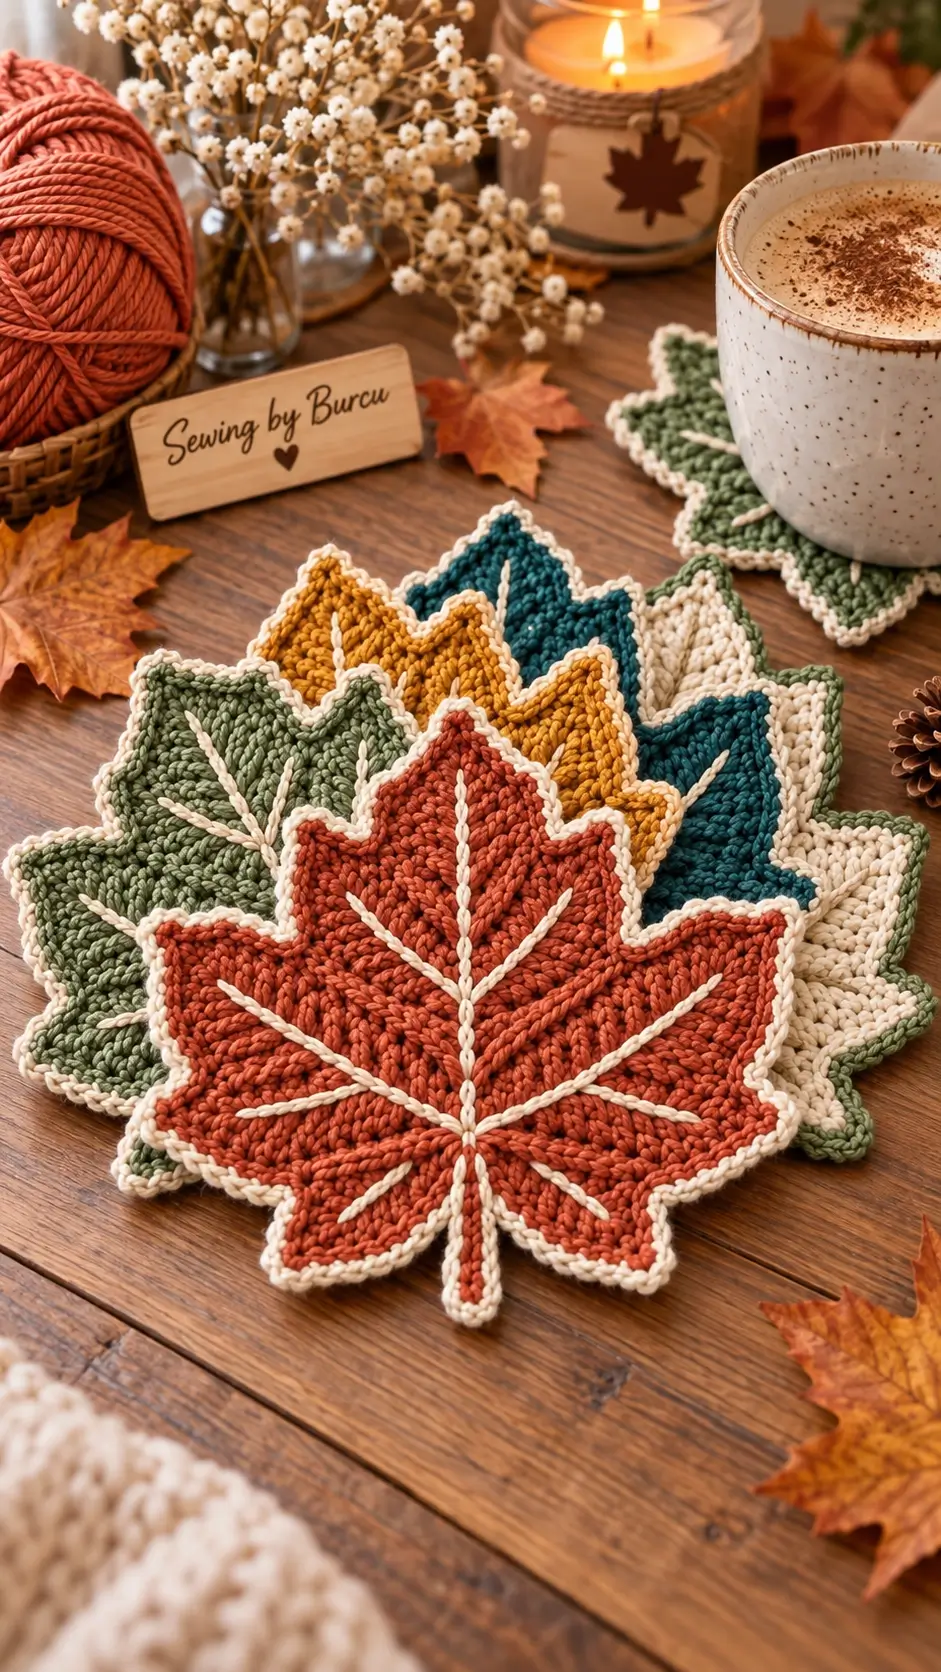
The silhouette does most of the work. Five major points are separated by deep valleys so the finished motif reads as a maple leaf rather than a generic round leaf. The center lobe is deliberately longest, while the lower side lobes are reduced to keep the base from becoming visually heavy.
A second structural decision concerns the border. The cream edging follows the rust-colored perimeter instead of forming a broad second layer; that keeps each point sharp. Raised veins are added after the main fabric is complete. This allows their angles to be positioned independently of the underlying stitch rows.
Two useful terms for this construction are crochet maple leaf pattern and fall crochet coaster. A common failure is overfilling the valleys with border stitches, which rounds off the characteristic maple silhouette.
Project Info at a Glance
| Skill Level | Time | Finished Size | Hook | Best For |
|---|---|---|---|---|
| Intermediate | 1–2 hours | About 12–15 cm | 4.0 mm | Coasters, table décor, garlands |
The 12 × 14 cm benchmark and 4 mm/worsted combination are documented by published maple-leaf coaster patterns. Finished dimensions can change considerably with yarn thickness, hook size, and individual tension.
Materials and Tools
Yarn
- Rust red — worsted/weight 4 cotton — approximately 20–30 g for one coaster.
- Cream — worsted/weight 4 cotton — approximately 5–10 g for the border and veins.
- Optional olive, mustard, teal, or natural — worsted cotton — use these as alternate main colors to reproduce the multi-leaf palette shown in the reference design.
The yarn quantities are project estimates. Actual consumption changes with yarn density, hook size, tension, and finished dimensions.
Tools
- 4.0 mm crochet hook
- Tapestry needle
- Locking stitch markers
- Scissors
- Blocking pins
- Blocking mat
- Measuring tape
No stuffing or safety eyes are required because this is a flat crochet motif.
Abbreviations
- ch — chain
- sc — single crochet
- hdc — half double crochet
- dc — double crochet
- tr — treble crochet
- sl st — slip stitch
- st/sts — stitch/stitches
- RS — right side
- BLO — back loop only
- FO — fasten off
Invisible decreases belong to three-dimensional amigurumi shaping and are not required for this flat leaf construction.
Pattern — Step by Step
The design depends on angular lobes rather than circular amigurumi shaping. For that reason, this pattern is worked flat and shaped with increases, decreases, chains, and slip stitches.
Leaf Center
Yarn: rust red.
Foundation: Ch 6.
R1: Beginning in second ch from hook, sc 5. Ch 1, turn. (5)
R2: 2 sc in first st, sc 3, 2 sc in last st. Ch 1, turn. (7)
R3: 2 sc in first st, sc 5, 2 sc in last st. Ch 1, turn. (9)
R4: Sc across. Ch 1, turn. (9)
R5: 2 sc in first st, sc 7, 2 sc in last st. Ch 1, turn. (11)
R6: Sc across. Ch 1, turn. (11)
Do not fasten off. The compact center acts as the junction from which the five maple lobes are developed.
Center Lobe
Work across the central section.
R7: Sl st 3, sc 5. Ch 1, turn. (5)
R8: Sc 5. Ch 1, turn. (5)
R9: Sc2tog, sc 1, sc2tog. Ch 1, turn. (3)
R10: Sc 3. Ch 1, turn. (3)
R11: Sc3tog. (1)
Point: Ch 3, sl st into first ch to form a small pointed picot.
Fasten off. Leave a 10 cm tail.
The center point should extend farther than the adjoining lobes. If it contracts after the final border, block it to length before adding the surface veins.
Upper Left Lobe
Yarn: rust red.
Join yarn approximately two stitches left of the center-lobe base.
R1: Sc 5. Ch 1, turn. (5)
R2: 2 sc in first st, sc 3, 2 sc in final st. Ch 1, turn. (7)
R3: Sc 7. Ch 1, turn. (7)
R4: Sc2tog, sc 3, sc2tog. Ch 1, turn. (5)
R5: Sc2tog, sc 1, sc2tog. Ch 1, turn. (3)
R6: Sc3tog. (1)
Ch 2, sl st into first chain for the point. Fasten off.
Upper Right Lobe
Repeat the upper-left lobe symmetrically on the opposite side.
R1: Sc 5. Ch 1, turn. (5)
R2: 2 sc in first st, sc 3, 2 sc in final st. Ch 1, turn. (7)
R3: Sc 7. Ch 1, turn. (7)
R4: Sc2tog, sc 3, sc2tog. Ch 1, turn. (5)
R5: Sc2tog, sc 1, sc2tog. Ch 1, turn. (3)
R6: Sc3tog. (1)
Ch 2, sl st into first chain to create the point. Fasten off.
Lower Left Lobe
Yarn: rust red.
Join yarn at the lower-left edge.
R1: Sc 4. Ch 1, turn. (4)
R2: 2 sc in first st, sc 2, 2 sc in last st. Ch 1, turn. (6)
R3: Sc 6. Ch 1, turn. (6)
R4: Sc2tog, sc 2, sc2tog. Ch 1, turn. (4)
R5: Sc2tog twice. (2)
R6: Sc2tog. (1)
Ch 2, sl st into first chain. Fasten off.
Lower Right Lobe
Work as for the lower-left lobe, mirrored.
R1: Sc 4. Ch 1, turn. (4)
R2: 2 sc in first st, sc 2, 2 sc in last st. Ch 1, turn. (6)
R3: Sc 6. Ch 1, turn. (6)
R4: Sc2tog, sc 2, sc2tog. Ch 1, turn. (4)
R5: Sc2tog twice. (2)
R6: Sc2tog. (1)
Ch 2, sl st into first chain. Fasten off.
Stem
Yarn: rust red.
Join yarn at the center of the leaf base.
R1: Ch 8.
Beginning in second chain from hook, sl st 2, sc 4, hdc 1. Join to the leaf base with sl st.
Fasten off. Leave a 10 cm tail and weave it into the back.
For a longer table-decoration version, increase the foundation to 10 chains. Keep the stem relatively narrow because widening it changes the maple-leaf proportions.
Cream Contrast Border
Yarn: cream.
Join cream yarn at the base of the stem.
Work one round of sc around the entire outer perimeter. Place 1 sc along short edges, 2 sc where extra height is required around an outside corner, and sl st into the deepest lobe valleys.
At each major side-lobe tip, work:
(sc, ch 2, sc) into the tip.
At the central lobe, work:
(sc, ch 3, sc).
The longer center picot reinforces the hierarchy of the five lobes. Avoid placing several additional stitches into the valleys because excess fabric makes the cream border ripple.
Join with sl st and fasten off.
Central Raised Vein
Yarn: cream.
The leaf uses a visible cream line running from the stem toward the central point. Surface slip stitch produces a raised decorative line without adding a separate sewn piece.
Insert the hook from the front near the base of the leaf. Hold the cream yarn behind the work and pull up a loop.
Surface sl st in a straight line through the center of the leaf toward the tallest point. Keep each slip stitch approximately one row high.
Stop approximately 1–1.5 cm before the cream border.
Fasten off on the back.
Side Veins — Make 6
Yarn: cream.
Create three branches on each side of the central vein.
Start each branch on the central line and angle it toward a major lobe. Surface sl st outward for approximately 3–5 cm, depending on the finished leaf size.
The upper branches should point toward the two upper lobes. Middle branches run toward the widest lateral points. Lower branches angle toward the lower lobes.
Fasten off every branch on the back and weave the tails under matching rust stitches.
Optional Color Variants
The same leaf construction can be worked in rust, olive, mustard, teal, and natural cream. Keeping a contrasting outline produces the strongest definition around the pointed perimeter.
For a cream main leaf, change the outline and veins to olive, teal, or rust rather than using cream on cream. The structural pattern remains unchanged.
Assembly
- Block the rust leaf body before applying the decorative veins if the lobes curl significantly.
- Measure from the center base to the central point and align the stem with that axis.
- Pin all five major lobes so their points remain distinct.
- Steam or wet-block according to the yarn label, keeping the finished dimensions near the intended 12–15 cm range.
- Add the cream perimeter after the base has settled into its final shape.
- Mark the center vein with removable stitch markers before surface crocheting it.
- Work the central vein from the base toward the highest lobe.
- Add three side veins to each half, checking that corresponding branches meet the center at similar heights.
- Weave every tail across at least 3 cm of matching stitches on the wrong side.
- Block once more without stretching the lobe valleys outward.
The completed piece should lie flat with five readable major lobes, a narrow stem, a contrasting perimeter, and seven visible vein lines.
7 Technical Tips for a Better Maple Leaf Shape
- Lobe rounding: A maple point loses definition when too many border stitches occupy its tip. Use one ch-2 point on the four side lobes and a slightly taller ch-3 point at the center.
- Border rippling: Too many additional stitches at repeated corners can produce a wavy cream outline. Reduce the added stitches before attempting to correct the problem through blocking.
- Valley filling: Multiple sc stitches in a deep valley make the notch shallower. Use a slip stitch at the deepest point when a sharper indentation is required.
- Vein distortion: Tight surface slip stitches shorten the fabric underneath them. Each surface stitch should span roughly the same distance as one underlying row or stitch.
- Uneven symmetry: Attaching corresponding side veins at visibly different heights makes the leaf appear rotated. Mark all six branch endpoints before crocheting the first branch.
- Loose tails: A short tail can migrate through open crochet fabric after washing. Weave each finishing tail through at least 3 cm of same-color stitches and reverse direction once.
- Heat damage: Acrylic and cotton respond differently to steam. Keep direct heat away from the fabric and follow the yarn manufacturer’s care instructions rather than pressing the crochet with an iron.
Finishing the Crochet Maple Leaf Coaster
The final blocking stage determines whether the five points remain recognizable, so measure the leaf before cutting the last yarn tail. For a coordinated autumn set, make the next crochet maple leaf coaster pattern in olive, mustard, teal, or natural cotton while retaining a contrasting border and raised vein network.
Start with one test leaf and record its blocked width and height. Adjust the hook size if the finished coaster is substantially larger or smaller than the intended 12–15 cm range, then use the same hook and tension for the remaining pieces.
Pin the finished color set to your Pinterest fall-crochet board or share it on Instagram with #MapleLeafCoaster. Which color will you crochet next: mustard, olive, teal, or cream?