Introduction
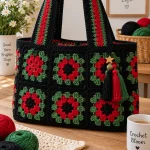
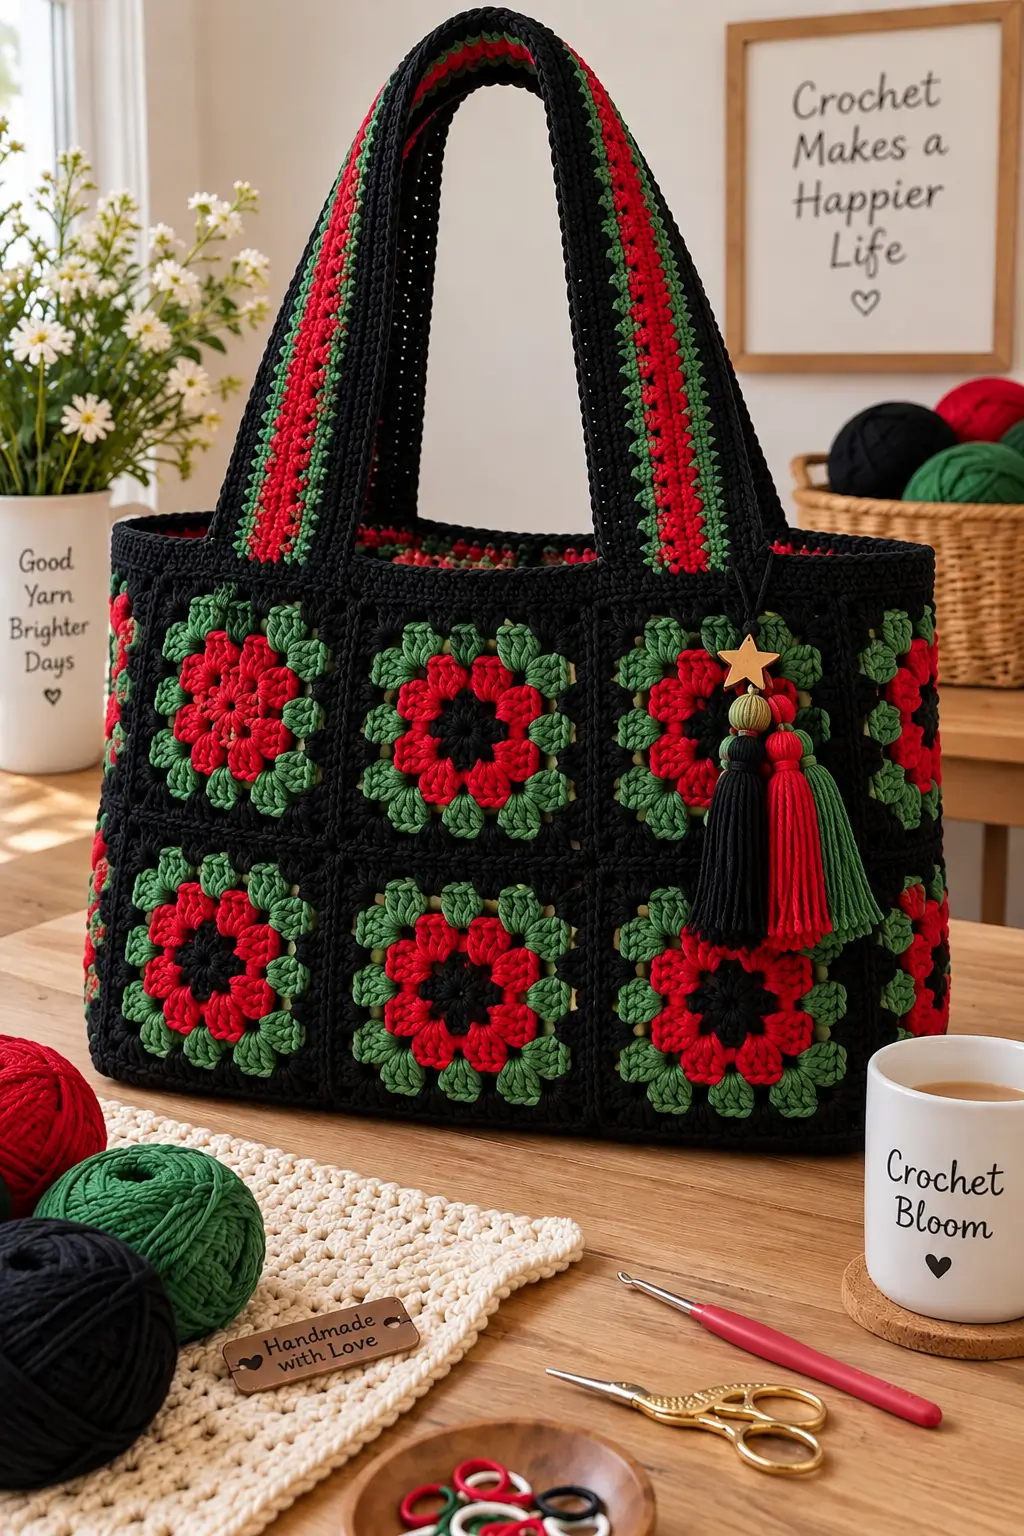
Red flower rounds surrounded by green clusters are what give this black tote its unusually graphic grid. This granny square tote bag crochet pattern uses worsted cotton, a 4 mm hook, joined floral motifs, reinforced straps and a tassel finish. Plan for an intermediate skill level and a medium tote around 30 cm tall. The modular construction also makes damaged squares easier to repair than a one-piece panel.
The Design: What Makes This Floral Tote Different
The strongest design decision is the black framework. Instead of allowing neighboring flowers to merge visually, a dark final motif round and dark joins create a separate frame around every red-and-green flower.
The second decision concerns proportion. Wide shoulder straps balance the relatively large rectangular body and distribute load over more stitches than a narrow chain strap. A floral granny square bag also needs controlled motif dimensions: even a 5 mm difference between squares can distort an assembled panel.
Color placement provides the third structural feature. Red occupies the flower round, green defines the foliage-like outer section, and black establishes both negative space and seams. One frequent error in a crochet flower tote bag is joining motifs before blocking them to equal dimensions. That transfers small gauge differences into the finished bag.
Project Info at a Glance
| Skill Level | Time | Finished Size | Hook | Best For |
|---|---|---|---|---|
| Intermediate | 8–12 hours | Approx. 28–32 cm body | 4 mm | Shoulder tote / everyday carry |
The finished measurement is a working target for this photo-inspired version. Exact dimensions depend on yarn, tension, motif gauge and panel layout.
Materials and Tools
Yarn
Use cotton or a firm cotton blend when possible. Worsted-weight cotton gives the motifs enough structure for a bag while keeping the individual flower clusters clearly defined.
- Black: #4 worsted cotton — approximately 150–200 g
- Red: #4 worsted cotton — approximately 75–100 g
- Green: #4 worsted cotton — approximately 75–100 g
- Tassel yarn: small quantities of black, red and green
Yarn quantities are estimates for this construction. Crochet tension, number of motifs, strap length and finished bag dimensions will change the total amount required.
Tools
- 4 mm crochet hook
- Tapestry needle
- Sharp scissors
- Locking stitch markers
- Measuring tape
- Blocking pins and blocking mat
- Optional cotton lining fabric
- Optional star charm or decorative bag charm
Abbreviations
- MR — magic ring
- ch — chain
- sc — single crochet
- hdc — half double crochet
- dc — double crochet
- sl st — slip stitch
- sp — space
- st/sts — stitch/stitches
- BLO — back loop only
- FO — fasten off
Invisible decrease is not required for the square motifs, but when used in three-dimensional crochet it is worked through the front loops of the next two stitches to reduce visible bulk.
Pattern — Step by Step
This tote is motif-based rather than amigurumi, so the six-stitch magic-ring increase and decrease formula used for spherical pieces does not apply. Granny squares grow through four corners, and the stitch placement must preserve those four corner points.
Floral Granny Square Motif
Make enough motifs for your selected bag layout. A 12-motif construction works well when using six squares for the front and six for the back. Additional motifs can be used for a larger bag or an alternative side and bottom construction.
Round 1 — Black: Make an MR. Ch 3, then work 11 dc into the ring. Join with sl st to the top of the beginning ch 3. (12 dc)
Fasten off black.
Round 2 — Red: Join red between two stitches. Ch 3 and work 2 dc in the same space. Ch 1. Continue working groups of 3 dc separated by ch 1 around the center, distributing the clusters evenly to create the red flower section.
Join with a sl st and fasten off red.
Round 3 — Green: Join green into a red chain space. Ch 3, 2 dc, ch 1, 3 dc in the same selected corner space.
Work compact 3-dc groups into the intervening spaces. Establish four clear corners using (3 dc, ch 2, 3 dc) in each corner position.
Place the motif on a flat surface before continuing. All four corners should be clearly defined and the motif should lie flat without cupping.
Round 4 — Black: Join black in one corner. Work (3 dc, ch 2, 3 dc) into each corner and a 3-dc group into each available side space, adding ch 1 between groups where required by the established spacing.
Join with sl st.
Fasten off and leave approximately 15 cm of yarn for weaving.
Block every completed motif to exactly the same dimensions before joining. Aim for approximately 10–11 cm per square, or use the natural measurement produced by your yarn and tension consistently across every motif.
Front Panel
Yarn: black for joining.
Arrange six floral motifs in a 3 squares across × 2 squares high grid. Position every red flower in the same orientation and check that the green outer sections line up consistently.
Pin neighboring motif corners before joining.
Join the horizontal seams with black using a flat slip-stitch seam or single crochet through corresponding loops. Avoid inserting an additional stitch into one motif without matching it on the neighboring motif.
Join the vertical seams using the same method.
Lay the completed panel flat and measure both diagonals. The measurements should be nearly identical. A substantial difference indicates uneven joining tension or mismatched motif dimensions.
Back Panel
Make another six floral motifs and arrange them in the same 3 × 2 configuration.
Join the squares in black using the same method as the front panel.
Place the front and back panels together after joining. Their widths, heights and corner positions should align before the side and bottom section is added.
The reverse side of the original photographed bag is not visible, so a matching floral back is a construction choice for this version.
Side and Bottom Gusset
Yarn: black.
The gusset creates depth and gives the tote a rectangular profile instead of producing a completely flat bag.
Chain enough stitches to make a strip approximately 8–10 cm wide.
Row 1: Sc in second ch from hook and in every chain across. Turn.
Row 2: Ch 1, sc in every stitch across. Turn.
Rows 3 onward: Repeat Row 2 until the strip is long enough to extend down one side of the front panel, across the entire bottom and up the opposite side.
Measure the actual panel rather than relying on a fixed row number. Individual motif dimensions determine the required gusset length.
Fasten off and leave approximately 30 cm of yarn for joining.
Mark the center of the gusset and the center of the panel bottom. Pin those two points together first.
Continue pinning toward both lower corners and then upward along each side. Join the gusset to the front panel using black yarn.
Repeat the process to attach the back panel.
Top Border
Yarn: black.
Round 1: Join black at one side seam. Ch 1 and sc evenly around the entire bag opening. Join with sl st.
Round 2: Ch 1, sc in each stitch around. Join with sl st.
Round 3: Repeat Round 2.
Round 4: Sl st loosely into every stitch around the opening.
Fasten off and weave the tail through at least 5 cm of dense black stitches.
The border stabilizes the opening, covers small variations along the motif edges and creates a stronger attachment area for the handles.
Striped Shoulder Handles — Make 2
The photographed tote uses wide, flat shoulder handles with black edges and red and green color sections. For this version, target approximately 65–70 cm for each finished handle.
Row 1 — Black: Chain to the required handle length. Sc in second ch from hook and every chain across.
Rows 2–3 — Black: Ch 1, sc across. Turn.
Rows 4–5 — Green: Change to green. Ch 1, sc across. Turn.
Rows 6–8 — Red: Change to red. Ch 1, sc across. Turn.
Rows 9–10 — Green: Change to green. Ch 1, sc across. Turn.
Rows 11–13 — Black: Change to black. Ch 1, sc across. Turn.
Fasten off with a 30 cm tail.
Make the second handle exactly the same way.
Place both handles beside each other before attachment. Their finished lengths should match closely so the bag hangs level.
Handle Reinforcement
Position the first handle symmetrically on the front panel. Measure from both side seams rather than judging the placement visually.
Pin the handle securely before sewing.
Sew a rectangular reinforcement area through the handle and top border. Add a diagonal X through the rectangle to distribute pulling force across a larger section of crochet.
Repeat at the opposite end of the handle.
Position the second handle on the back panel using the same measurements. Reinforce both ends in the same manner.
Check that all four attachment points sit at equal distances from their corresponding side seams.
Three-Color Tassel
Yarn: black, red and green.
Cut approximately 20–30 strands of each color to twice the intended finished tassel length.
Keep the three colors separated into individual bundles.
Fold each bundle in half at its midpoint.
Bind each bundle tightly approximately 1.5 cm below the fold.
Trim the black, red and green bundles to equal lengths.
Attach all three tassels to a shared cord or loop, positioning them next to one another.
Add an optional star charm above the tassels to reproduce the decorative detail visible on the reference bag.
Attach the decoration near one handle base rather than directly to a load-bearing section of the strap.
Optional Fabric Lining
A fabric lining is useful when the tote will carry keys, pens or other small objects that could pass through the openings between crochet clusters.
Measure the completed interior.
Cut two cotton fabric rectangles based on the finished panel dimensions, adding approximately 1.5 cm seam allowance around the sides and bottom.
Place the fabric pieces with right sides together and sew the side and bottom seams.
Fold the upper raw edge toward the wrong side.
Insert the lining into the crochet bag with the fabric wrong side against the inside of the crochet.
Pin the upper edge immediately below the black crochet border.
Hand-sew the lining into place using small stitches that do not show prominently on the outside of the tote.
Assembly
- Block every floral granny square to the same finished measurement before beginning any joins.
- Arrange six motifs into a 3 × 2 front panel and check the position of every red flower and green outer section.
- Join the front motifs with black yarn, matching every corner and corresponding cluster.
- Construct the matching back panel and compare its dimensions directly with the front.
- Crochet the black gusset according to the measured side-bottom-side perimeter of the finished panel.
- Pin the gusset at the bottom center, bottom corners and upper corners before completing the joins.
- Attach the second panel, then crochet the black border evenly around the complete bag opening.
- Position both striped handles symmetrically and reinforce all four attachment points with rectangular stitching and a diagonal X.
- Make the black, red and green tassels, trim them evenly and attach the optional star charm.
- Weave every yarn tail securely, install the optional fabric lining and block the completed tote according to the yarn manufacturer’s care instructions.
The completed tote should have square panel corners, matching handle drops, a level upper border and a gusset that sits flat across the base.
7 Technical Tips for a Better Granny Square Tote
- Control motif size. Keep blocked squares within approximately 2–3 mm of one another. A 5 mm discrepancy repeated across three motifs can shift a panel edge by 15 mm.
- Prevent joining-seam mismatch. Put a stitch marker through both layers at every motif corner before joining. Unmarked corners make it easier for one square to advance by a cluster or stitch.
- Watch joining tension. If a black joining seam causes the motifs to cup or fold inward, the joining tension is too tight. Try a hook approximately 0.5 mm larger for the seams.
- Measure handle stretch. Compare both handles under light tension before sewing them onto the bag. Correct any difference greater than approximately 5 mm before attachment.
- Keep the top border level. Count or mark stitches at each motif junction while working the first border round. Too many stitches create rippling; too few pull the opening inward.
- Pin every handle before sewing. Use at least five temporary attachment points across each handle base. This keeps the wide striped handle from rotating while reinforcement stitches are added.
- Secure color-change tails. Weave each tail through at least 5 cm of matching-color crochet and reverse direction once. Short tails can migrate toward the surface as the bag repeatedly flexes.
Finishing the Floral Granny Square Tote
Inspect every black joining seam from both sides. Loose ends should be woven back through dense stitches rather than trimmed directly beside a knot.
Place the finished bag on a flat surface and check the bottom corners. Both sides should rise at approximately the same angle. If one panel pulls inward, examine the gusset seam for an uneven stitch distribution.
Next, hang the empty tote from both handles. Compare the handle drops and check that the upper border remains level. Reinforce an attachment point before using the bag if visible stretching develops around the stitches.
For cotton yarn, final blocking can improve the alignment of the floral grid. Follow the care instructions for the specific yarn rather than applying high heat directly to an unknown fiber.
Conclusion
Check the blocked motif dimensions before committing the final seams; that measurement controls the finished tote more reliably than an assumed row count. For this granny square tote bag crochet pattern, the next practical step is to crochet one black, red and green test motif, block it, and calculate the final panel dimensions from that square. Photograph the completed tote square-on for Pinterest, then share a close view of the striped handles and three-color tassel on Instagram using #FloralGrannySquareTote. For this specific color layout, would you keep the medium leaf green shown in the reference or replace it with dark forest green for stronger separation against the red flowers?