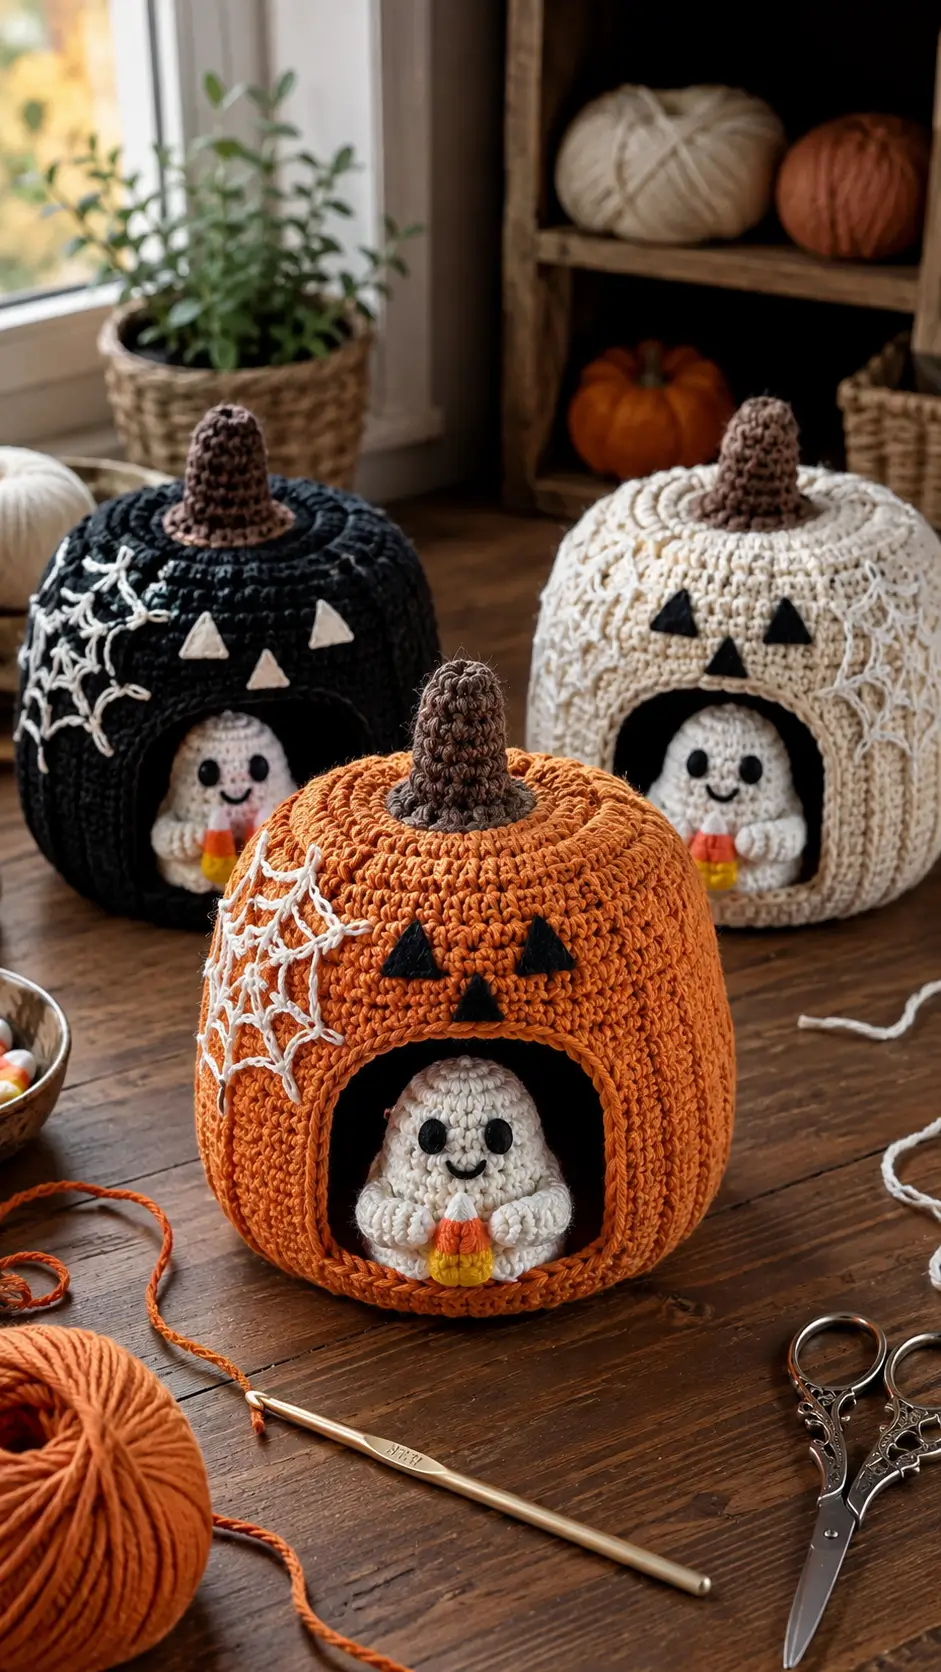
A ghost cannot sit inside a jack-o’-lantern unless the pumpkin keeps its doorway open under its own stuffing pressure. This ghost in pumpkin amigurumi crochet pattern solves that structural problem with a firm 42-stitch shell, reinforced opening and compact seated ghost. Use Worsted/Aran yarn, a 3.5 mm hook and 10 mm eyes for an approximately 21 cm display piece. Intermediate skills are appropriate, particularly for shaping the doorway and web.
The Design: What Makes the Pumpkin Ghost Different
The pumpkin is treated as a structure rather than a conventional stuffed sphere. Its broad 42-stitch plateau supplies enough circumference for an arched opening while the lower front edge remains wide enough to support the seated ghost. A separate black doorway panel creates visual depth without requiring the entire pumpkin to remain hollow.
The ghost uses a 30-stitch plateau, keeping its head large enough for 10 mm eyes while leaving clearance around the doorway. Short arms sit forward because the figure must visibly hold the candy corn instead of disappearing inside the shell.
Surface ribs add pumpkin definition after construction rather than complicating the main rounds. The most common mistake in a crochet pumpkin house is overstuffing beside the doorway; that pushes the arch inward and converts a clean opening into a narrow slit. This Halloween ghost crochet pattern therefore uses controlled stuffing around the front.
Project Info at a Glance
| Skill Level | Time | Finished Size | Hook | Best For |
|---|---|---|---|---|
| Intermediate | 6–8 hours | Approx. 21 cm including stem | 3.5 mm | Halloween shelf and table décor |
Published comparison projects range from an 8 cm ghost to approximately 22 cm for a larger pumpkin-and-ghost composition, so yarn choice remains a major size variable.
Materials and Tools
Yarn
- Burnt orange — Worsted/Aran — approximately 130 g — cotton or cotton/acrylic amigurumi yarn
- Cream/ivory — Worsted/Aran — approximately 45 g — matte cotton or cotton blend
- Brown — Worsted/Aran — approximately 12 g — for the stem
- Black — Worsted/Aran — approximately 8 g — for doorway and facial pieces
- White — Worsted/Aran — approximately 8 g — for the spiderweb
- Yellow — Worsted/Aran — approximately 3 g — for the candy corn
- Candy orange — Worsted/Aran — approximately 3 g — for the candy corn
Tools
- 3.5 mm crochet hook
- 10 mm safety eyes
- Polyester stuffing
- Yarn needle
- Stitch markers
- Scissors
- Pins
- Black embroidery yarn
- Optional plastic canvas strip for extra doorway reinforcement
Abbreviations
- MR — magic ring
- sc — single crochet
- inc — 2 sc in one stitch
- dec — invisible decrease
- sl st — slip stitch
- ch — chain
- BLO — back loop only
- FLO — front loop only
- FO — fasten off
For an invisible decrease, insert the hook through the front loops of the next two stitches and complete one single crochet through both loops.
Pattern — Step by Step
Work in a continuous spiral unless a section says otherwise. The shaping follows standard six-stitch amigurumi expansion: 6, 12, 18, 24, 30, 36 and 42 stitches.
Pumpkin House
Yarn: burnt orange — standard amigurumi shaping.
R1: 6 sc in MR (6)
R2: inc ×6 (12)
R3: (1 sc, inc) ×6 (18)
R4: (2 sc, inc) ×6 (24)
R5: (3 sc, inc) ×6 (30)
R6: (4 sc, inc) ×6 (36)
R7: (5 sc, inc) ×6 (42)
R8–R19: sc around (42)
R20: (5 sc, dec) ×6 (36)
R21: sc around (36)
R22: (4 sc, dec) ×6 (30)
R23: (3 sc, dec) ×6 (24)
R24: (2 sc, dec) ×6 (18)
R25: (1 sc, dec) ×6 (12)
R26: dec ×6 (6)
Stuff firmly at the back and sides but more lightly across the front. The 42-stitch plateau forms the main structural component.
Fasten off. Leave a 20 cm tail and close the remaining opening.
Use a long strand of orange yarn to make six evenly spaced surface ribs from the bottom center to the upper center. Pull each strand only until a shallow groove forms.
Black Doorway Panel
Yarn: black.
Ch 17.
Row 1: sc in second ch from hook and across (16)
Row 2: ch 1, turn, sc across (16)
Row 3: ch 1, turn, dec, 12 sc, dec (14)
Row 4: sc across (14)
Row 5: dec, 10 sc, dec (12)
Row 6: sc across (12)
Row 7: dec, 8 sc, dec (10)
Row 8: sc across (10)
Row 9: dec, 6 sc, dec (8)
Row 10: dec, 4 sc, dec (6)
Fasten off. Leave a 30 cm sewing tail.
Pin the panel to the lower front of the pumpkin. Sew around the curved sides and top, leaving the lower edge visually aligned with the pumpkin base. The black field creates the dark interior behind the ghost.
Ghost Head
Yarn: cream.
R1: 6 sc in MR (6)
R2: inc ×6 (12)
R3: (1 sc, inc) ×6 (18)
R4: (2 sc, inc) ×6 (24)
R5: (3 sc, inc) ×6 (30)
R6–R10: sc around (30)
Insert 10 mm safety eyes between R8 and R9, approximately 6 stitches apart.
R11: (3 sc, dec) ×6 (24)
R12: (2 sc, dec) ×6 (18)
R13: (1 sc, dec) ×6 (12)
R14: dec ×6 (6)
Stuff firmly before the final decrease.
Fasten off. Leave a 20 cm tail.
Ghost Body
Yarn: cream.
R1: 6 sc in MR (6)
R2: inc ×6 (12)
R3: (1 sc, inc) ×6 (18)
R4: (2 sc, inc) ×6 (24)
R5: (3 sc, inc) ×6 (30)
R6–R9: sc around (30)
R10: (3 sc, dec) ×6 (24)
R11: sc around (24)
R12: (2 sc, dec) ×6 (18)
R13: sc around (18)
Stuff the lower half firmly and the neck area moderately.
Fasten off. Leave a 25 cm tail for joining to the head.
Ghost Arms — Make 2
Yarn: cream.
R1: 6 sc in MR (6)
R2: inc ×6 (12)
R3–R5: sc around (12)
R6: dec ×6 (6)
Add only a small amount of stuffing to the rounded end. Flatten the open edge.
Fasten off. Leave a 20 cm tail on each arm.
The arms should project toward the candy corn rather than hang vertically.
Back Legs
No separate back legs are visible in the reference design. The ghost is seated as a continuous body inside the pumpkin doorway, so adding external legs would change the intended silhouette.
Cheek Patches — Make 2
Yarn: cream or very pale peach.
R1: 6 sc in MR (6)
R2: inc ×6 (12)
Fasten off. Leave a 12 cm tail.
Keep these patches subtle or omit them for a closer match to the reference design. The ghost’s face is primarily defined by the black eyes and curved embroidered mouth.
Pumpkin Stem
Yarn: brown.
R1: 6 sc in MR (6)
R2: inc ×6 (12)
R3–R8: sc around (12)
Stuff firmly enough that the stem remains upright.
Fasten off. Leave a 25 cm tail. Pin the stem over the pumpkin’s upper center and stitch securely around its base.
Jack-o’-Lantern Eyes — Make 2
Yarn: black.
Ch 5.
Row 1: sc in second ch from hook and across (4)
Row 2: ch 1, turn, dec, dec (2)
Row 3: dec (1)
Fasten off. Leave a 15 cm tail.
Position the triangular pieces above the doorway and angle them slightly toward the center.
Jack-o’-Lantern Nose
Yarn: black.
Ch 5.
Row 1: sc in second ch from hook and across (4)
Row 2: dec, dec (2)
Row 3: dec (1)
Fasten off. Leave a 15 cm tail. Place the nose centrally between the two eyes with its point directed downward.
Candy Corn
Yarn: yellow, orange and cream.
With yellow:
R1: 6 sc in MR (6)
R2: inc ×6 (12)
R3: sc around (12)
Change to orange:
R4: sc around (12)
R5: (1 sc, dec) ×4 (8)
Change to cream:
R6: sc around (8)
R7: dec ×4 (4)
Add a small amount of stuffing before R7.
Fasten off. Leave a 15 cm tail. The candy corn should fit between both ghost arms without covering the embroidered mouth.
Spiderweb
Yarn: white.
Make the central ring with ch 12, then sl st into the first chain.
Spoke 1: ch 16 and fasten the end to the pumpkin with a small stitch. Repeat until six spokes radiate from the central ring.
For the inner web line, join white yarn to one spoke approximately 4 cm from the center. Ch 5–7 to reach the next spoke and secure with sl st. Continue around all six spokes.
Repeat approximately 3 cm farther out, using ch 8–10 between spokes.
Fasten off each structural end securely. Keep the web slightly irregular; identical chain arches produce a wheel-like shape rather than the loose spiderweb structure required here.
Assembly
- Sew the ghost head centrally to the body, checking that the eyes face directly forward before tightening the final stitches.
- Pin the ghost against the black doorway panel so approximately two-thirds of the body remains visible.
- Embroider a shallow curved black mouth beneath the eyes, centered between them.
- Position the cheek patches beside the mouth only if using them; keep them flat and visually secondary.
- Sew both arms to the body’s upper sides, rotating their ends toward the center.
- Place the candy corn between the arms and attach it to both hands plus one point on the body.
- Sew the brown stem to the top center of the pumpkin and check that it remains vertical when the piece stands.
- Attach the two black triangular eyes and central nose above the doorway without covering the orange rib lines.
- Build and anchor the white spiderweb across one side of the pumpkin, keeping its outer spokes clear of the doorway.
- Weave all remaining tails into stuffed sections, redistribute the pumpkin stuffing around the doorway and set the base flat.
The completed construction consists of a large 42-stitch pumpkin form surrounding a compact 30-stitch-scale seated ghost.
7 Technical Tips for a Cleaner Pumpkin Ghost
- Lost round position: Move the stitch marker into the first stitch immediately after completing every round. A one-stitch drift during the 42-stitch pumpkin plateau can rotate the surface-rib placement away from the centerline.
- Doorway collapse: Keep stuffing approximately 1–2 cm away from the immediate edge of the black doorway panel. Dense stuffing directly behind the arch forces the front surface outward and makes the opening look narrow.
- Visible decrease gaps: Work decreases through the front loops when closing the ghost head and pumpkin. A conventional two-stitch decrease can expose stuffing, particularly across R23–R26 of the orange shell.
- Incorrect eye placement: Install the 10 mm eyes before the ghost head passes below 18 stitches. Waiting until the head is closed makes installing the locking washers difficult without reopening the fabric.
- Loose yarn tension: If stuffing becomes visible between stitches, reduce the hook by 0.5 mm instead of adding extra fiberfill behind the gap. Excess stuffing changes the pumpkin circumference and can distort the doorway.
- Crooked facial pieces: Pin both jack-o’-lantern eyes before sewing either one. Measure their inner corners from the doorway centerline so one triangle does not finish noticeably higher than the other.
- Escaping yarn tails: Weave each structural tail through at least 4–5 cm of stuffed fabric and reverse direction once. A straight tail path can pull free when the stem, arms or spiderweb are handled.
Finishing the Ghost in Pumpkin Amigurumi
Check the pumpkin from the front before weaving the final orange tail: the doorway should stay open, both black eyes should sit level, and the brown stem should align with the center of the shell. The next practical step is to pin the ghost and candy corn temporarily, photograph the arrangement, then correct their positions before permanent sewing.
Save this ghost in pumpkin amigurumi crochet pattern to your Halloween Pinterest board and share the finished version on Instagram with #GhostPumpkinHouse. Include the yarn weight and finished height when posting because both make size comparisons more useful. Which detail would you change on this pumpkin house first: the jack-o’-lantern face, spiderweb placement, or candy corn?









