Introduction
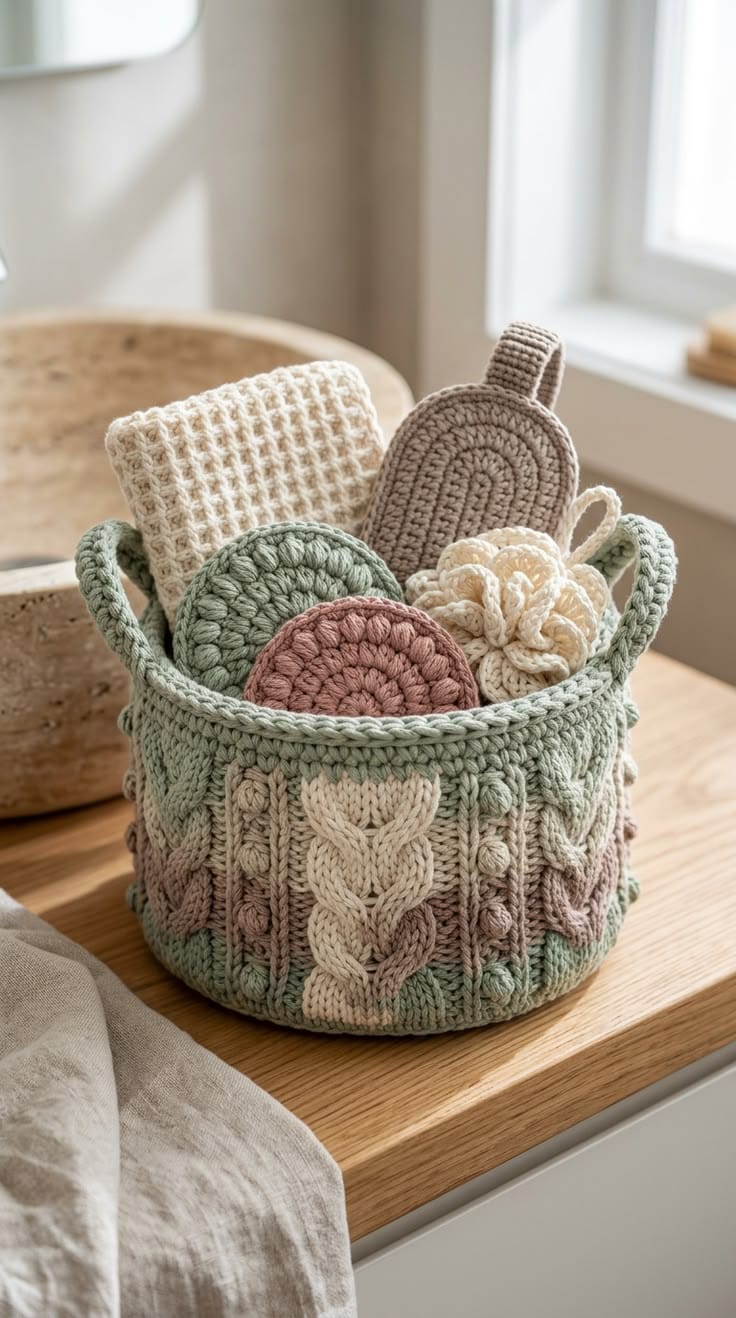
Three oversized braided cables divide this basket into architectural panels instead of ordinary crochet rounds. This crochet cable basket pattern combines a firm circular base, sage green rim, integrated handles, and cream, dusty rose, taupe, and green cable sections. Worked with bulky yarn and a 6 mm hook, the finished basket is approximately 28 cm wide and 24 cm high. Use it for yarn, towels, craft supplies, or lightweight household storage.
The Design: What Makes This Cable Basket Different
The photographed basket uses two different structural ideas at once. Its upper section behaves like a conventional round crochet basket, while the lower wall resembles knitted cable panels. Reproducing that appearance in crochet requires raised post stitches rather than simple color changes.
Three large cream cable motifs form the visual anchors. Narrower bobble columns and dusty rose sections separate them, while sage green connects the lower edge to the upper basket wall. This arrangement keeps the crochet storage basket from looking like one continuous block of textured stitches.
The handles are incorporated near the rim instead of sewn on afterward. That distributes pulling force across several stitches. The main technical failure with a crochet cable basket is loss of structure: cables consume extra yarn and can make the wall heavy, so the base and upper rounds must be worked at a firm tension.
Project Info at a Glance
| Skill Level | Time | Finished Size | Hook | Best For |
|---|---|---|---|---|
| Intermediate | 6–9 hours | Approx. 28 cm diameter × 24 cm high | 6 mm | Yarn, towels, craft supplies, lightweight storage |
The finished dimensions are a target for this photograph-inspired construction. Published crochet storage baskets vary considerably: examples range from approximately 12 cm diameter using worsted cotton to much larger baskets made with super-bulky yarn. Firm yarn, doubled strands, and smaller hooks are commonly used when a basket needs to stand without collapsing.
Materials and Tools
Yarn
- Sage green — bulky/chunky weight — approximately 180–220 g
- Warm cream — bulky/chunky weight — approximately 100–130 g
- Dusty rose — bulky/chunky weight — approximately 70–90 g
- Warm taupe — bulky/chunky weight — approximately 40–60 g
Use a firm cotton, cotton blend, or tightly spun bulky yarn. Another option is to hold two strands of worsted-weight cotton together. Doubling medium-weight yarn is a common basket technique because the resulting fabric is substantially more rigid than a single strand.
Tools
- 6 mm crochet hook
- 5.5 mm crochet hook — optional for firmer rim and handles
- Tapestry needle
- Scissors
- 6 locking stitch markers
- Blocking mat
- Rust-resistant pins
Abbreviations
- MR — magic ring
- ch — chain
- sl st — slip stitch
- sc — single crochet
- hdc — half double crochet
- dc — double crochet
- inc — two stitches in one stitch
- BLO — back loop only
- FLO — front loop only
- FPdc — front post double crochet
- FPtr — front post treble crochet
- BPdc — back post double crochet
- bo — bobble
- st/sts — stitch/stitches
Keep front-post stitches slightly looser than ordinary double crochet. Pulling the post stitches too tightly shortens the cable panel and causes the lower basket wall to contract.
Pattern — Step by Step
This basket is worked from the circular base upward. US crochet terminology is used throughout. The textured lower section is created with raised post stitches and bobbles, followed by a simpler sage-green upper wall.
Basket Base
Yarn: sage green.
Use the 6 mm hook. Work in a continuous spiral and place a stitch marker in the first stitch of each round.
R1: 6 sc in MR (6)
R2: inc ×6 (12)
R3: (1 sc, inc) ×6 (18)
R4: (2 sc, inc) ×6 (24)
R5: (3 sc, inc) ×6 (30)
R6: (4 sc, inc) ×6 (36)
R7: (5 sc, inc) ×6 (42)
R8: (6 sc, inc) ×6 (48)
R9: (7 sc, inc) ×6 (54)
R10: (8 sc, inc) ×6 (60)
R11: (9 sc, inc) ×6 (66)
R12: (10 sc, inc) ×6 (72)
Measure the base. The target is approximately 26–28 cm across.
If the base reaches 28 cm before R12, stop increasing at the previous complete round. If it remains substantially smaller, yarn thickness or tension differs from the target and another increase round may be required.
Structural Turning Round
Continue with sage green.
R13: Sl st in BLO of every stitch around. (72)
R14: Working over the slip-stitch round and into the same back-loop area, sc in each stitch around. (72)
R15: Sc around. (72)
This reinforced transition creates a sharper angle between the base and wall. The basket should begin rising vertically instead of continuing to expand outward.
Preparing the Cable Panels
Continue with sage green.
The 72 stitches are divided into six 12-stitch panels. Place a stitch marker after every 12 stitches.
Panels 1, 3, and 5 will become the large cable sections. Panels 2, 4, and 6 form the narrower decorative separators.
R16: Ch 2, dc in each stitch around. Join with sl st. (72)
Do not increase. The stitch count remains fixed throughout the main wall.
Large Cream Cable Panel
Make this texture in Panels 1, 3, and 5.
Change to warm cream when entering a large cable panel. Carry unused colors loosely along the wrong side or fasten off between sections if a cleaner interior is preferred.
Each cable occupies the center six stitches of its 12-stitch panel.
Cable Setup: 3 dc, FPdc around each of next 6 posts, 3 dc.
On the next cable row:
3 dc, skip first 3 raised posts, FPtr around posts 4, 5, and 6, working in front of the skipped stitches. Then FPtr around skipped posts 1, 2, and 3. Finish with 3 dc.
This crossing creates the first half of the braided cable.
Work one plain establishing row:
3 dc, FPdc around next 6 raised posts, 3 dc.
For the next crossing, reverse the direction:
3 dc, skip the next 3 raised posts, work FPtr around the following 3 posts from behind the work, then return to the skipped 3 posts. Finish with 3 dc.
Alternating the crossing direction produces the interlocking cable appearance visible on the basket.
Dusty Rose Cable Sections
Yarn: dusty rose.
Use dusty rose in selected portions of Panels 2, 4, and 6 to reproduce the muted pink blocks visible around the lower wall.
Texture Row: 2 dc, FPdc around next 2 posts, 4 dc, FPdc around next 2 posts, 2 dc. (12)
Cross Row: 2 dc, cross the two raised pairs using FPtr stitches, 4 dc, repeat the crossed pair, 2 dc. (12)
Plain Row: Work established stitches without crossing. (12)
Repeat the three-row sequence once more.
The rose cables are intentionally smaller than the cream center braids. Keeping them narrow prevents the entire lower basket from becoming visually heavy.
Taupe Accent Panels
Yarn: warm taupe.
Taupe is used sparingly between the cream and dusty rose sections.
Row 1: Dc across the selected 12-stitch panel. (12)
Row 2: 3 dc, FPdc around next 2 posts, 2 dc, FPdc around next 2 posts, 3 dc. (12)
Row 3: Repeat Row 2. (12)
Return to sage green or dusty rose according to the color placement around the basket.
Bobble Columns
Use sage, cream, or dusty rose to coordinate with the surrounding panel.
The photograph contains narrow raised bobble columns between several larger cable sections.
To make one bobble:
Yarn over, insert hook into stitch, yarn over and pull up a loop, yarn over and pull through two loops. Repeat this partial double crochet four more times in the same stitch. Yarn over and pull through all six loops on the hook.
Bobble Row: 2 dc, bo, 3 dc, bo, 3 dc, bo, 1 dc. (12 stitch positions)
Next Row: Dc across. (12)
Repeat these two rows as required through the textured section.
Push each bobble toward the outside of the basket before continuing.
Lower Textured Basket Wall
The following sequence coordinates the cable and accent panels into one continuous lower wall.
R17: Establish all cable, accent, and bobble panels. (72)
R18: First cable crossing round. (72)
R19: Work established stitches without crossing. (72)
R20: Second cable crossing round. (72)
R21: Work established stitches. (72)
R22: First cable crossing round. (72)
R23: Work established stitches. (72)
R24: Second cable crossing round. (72)
R25: Work established stitches. (72)
R26: Final cable crossing round. (72)
The textured section should measure approximately 12–14 cm high.
Do not increase during these rounds. Maintaining 72 stitch positions keeps the sides cylindrical.
Sage Green Upper Basket Wall
Change completely to sage green.
R27: Sc around, working one stitch into every established stitch position. (72)
R28: Sc around. (72)
R29: Sc around. (72)
R30: Sc around. (72)
R31: Sc around. (72)
R32: Sc around. (72)
R33: Sc around. (72)
Measure the basket height. The target before the final rim is approximately 22–23 cm.
If the sides lean outward, change to a 5.5 mm hook for the remaining rounds rather than adding decreases randomly.
Integrated Basket Handles
Continue with sage green.
Flatten the basket temporarily and identify two opposite sides. Place stitch markers at the center of each side.
Each handle opening uses approximately 10 stitches.
R34: Sc to 5 stitches before the first side marker, ch 10, skip 10 stitches, sc around to 5 stitches before the opposite marker, ch 10, skip 10 stitches, sc through the remaining stitches. (52 sc + 20 ch)
Check that both openings are directly opposite one another before continuing.
R35: Sc in each sc and work 10 sc around each ch-10 handle section. (72)
R36: Sc around. (72)
R37: Sc around. (72)
The handle openings should be approximately 8–10 cm wide depending on yarn and tension.
Reinforced Handle Edging
Continue with sage green. Change to the 5.5 mm hook if available.
Join yarn at one lower corner of a handle opening.
Work 12–14 tight sc evenly around the complete opening.
Join with sl st.
Work a second round of sc around the handle opening.
Fasten off.
Repeat for the second handle.
The extra edging limits stretching when the basket is lifted.
Braided-Look Top Rim
Yarn: sage green.
The photographed basket has a visibly raised top edge. A reverse single crochet border creates a similar corded finish without requiring a separate sewn braid.
R38: Sc around. (72)
R39: Reverse sc in every stitch around. (72)
Join with sl st and fasten off.
Weave the final tail through at least 5 cm of the inside rim before trimming.
How to Work the Cable Crossings
Raised crochet cables depend on stitch placement rather than extra pieces sewn onto the surface. Front-post stitches are worked around the vertical post of a previous stitch instead of into the conventional top loops.
When six raised stitches form a cable, mentally divide them into two groups of three. Crossing one group over the other creates the braided structure.
Use treble crochet for the crossing rows because the stitches need additional length to travel diagonally across neighboring posts. A standard double crochet can pull the cable too tightly and shorten the panel.
After completing each crossing, spread the six cable posts with your fingers. The three crossed stitches should remain visible as one continuous diagonal section.
Color Placement
The reference basket does not use horizontal stripes. Color is arranged vertically and in blocks, so the textured sections remain more important than the color changes.
Keep sage green dominant. Use it for the base, background, upper wall, handles, and rim.
Place the cream yarn in three major cable panels around the circumference. Space these panels approximately equally so the basket has visual balance from every side.
Use dusty rose between the cream sections and add small taupe areas as transitional accents. Exact repetition is not required, but the three major cream cables should remain the strongest elements.
When changing color, complete the final yarn-over of the stitch before the color change with the new yarn. This creates a cleaner vertical transition.
Assembly and Finishing
- Turn the finished basket inside out and inspect every color transition before weaving the tails.
- Secure the cream cable tails through at least 5 cm of matching stitches because cable fabric experiences more movement than plain single crochet.
- Weave dusty rose and taupe tails only through matching or similarly colored sections so contrasting fibers do not show on the front.
- Turn the basket right side out and press the base flat with both hands.
- Arrange the three major cream cable panels so each braid runs vertically rather than twisting toward one side.
- Push all bobbles outward with a finger from inside the basket.
- Check both handle openings and compare their widths. Correct an opening if the difference exceeds approximately 1 cm.
- Shape the upper sage wall into a cylinder and check that the 72-stitch rim does not flare outward.
- Lightly block the basket around a container close to the desired 28 cm diameter if the yarn responds well to blocking.
- Allow the basket to dry completely in its upright shape before loading it with stored items.
The completed basket should have a flat circular base, upright textured walls, two opposing handles, three dominant cream cable panels, and a raised sage-green rim.
7 Technical Tips
- Base develops waves: Stop increasing if the circle begins forming pronounced ripples before reaching R12. Extra circumference at the base transfers directly into a flared basket wall.
- Sides remain flat instead of rising: Check that no increases have been added after the base is complete. The wall must remain at the established 72 stitches to form a cylinder.
- Cables pull the wall inward: Make each FPtr crossing slightly taller than a normal post stitch. A cable section that becomes more than approximately 1 cm shorter than its neighboring panel is being worked too tightly.
- Basket collapses when empty: Use a smaller hook or double strands of worsted cotton. Loose single crochet combined with heavy cable panels produces insufficient wall stiffness.
- Handles stretch: Reinforce each opening with two rounds of tight single crochet. An unsupported chain handle can lengthen substantially once the basket carries yarn or towels.
- Bobble columns disappear: Push every bobble toward the public side immediately after completing it. Bobbles left on the inside are difficult to reposition after several additional rounds.
- Rim flares outward: Change from the 6 mm hook to a 5.5 mm hook for the final two rounds. Do not remove random stitches because uneven decreases can distort the two handle positions.
How to Make the Crochet Basket Sturdy
Basket structure starts at the base rather than the decorative wall. A reinforced transition between the flat circle and the first vertical round creates a defined lower edge and reduces the tendency for the sides to spread.
Cotton is particularly useful for a crochet storage basket because it generally stretches less than soft acrylic. Published basket patterns also commonly use two strands of worsted yarn held together or one strand of bulky to super-bulky yarn when structural stiffness is required.
Hook size matters just as much as yarn thickness. The goal is a dense fabric with minimal visible space between stitches. If you can easily push two fingers through the plain single-crochet wall, the fabric is probably too loose for a freestanding basket of this size.
Do not solve weak walls by adding large quantities of starch. Correct yarn thickness and tight crochet construction produce a more practical storage basket.
Adjusting the Basket Size
The base determines the finished diameter. Each conventional increase round adds six stitches and expands the circle before the vertical wall begins.
For a smaller basket, stop after R10 at 60 stitches. Divide the wall into six 10-stitch sections and reduce the width of each cable panel accordingly.
For a larger basket, add another increase round after R12:
R13: (11 sc, inc) ×6 (78)
A still larger version can continue with:
Next Round: (12 sc, inc) ×6 (84)
Do not add these rounds after the wall has begun. Diameter changes belong in the flat base section.
To change only the height, repeat additional plain sage-green rounds before constructing the handles. Adding four rounds increases height without affecting diameter or cable placement.
Making the Basket with Worsted Yarn
If bulky yarn is unavailable, hold two strands of worsted-weight yarn together and treat them as one working strand. This technique is widely used in crochet basket construction because doubled yarn creates thicker, denser walls.
Begin with a 6 mm hook and crochet a base swatch. If the fabric bends easily, test a 5.5 mm hook.
Keep both strands under equal tension. Allowing one strand to remain loose creates loops on the surface, particularly around the front-post cable stitches.
For color changes, change both strands simultaneously. Using one strand of each color produces a marled appearance rather than the defined cream, rose, taupe, and sage blocks visible in this design.
Using the Basket for Yarn Storage
The open cylindrical form works well as a project basket because the handles remain below the top edge rather than extending over the contents. Yarn cakes, skeins, crochet tools, and folded works in progress can therefore be placed inside without passing beneath a fixed overhead handle.
Keep the heaviest objects near the base. The cable wall is decorative and structural, but repeatedly loading one handle with concentrated weight can distort the upper rim.
For crochet hooks and small notions, place a separate pouch inside rather than pushing sharp tools directly through the textured wall. The raised cable stitches can catch narrow objects more easily than plain single crochet.
A washable cotton yarn is practical when the basket will be used frequently. Follow the care instructions supplied with the selected yarn rather than assuming every cotton or blend tolerates the same washing temperature.
Optional Internal Lining
A fabric lining is not required, but it can prevent small objects from catching on the wrong side of the cable stitches.
Measure the internal circumference and height after the crochet basket is complete. Cut a fabric rectangle using those measurements plus seam allowance, then cut a circular base to match the inside diameter.
Sew the fabric cylinder to the circular bottom first. Insert it into the basket with the wrong sides facing one another.
Fold the upper fabric edge under and hand-sew it to the inside of the sage rim. Keep stitches below the visible reverse-single-crochet border.
Do not sew across the handle openings. Shape the lining around each opening so the handles remain fully usable.
Conclusion
The cable placement determines the finished character of this basket more than the color changes. Complete the flat base first, establish 72 vertical stitches, and keep the three large cream braids evenly distributed while the dusty rose, taupe, and bobble panels fill the spaces between them. Before weaving the final tails, load the basket lightly and check both handle openings for stretching. Save this crochet cable basket pattern to Pinterest or share the finished storage basket on Instagram with #CableCrochetBasket. If you make the photographed color combination, which section would you repeat most prominently: the oversized cream braid, dusty rose cable, or raised bobble column?









