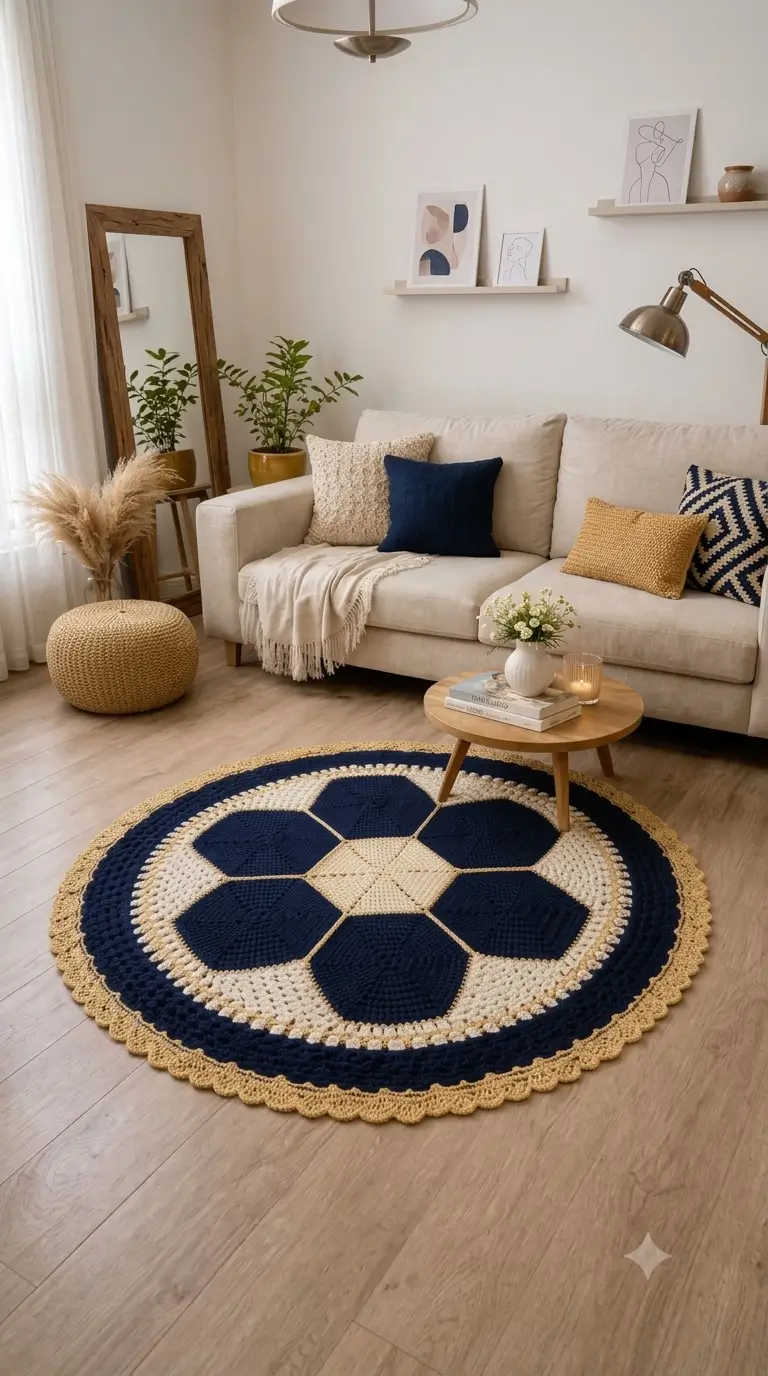
A football needs five- and six-sided panels to become a sphere; this rug has to suggest the same geometry while staying completely flat. This soccer ball crochet rug pattern converts that problem into a 150 cm floor piece using navy, cream and beige bulky cotton cord. The project is rated intermediate because accurate polygon shaping and controlled increases matter more than complicated stitches. Use it where a washable, low-profile sports-themed floor covering is required.
The Design: What Makes This Soccer Ball Rug Different
The central problem is keeping recognizable football geometry without forcing a three-dimensional ball structure into a flat circle. Large navy polygon panels therefore form the visual focus, while narrow beige joining lines separate them. A cream central motif gives the six surrounding panels a fixed reference point. Outside that section, circular rounds replace polygon construction so the rug can expand evenly.
The second structural decision is the wide navy outer band. It visually balances the dark center panels and adds enough diameter for the design to function as a floor rug rather than an oversized motif. Finally, a beige scalloped border repeats the joining color and gives the circumference a defined finish. A common mistake in a crochet football rug is adding increases too slowly after the geometric center; that produces a bowl-shaped edge instead of a flat floor surface.
Project Info at a Glance
| Skill Level | Time | Finished Size | Hook | Best For |
|---|---|---|---|---|
| Intermediate | 18–25 hours | Approx. 150 cm diameter | 8 mm | Bedroom, playroom or sports-themed interior |
Materials and Tools
Yarn
- Navy blue — bulky 5 mm cotton cord — approximately 1,200–1,400 g
- Cream/ivory — bulky 5 mm cotton cord — approximately 650–800 g
- Warm beige/gold — bulky 5 mm cotton cord — approximately 450–600 g
The exact amount changes with cord density, hook size and finished diameter. Buy additional yarn from the same dye lot when possible because the navy sections occupy a large percentage of the finished surface.
Tools
- 8 mm crochet hook
- Large tapestry needle
- Locking stitch markers
- Scissors
- Measuring tape
- Rust-resistant blocking pins
- Non-slip rug underlay for use on smooth flooring
Abbreviations
- MR — magic ring
- ch — chain
- sc — single crochet
- hdc — half double crochet
- dc — double crochet
- inc — increase
- sl st — slip stitch
- st/sts — stitch/stitches
- sp — space
- BLO — back loop only
An invisible decrease is made by inserting the hook through the front loops of the next two stitches before completing one single crochet through both loops.
Pattern Notes
This pattern is inspired by the photographed rug rather than copied from a commercial design. Work the central components first, join them into one stable disk, then build the circular border around that disk. Check the work on a hard, level surface after every two or three border rounds.
Gauge is less important than flatness. Cotton cord varies substantially between manufacturers. If the fabric begins to ripple, reduce the number of increases. If the edge pulls upward, add increases at evenly spaced positions rather than concentrating them in one area.
Pattern — Step by Step
Central Cream Hexagon — Make 1
Yarn: cream. Work in joined rounds so the six corners remain clearly defined.
R1: 6 sc in MR. Join with sl st. (6)
R2: ch 1, 3 sc in each st around. Join. (18)
R3: ch 1, *sc in next 2 sts, 3 sc in next st; repeat from * around. Join. (30)
R4: ch 1, *sc in next 4 sts, 3 sc in next st; repeat from * around. Join. (42)
R5: ch 1, *sc in next 6 sts, 3 sc in next st; repeat from * around. Join. (54)
R6: ch 1, *sc in next 8 sts, 3 sc in next st; repeat from * around. Join. (66)
Fasten off, leaving a 40 cm tail. Block the motif so all six sides measure equally.
Navy Football Panels — Make 6
Yarn: navy. These large polygon sections create the dominant football graphic visible in the photograph.
R1: 6 sc in MR. (6)
R2: inc ×6. (12)
R3: (sc, inc) ×6. (18)
R4: (2 sc, inc) ×6. (24)
R5: (3 sc, inc) ×6. (30)
R6: (4 sc, inc) ×6. (36)
R7: (5 sc, inc) ×6. (42)
The 42-stitch plateau creates the large panel size required for the center of this rug.
R8: sc around, placing a marker every 7 sts. (42)
R9: work 3 sc into each marked stitch and sc in every remaining stitch. (54)
R10: sc evenly around while maintaining six visible corner positions. (54)
Fasten off and leave a 50 cm sewing tail. Make six identical pieces. Measure every finished panel before assembly; a difference greater than 1 cm can distort the center.
Beige Joining Lines
Place the cream center on a flat surface. Arrange all six navy panels around it with one edge of each panel facing the central motif.
Thread the tapestry needle with beige cord. Mattress stitch the first navy panel to one side of the center. Repeat around all six sides. The beige seam should remain visible from the front because it forms the narrow gold-colored line seen between the football panels.
Join neighboring navy panels along their adjacent edges. Do not pull the sewing yarn tightly enough to shorten an edge. Lay the work flat after every seam.
Cream Transition Round
Yarn: cream. Stitch counts can vary slightly around the assembled polygon center, so this section uses evenly distributed placement rather than forcing a fixed count into mismatched seams.
Round 1: Join cream at an outer corner. Work sc evenly around the complete perimeter, placing approximately 3 sc for every 2 row ends where needed. Join with sl st.
Round 2: ch 1, sc around, adding 6 evenly spaced increases.
Round 3: ch 2, hdc around, adding 6 evenly spaced increases.
Round 4: ch 1, sc around with 6 evenly spaced increases.
Place the rug on the floor. The transition should form a flat circular outline rather than six pronounced lobes.
Cream Openwork Band
Round 5: ch 3, skip 1 st, *dc in next st, ch 1, skip next st; repeat around. Join.
Round 6: sl st into first ch-1 sp, ch 3, dc in same sp, *2 dc in next ch-1 sp; repeat around. Join.
Round 7: ch 1, sc in each st around. Add 6 evenly spaced increases only if the edge begins pulling inward.
The openwork should remain visible but not loose enough for large gaps to develop. With thick cotton cord, one mesh round creates substantially more visual texture than it would in standard worsted yarn.
Beige Accent Round
Change to beige.
Round 8: ch 1, sc in every st around, distributing 6 increases.
Round 9: *sc in next 4 sts, ch 1, skip 1 st; repeat around as evenly as possible. Adjust the final repeat at the join.
Fasten off beige. The purpose of this narrow round is visual separation, not major diameter growth.
Second Cream Band
Rejoin cream.
Round 10: ch 1, sc in each sc and 1 sc in every ch-1 sp around.
Round 11: ch 2, hdc around with evenly spaced increases.
Round 12: ch 1, sc around.
Round 13: ch 3, *dc in next 2 sts, ch 1, skip next st; repeat around.
Round 14: ch 1, sc in each dc and each ch-1 sp around.
Measure the rug in at least four directions through the center. A difference of more than 2 cm indicates uneven tension or increase placement and should be corrected before beginning the dark outer border.
Wide Navy Outer Border
Change to navy. This is the widest continuous color band in the photographed rug.
Round 15: sc around, distributing increases evenly.
Round 16: hdc around.
Round 17: hdc around with evenly spaced increases.
Round 18: sc around.
Round 19: hdc around with evenly spaced increases.
Round 20: hdc around.
Round 21: sc around with evenly spaced increases.
Round 22: hdc around.
Round 23: hdc around with evenly spaced increases.
Round 24: sc around.
At this diameter, blindly adding six increases to every round may create excess fabric because yarn, hook and individual gauge change the circumference. The rug itself is the measurement tool. Add increases only when the outer edge begins contracting.
Continue additional navy rounds if the piece has not yet reached approximately 138–142 cm before edging. The final scalloped border contributes several additional centimeters.
Beige Scalloped Border
Change to beige. The photographed rug uses a clearly defined decorative outer edge rather than a plain final round.
Round 25: ch 1, sc evenly around. Adjust the total stitch count so it is divisible by 6.
Round 26: *skip 2 sts, 7 dc in next st, skip 2 sts, sl st in next st; repeat around.
Round 27: Working around each shell, sl st to the center dc, ch 1, sc in center dc, ch 5, sc in center dc of next shell; repeat around if a more pronounced lace edge is wanted.
For the compact scallops shown in the photograph, stop after Round 26. Fasten off and weave the final tail through at least 8 cm of dense stitches on the reverse.
Assembly
- Block the cream central hexagon and confirm that all six sides have matching measurements.
- Block the six navy panels to identical dimensions before joining.
- Place the cream center face up on a flat surface.
- Position one navy panel against each of the six central edges.
- Pin every panel before sewing so the complete football layout can be checked.
- Join each navy panel to the center with beige yarn and an even mattress stitch.
- Sew adjacent navy panels together without shortening their outer edges.
- Work the cream, beige and navy circular bands around the assembled center.
- Complete the beige scalloped edging and weave all tails into the reverse side.
- Wet-block the finished rug to approximately 150 cm diameter and dry it completely on a level surface.
The completed piece should lie flat with six navy center panels, a cream geometric core, concentric cream and navy bands, and an even beige scalloped circumference.
7 Technical Tips for a Flat Soccer Ball Crochet Rug
- Mark every round transition. A missed stitch can shift later increase points by several centimeters on a 150 cm rug. Keep one locking marker in the first stitch and move it after every completed round.
- Watch for center doming. If the geometric section rises more than about 1 cm when placed on a hard floor, the seams are probably too tight. Release the affected seam and resew it with enough slack for the panels to lie flat.
- Correct rippling immediately. A border that develops repeated waves contains too many increases. Remove the last round and reduce the increase frequency rather than expecting blocking to remove several centimeters of excess circumference.
- Keep the beige seams narrow. Aim for an exposed joining line of roughly 5–8 mm. Wider seams begin to dominate the navy football panels and alter the proportions visible in the reference design.
- Pin all six panels before sewing. Joining them individually without checking the full layout can create an asymmetric center. Measure from the cream center to the outer tip of every navy panel and keep those measurements within approximately 5 mm.
- Control cotton-cord tension. Thick cord can make the hook hand tighten as the rug grows. If a 10 cm section suddenly contains noticeably more stitches than the corresponding section opposite it, redo that area before continuing.
- Secure tails for floor use. Short woven ends can migrate out when a rug is walked on or washed. Weave each major color-change tail through at least 8–10 cm of dense stitches on the reverse, changing direction once.
Adjusting the Rug Size
For a smaller rug, stop the navy border when the piece is approximately 8–10 cm below the desired final diameter, then work the beige edging. A 100 cm version works well as a compact floor mat, while 120–150 cm provides enough area for the football graphic to read clearly from across a room.
For a larger rug, continue the navy band rather than enlarging the center panels. This keeps the football geometry proportional. Check the circumference after each round because large circular crochet pieces amplify even small tension changes.
If additional diameter is needed without creating a very wide navy section, repeat a narrow cream and beige accent sequence before returning to navy. Maintain the same color hierarchy: navy should remain dominant, cream secondary and beige an outlining color.
Choosing Yarn for a Floor Rug
Cotton cord is a practical choice because its stitch definition keeps the polygon edges readable. A 5 mm cord also creates enough body for the large motifs to remain stable after assembly. Standard worsted yarn can reproduce the design, but considerably more rounds would be required to reach the same diameter.
Keep all three colors in the same yarn construction. Mixing soft acrylic with rigid cotton cord can cause one section to stretch more than another. That difference becomes particularly visible where the cream transition band meets the navy center panels.
The reference image uses dark navy rather than black. Navy gives the traditional football-panel idea a softer interior color scheme while retaining strong contrast against cream. Beige replaces the stark black-and-white seam treatment found on conventional soccer-ball graphics.
Blocking and Floor Placement
Measure the rug before wet blocking. Mark four points across the diameter, then compare opposite measurements. The target for this version is approximately 150 cm, but consistency matters more than hitting that number exactly.
After washing or dampening according to the yarn manufacturer’s instructions, place the rug on a blocking surface large enough to support the entire circumference. Shape the six center panels first. Next, smooth the cream transition area and navy band outward. Pin the scallops last so each one has approximately equal width.
Do not stretch one side merely to reach the target diameter. An asymmetric rug will often return to its original shape after washing.
On polished wood, tile or laminate, place a suitable non-slip rug pad underneath the crochet piece. Crochet stitches alone do not provide a dependable anti-slip surface.
How the Football Geometry Works
A conventional three-dimensional soccer ball uses pentagonal and hexagonal panels. Crochet ball patterns commonly reproduce that structure by sewing separate motifs together. A flat rug cannot follow the complete spherical arrangement because joining the same collection of polygons would force the fabric upward.
This design uses the visual language instead. The cream center establishes the geometric axis, six dark panels provide the recognizable sports graphic, and the surrounding rounds convert that angular center into a circle.
That distinction is important. Trying to reproduce a complete three-dimensional soccer-ball panel map and then force it flat introduces unwanted curvature. For floor crochet, the design has to prioritize a level surface over literal ball construction.
Final Finishing
Inspect every joining seam from the reverse side. No tail should remain loose, and no seam should contain a gap large enough for the floor underneath to show prominently. Check the outer shells individually and repair any loose final loops.
Measure the finished diameter once the rug is completely dry. Record that measurement together with the yarn brand, hook size and total yarn used. Those three notes make it much easier to reproduce the same size later because cotton cord thickness can vary even when two products carry similar weight descriptions.
Conclusion
The finished rug depends on three controls: equal center panels, a genuinely flat transition from polygons to circular rounds, and consistent expansion through the wide navy border. Block the piece only after those structural points have been checked. Your next step is to crochet one navy test panel and measure it before committing the full yarn quantity to the project. Save the finished soccer ball crochet rug pattern to Pinterest or share your completed version on Instagram with #SoccerBallCrochetRug. For the photographed color scheme, would you keep the navy, cream and beige combination, or replace the navy panels with your football team’s main color?









