Introduction
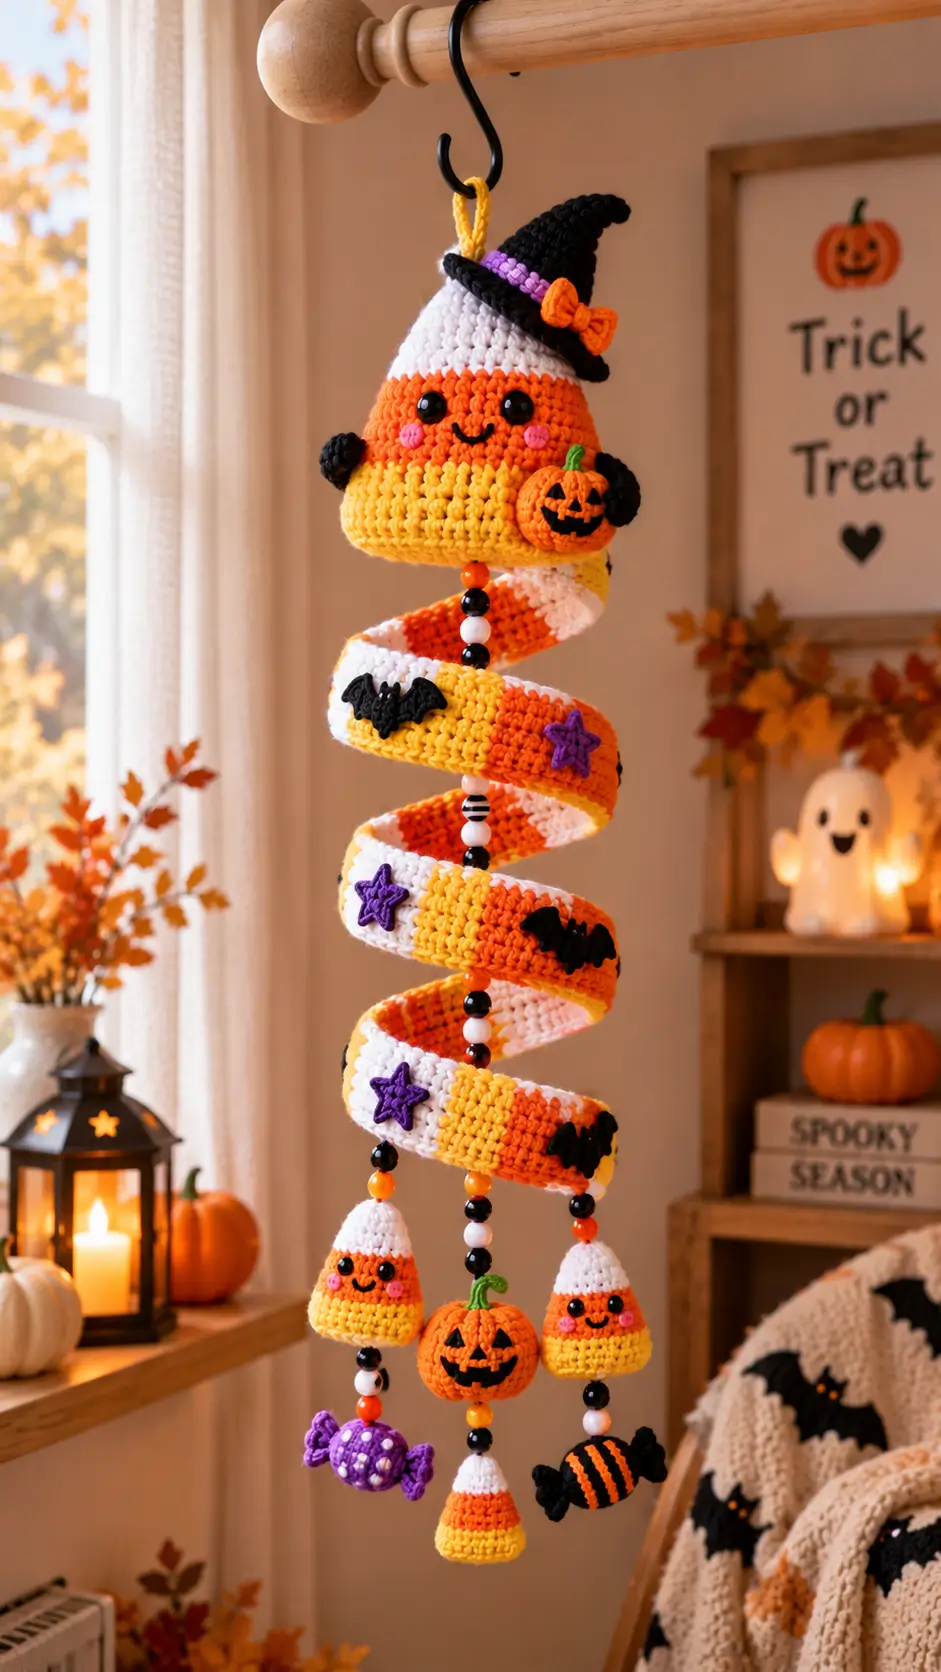
Candy corn has three rigid color zones, and turning those stripes into a witch wearing her own pumpkin bucket creates the central construction problem here. This candy corn amigurumi crochet pattern uses worsted/Aran yarn, a 4 mm hook and a roughly 13 cm main figure at intermediate skill level. The extended spiral and removable ornaments turn the figure into a vertical Halloween door or wall decoration rather than another tabletop plush.
The Design: What Makes This Candy Corn Witch Different
The main figure needs a broad yellow base because the witch hat adds visual and physical weight above the narrow white tip. A 36-stitch plateau supplies enough width without producing a spherical candy corn. Second, the arms sit inside the orange band so the pumpkin bucket reads separately from the yellow lower section.
The Halloween candy corn crochet pattern also uses a long flat band rather than trying to crochet the entire helix as a stuffed tube. After shaping, that band can hang in an open spiral and carry lightweight appliqués.
Finally, the crochet candy corn witch needs a disproportionately wide hat brim. A common mistake is making the cone correctly but stopping the brim too early; the result resembles a pointed cap rather than a witch hat. Here the brim reaches approximately the width of the candy-corn head.
Project Info at a Glance
| Skill Level | Time | Finished Size | Hook | Best For |
|---|---|---|---|---|
| Intermediate | 7–10 hours | Main figure ≈13 cm; full mobile ≈65–80 cm | 4.0 mm | Halloween wall/door display |
Published candy-corn references support 4 mm hooks with worsted/Aran yarn, although their individual figures are generally smaller than this photo-inspired centerpiece.
Materials and Tools
Yarn
- Yellow — worsted/Aran — approx. 35 g — cotton or smooth acrylic
- Orange — worsted/Aran — approx. 25 g — cotton or smooth acrylic
- White — worsted/Aran — approx. 20 g
- Black — worsted/Aran — approx. 20 g
- Purple — worsted/Aran — approx. 8 g
- Green — worsted/Aran — approx. 3 g
- Pink — worsted/Aran — approx. 3 g
A 4 mm hook with worsted/Aran yarn gives the dense fabric required for the stuffed pieces while keeping the spiral flexible enough to hang correctly.
Tools
- 4.0 mm crochet hook
- 10 mm safety eyes, 1 pair for the main figure
- 8 mm safety eyes, 2 pairs for the hanging candy corns
- Polyester stuffing
- Yarn needle
- Locking stitch markers
- Scissors
- Black embroidery thread
- Strong hanging cord
- Optional 10–14 mm craft beads
- Optional flexible plastic canvas strip for extra spiral support
Abbreviations
- MR — magic ring
- sc — single crochet
- inc — 2 sc in one stitch
- dec — invisible decrease
- sl st — slip stitch
- ch — chain
- BLO — back loop only
- hdc — half double crochet
- dc — double crochet
For an invisible decrease, insert the hook through the front loops of the next two stitches before completing one sc through both.
Pattern — Step by Step
Work stuffed pieces in a continuous spiral unless a section states otherwise. Place a stitch marker in the first stitch of each round.
Head / Main Candy Corn
Yarn: white, orange and yellow.
Start with white.
R1: 6 sc in MR (6)
R2: inc ×6 (12)
R3: (sc, inc) ×6 (18)
R4: 18 sc (18)
R5: (2 sc, inc) ×6 (24)
R6: 24 sc (24)
R7: (3 sc, inc) ×6 (30)
R8: 30 sc (30)
Change to orange.
R9: (4 sc, inc) ×6 (36)
R10: 36 sc (36)
R11: 36 sc (36)
R12: 36 sc (36)
R13: 36 sc (36)
Insert 10 mm eyes between R11 and R12, approximately 7 stitches apart.
Change to yellow.
R14: 36 sc (36)
R15: 36 sc (36)
R16: 36 sc (36)
R17: 36 sc (36)
R18: 36 sc (36)
R19: BLO 36 sc (36)
R20: (4 sc, dec) ×6 (30)
R21: (3 sc, dec) ×6 (24)
Stuff the point first, then fill the orange and yellow sections without flattening the color boundaries.
R22: (2 sc, dec) ×6 (18)
R23: (sc, dec) ×6 (12)
R24: dec ×6 (6)
Fasten off. Leave a 15 cm tail and close the opening.
Spiral Hanging Body
Yarn: yellow, orange and white.
Ch 13.
Row 1: sc in second ch from hook and across (12)
Rows 2–8: ch 1, turn, 12 sc (12)
Change to orange.
Rows 9–16: ch 1, turn, 12 sc (12)
Change to white.
Rows 17–24: ch 1, turn, 12 sc (12)
Repeat the three eight-row color blocks until the strip measures approximately 90–110 cm.
For the edging, work 2 sc into each row end along one long side. Work 3 sc into each row end along the opposite side. The unequal edging causes the band to curve.
Shape the completed band around a cylindrical form. Add a narrow flexible plastic-canvas strip only when a firmer helix is required.
Fasten off. Leave a 25 cm tail at the upper end.
Arms / Front Limbs — Make 2
Yarn: black.
R1: 6 sc in MR (6)
R2: inc ×6 (12)
R3: 12 sc (12)
R4: (sc, dec) ×4 (8)
R5: 8 sc (8)
R6: 8 sc (8)
Add only a small amount of stuffing to the hand end.
Flatten the opening and crochet 4 sc through both layers. Fasten off and leave a 20 cm sewing tail.
Back Legs
No back legs are visible in the reference design. The yellow base is closed as one continuous candy-corn form rather than supported by feet.
Cheek Patches — Make 2
Yarn: pink.
R1: 6 sc in MR (6)
R2: inc ×6 (12)
Sl st to the first stitch. Fasten off and leave a 12 cm sewing tail.
For a smaller face, stop after R1 and embroider the cheeks instead.
Witch Hat
Yarn: black with purple and orange accents.
Start with black.
R1: 6 sc in MR (6)
R2: 6 sc (6)
R3: inc ×6 (12)
R4: 12 sc (12)
R5: (sc, inc) ×6 (18)
R6: 18 sc (18)
R7: (2 sc, inc) ×6 (24)
R8: 24 sc (24)
R9: (3 sc, inc) ×6 (30)
R10: 30 sc (30)
Change to purple.
R11: 30 sc (30)
R12: 30 sc (30)
Change back to black.
R13: (4 sc, inc) ×6 (36)
R14: BLO 36 sc (36)
R15: (5 sc, inc) ×6 (42)
R16: 42 sc (42)
Fasten off. Leave 25 cm for attaching the hat. Bend the top slightly after assembly and secure the bend with two hidden stitches.
Orange Hat Bow
Yarn: orange.
Ch 9.
Row 1: sc across from second ch (8)
Rows 2–4: ch 1, turn, 8 sc (8)
Fasten off. Wrap orange yarn six times around the center and knot at the rear. Sew the bow over the purple hat band.
Pumpkin Bucket
Yarn: orange, green and black.
R1: 6 sc in MR (6)
R2: inc ×6 (12)
R3: (sc, inc) ×6 (18)
R4: (2 sc, inc) ×6 (24)
R5: BLO 24 sc (24)
R6: 24 sc (24)
R7: 24 sc (24)
R8: (2 sc, dec) ×6 (18)
Lightly stuff.
R9: (sc, dec) ×6 (12)
R10: dec ×6 (6)
Fasten off and close.
For the stem, join green yarn and ch 5, then sl st back down the chain. Embroider triangular eyes and a jagged mouth with black yarn.
Make the handle from ch 15 in black or orange and attach each end near R7.
Black Bat Appliqués — Make 3
Yarn: black.
Ch 7. Starting in the second ch: sl st, sc, hdc, dc, hdc, sc.
Ch 5 for the first wing. Working back: sl st, sc, hdc, dc. Sl st into the center body.
Ch 5 for the second wing and repeat in reverse.
Fasten off with a 15 cm tail. Shape each wing with the sewing tail while attaching it to the spiral.
Purple Stars — Make 3
Yarn: purple.
R1: 6 sc in MR (6)
R2: inc ×6 (12)
For each of six points: ch 4, sl st in second ch, sc in next ch, hdc in next ch, then sl st into the next two stitches of R2.
Repeat six times. Fasten off and leave 15 cm for attachment.
Small Hanging Candy Corns — Make 2
Yarn: white, orange and yellow.
Start with white.
R1: 6 sc in MR (6)
R2: inc ×6 (12)
R3: 12 sc (12)
Change to orange.
R4: (sc, inc) ×6 (18)
R5: 18 sc (18)
Place 8 mm eyes between R4 and R5, about 4 stitches apart.
Change to yellow.
R6: (2 sc, inc) ×6 (24)
R7: 24 sc (24)
R8: (2 sc, dec) ×6 (18)
Stuff lightly.
R9: (sc, dec) ×6 (12)
R10: dec ×6 (6)
Fasten off. Leave 15 cm and close. Add a small embroidered black smile and pink cheek stitches.
Center Hanging Pumpkin
Yarn: orange and green.
R1: 6 sc in MR (6)
R2: inc ×6 (12)
R3: (sc, inc) ×6 (18)
R4: (2 sc, inc) ×6 (24)
R5: 24 sc (24)
R6: 24 sc (24)
R7: 24 sc (24)
R8: (2 sc, dec) ×6 (18)
Stuff firmly enough to retain a round shape.
R9: (sc, dec) ×6 (12)
R10: dec ×6 (6)
Close the opening. Run a long orange strand vertically around the pumpkin four to six times and pull each pass slightly to create ribs.
For the green stem:
R1: 6 sc in MR (6)
R2: 6 sc (6)
R3: 6 sc (6)
Fasten off and sew centrally.
Wrapped Candies — Make 2
Yarn: purple and white for one; black and orange for the second.
R1: 6 sc in MR (6)
R2: inc ×6 (12)
R3: 12 sc (12)
R4: 12 sc (12)
R5: 12 sc (12)
R6: dec ×6 (6)
Stuff before closing and fasten off.
For each wrapper end, join the contrasting color into one end of the cylinder.
R1: 12 sc around the end (12)
R2: (sc, inc) ×6 (18)
Fasten off and repeat at the opposite end. Pinch each wrapper edge at three points and tack those points together. Add embroidered dots or stripes after assembly.
Mini Bottom Candy Corn
Yarn: white, orange and yellow.
Start with white.
R1: 6 sc in MR (6)
R2: inc ×6 (12)
Change to orange.
R3: 12 sc (12)
R4: (sc, inc) ×6 (18)
Change to yellow.
R5: 18 sc (18)
R6: 18 sc (18)
R7: (sc, dec) ×6 (12)
Stuff lightly.
R8: dec ×6 (6)
Fasten off and close.
Hanging Loop
Yarn: yellow.
Ch 30. Sl st into the first chain to form a loop. Work 30 sl st around the chain for a denser cord.
Fasten off with two 20 cm tails. Pass both tails through the top of the witch hat and into the main candy-corn body so the weight is carried by the stuffed figure rather than the hat brim.
Assembly
- Sew the witch hat to the white upper section of the main candy corn, centering the purple band above the face and leaving the brim slightly angled.
- Attach the spiral body securely to the closed underside of the main figure. Run the joining strand through several body stitches rather than catching one round.
- Finish the face. Position the pink cheek patches below the eyes, then embroider a curved black mouth between them.
- Sew the black arms to opposite sides of the orange section. Angle one arm toward the pumpkin bucket.
- Attach the pumpkin bucket beside the right arm and tack its handle to the hand so the accessory cannot rotate forward.
- Sew the black bats and purple stars at alternating points along the outer face of the spiral. Keep heavier decorations away from the lowest turn.
- Thread strong cord vertically through the mobile and add optional beads between sections. Knot beneath each bead group so a failed lower connection cannot release the entire strand.
- Suspend the two small candy corns from the left and right lower points. Match their cord lengths before adding the wrapped candies below.
- Hang the pumpkin from the center strand and the miniature candy corn beneath it. Attach the two wrapped candies to the outside strands.
- Add the yellow top loop, weave every structural tail through at least 4 cm of dense crochet, trim loose fibers and check the mobile while suspended.
The completed structure should hang vertically with the large candy-corn witch above an open, balanced spiral.
7 Technical Tips for a Cleaner Candy Corn Mobile
- Losing the start of a round: Move the stitch marker after the first stitch of every round, not after finishing the round. A one-stitch drift becomes visible immediately at the white-to-orange boundary.
- Overstuffed white point: Pack the first 2 cm with small pieces of fiberfill before filling the wider section. One large wad can leave a blunt or sideways-pointing tip.
- Visible decrease gaps: Work invisible decreases through the front loops on R20–R24 of the main figure. Standard two-stitch decreases can leave openings large enough to expose stuffing.
- Incorrect eye height: Fit the 10 mm eyes between R11 and R12 before the yellow section is completed. Installing them after stuffing makes the seven-stitch eye spacing harder to maintain.
- Uneven spiral tension: Keep all 12 stitches of each flat row at the same gauge. A width variation greater than roughly 5 mm causes one section of the helix to buckle instead of curving.
- Rotating appliqués: Pin each bat or star with two points of contact before sewing. A single central stitch lets the appliqué rotate when the mobile moves.
- Structural tails pulling free: Weave suspension tails through at least 4 cm of dense fabric and reverse direction once. Short tails hidden directly beside a knot can migrate through the crochet under the combined ornament weight.
Finishing the Candy Corn Witch Mobile
Check the hanging balance before permanently knotting the bottom three ornament strands. The center pumpkin should remain below the spiral axis, while the two small candy corns sit at approximately equal heights on either side. After that test, photograph the finished piece against a plain background so the black bats and purple stars remain distinct.
Save the project to Pinterest as a Halloween crochet reference, then share the finished mobile on Instagram with #CandyCornWitchMobile. This candy corn amigurumi crochet pattern can also be shortened by removing one complete spiral color repeat. Which detail would you change first: the witch’s hat bow, the jack-o’-lantern bucket or the hanging wrapped candies?









