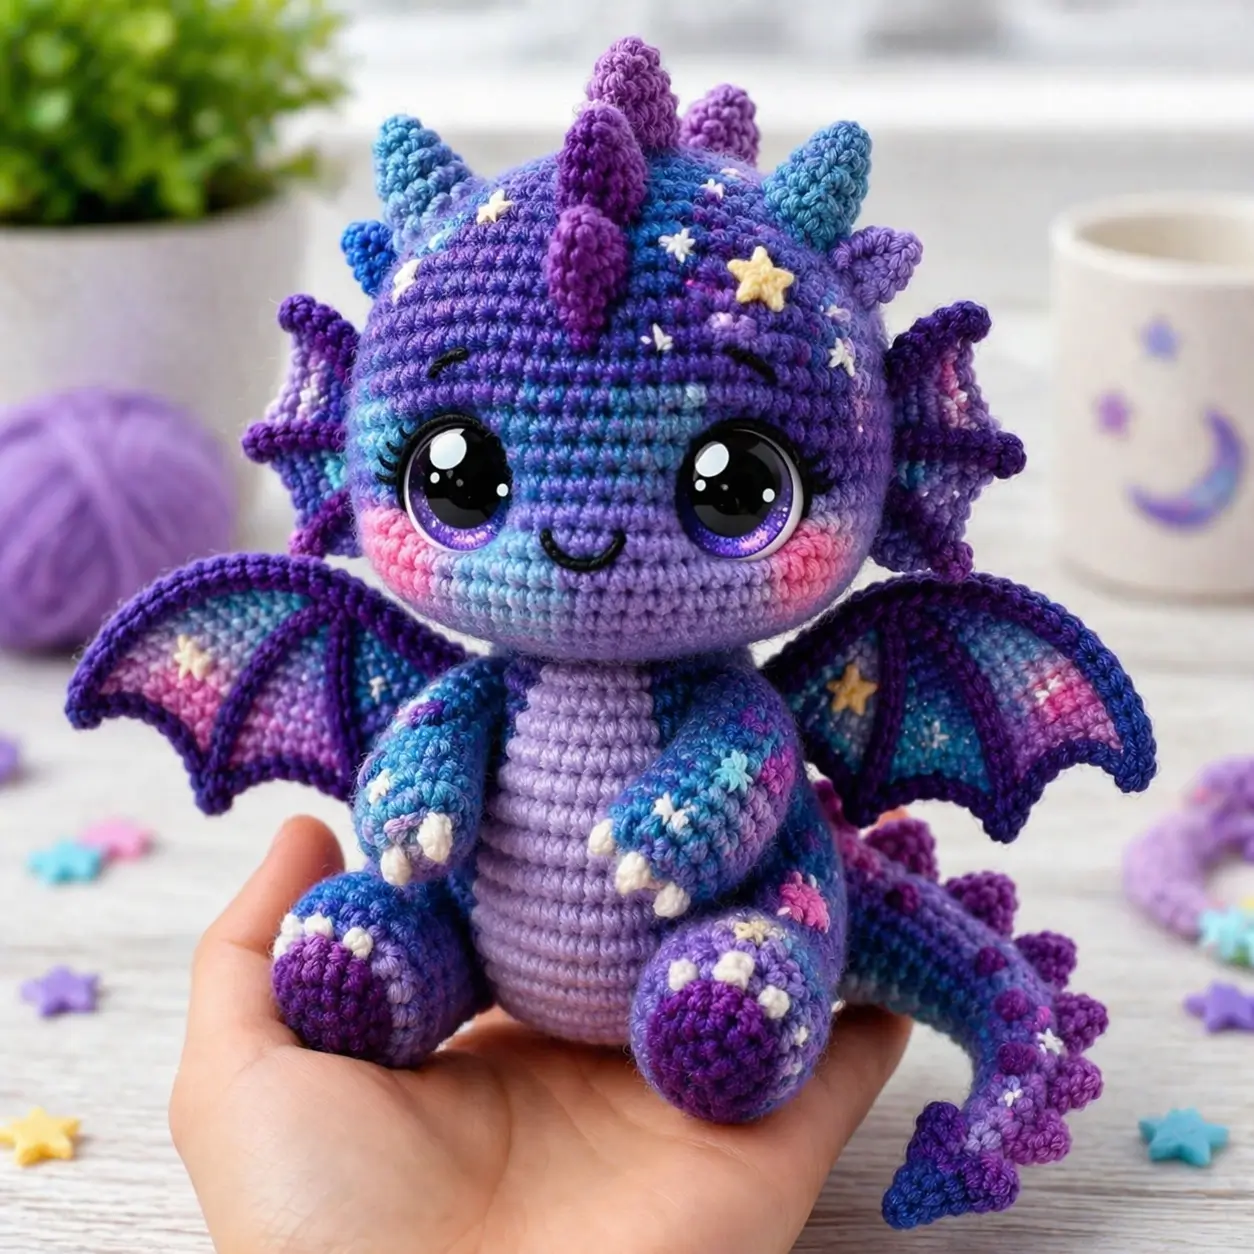
A galaxy dragon with blush cheeks and star-marked wings collapses visually the moment the belly column gets too wide. This galaxy dragon amigurumi crochet pattern uses medium yarn, a 2.75 mm hook baseline, compact shaping, and an intermediate assembly sequence to build a palm-size fantasy dragon that works well as display decor, gift stock, or a photographed shop sample.
The Design: What Makes Galaxy Dragon Different
This dragon is not built like a generic reptile plush. The head runs larger than the torso on purpose, because the photo shows an exaggerated chibi ratio with a narrow neck and a centered belly panel. Wing scale matters too. Too small, and the silhouette reads dinosaur. Too large, and the body loses its seated balance. A third structural choice is the spike rhythm: short forehead horns, then smaller back spikes, then a tapered tail line. That sequence keeps the outline readable from the front and side.
A common maker mistake with a dragon amigurumi pattern is overstuffing the neck. That pushes the head upward and removes the tucked seated posture visible in many baby dragon crochet pattern builds. Another failure point is attaching wings too low on the back, which makes the dragon appear to lean backward instead of sit upright. Comparable dragon references show palm-size builds, separate wing structures, and compact body plans, but the galaxy styling here shifts the emphasis to color zoning and face framing.
Project Info at a Glance
| Skill Level | Time | Finished Size | Hook | Best For |
|---|---|---|---|---|
| Intermediate | 6–8 hours | approx. 11.5–15 cm seated | 2.75 mm | Display plush, gifts, fantasy decor |
The verified palm-size benchmark is 11.5 cm with medium yarn and a 2.75 mm hook; this galaxy version may finish slightly taller if you add eye appliqués and heavier stuffing.
Materials and Tools
Yarn
- Variegated blue-purple — medium weight — 56 g — Hobbii Friends Cotton 8/8, Brava Worsted, or similar smooth yarn
- Lavender — medium weight — 12 g — for belly panel and parts of ears
- Deep purple — medium weight — 12 g — for wing edging, claws, horns, and spikes
- Pink — scraps — for cheek patches
- White — scraps — for claws and small stars
- Yellow — scraps — for star appliqués
Comparable dragon projects in this size and yarn family commonly use medium or worsted yarn, with one reference listing 56 g main yarn and 12 g accent colors.
Tools
- Hook 2.75 mm
- 6 mm safety eyes for a standard palm-size version, or decorative eye appliqués if copying the oversized anime look
- Stuffing
- Yarn needle
- Stitch markers
- Pins
- Small embroidery needle for lashes and smile
Abbreviations
MR / sc / inc / dec / sl st / ch / BLO / hdc / dc / FO
Use invisible decrease wherever a round calls for dec. It reduces front-loop gaps and keeps the face and belly shaping cleaner than a standard decrease.
Pattern — Step by Step
Continuous spiral unless noted.
Head
Yarn: variegated blue-purple — Source: standard amigurumi math inspired by compact dragon references
- R1: 6 sc in MR (6)
- R2: inc x6 (12)
- R3: (sc, inc) x6 (18)
- R4: (2 sc, inc) x6 (24)
- R5: (3 sc, inc) x6 (30)
- R6: (4 sc, inc) x6 (36)
- R7–R12: sc around (36)
Place eyes between R8 and R9, spaced 8 sts apart. For oversized decorative eyes, anchor placement first, then add appliqué surrounds after assembly.
- R13: (4 sc, dec) x6 (30)
- R14: (3 sc, dec) x6 (24)
- R15: (2 sc, dec) x6 (18)
Stuff firmly at the crown, lightly at the lower face.
- R16: (sc, dec) x6 (12)
- R17: dec x6 (6)
Fasten off. Close opening. Leave 20 cm tail.
Body
Yarn: lavender for belly-facing front, variegated blue-purple for rest — Source: standard amigurumi math for a slim seated torso
- R1: 6 sc in MR (6)
- R2: inc x6 (12)
- R3: (sc, inc) x6 (18)
- R4: (2 sc, inc) x6 (24)
- R5: (3 sc, inc) x6 (30)
- R6–R10: sc around (30)
- R11: (3 sc, dec) x6 (24)
- R12–R15: sc around (24)
- R16: (2 sc, dec) x6 (18)
- R17–R20: sc around (18)
Stuff base firmly. Keep neck area lighter so the head can tilt slightly forward.
Fasten off. Leave 25 cm tail.
Arms / Front Legs (Make 2)
Yarn: variegated blue-purple, white claws — Source: standard amigurumi math
- R1: 6 sc in MR (6)
- R2: (sc, inc) x3 (9)
- R3–R4: sc around (9)
Optional claw tips: replace first 3 sts of R4 with white.
- R5: (sc, dec) x3 (6)
- R6–R8: sc around (6)
Stuff paw only.
Flatten and sc through both sides 3 sts to close. Fasten off. Leave 18 cm tail.
Back Legs (Make 2)
Yarn: variegated blue-purple, deep purple soles, white claws — Source: standard amigurumi math
- R1: 6 sc in MR (6)
- R2: inc x6 (12)
- R3: BLO sc around (12)
- R4–R5: sc around (12)
Add 3 white claw stitches at front if desired.
- R6: (2 sc, dec) x3 (9)
- R7–R8: sc around (9)
Stuff firmly in foot, lightly in upper leg.
Flatten and sc through both sides 4 sts to close. Fasten off. Leave 20 cm tail.
Webbed Ears (Make 2)
Yarn: outer deep purple, inner lavender — Source: adapted from separate ear references with original sizing
- Ch 6.
- Row 1: sc in 2nd ch from hook, sc 4, ch 1, turn (5)
- Row 2: dec, sc, dec, ch 1, turn (3)
- Row 3: sc 3, FO.
Border: attach deep purple at base, work sc evenly around, placing 2 sc in tip. Fasten off. Leave 15 cm tail.
Wings (Make 2)
Yarn: inner variegated blue-purple/lavender, border deep purple — Source: wing references resized for this project
- Ch 11.
- Row 1: sc in 2nd ch from hook and across (10), ch 1, turn
- Row 2: dec, sc 6, dec (8), ch 1, turn
- Row 3: sc 8, ch 1, turn
- Row 4: dec, sc 4, dec (6), ch 1, turn
- Row 5: sc 6, ch 1, turn
- Row 6: dec, sc 2, dec (4), ch 1, turn
- Row 7: sc 4
Wing Fingers:
- Ch 1, rotate work. Sl st to base corner, ch 5, sl st in next edge point, ch 4, sl st in next edge point, ch 3, sl st in base.
Border: with deep purple, sc evenly around the wing and work 1 sc into each chain on the finger arches. Fasten off. Leave 20 cm tail.
Forehead Horns / Head Spikes
Yarn: deep purple — Source: standard cone math informed by dragon spike references
Large center horn (Make 1)
- R1: 6 sc in MR (6)
- R2: sc around (6)
- R3: (2 sc, dec) x2 (4)
- R4: sc around (4)
Fasten off. Leave 12 cm tail.
Small side horns (Make 2)
- R1: 6 sc in MR (6)
- R2: sc around (6)
- R3: dec x3 (3)
Fasten off. Leave 10 cm tail.
Tail
Yarn: variegated blue-purple — Source: standard amigurumi math
- R1: 6 sc in MR (6)
- R2: sc around (6)
- R3: (2 sc, inc) x2 (8)
- R4: sc around (8)
- R5: (3 sc, inc) x2 (10)
- R6: sc around (10)
- R7: (4 sc, inc) x2 (12)
- R8–R12: sc around (12)
Stuff only first 5 rounds. Keep tip flexible.
Fasten off. Leave 25 cm tail.
Tail Spikes (Make 5)
Yarn: deep purple — Source: simplified cone based on spike references
- R1: 6 sc in MR (6)
- R2: sc around (6)
- R3: dec x3 (3)
Fasten off. Leave 10 cm tail.
Cheek Patches (Make 2)
Yarn: pink — Source: standard flat circle
- R1: 6 sc in MR (6)
- R2: inc x6 (12)
Fasten off. Leave 10 cm tail.
Belly Panel
Yarn: lavender — Source: original oval insert for the photo look
- Ch 8.
- R1: sc in 2nd ch from hook 6, 3 sc in last ch, work opposite side: sc 5, inc in last st (16)
- R2: inc, sc 5, inc x3, sc 5, inc x2 (22)
- R3: sc around (22)
Fasten off. Leave 20 cm tail.
Star Appliqués
Yarn: white and yellow — Source: simple decorative accessory to match the photo
Make 5–7 tiny stars.
- Ch 2, sl st in 2nd ch from hook 5 times around the same center point, or use embroidered asterisk stars for smaller details.
Fasten off. Leave short tails for sewing.
Assembly
- Sew the head to the body, centering the chin slightly forward of the neck opening.
- Attach the belly panel to the front body and tack the upper edge just below the chin.
- Sew cheek patches below the eyes, one on each side of the smile line.
- Attach arms at the upper body sides, aligned so the paws angle inward toward the belly.
- Sew back legs to the lower front sides of the body so the dragon sits without rocking.
- Attach ears to the head sides, slightly behind the eye line.
- Sew the large horn at the forehead center and the two smaller horns behind it.
- Attach wings high on the back, with the top edge near the shoulder line.
- Sew the tail to the lower back seam and attach tail spikes along the top ridge.
- Add stars, lashes, nostrils, and smile embroidery, then weave in every tail on the inside path of a matching color.
The completed dragon should sit upright with the head slightly forward and the wings clear of the table surface.
7 Technical Tips
- Mark the first stitch of every round. Losing the round start by even one stitch shifts the eye line and makes the cheek patches sit unevenly.
- Do not overstuff the neck. A neck cylinder packed as firmly as the head will push the dragon into a rigid, upright pose instead of the slight forward tilt shown here.
- Use invisible decreases on the face rounds only. Standard decreases can leave laddering that shows clearly across light lavender and pink sections.
- Install eyes before R13 on the head. Waiting until after the decrease rounds can compress the face opening and distort spacing.
- Pin the wings before sewing and check rear balance. If the wings sit lower than the arm join, the dragon starts to read heavy at the back and may tip.
- Keep tail stuffing limited to the first 5 rounds. A fully packed tail becomes a prop rod and lifts the seated base off level.
- Weave tails for at least 4 directional passes. Short cut tails in medium cotton can work loose around high-tension points like horns, wings, and cheeks.
Conclusion
Galaxy color changes are decorative, but the real control point in a galaxy dragon amigurumi crochet pattern is proportion. Keep the head broad, the belly column narrow, the wings high, and the tail lightly filled. Work the pattern once in solid yarn first if you want to test the shaping, then repeat it in a variegated palette with stars and blush. Share the finished dragon on Pinterest and Instagram with one front view and one side profile so the wing placement is visible. Use #GalaxyDragonPattern. For this version, would you place the forehead horn as one large center spike or split it into three equal points?









