Introduction
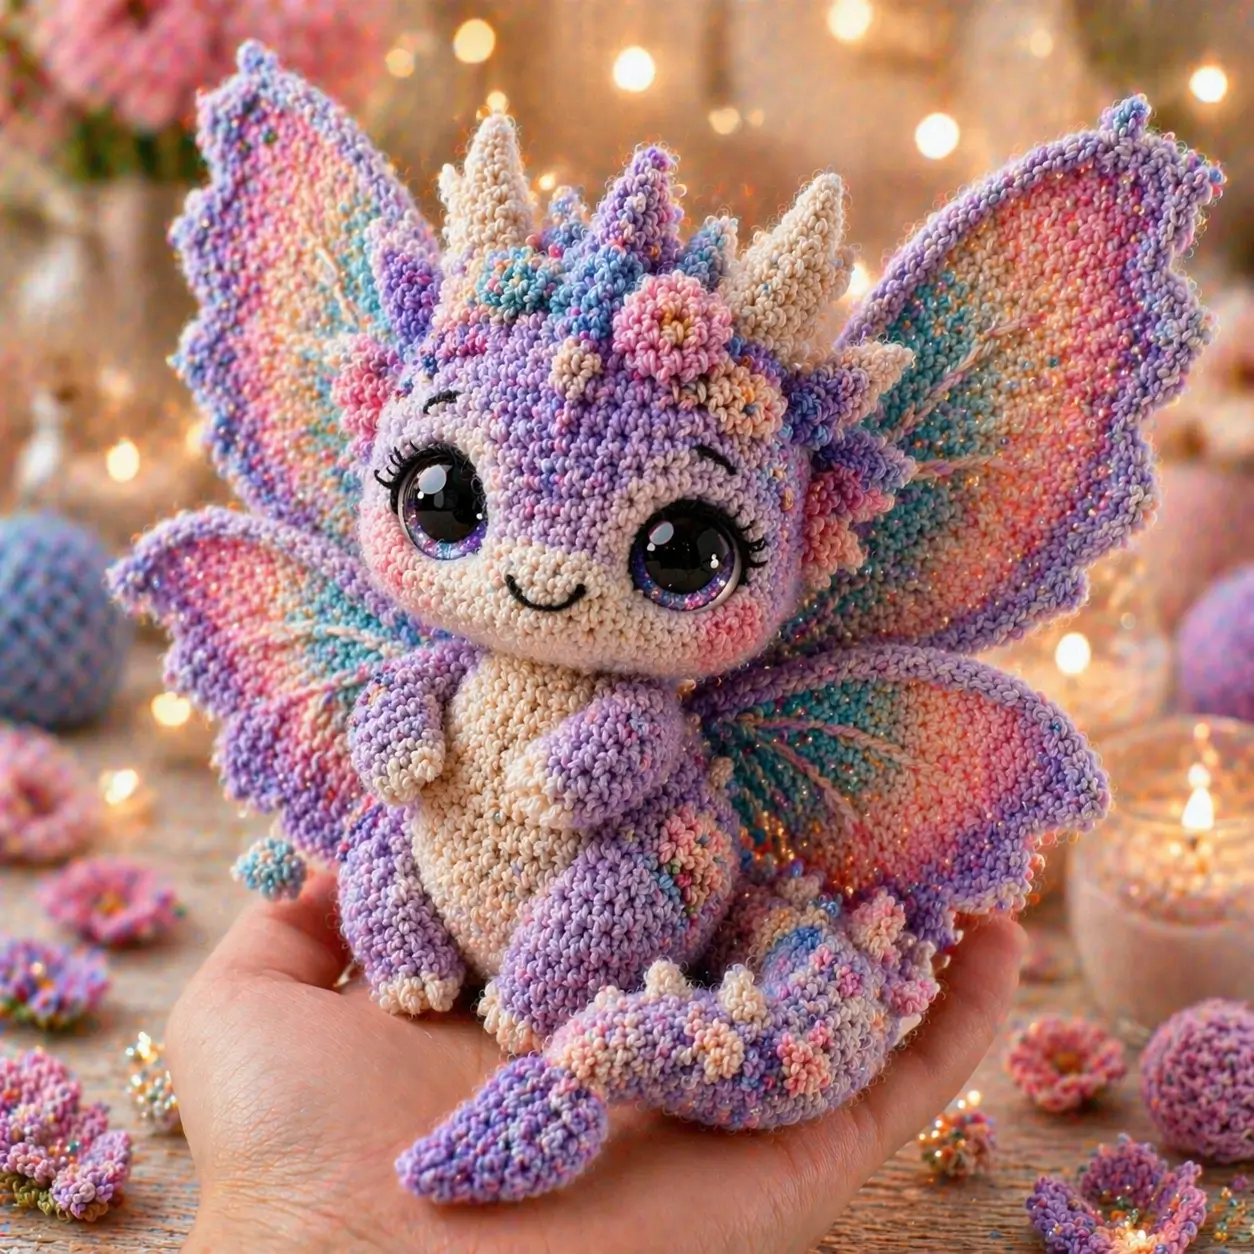
Petal-shaped wings break the usual dragon silhouette. That is the geometry problem first. This dragon amigurumi crochet pattern uses worsted yarn, a 4 mm hook, and an intermediate construction sequence to produce a seated dragon about 16 to 18 cm tall. The floral crown gives the project a second job beyond display: it doubles as a photography prop for spring market tables and gift baskets.
The Design: What Makes This Dragon Different
A flower-crowned dragon needs a broader forehead than a standard fantasy hatchling. That extra width gives room for four horns and a cluster of blossoms without forcing the eyes too low. The wings also change the build. Instead of bat-like triangles, this version uses petal contours with a central ridge, which keeps the silhouette soft and stops the finished piece from reading as a gargoyle.
The belly panel matters too. A cream oval running from muzzle to lower torso breaks up the lavender mass and makes the seated pose clearer from the front. Many makers miss one structural point on this character type: the head can look too heavy if the neck rounds close too fast. In a pastel dragon amigurumi, that imbalance becomes obvious because the face is oversized. A second common mistake is placing the wings too high, which hides the arms and shortens the body visually. For a crochet dragon with wings, proportion decides everything.
Project Info at a Glance
| Skill Level | Time | Finished Size | Hook | Best For |
|---|---|---|---|---|
| Intermediate | 8–12 hours | 16–18 cm seated | 4 mm | Display plush, spring decor, gift item |
Materials and Tools
Yarn
- Lavender — worsted — 80–100 g — Rico Creative Cotton Aran or similar benchmark
- Cream — worsted — 20–25 g — same line for belly, muzzle, horns
- Blush pink — worsted — 10 g — flower petals and cheeks
- Peach — worsted — 10 g — wing gradient and flowers
- Aqua — worsted — 10 g — wing inner shading
- Soft blue — worsted — 10 g — wing inner shading
- Violet — worsted — 10 g — flower accents and tail blossoms
Tools
- Hook 4 mm
- 18 mm safety eyes
- Stuffing
- Tapestry needle
- Stitch markers
- Pins or clips
- Black embroidery thread for mouth
Abbreviations
MR = magic ring; sc = single crochet; inc = increase; dec = invisible decrease; sl st = slip stitch; ch = chain; BLO = back loop only; FLO = front loop only; hdc = half double crochet.
Invisible decrease is worked through the front loops of the next two stitches so the decrease stays flatter on the face and cleaner along the body line.
Pattern — Step by Step
Continuous spiral unless noted.
Head (Make 1)
Yarn: lavender — Standard amigurumi math
R1: 6 sc in MR (6)
R2: inc x6 (12)
R3: (sc, inc) x6 (18)
R4: (2 sc, inc) x6 (24)
R5: (3 sc, inc) x6 (30)
R6: (4 sc, inc) x6 (36)
R7–12: sc around (36)
R13: (4 sc, dec) x6 (30)
R14: (3 sc, dec) x6 (24)
Insert safety eyes between R9 and R10, spaced 8 stitches apart. Start stuffing.
R15: (2 sc, dec) x6 (18)
R16: in FLO, (2 sc, inc) x6 (24)
R17: (3 sc, inc) x6 (30)
R18–19: sc around (30)
R20: (3 sc, dec) x6 (24)
R21: (2 sc, dec) x6 (18)
Fasten off. Leave 20 cm tail.
Muzzle (Make 1)
Yarn: cream — Standard amigurumi math
R1: 6 sc in MR (6)
R2: inc x6 (12)
R3: sc around (12)
R4: 6 sc, sl st, leave tail (12)
Lightly stuff or leave flat. Sew centered below eyes. Embroider mouth after attaching.
Body (Make 1)
Yarn: lavender with cream belly insert — Standard amigurumi math
R1: 6 sc in MR (6)
R2: inc x6 (12)
R3: (sc, inc) x6 (18)
R4: (2 sc, inc) x6 (24)
R5: (3 sc, inc) x6 (30)
R6–8: sc around (30)
R9: 10 sc lavender, 5 sc cream, 10 sc lavender, 5 sc cream (30)
R10–11: repeat color placement (30)
R12: (3 sc, dec) x6 (24)
R13: sc around (24)
R14: (2 sc, dec) x6 (18)
Stuff firmly at base, medium-firm at chest.
R15: sc around (18)
Fasten off. Leave 25 cm tail.
Arms / Front Legs (Make 2)
Yarn: cream then lavender — Standard amigurumi math
R1: 6 sc in MR with cream (6)
R2: inc x6 (12)
R3: BLO sc around, change to lavender at end (12)
R4–5: sc around (12)
R6: (4 sc, dec) x2 (10)
R7–8: sc around (10)
Flatten top and crochet 5 sc through both layers (5)
Stuff only the paw section.
Fasten off. Leave 18 cm tail.
Back Legs (Make 2)
Yarn: cream then lavender — Standard amigurumi math
R1: 6 sc in MR with cream (6)
R2: inc x6 (12)
R3: (sc, inc) x6 (18)
R4: BLO sc around, change to lavender at end (18)
R5–6: sc around (18)
R7: (4 sc, dec) x3 (15)
R8: sc around (15)
R9: (3 sc, dec) x3 (12)
Flatten top and crochet 6 sc through both layers (6)
Stuff the front half only so the leg sits flat against the body.
Fasten off. Leave 20 cm tail.
Wings (Make 2)
Yarn: lavender edging with pink, peach, aqua, and blue interior
Ch 13.
Row 1: sc in 2nd ch from hook and across (12)
Row 2: ch 1, turn, dec, 8 sc, dec (10)
Row 3: ch 1, turn, 10 sc (10)
Row 4: ch 1, turn, dec, 6 sc, dec (8)
Row 5: ch 1, turn, 8 sc (8)
Row 6: ch 1, turn, dec, 4 sc, dec (6)
Row 7: ch 1, turn, 6 sc (6)
Do not fasten off. Work an edging around the wing:
2 sc in tip, 5 sc down first side, 3 sc in lower corner, 11 sc along base, 3 sc in lower corner, 5 sc up second side, 1 sc at tip join.
Surface-stitch three inner rays from base to outer edge using aqua, blue, and peach. Make one larger upper pair and one slightly smaller lower pair.
Fasten off. Leave 20 cm tail.
Horns (Make 4)
Yarn: cream — Standard amigurumi math
R1: 4 sc in MR (4)
R2: sc around (4)
R3: (sc, inc) x2 (6)
R4–5: sc around (6)
Do not stuff.
Fasten off. Leave 12 cm tail.
Ears / Side Frills (Make 2)
Yarn: lavender — Standard amigurumi math
Ch 5.
Row 1: sc in 2nd ch, hdc, sc, sl st (4)
Fasten off. Leave 10 cm tail.
Tail (Make 1)
Yarn: lavender with blossom accents — Standard amigurumi math
R1: 6 sc in MR (6)
R2: sc around (6)
R3: (2 sc, inc) x2 (8)
R4: sc around (8)
R5: (3 sc, inc) x2 (10)
R6: sc around (10)
R7: (4 sc, inc) x2 (12)
R8–16: sc around (12)
Lightly stuff for the first 8 rounds only. Bend into a curve while sewing.
Fasten off. Leave 25 cm tail.
Tail Tip Blossom Bumps (Make 3)
Yarn: blush, peach, violet — Standard amigurumi math
R1: 6 sc in MR (6)
R2: sc around (6)
Fasten off. Leave short tails for sewing.
Flower Crown Blossoms (Make 5)
Yarn: blush, peach, violet, cream — Standard flat flower math
For each flower:
Ch 5, join with sl st to first ch ring.
(Ch 2, 2 dc, ch 2, sl st into ring) x5.
Fasten off. Leave 12 cm tail.
Cheek Patches (Make 2)
Yarn: blush — Standard amigurumi math
R1: 6 sc in MR (6)
R2: inc x6 (12)
Fasten off. Leave 10 cm tail.
Belly Patch Overlay (Optional, Make 1)
Yarn: cream — Standard oval math
Ch 7.
R1: 5 sc, 3 sc in last ch, working opposite side 4 sc, inc (14)
R2: inc, 4 sc, 3 inc, 4 sc, 2 inc (20)
R3: sc around (20)
Fasten off. Leave 20 cm tail.
Assembly
- Sew the head to the body, centering the neck opening over the top body rounds. Add extra stuffing to the neck before closing the final third.
- Attach the muzzle to the lower half of the face, with its top edge sitting about one round below the eyes.
- Sew the cheek patches one stitch-width outside the muzzle corners. Embroider the mouth in black across the lower center of the muzzle.
- Attach the back legs to the lower sides of the body so the dragon sits with the paws angled slightly forward.
- Sew the arms high on the front body, just below the head seam. Keep both paws clear of the belly panel.
- Attach the wings to the upper back across two rounds, with the upper wing tip level just below the horn line.
- Sew the four horns across the crown: two larger front horns and two slightly lower back horns.
- Add the side frills or ears behind the outer eye line and below the back horn pair.
- Sew the tail to the lower back center, curving it around the front. Add the three blossom bumps near the tail tip.
- Stitch the five flowers between the horns and frills to form the crown, then weave in every tail inside the head or body cavity.
The completed dragon should sit upright with the tail acting as a visual counterbalance rather than a weight-bearing support.
7 Technical Tips
- Mark the first stitch of every round from the head onward. Missing one marker shift on a 36-stitch head will throw the eye line off-center by the time you reach the neck.
- Stuff the head firmer than the body. A soft head collapses around 18 mm eyes and makes the muzzle seam wrinkle.
- Use invisible decreases on the face and body. Standard decreases leave a ridge that shows clearly on pale lavender yarn under direct light.
- Insert the eyes before the final head decreases. Trying to place washers after round 14 on a small opening can distort the whole forehead.
- Keep wing tension slightly tighter than body tension. Loose wing rows curl at the outer edge and the petals lose their pointed profile.
- Pin every horn and flower before sewing. Even a 5 mm shift between the front horn pair can make the crown look twisted from the front view.
- Weave tail ends back through at least 4 cm of internal stitches. Short buried ends can work loose where the wings and tail receive repeated handling.
Conclusion
This build works because the silhouette is managed in layers: broad head, compact seated body, petal wings, then crown details. The published dragon benchmarks show how size shifts with yarn and hook, but this version pushes the profile toward a display-led fantasy plush with a flowered crest and oversized eyes. That makes it a distinct dragon amigurumi crochet pattern, not just another generic hatchling. The next step is practical: swatch the wing color order before starting the body so the palette stays balanced. Share the finished piece on Pinterest and Instagram with #PetalWingDragon. Which flower placement worked better on your dragon: centered between the front horns or offset toward one wing?









