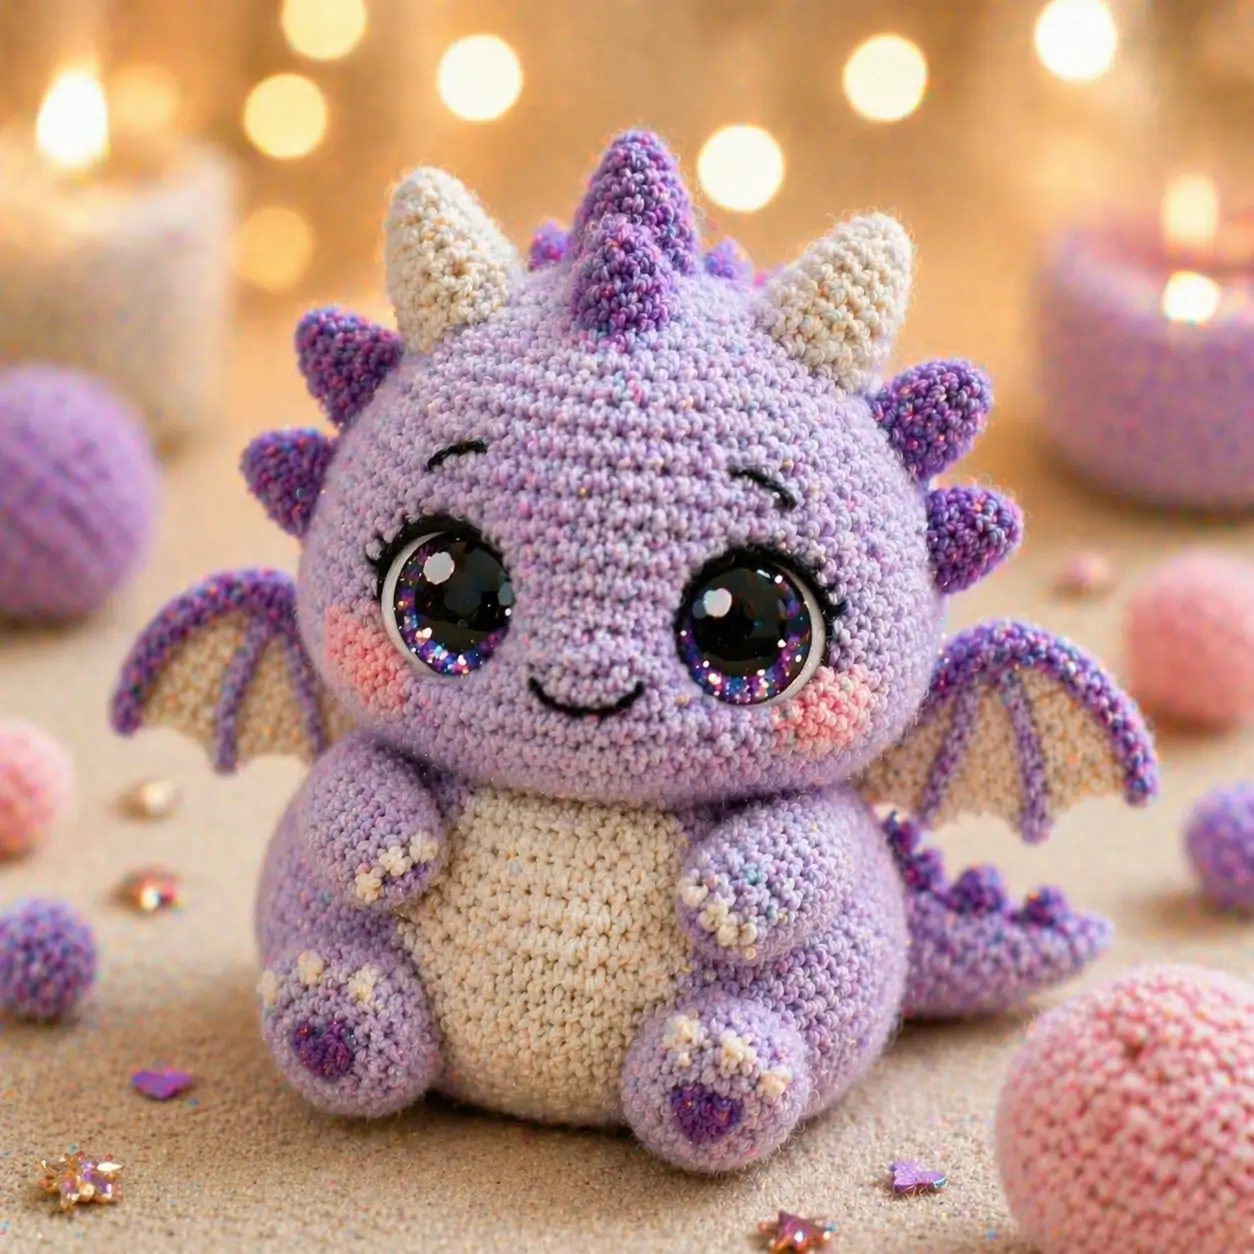
A baby dragon fails fast when the snout sits too flat; the forehead-to-nose drop has to read before the wings do. This dragon amigurumi crochet pattern builds that profile with worsted or medium-weight yarn, a 4 mm hook, a seated size around 16 cm, and intermediate shaping. It suits display makes, nursery decor, and small gift inventory because the silhouette stays readable from the front.
The Design: What Makes This Dragon Different
This dragon uses a large round head, a compact seated body, and short limbs. That ratio matters because dragons lose their character quickly when the torso grows too long; the face stops carrying the design. The second structural choice is the raised snout ridge. Rather than sewing on a separate muzzle, the profile is implied by front-round shaping and embroidery placement, which keeps the face cleaner for a kawaii result. A third choice is the small bat wing. The wings are deliberately undersized so the piece remains stable in a seated pose and does not tip backward, a common issue in a sitting dragon amigurumi. Many dragon tutorials focus on side-profile builds or long bodies; fewer address front-facing chibi balance, oversized eye spacing, and cheek patches. That gap is why this baby dragon crochet pattern emphasizes proportions first, then embellishment.
Project Info at a Glance
| Skill Level | Time | Finished Size | Hook | Best For |
|---|---|---|---|---|
| Intermediate | 6–8 hours | 16 cm seated | 4 mm | Display plush, gift stock, fantasy decor |
The size and hook shown above align with published seated dragon references that use worsted or medium-weight yarn and a 4 mm hook.
Materials and Tools
Yarn
- Lavender — aran/worsted or medium weight — about 56 g for the main body on a 16 cm reference dragon — brand suggestion: Rico Designs Creative Cotton Aran or similar cotton/acrylic blend.
- Cream — same weight — about 12 g for belly, horns, wing membrane, and claw details in a small seated dragon.
- Purple — same weight — about 12 g for spikes, tail tip, and paw accents.
- Pink scrap yarn — small amount for blush if crocheting cheek circles rather than brushing color on.
- Black embroidery floss — for eyebrows and mouth.
Tools
- Hook 4 mm
- Safety eyes 8–12 mm for standard dragon builds; this photo style reads closer to oversized decorative eyes, so many makers would substitute larger craft eyes or cabochons for the same look.
- Polyfill stuffing
- Tapestry needle
- Stitch markers
- Pins
- Small scissors
Abbreviations
MR = magic ring, sc = single crochet, inc = increase, dec = invisible decrease, sl st = slip stitch, ch = chain, BLO = back loop only, FLO = front loop only.
Invisible decrease reduces bulk on visible shaping lines and is preferable on the head, body close, and limb taper because standard decreases leave wider gaps.
Pattern — Step by Step
Continuous spiral unless noted.
Head (Make 1)
Yarn: lavender
R1: 6 sc in MR (6)
R2: inc x6 (12)
R3: (sc, inc) x6 (18)
R4: (2 sc, inc) x6 (24)
R5: (3 sc, inc) x6 (30)
R6–R11: sc around (30)
Place eyes between R7 and R8 with 8 sts visible between them for standard eyes; for oversized decorative eyes, reduce the gap to 6–7 sts so the face stays centered.
R12: (3 sc, dec) x6 (24)
R13: (2 sc, dec) x6 (18)
R14: (sc, dec) x6 (12)
Stuff firmly, especially across the forehead and cheeks.
Fasten off. Leave 20 cm tail.
Snout Ridge (Make 1)
Yarn: lavender
Ch 5.
Row 1: Starting in 2nd ch from hook, 4 sc (4)
Row 2: ch 1, turn, inc, 2 sc, inc (6)
Row 3: ch 1, turn, 6 sc (6)
Fasten off. Leave 15 cm tail.
Body (Make 1)
Yarn: lavender with cream belly panel
R1: 6 sc in MR (6)
R2: inc x6 (12)
R3: (sc, inc) x6 (18)
R4: (2 sc, inc) x6 (24)
R5: (3 sc, inc) x6 (30)
R6: (4 sc, inc) x6 (36)
R7–R10: sc around (36)
R11: (4 sc, dec) x6 (30)
R12: (3 sc, dec) x6 (24)
R13: (2 sc, dec) x6 (18)
R14: (sc, dec) x6 (12)
Stuff the lower body firmly but keep the upper neck area slightly softer for easier sewing.
Fasten off. Leave 25 cm tail.
Belly Patch (Make 1)
Yarn: cream
Ch 7.
Rnd 1: Starting in 2nd ch from hook, 5 sc, 3 sc in last ch, working on opposite side 4 sc, inc (14)
Rnd 2: inc, 4 sc, inc x3, 4 sc, inc x2 (20)
Rnd 3: sc, inc, 4 sc, (sc, inc) x3, 4 sc, (sc, inc) x2 (26)
Fasten off. Leave 20 cm tail.
Front Legs / Arms (Make 2)
Yarn: lavender with cream claw dots
R1: 6 sc in MR (6)
R2: inc x6 (12)
R3–R4: sc around (12)
R5: (sc, dec) x4 (8)
R6–R8: sc around (8)
Stuff lower half only.
Fasten off. Leave 18 cm tail.
Back Legs (Make 2)
Yarn: lavender with cream claw dots
R1: 6 sc in MR (6)
R2: inc x6 (12)
R3: (sc, inc) x6 (18)
R4–R5: sc around (18)
R6: (sc, dec) x6 (12)
R7: sc around (12)
Flatten top opening lightly; this helps the seated angle.
Fasten off. Leave 20 cm tail.
Ears / Horn Base Supports (Make 2)
Yarn: cream
R1: 6 sc in MR (6)
R2: (sc, inc) x3 (9)
R3: sc around (9)
Fold flat and sc through both layers across 4 sts.
Fasten off. Leave 12 cm tail.
Horns (Make 2)
Yarn: cream
R1: 6 sc in MR (6)
R2: sc around (6)
R3: (2 sc, inc) x2 (8)
R4: sc around (8)
Do not stuff.
Fasten off. Leave 12 cm tail.
Wings (Make 2)
Yarn: purple edge and cream membrane
With purple, ch 10.
Row 1: Starting in 2nd ch from hook, 9 sc (9)
Row 2: ch 1, turn, dec, 5 sc, dec (7)
Row 3: ch 1, turn, 7 sc (7)
Switch to cream.
Row 4: ch 1, turn, dec, 3 sc, dec (5)
Row 5: ch 1, turn, 5 sc (5)
Fasten off.
Rejoin purple at lower edge. Work 3 chain arches into the wing edge:
Arch 1: ch 4, sl st 2 rows down
Arch 2: ch 5, sl st 2 rows down
Arch 3: ch 4, sl st at wing base
Fasten off. Leave 15 cm tail.
Head Spikes (Make 5)
Yarn: purple
R1: 6 sc in MR (6)
R2: sc around (6)
R3: (2 sc, inc) x2 (8)
R4: sc around (8)
Do not stuff.
Fasten off. Leave 12 cm tail.
Tail (Make 1)
Yarn: lavender
R1: 6 sc in MR (6)
R2: sc around (6)
R3: (2 sc, inc) x2 (8)
R4–R5: sc around (8)
R6: (3 sc, inc) x2 (10)
R7–R9: sc around (10)
R10: (3 sc, dec) x2 (8)
R11–R12: sc around (8)
R13: (sc, dec) x2, 2 sc (6)
Stuff lightly near the base only.
Fasten off. Leave 20 cm tail.
Tail Spikes (Make 3)
Yarn: purple
R1: 6 sc in MR (6)
R2: (sc, inc) x3 (9)
R3: sc around (9)
Do not stuff.
Fasten off. Leave 10 cm tail.
Cheek Patches (Make 2)
Yarn: soft pink
R1: 6 sc in MR (6)
R2: inc x6 (12)
Fasten off. Leave 10 cm tail.
Paw Pads / Claw Dots (Make 4 large, 8 small)
Yarn: cream or purple
For large pad:
R1: 6 sc in MR (6)
Fasten off.
For small dots:
MR, 4 sc.
Fasten off.
Face Embroidery
Yarn: black and pink
Embroider a shallow curved smile centered below the snout ridge. Add short curved brows above the eyes. Lash lines can be added with one outward stitch at the upper outer corners.
Assembly
- Sew the head to the body, centering the chin over the front body rounds. Add extra stuffing to the neck gap before closing.
- Attach the snout ridge vertically down the center front of the face, starting between the eyes and ending above the smile.
- Sew the belly patch to the body front. Keep the top edge just below the head seam.
- Position the cheek patches one round below the outer lower edge of each eye and sew flat.
- Attach the front legs to the upper body sides, slightly forward of center so they rest against the belly.
- Sew the back legs low on the body with the wide section facing front; angle them outward to create the seated stance.
- Place the horns on the top head corners, then add the ear supports slightly behind or below them if used as backing pieces.
- Sew the head spikes from forehead to back head. Continue with the tail spikes along the upper tail line.
- Attach the wings to the upper back, one to each side, high enough to clear the arms when viewed from the front.
- Sew the tail at the lower back seam, curving it around one side so it remains visible from the front.
The piece is complete when the dragon sits flat without rocking and the face reads symmetrically from a straight-on view.
7 Technical Tips
- Mark the first stitch of every round on the head and body. Losing one increase round on a 30- or 36-stitch plateau shifts the face seam and throws off eye centering by more than one stitch.
- Stuff the head in two passes. First fill the crown, then pack both cheeks separately so the oversized eyes do not sink inward after assembly.
- Use invisible decrease on all visible shaping rounds. Standard decreases produce small horizontal bars that become obvious on light lavender yarn, especially across the forehead.
- Install or test eye placement before the final two decrease rounds of the head. On a chibi dragon, moving the eyes even one round too high makes the snout look short and the forehead look empty.
- Keep wing tension slightly tighter than body tension. Loose wing rows curl at the membrane arches and make both wings droop instead of holding a bat-wing outline.
- Pin every feature before sewing. Horns, wings, and cheek circles need mirror placement, and a 3–5 mm height difference shows immediately on a front-facing design.
- Weave tails through at least three direction changes inside the plush. A straight buried tail can work loose at the spikes and horns because those parts have minimal internal stuffing to grip the yarn.
Conclusion
This build works because the silhouette stays controlled: broad head, short body, small wings, clear horns, and a visible tail line. The dragon amigurumi crochet pattern above is not a generic reptile body with extras added later; each part is sized to support a seated front view. Next step: swatch the head through Round 8 and test eye spacing before committing to the full make. Share the finished dragon on Pinterest and Instagram with a front view, side view, and wing spread. Use #BabyDragonPattern. One question matters for this character in particular: did you keep the forehead spike centered between the horns, or shift it forward to strengthen the baby-dragon profile?









