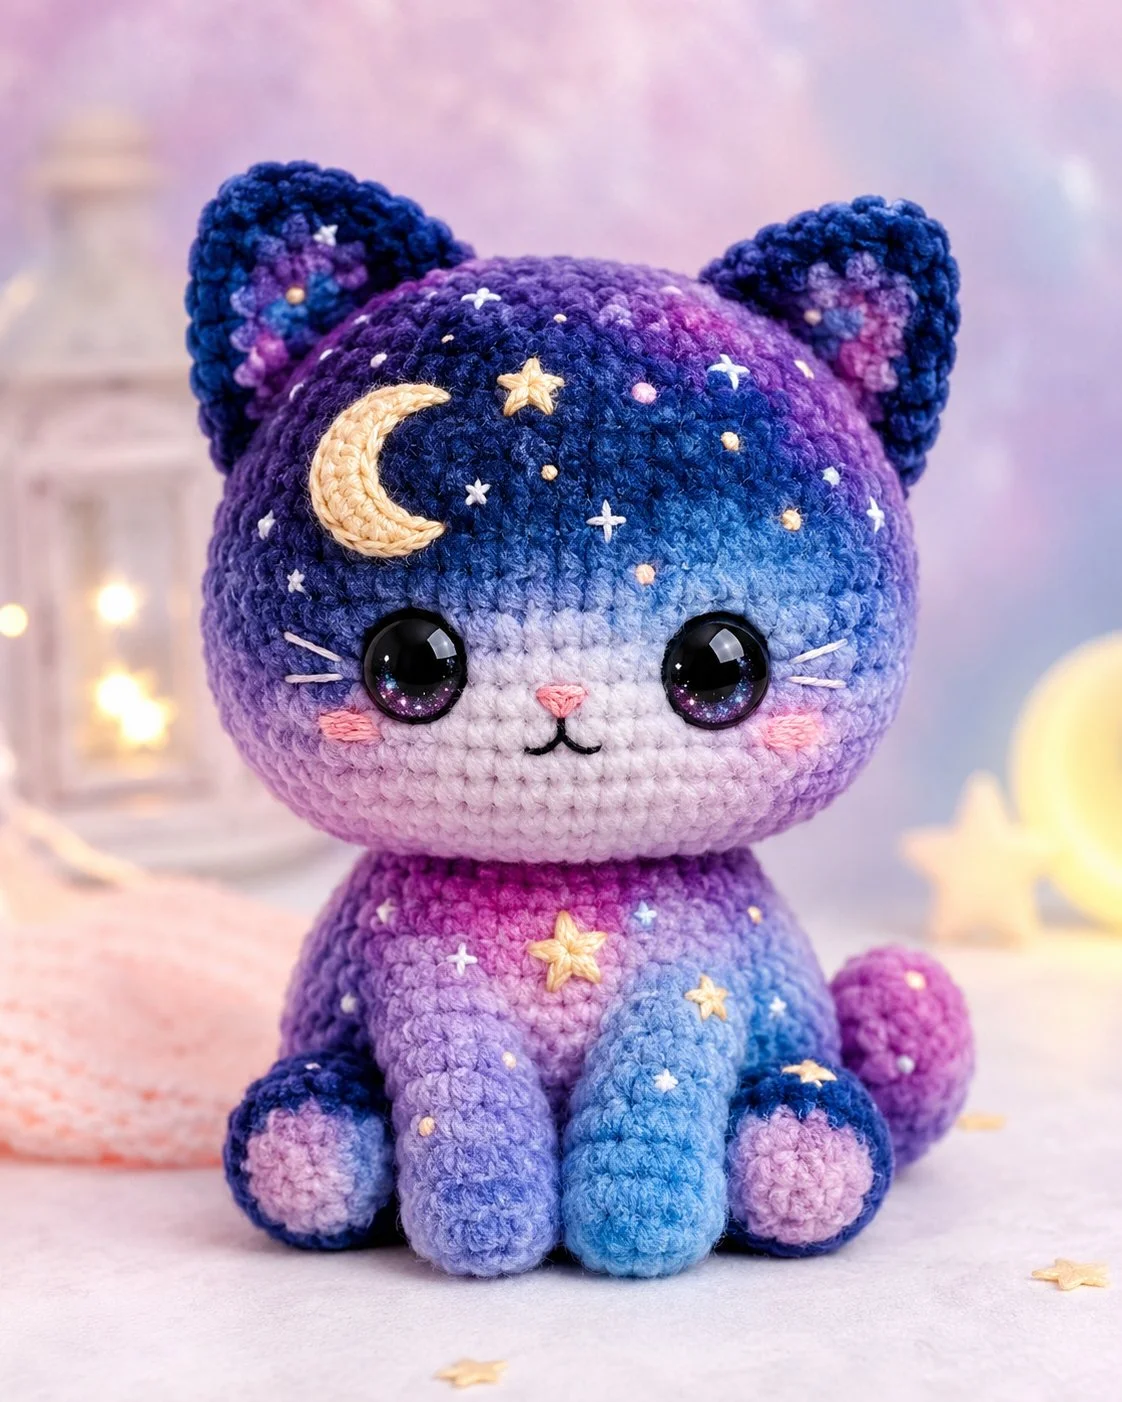
The crescent moon on this cat’s forehead shifts the whole face off center, so symmetry is not the first problem here. This galaxy cat amigurumi crochet pattern uses bulky chenille yarn, a 4.0 mm hook, 12 mm safety eyes, and a seated size around 14 cm, with intermediate shaping and surface embroidery that make it useful as shelf decor or a nursery display piece.
The Design: What Makes Galaxy Cat Different
You are not building a standard round kitten. The head is oversized, the ears sit high and slightly outward, and the celestial face details pull attention upward, which means the lower muzzle must stay visually quiet. The maker who overworks the snout usually loses that clean “night sky” read. A second structural choice is the short seated body: it keeps the plush stable and lets the forehead moon remain the focal point. Third comes color zoning. A celestial cat crochet pattern only works when the darkest tones stay on the crown and ear edges, while the lightest shade sits around the muzzle and chest. That gradient sells the idea faster than the embroidery does. Most errors happen when the ears are sewn too low, turning a starry cat amigurumi into a bear-like silhouette.
Project Info at a Glance
Skill LevelTimeFinished SizeHookBest ForIntermediate4–6 hours~14 cm seated4.0 mmDisplay plush, nursery shelf, gift plush
Finished size and hook are based on comparable bulky-chenille cat patterns and adjusted to the reference photo’s proportions.
Materials and Tools
Yarn
- Galaxy gradient chenille — bulky / chunky velvet — 70–90 g — Himalayan Dolphin Baby or similar multicolor chenille
- Pale lavender chenille — bulky — 10 g — for muzzle and cheek circles
- Cream or soft gold cotton/velvet — light accent — 5 g — for moon and stars
- Pink yarn or embroidery floss — small amount — for nose and blush
- White embroidery thread — small amount — for stars and whiskers
- Black embroidery thread — small amount — for mouth
Tools
- Hook 4.0 mm
- 12 mm safety eyes
- Stuffing
- Tapestry needle
- Stitch markers
- Pins
- Small scissors
The 4.0 mm hook and bulky chenille pairing match published cat-pattern ranges for similar plush size.
Abbreviations
MR = magic ring
sc = single crochet
inc = increase
dec = invisible decrease
sl st = slip stitch
ch = chain
BLO = back loop only
Invisible decrease is used on visible shaping rounds because it keeps the front of the fabric flatter than a standard decrease.
Pattern — Step by Step
Continuous spiral unless noted.
Head (Make 1)
Yarn: galaxy gradient chenille — Source: standard amigurumi math adapted from the reference photo
R1: 6 sc in MR (6)
R2: inc x6 (12)
R3: (sc, inc) x6 (18)
R4: (2 sc, inc) x6 (24)
R5: (3 sc, inc) x6 (30)
R6: (4 sc, inc) x6 (36)
R7: (5 sc, inc) x6 (42)
R8–R15: sc around (42)
R16: (5 sc, dec) x6 (36)
R17: (4 sc, dec) x6 (30)
Insert safety eyes between R11 and R12, about 8 stitches apart. Add stuffing firmly through the crown and cheeks.
R18: (3 sc, dec) x6 (24)
R19: (2 sc, dec) x6 (18)
R20: (sc, dec) x6 (12)
R21: dec x6 (6)
Fasten off. Close opening. Leave a 20 cm tail if sewing to body.
Body (Make 1)
Yarn: galaxy gradient chenille — Source: standard amigurumi math adapted from the reference photo
R1: 6 sc in MR (6)
R2: inc x6 (12)
R3: (sc, inc) x6 (18)
R4: (2 sc, inc) x6 (24)
R5: (3 sc, inc) x6 (30)
R6: (4 sc, inc) x6 (36)
R7–R10: sc around (36)
R11: (4 sc, dec) x6 (30)
R12: sc around (30)
R13: (3 sc, dec) x6 (24)
Stuff the lower body firmly. Keep the front slightly flatter so the legs sit close.
R14: (2 sc, dec) x6 (18)
Fasten off. Leave a 20 cm tail.
Front Legs (Make 2)
Yarn: gradient chenille, with darkest shade at paw if possible — Source: standard amigurumi math adapted from the reference photo
R1: 6 sc in MR (6)
R2: inc x6 (12)
R3–R6: sc around (12)
R7: (4 sc, dec) x2 (10)
R8–R11: sc around (10)
Lightly stuff only the lower half.
Fasten off. Leave a 15 cm tail.
Back Legs / Paws (Make 2)
Yarn: dark outer paw + pale inner paw circle — Source: standard amigurumi math adapted from the reference photo
Outer paw:
R1: 6 sc in MR (6)
R2: inc x6 (12)
R3: sc around (12)
Inner paw pad:
R1: 6 sc in MR (6)
R2: inc x6 (12)
Sew the pale circle onto the front of the outer paw. Lightly stuff the outer paw before attachment. Fasten off each piece with a 12 cm tail.
Ears (Make 2)
Yarn: darkest galaxy shade outside, lighter shade optional inside — Source: ear counts informed by comparable cat-ear patterns and adapted to the photo.
R1: 6 sc in MR (6)
R2: (2 sc, inc) x2 (8)
R3: (3 sc, inc) x2 (10)
R4: sc around (10)
Flatten. Crochet 5 sc through both layers to close the base.
Fasten off. Leave a 15 cm tail.
Tail (Make 1)
Yarn: gradient chenille — Source: narrow tail tube supported by comparable cat-tail patterns.
R1: 6 sc in MR (6)
R2–R10: sc around (6)
Stuff very lightly or not at all for a curled tail.
Fasten off. Leave an 18 cm tail.
Muzzle Patch (Make 1)
Yarn: pale lavender — Source: standard amigurumi math adapted from the reference photo
R1: 6 sc in MR (6)
R2: inc x6 (12)
R3: (sc, inc) x6 (18)
Sl st to finish.
Fasten off. Leave a 15 cm tail.
Cheek Patches (Make 2)
Yarn: pink or pale blush — Source: standard amigurumi math adapted from the reference photo
R1: 6 sc in MR (6)
R2: inc x6 (12)
Sl st to finish.
Fasten off. Leave a 10 cm tail.
Crescent Moon Applique (Make 1)
Yarn: cream or soft gold cotton — Source: photo-based applique design
Ch 11.
Row 1: Starting in second ch from hook, 9 sc, ch 1, turn (9)
Row 2: dec, 5 sc, dec, ch 1, turn (7)
Row 3: dec, 3 sc, dec, ch 1, turn (5)
Row 4: dec, sc, dec, ch 1, turn (3)
Row 5: 3 sc.
Work a neat sc edging around the outside curve. To make the inner crescent cutout, embroider a shallow curved line in matching yarn and pull slightly while sewing in place.
Fasten off. Leave a 20 cm tail.
Star Appliques (Make 3–5)
Yarn: cream or soft gold — Source: photo-based embellishment
Small stars are best embroidered directly with 4–5 straight stitches crossing at the center. For one raised center star, make a tiny knot star or sew a premade applique.
Fasten off.
Facial Embroidery
Yarn: pink, black, and white — Source: reference photo
Embroider a small triangular pink nose centered just below the eyes. Add a short black split mouth underneath. Stitch three white whisker lines on each side. Place blush patches low and outward from each eye.
Assembly
- Sew the head to the body, centering the lower head opening over the body’s top round.
- Attach the muzzle patch between the eyes, slightly low, so the forehead stays open for the moon.
- Secure the safety eyes if you staged them earlier without washers, then embroider the nose and mouth.
- Sew the cheek patches one round below eye level, slightly outside the eye centers.
- Pin the ears first. Place them high on the head, with the inner edges roughly aligned above the eyes. Then sew.
- Attach the front legs to the lower front body so they touch or nearly touch at the center.
- Sew the back paws at the lower outer body edges, angled forward.
- Attach the tail at the back seam line, low enough that the plush can still sit.
- Sew the crescent moon applique on the upper left forehead and add the embroidered stars across head and chest.
- Weave in every tail internally and shape the stuffing with your fingers until the head remains round and the body sits flat.
The completed plush should sit upright without external support.
7 Technical Tips
- Mark the first stitch of every round. Lose the round start once on chenille yarn and the forehead moon will drift off axis by several stitches before you notice it.
- Do not overstuff the neck join. A hard neck seam pushes the head upward and exposes the body top, which breaks the compact cat silhouette.
- Use invisible decreases on the face side. Standard decreases leave diagonal bars that show badly on dark galaxy shades, especially under bright photo lighting.
- Place the eyes before R18 on the head. After that point, access tightens too much for 12 mm posts, and forcing them through chenille can split the pile.
- Keep paw stuffing to the lowest 2–3 cm only. A fully stuffed front leg becomes cylindrical and will not rest with the soft bend shown in the reference plush.
- Pin both ears and the moon before sewing anything permanent. The moon is asymmetrical, so even a 3–4 mm placement error makes the whole face look tilted.
- Weave yarn tails through at least 4 directional changes. Chenille sheds grip, and a single straight weave can pull loose after handling or shipping.
Related Patterns
- Mini Sitting Cat Amigurumi — simpler silhouette for testing color changes before the galaxy version — Flag: [INTERNAL LINK NEEDED: mini cat crochet pattern]
- Moon Pillow Crochet Pattern — matching celestial decor piece for nursery or shelf styling — Flag: [INTERNAL LINK NEEDED: moon pillow crochet pattern]
- Star Applique Crochet Guide — small stitched stars and flat stars for plush embellishment — Flag: [INTERNAL LINK NEEDED: crochet star applique tutorial]
- No-Sew Cat Plush — useful comparison project for makers who want less assembly — Flag: [INTERNAL LINK NEEDED: no-sew cat amigurumi]
Conclusion
This galaxy cat amigurumi crochet pattern works because the shaping stays simple while the finish work carries the theme. Build the head cleanly, keep the ears high, and treat the moon and stars as placement work rather than decoration added at random. The next step is practical: make the body and head in plain yarn first, confirm the silhouette, then repeat the same counts in your galaxy palette. Share the result on Pinterest and Instagram with a front, side, and forehead detail photo. Hashtag: #GalaxyCatPattern. One question matters with this character more than most: did you place the crescent on the left forehead or mirror it to the right?









