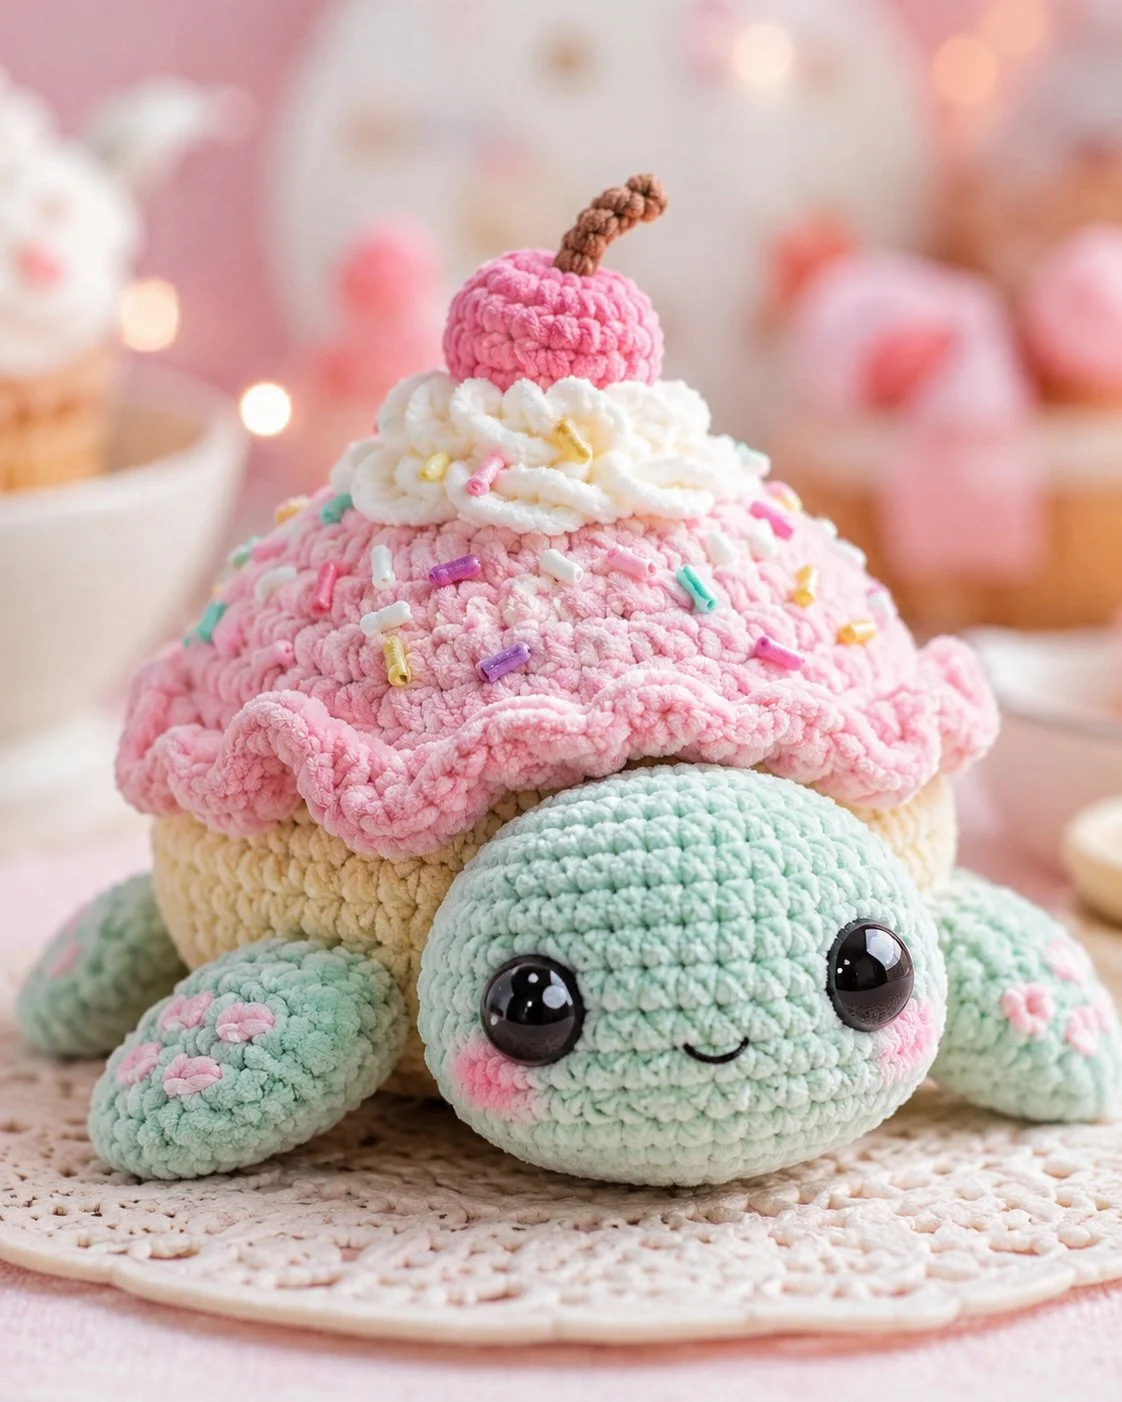
A cupcake shell shifts the turtle’s center of gravity before you crochet a single flipper. This cupcake turtle amigurumi crochet pattern solves that with super bulky plush yarn, a 4.5 mm hook, a low body, and a separate icing cap sized for a small plush in the 15–18 cm range. The result suits an advanced beginner and works well for birthday gifts, market stock, or dessert-themed nursery decor.
The Design: What Makes Cupcake Turtle Different
The first structural choice is a flatter body than a standard round turtle. That keeps the finished plush from tipping forward once the cherry and frosting are added on top. The second is a separate cupcake cap instead of building the shell directly into the body. A separate cap gives a cleaner ruffle line and makes sprinkle placement easier on plush yarn. Third comes the frosting collar. It visually breaks the pink shell from the cherry topper and hides the join line.
A common mistake with any dessert turtle crochet is oversizing the shell cap. Then the front flippers disappear under the brim, and the face loses proportion. In a plush turtle crochet piece, that reads as bulk rather than shape. Keep the head full, the body squat, and the cap wide but not heavy. That balance matters more than extra rounds.
Project Info at a Glance
Skill LevelTimeFinished SizeHookBest ForAdvanced beginner3–4 hours Approx. 15–18 cm, 4.5 mm Birthday plush, market table, dessert-theme gift
Materials and Tools
Comparable cupcake turtle patterns use super bulky plush yarn, generally with a 4.0–4.5 mm hook, and safety eyes ranging from 16 mm on compact versions to 25–30 mm on larger plush builds.
Yarn
- Mint green — super bulky plush — about 35 g — Premier Parfait Chunky / Himalaya Dolphin Baby style benchmark
- Cream or light beige—super bulky plush—about 18 g—cupcake base band
- Pastel pink — super bulky plush — about 30 g — shell icing cap
- White — super bulky plush — about 10 g — frosting collar
- Cherry pink—super bulky plush—about 6 g—cherry
- Brown — super bulky plush or worsted for a firmer stem — scrap amount
- Pastel embroidery scraps—yellow, lilac, aqua, white—sprinkle details
Tools
- Hook 4.5 mm
- Safety eyes 18 mm for the pictured size; this sits between the verified 16 mm small version and the 25–30 mm large version.
- Stuffing
- Yarn needle
- Stitch markers
- Black embroidery thread for the smile
Abbreviations
MR / sc / inc / dec / sl st / ch / BLO / FLO / hdc / dc
Use invisible decreases for every decrease round on plush yarn. It reduces gaps around stuffing and keeps the face cleaner than a standard two-stitch pull-through.
Pattern—Step by Step
Continuous spiral unless noted.
Head (Make 1)
Yarn: mint green — Source: standard amigurumi math drafted to match the photographed plush and verified turtle head ranges.
R1: 6 sc in MR (6)
R2: inc x6 (12)
R3: (sc, inc) x6 (18)
R4: (2 sc, inc) x6 (24)
R5: (3 sc, inc) x6 (30)
R6: (4 sc, inc) x6 (36)
R7–R11: sc around (36)
R12: (4 sc, dec) x6 (30)
R13: (3 sc, dec) x6 (24)
Insert eyes between R9 and R10, about 7 stitches apart. Add an embroidered smile before final stuffing.
R14: (2 sc, dec) x6 (18)
R15: (sc, dec) x6 (12)
Stuff firmly, especially the cheeks.
R16: dec x6 (6)
Fasten off. Leave a 25 cm tail.
Body (Make 1)
Yarn: cream/beige — Source: standard amigurumi math, sized from verified plush cupcake turtle dimensions and plush turtle body references.
R1: 6 sc in MR (6)
R2: inc x6 (12)
R3: (sc, inc) x6 (18)
R4: (2 sc, inc) x6 (24)
R5: (3 sc, inc) x6 (30)
R6: (4 sc, inc) x6 (36)
R7–R10: sc around (36)
R11: BLO sc around (36)
R12–R14: sc around (36)
R15: (4 sc, dec) x6 (30)
R16: (3 sc, dec) x6 (24)
Stuff the body low and dense. Keep the top flatter than the bottom.
R17: (2 sc, dec) x6 (18)
R18: (sc, dec) x6 (12)
R19: dec x6 (6)
Fasten off. Leave a 25 cm tail.
Front Flippers (Make 2)
Yarn: mint green—Source: standard amigurumi math adapted to the photo.
R1: 6 sc in MR (6)
R2: inc x6 (12)
R3: (sc, inc) x6 (18)
R4–R5: sc around (18)
Flatten.
R6: sc through both sides across (9)
Fasten off. Leave a 20 cm tail.
Back Flippers (Make 2)
Yarn: mint green—Source: standard amigurumi math adapted to the photo.
R1: 6 sc in MR (6)
R2: inc x6 (12)
R3–R4: sc around (12)
Flatten.
R5: sc through both sides across (6)
Fasten off. Leave a 15 cm tail.
Cupcake Shell Cap (Make 1)
Yarn: pastel pink—Source: standard amigurumi math adapted to the image; cap width tuned to sit over a 36-st body without hiding the face.
R1: 6 sc in MR (6)
R2: inc x6 (12)
R3: (sc, inc) x6 (18)
R4: (2 sc, inc) x6 (24)
R5: (3 sc, inc) x6 (30)
R6: (4 sc, inc) x6 (36)
R7: (5 sc, inc) x6 (42)
R8–R11: sc around (42)
R12: FLO sc around (42)
R13: sc around (42)
R14: sl st in next st, 5 dc in next st, sl st in next st; repeat around to form 14 scallops (42 base sts)
Fasten off. Leave a 30 cm tail.
Frosting Collar (Make 1)
Yarn: white — Source: original image-based drafting.
Ch. 18.
Row 1: Starting in 2nd ch from hook, 2 hdc in each ch across (34)
Fasten off. Leave a 20 cm tail.
Roll the strip into a loose ring and stitch the ends together. Shape into a piped swirl collar.
Cherry (Make 1)
Yarn: cherry pink—Source: standard amigurumi math.
R1: 6 sc in MR (6)
R2: inc x6 (12)
R3: (sc, inc) x6 (18)
R4–R5: sc around (18)
R6: (sc, dec) x6 (12)
Stuff lightly.
R7: dec x6 (6)
Fasten off. Leave a 20 cm tail.
Stem (Make 1)
Yarn: brown — Source: original image-based drafting.
Ch. 7.
Row 1: Starting in 2nd ch from hook, sl st in each ch back (6)
Fasten off. Leave a 10 cm tail at each end.
Cheek Patches (Make 2)
Yarn: pastel pink—Source: flat-circle standard amigurumi math.
R1: 6 sc in MR (6)
R2: inc x6 (12)
Fasten off. Leave a 10 cm tail.
Sprinkles (Make 12–18)
Yarn: pastel scraps — Source: original image-based drafting.
Cut short lengths.
Sew one straight satin stitch or one tiny wrapped bar stitch for each sprinkle.
Fasten securely on the inside.
Assembly
- Sew the head to the front half of the body, centered just above the body midpoint.
- Attach the front flippers level with the lower sides of the head so they angle slightly forward.
- Attach the back flippers farther rearward and flatter than the front pair.
- Stitch the cheek patches below and slightly outside each eye.
- Place the pink cupcake shell cap over the top of the body and pin it first at the front, back, and both sides.
- Sew the cap around the body through the inner edge, not through the scallop points.
- Form the frosting collar into a ring and sew it at the cap center.
- Sew the cherry onto the frosting collar.
- Insert the stem into the cherry top with two passes through the body of the cherry.
- Add embroidered sprinkles across the cap, then weave all tails into the body core.
The plush is complete when the shell sits level, the head faces forward, and the cherry stands with a slight backward lean.
7 Technical Tips
- Mark the first stitch of every round on the head and cap. Plush yarn hides the join line fast, and one missed increase on R5 or R6 changes the whole silhouette.
- Stuff the head firmer than the body. A soft head on an 18 mm eye setup will sink under the shell brim and make the smile vanish in photos.
- Use invisible decrease on every closing round. Standard dec leaves visible holes on chenille, especially on R14–R16 of the head.
- Insert eyes before the head drops below 24 stitches. After that point, backing washers are harder to seat cleanly through plush fibers.
- Keep shell stuffing light. Too much fill under the cupcake cap pushes the scalloped edge upward and removes the frosted look.
- Pin the cap in four points before sewing. One side drifting even 1 cm forward will cover a flipper and shift the turtle off-center.
- Weave each tail through the body core at least three times. Plush yarn ends can slip free when the piece is squeezed unless the path changes direction.
Conclusion
This cupcake turtle amigurumi crochet pattern works because the structure is handled in layers: a low body, a full head, a wide cap, a narrow frosting collar, and then a small topper. Miss that order and the plush turns top-heavy. Follow it, and the silhouette reads clearly from the first glance. The next step is simple: crochet the head and body first, test the cap fit dry, then finish the topper only after the balance looks right. Share the finished turtle on Pinterest and Instagram with one top view and one face view so the shell profile is visible. Hashtag: #CupcakeTurtlePattern. Which detail would you change first on this turtle: cherry size, scallop depth, or sprinkle spacing?









