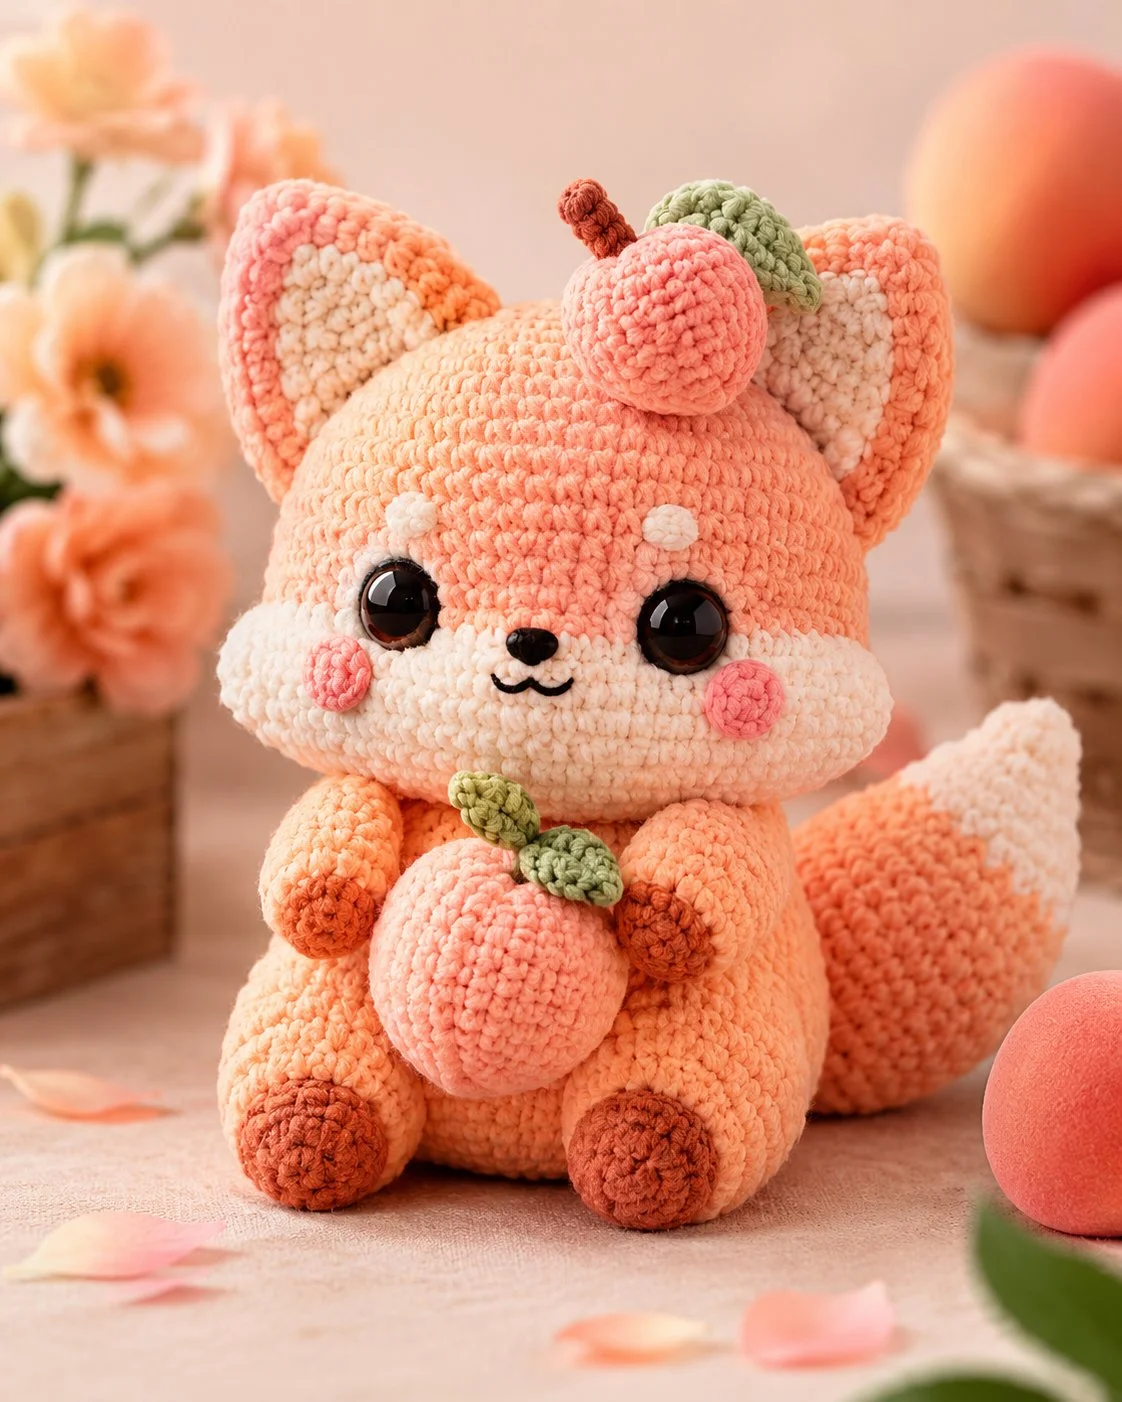
A fox tail only looks right when the white tip lands before the final taper. This fox amigurumi crochet pattern solves that proportion first, then builds the round head, cream face, and peach accessories in a DK-weight format sized for a display plush at roughly 26 cm. It suits an intermediate maker who wants stable shaping, clean color zoning, and a seasonal piece that reads as nursery decor or market stock.
The Design: What Makes Peach Fox Different
This fox is not drafted like a narrow woodland toy. The head is deliberately oversized, so the pattern uses a medium 36-stitch plateau instead of a small 30-stitch plateau. That keeps the forehead round enough for large eyes and a separate fruit topper. The lower face is also split into layers rather than forced through tight color changes. You sew on a face patch and snout, which gives the cream section a cleaner edge and broader cheek line.
You will notice the seated fox amigurumi stance depends on short limbs and a low body center. That is why the legs are stout cylinders with flat paw caps, while the tail widens, then narrows into a pointed counterbalance. Many makers miss the ear angle on a crocheted fox plush. They place both ears vertically, which makes the face read as cat-like. One ear should cant slightly outward. The second should mirror it, not copy it.
Project Info at a Glance
Skill Level: Time Finished Size Hook Best For Intermediate 7–10 hours, 26 cm sitting target, 3.0 mm Decor, gift, seasonal display
Reference sizing for this target comes from comparable DK fox patterns that finish around 26 cm with a 3.0 mm class hook and DK yarn.
Materials and Tools
Yarn
- Peach/apricot—DK—100 g—Stylecraft Special DK or similar
- Cream — DK — 20 g — Stylecraft Special DK or similar
- Blush pink — DK — 10 g
- Sage green—DK—10 g
- Cocoa brown—DK—10 g
- Black—DK—5 g for nose and mouth reference range
Tools
- Hook 3.0 mm
- Safety eyes 18–20 mm for the photo-matched large-head version; verified fox references commonly use 10 mm for smaller DK builds.
- Stuffing
- Tapestry needle
- Stitch markers
- Pins
- Scissors
Abbreviations
MR / sc / inc / dec / sl st / ch / BLO / FO / st
Use invisible decrease on visible shaping rounds because a standard decrease leaves a ridge that shows on pale cream sections.
Pattern—Step by Step
Continuous spiral unless noted.
Head (Make 1)
Yarn: peach—Source: Standard amigurumi math scaled to a medium 36-st plateau
R1: 6 sc in MR (6)
R2: inc x6 (12)
R3: (sc, inc) x6 (18)
R4: (2 sc, inc) x6 (24)
R5: (3 sc, inc) x6 (30)
R6: (4 sc, inc) x6 (36)
R7–R12: sc around (36)
R13: (4 sc, dec) x6 (30)
R14: sc around (30)
R15: (3 sc, dec) x6 (24)
Insert eyes between R10 and R11, 9 stitches apart. Stuff firmly from this point onward.
R16: (2 sc, dec) x6 (18)
R17: (sc, dec) x6 (12)
R18: dec x6 (6)
Fasten off. Leave an 18 cm tail.
Body (Make 1)
Yarn: peach—Source: Standard amigurumi math
R1: 6 sc in MR (6)
R2: inc x6 (12)
R3: (sc, inc) x6 (18)
R4: (2 sc, inc) x6 (24)
R5: (3 sc, inc) x6 (30)
R6–R10: sc around (30)
R11: (3 sc, dec) x6 (24)
R12: sc around (24)
R13: (2 sc, dec) x6 (18)
R14: sc around (18)
Stuff the lower half firm, the upper half medium.
R15: (sc, dec) x6 (12)
R16: sc around (12)
Fasten off. Leave a 22 cm tail.
Arms / Front Legs (Make 2)
Yarn: cocoa brown, then peach—Source: Standard amigurumi math
R1: 6 sc in MR in cocoa brown (6)
R2: inc x6 (12)
R3: BLO sc around (12)
R4: dec x6 (6)
Change to peach.
R5–R8: sc around (6)
Light stuffing in paw only.
Fasten off. Leave a 16 cm tail.
Back Legs (Make 2)
Yarn: cocoa brown, then peach—Source: Standard amigurumi math
R1: 6 sc in MR in cocoa brown (6)
R2: inc x6 (12)
R3: BLO sc around (12)
R4–R5: sc around (12)
Change to peach.
R6: dec x6 (6)
R7–R10: sc around (6)
Stuff paw and lower leg. Flatten the top before sewing.
Fasten off. Leave an 18 cm tail.
Ears Outer (Make 2)
Yarn: peach—Source: Standard amigurumi math
R1: 4 sc in MR (4)
R2: inc x4 (8)
R3: (sc, inc) x4 (12)
R4: (2 sc, inc) x4 (16)
R5–R6: sc around (16)
Fasten off. Leave a 15 cm tail.
Ears Inner (Make 2)
Yarn: cream — Source: Standard amigurumi math
R1: 4 sc in MR (4)
R2: inc x4 (8)
R3: (sc, inc) x4 (12)
R4: sc around (12)
Fasten off. Leave a 12 cm tail.
Tail (Make 1)
Yarn: cream, then peach—Source: Standard amigurumi math, fox-tail taper informed by common fox tail proportions.
R1: 6 sc in MR in cream (6)
R2: (sc, inc) x3 (9)
R3: sc around (9)
R4: (2 sc, inc) x3 (12)
R5: sc around (12)
Change to peach.
R6: (3 sc, inc) x3 (15)
R7: sc around (15)
R8: (4 sc, inc) x3 (18)
R9–R14: sc around (18)
R15: (4 sc, dec) x3 (15)
R16–R17: sc around (15)
R18: (3 sc, dec) x3 (12)
R19: sc around (12)
R20: (2 sc, dec) x3 (9)
Stuff lightly so the tail can curve.
R21: sc around (9)
Fasten off. Leave a 20 cm tail.
Face Patch (Make 1)
Yarn: cream—Source: Standard amigurumi shaping
Ch 8.
R1: Starting in 2nd ch from hook, 6 sc, 3 sc in last ch, working opposite side 5 sc, inc (16)
R2: inc, 5 sc, 3 inc, 5 sc, 2 inc (22)
R3: sc around (22)
SL st to finish.
Fasten off. Leave a 20 cm tail.
Snout (Make 1)
Yarn: cream — Source: Standard amigurumi math
R1: 6 sc in MR (6)
R2: inc x6 (12)
R3: sc around (12)
R4: (sc, dec) x4 (8)
Lightly stuff before sewing. Embroider nose after attachment.
Fasten off. Leave an 18 cm tail.
Cheek Patches (Make 2)
Yarn: blush pink—Source: Standard amigurumi math
R1: 6 sc in MR (6)
R2: inc x6 (12)
SL st to finish.
Fasten off. Leave a 12 cm tail.
Eyebrows (Make 2)
Yarn: cream—Source: Standard amigurumi shaping
Ch. 4.
Row 1: Starting in 2nd ch from hook, 3 sl st (3)
Fasten off. Leave an 8 cm tail.
Peach Accessory (Make 2)
Yarn: blush pink/peach—Source: Standard amigurumi math
R1: 6 sc in MR (6)
R2: inc x6 (12)
R3: (sc, inc) x6 (18)
R4: (2 sc, inc) x6 (24)
R5–R7: sc around (24)
R8: (2 sc, dec) x6 (18)
Stuff firmly. Pull the top center slightly inward when closing for a peach dimple.
R9: (sc, dec) x6 (12)
R10: dec x6 (6)
Fasten off. Leave an 18 cm tail.
Leaves (Make 4)
Yarn: sage green — Source: Standard crochet leaf shaping
Ch 6.
Working back along the chain: sl st, sc, hdc, sc, sl st.
Fasten off. Leave a 10 cm tail.
Stems (Make 2)
Yarn: cocoa brown—Source: Standard crochet cord
Ch 5.
Row 1: Starting in 2nd ch from hook, 4 sl st (4)
Fasten off. Leave an 8 cm tail.
Assembly
- Sew the head to the body, centering the neck opening and checking the face points straight forward.
- Stitch the face patch to the lower half of the head so its top edge sits just below the eye line.
- Attach the snout centered over the patch, then embroider a small black triangular nose and a shallow smile.
- Sew the cheek patches under the eyes, offset slightly outward from the snout edges.
- Fix the eyebrows one row above the eyes, angled slightly toward the center.
- Join each inner ear to an outer ear, pinch the bases, then sew the ears to the crown with a slight outward tilt.
- Attach the back legs low on the body front so the plush sits without rolling backward.
- Sew the arms at the shoulder line and angle them inward to grip the front peach.
- Stitch the tail to the rear body at a side-back position so the cream tip remains visible from the front quarter view.
- Assemble two peaches with leaves and stems, then sew one between the paws and one on the head between the ears.
The plush is complete when it sits flat on both back paws and the tail acts as a visual counterweight.
7 Technical Tips
- Mark the first stitch of every round. Losing one increase on the 36th head plateau shifts the eyeline, and the cream face patch will no longer sit centered.
- Stuff the head firmer than the body. A soft head collapses around 18–20 mm eyes and causes the cheeks to bulge downward.
- Use invisible decreases on cream areas. Standard decreases leave darker shadow dents that show more on pale yarn than on peach yarn.
- Install eyes before the final three decrease rounds. Trying to force washers in after R15 on the head risks stretching the fabric.
- Pin both ears before sewing. On a fox, a 5–8 mm difference in ear spacing is enough to change the face from fox-like to cat-like.
- Keep tail stuffing light. Overstuffed tails stand straight and lose the side curve that makes the seated silhouette read correctly.
- Weave accessory tails through at least three direction changes. A peach topper or leaf sewn with one pass will loosen first because those parts get handled most.
Conclusion
This peach fox amigurumi crochet pattern works because the shaping priorities stay in the right order: tail tip first, head volume second, face layering third, and accessories last. The verified reference range points to DK yarn and a 3.0 mm hook for a fox plush in this size bracket, while this custom draft adds the fruit details missing from most fox tutorials. Your next step is simple: crochet the head and one ear first, then compare the scale against your chosen eye size before committing to the full set. Share the finished piece on Pinterest and Instagram with #PeachFoxPattern. One question remains: did you place the tail high enough to keep the cream tip visible from the front?









