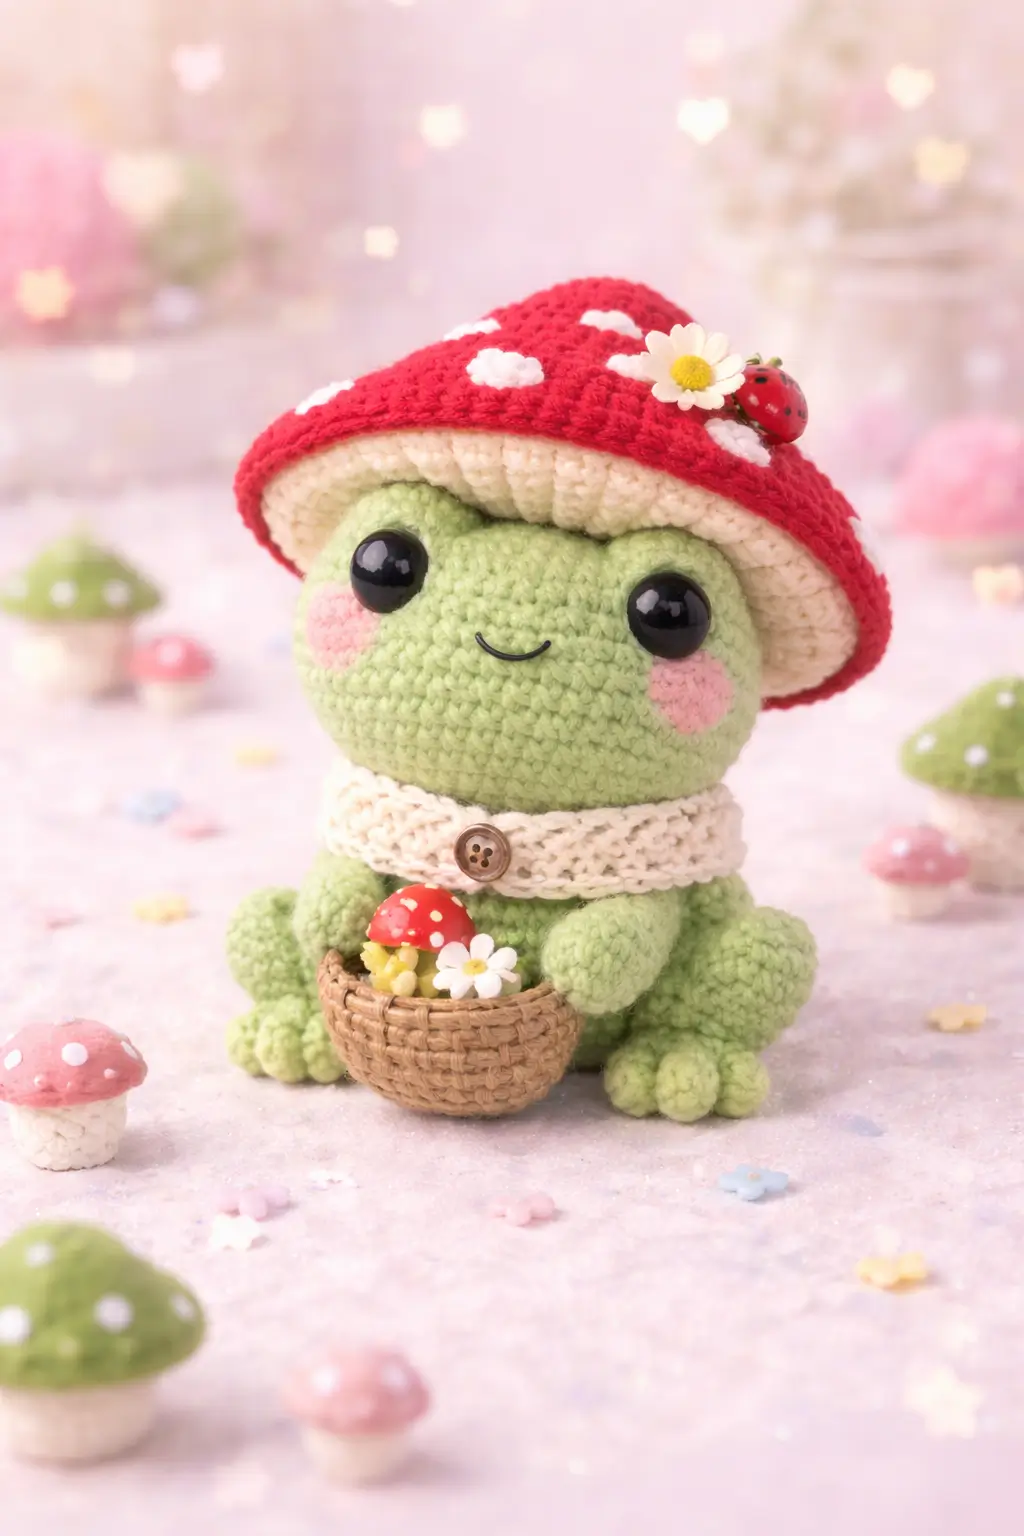
Frogs stop looking right when the eyes drift toward the middle of the face. This frog amigurumi crochet pattern uses sport cotton, a 3 mm hook, a seated 11 to 13 cm scale, and an intermediate build with small accessories. The result works well as a shelf plush, spring market sample, or styled photo prop.
The Design: What Makes This Frog Different
This frog is built around three structural choices. First, the head is wider than the body neck join, because frogs read better with lateral cheek volume and a compressed lower face. Second, the back legs sit low and forward, not under the body, so the plush keeps a stable seated pose in photos. Third, the mushroom cap needs a firm crown and a softer brim; otherwise the hat collapses onto the eyes and hides the character. That problem shows up often in mushroom-frog variants. A common maker mistake is placing the eyes too low on the face instead of on raised eye pads or the upper facial plane. In frog crochet tutorial results and mushroom frog crochet pattern listings, the better samples keep the eye line high and the mouth short.
Project Info at a Glance
| Skill Level | Time | Finished Size | Hook | Best For |
|---|---|---|---|---|
| Intermediate | 5–7 hours | 11–13 cm seated | 3 mm | Display plush, gift topper, spring decor |
Materials and Tools
Yarn
- Light green — sport cotton — about 30 g — DROPS Safran or similar 4 ply cotton
- Red — sport cotton — about 5 g — for mushroom cap top
- Cream — sport cotton — about 8 g — hat underside and scarf
- White — sport cotton — scraps — mushroom spots and daisies
- Pink — sport cotton — scraps — cheek patches
- Tan — sport cotton — scraps — basket
- Yellow — sport cotton — scrap — flower center
- Black embroidery floss — scrap — mouth
Tools
- Hook 3 mm
- 12 mm safety eyes
- Polyester stuffing
- Yarn needle
- Stitch markers
- Small button for scarf closure
- Craft wire or hot glue optional for the basket handle and hat embellishments
Abbreviations
MR = magic ring; sc = single crochet; inc = increase; dec = decrease; sl st = slip stitch; ch = chain; BLO = back loop only; FLO = front loop only.
Invisible decrease keeps the decrease line flatter on visible shaping rounds and reduces the ridged seam that shows under sport cotton.
Pattern — Step by Step
Continuous spiral unless noted. The pattern below is an original draft from the photo, built with standard amigurumi math and scaled to a medium 36-stitch plateau for the head and body.
Head (Make 1)
Yarn: light green
R1: 6 sc in MR (6)
R2: inc x6 (12)
R3: (sc, inc) x6 (18)
R4: (2 sc, inc) x6 (24)
R5: (3 sc, inc) x6 (30)
R6: (4 sc, inc) x6 (36)
R7–R12: sc around (36)
R13: (4 sc, dec) x6 (30)
R14: (3 sc, dec) x6 (24)
Insert stuffing. Keep the lower face slightly firmer than the crown.
R15: (2 sc, dec) x6 (18)
R16: (sc, dec) x6 (12)
R17: dec x6 (6)
Fasten off. Leave 20 cm tail.
Body (Make 1)
Yarn: light green
R1: 6 sc in MR (6)
R2: inc x6 (12)
R3: (sc, inc) x6 (18)
R4: (2 sc, inc) x6 (24)
R5: (3 sc, inc) x6 (30)
R6: (4 sc, inc) x6 (36)
R7–R10: sc around (36)
R11: BLO sc around (36)
R12: (4 sc, dec) x6 (30)
R13: sc around (30)
R14: (3 sc, dec) x6 (24)
Stuff the base firmly so it can sit without rocking.
R15: sc around (24)
Fasten off. Leave 20 cm tail.
Front Legs (Make 2)
Yarn: light green
R1: 6 sc in MR (6)
R2: inc x6 (12)
R3–R4: sc around (12)
R5: (2 sc, dec) x3 (9)
R6–R8: sc around (9)
Lightly stuff only the paw end.
Fasten off. Leave 18 cm tail.
Back Legs (Make 2)
Yarn: light green
R1: 6 sc in MR (6)
R2: inc x6 (12)
R3: (sc, inc) x6 (18)
R4–R5: sc around (18)
R6: (sc, dec) x6 (12)
R7: sc around (12)
R8: (2 sc, dec) x3 (9)
R9–R11: sc around (9)
Stuff foot section and leave upper leg soft.
Fasten off. Leave 20 cm tail.
Toe Bumps (Make 12)
Yarn: light green
R1: 6 sc in MR (6)
R2: sc around (6)
Fasten off. Leave 10 cm tail.
Eye Pads (Make 2)
Yarn: light green
R1: 6 sc in MR (6)
R2: inc x6 (12)
R3: sc around (12)
Fasten off. Leave 18 cm tail.
Insert one 12 mm safety eye through each pad after sewing placement is marked.
Mushroom Hat Top (Make 1)
Yarn: red
R1: 6 sc in MR (6)
R2: inc x6 (12)
R3: (sc, inc) x6 (18)
R4: (2 sc, inc) x6 (24)
R5: (3 sc, inc) x6 (30)
R6: (4 sc, inc) x6 (36)
R7: (5 sc, inc) x6 (42)
R8: (6 sc, inc) x6 (48)
R9–R10: sc around (48)
R11: BLO sc around (48)
R12: (7 sc, inc) x6 (54)
R13: (8 sc, inc) x6 (60)
R14: sc around (60)
Fasten off. Leave 25 cm tail.
Mushroom Hat Underside / Gills (Make 1)
Yarn: cream
R1: 6 sc in MR (6)
R2: inc x6 (12)
R3: (sc, inc) x6 (18)
R4: (2 sc, inc) x6 (24)
R5: (3 sc, inc) x6 (30)
R6: (4 sc, inc) x6 (36)
R7: (5 sc, inc) x6 (42)
R8: (6 sc, inc) x6 (48)
R9: BLO sc around (48)
R10: (7 sc, inc) x6 (54)
Fasten off. Leave 25 cm tail.
Whipstitch to the hat top, lightly stuffing the crown only. Leave brim unstuffed.
Mushroom Spots (Make 6)
Yarn: white
R1: 6 sc in MR (6)
R2: inc x3, sc x3 (9)
Fasten off. Leave 8 cm tail.
Cheek Patches (Make 2)
Yarn: pink
R1: 6 sc in MR (6)
R2: inc x6 (12)
Fasten off with long tail.
Scarf (Make 1)
Yarn: cream
Ch 46.
Row 1: Starting in 2nd ch from hook, sc across (45)
Row 2: ch 1, BLO sc across (45)
Row 3: ch 1, BLO sc across (45)
Fasten off. Leave 20 cm tail.
Sew ends to overlap and add a small button.
Basket Bowl (Make 1)
Yarn: tan
R1: 6 sc in MR (6)
R2: inc x6 (12)
R3: BLO sc around (12)
R4: sc around (12)
R5: (sc, inc) x6 (18)
R6–R8: sc around (18)
Sl st around top edge.
Fasten off. Leave 20 cm tail.
Basket Handle (Make 1)
Yarn: tan
Ch 16.
Row 1: sl st back along chain (15)
Fasten off. Leave tails for sewing.
Mini Mushroom Accessory (Make 1 cap, 1 stem)
Yarn: red cap, cream stem
Cap
R1: 6 sc in MR (6)
R2: inc x6 (12)
R3: (sc, inc) x6 (18)
R4: sc around (18)
Fasten off.
Stem
R1: 6 sc in MR (6)
R2: sc around (6)
R3: BLO (sc, inc) x3 (9)
R4: sc around (9)
Stuff lightly, sew to cap.
Add 3 tiny white French-knot spots if preferred.
Daisy (Make 2)
Yarn: white petals, yellow center
With white:
R1: 5 sc in MR (5)
Create 5 petals: (ch 3, sl st in 2nd ch from hook, sl st in next ch, sl st in next base st) x5
With yellow: embroider a small center knot.
Fasten off.
Ladybug (Make 1)
Yarn: red and black or felt substitute
R1: 4 sc in MR (4)
R2: inc x4 (8)
Fasten off.
Add a black split line and dots with embroidery.
Assembly
- Sew the head to the body with the narrower side of the body facing up.
- Pin both eye pads high on the head, about 6 stitches apart, then install the 12 mm eyes through them before fastening the backs.
- Sew the cheek patches centered 2 rows below the eyes and 2 stitches out from the mouth line.
- Embroider a shallow curved mouth between the cheeks, one row below the eye line.
- Attach the front legs at the front body join, slightly angled inward so the basket can rest between them.
- Attach the back legs low on the body sides, rotating the feet forward for the seated pose.
- Sew three toe bumps to each foot and three to each back foot front edge.
- Join the mushroom hat underside to the red cap, place it on the head, and tack it down at four points so the brim stays low but does not cover the eyes.
- Wrap the scarf around the neck, overlap the ends, and sew on the button. Add the basket, mini mushroom, daisies, and ladybug.
- Weave in every tail on the back or underside only, then steam-block the hat brim very lightly if it curls.
The piece is complete when it sits flat, the brim clears both eyes, and the basket rests without tipping.
7 Technical Tips
- Mark round starts on the head and body from R1 onward. A drifting marker shifts the eye line, and even a one-stitch drift will make one cheek read larger than the other.
- Stuff the body base firmer than the upper body. A soft base makes the frog pitch backward once the hat weight is added.
- Work invisible decreases on all visible shaping rounds. Standard decreases leave a ridge that shows clearly under smooth sport cotton.
- Install safety eyes before the head closes beyond 24 stitches. For this scale, placing them around rounds 7 to 8 keeps enough finger room for the washers.
- Keep the hat crown lightly stuffed and the brim unstuffed. Filling the brim produces a helmet edge instead of the soft amanita flare seen in the photo.
- Pin legs before sewing and check that both back feet touch the same plane. A 3 to 4 mm height mismatch is enough to make the finished plush wobble.
- Weave tails back through the same color zone for at least 4 to 5 cm. Short cut tails in cotton yarn can work loose at the scarf edge and basket rim.
Conclusion
This build works because the frog anatomy stays readable under the costume layer. High eye placement, a short embroidered smile, forward-set back feet, and a broad mushroom brim do most of the visual work. That is the part many frog posts skip. For your next step, make the base frog first, test the seated balance, then add the hat and basket only after the silhouette is correct. Save this frog amigurumi crochet pattern to Pinterest, post your version on Instagram, and tag the mushroom details clearly in the caption. #MushroomFrogPattern One question matters here: did you angle the back feet forward enough to keep the basket centered?









