Introduction
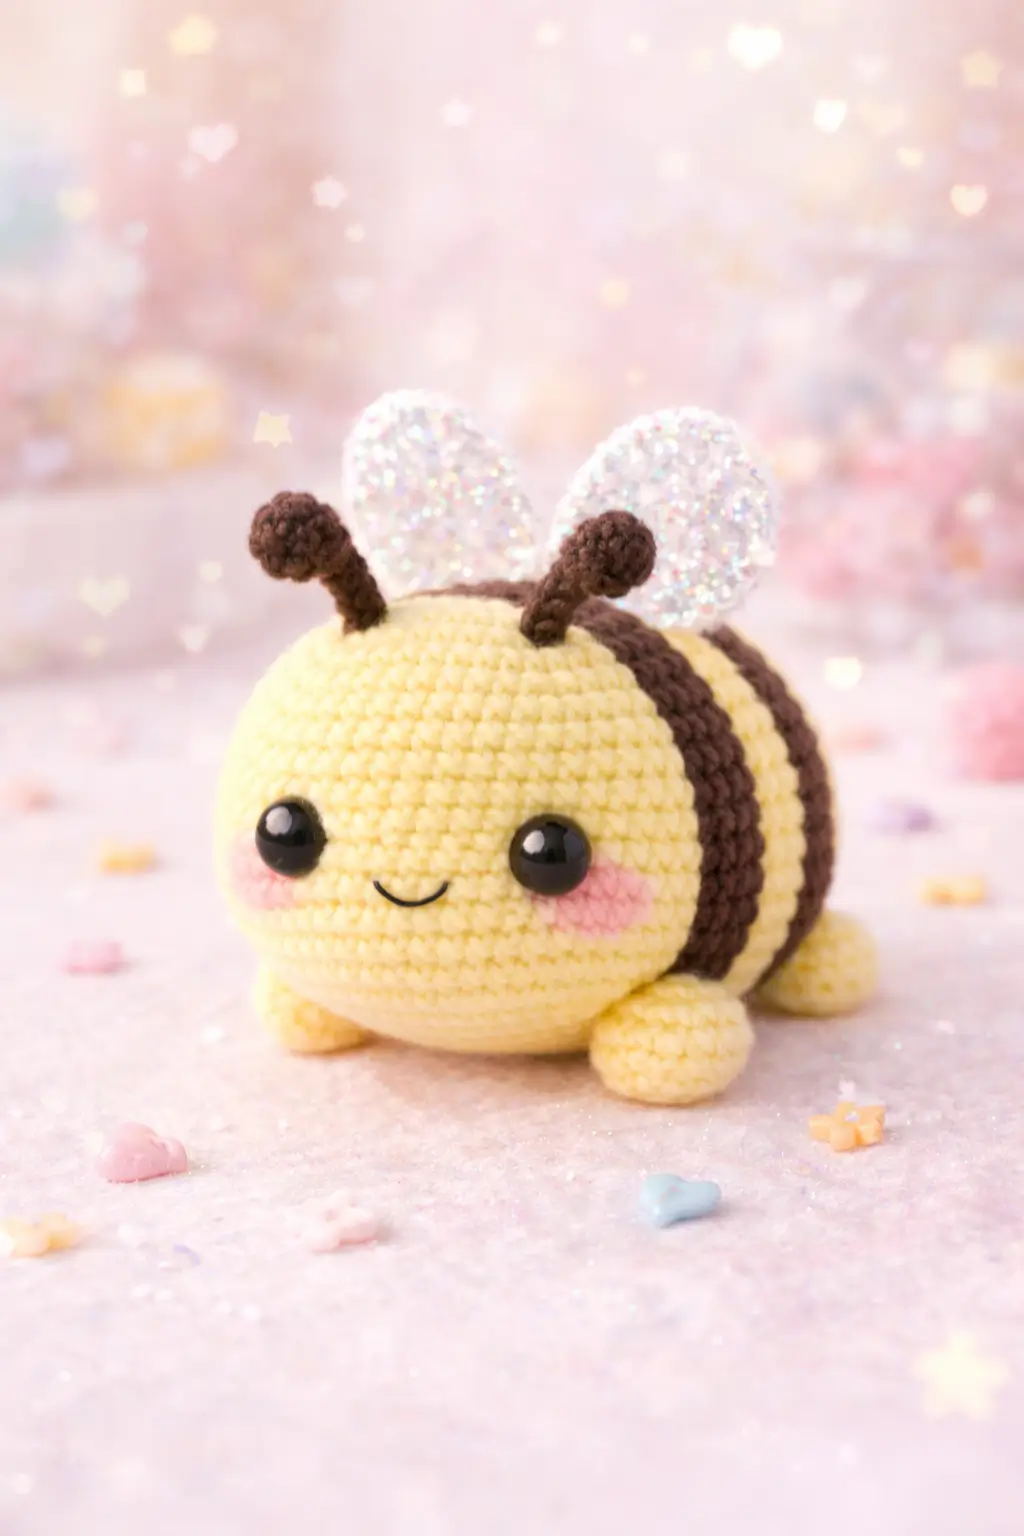
A bee looks wrong the second the stripes drift and the wings sit too low. This bee amigurumi crochet pattern fixes both problems with a broad yellow face, compact striped body, DK yarn, a 3.0 mm hook, and a medium finish near 15 cm. Skill level sits at easy to intermediate. Make it as a desk mascot, spring market piece, or nursery shelf plush.
The Design: What Makes This Bee Different
This version copies the proportions in the photo, not the usual tiny keychain bee. The head stays visually dominant, the body runs longer than it is tall, and the legs are short enough to keep the plush resting close to the surface. That matters. A real bumble-bee read in amigurumi form depends on stripe placement, wing height, and face width more than on fine anatomical detail. Comparable published bee patterns range from miniature 5 cm builds to fuller 15 cm plush versions, and that spread explains why proportion choices drive the finished look.
Two decisions shape this pattern. First, the head uses a medium 36-stitch plateau rather than a tiny 24-stitch sphere. Second, the body keeps a flatter underside so the toy does not roll. A common mistake in a kawaii bee amigurumi is placing the eyes too high and the wings too far back, which makes the face collapse visually. In many crochet bee pattern tutorials, wing placement is treated as decoration. Here it is structural. The bee reads correctly only when the wings sit just behind the head-body join.
Project Info at a Glance
| Skill Level | Time | Finished Size | Hook | Best For |
|---|---|---|---|---|
| Easy–Intermediate | 3–5 hours | about 15 cm long | 3.0 mm | shelf plush, market table, gift topper |
Materials and Tools
Yarn
- Pale yellow DK yarn — light weight 3 — about 25 g — Paintbox Cotton DK or similar
- Dark brown DK yarn — light weight 3 — about 15 g — any smooth cotton or acrylic blend
- White DK yarn — light weight 3 — about 8 g — for wings
- Pink DK yarn — light weight 3 — scraps only — for cheek patches
- Black embroidery thread — scrap — for mouth detail
Tools
- Hook 3.0 mm
- 10 mm safety eyes
- Polyfill stuffing
- Tapestry needle
- Stitch markers
- Optional iridescent tulle or organza scraps for sparkle wing overlays
DK yarn with a 3.0 mm hook is a verified bee-pattern pairing, while 10 mm eyes fit the medium display scale used by separate-part bees. Larger pattern references also place yellow and dark stripe yarn at about 25 g each.
Abbreviations
MR / sc / inc / dec / sl st / ch / BLO / FO
Use an invisible decrease for the closing rounds on the head and body so the yellow surface stays smooth instead of forming a jagged seam line.
Pattern — Step by Step
Continuous spiral unless noted. This photo-matched version uses standard amigurumi stitch math with a medium 36-stitch plateau for the head.
Head (Make 1)
Yarn: pale yellow — Source: standard amigurumi math inspired by medium bee proportions
R1: 6 sc in MR (6)
R2: inc x6 (12)
R3: (sc, inc) x6 (18)
R4: (2 sc, inc) x6 (24)
R5: (3 sc, inc) x6 (30)
R6: (4 sc, inc) x6 (36)
R7-11: sc around (36)
Insert 10 mm eyes between R8 and R9, 8 sts apart. Start light stuffing.
R12: (4 sc, dec) x6 (30)
R13: (3 sc, dec) x6 (24)
R14: (2 sc, dec) x6 (18)
Finish stuffing firmly across the cheeks.
R15: (sc, dec) x6 (12)
R16: dec x6 (6)
Fasten off. Leave 20 cm tail.
Body (Make 1)
Yarn: pale yellow and dark brown — Source: standard amigurumi math; stripe logic informed by published bee bodies
R1: 6 sc in MR (6)
R2: inc x6 (12)
R3: (sc, inc) x6 (18)
R4: (2 sc, inc) x6 (24)
R5: (3 sc, inc) x6 (30)
R6-7: sc around in yellow (30)
R8-9: sc around in brown (30)
R10-11: sc around in yellow (30)
R12-13: sc around in brown (30)
R14-15: sc around in yellow (30)
Stuff the front half first, then the tail end. Keep underside flatter than top.
R16: (3 sc, dec) x6 (24)
R17: sc around (24)
R18: (2 sc, dec) x6 (18)
R19: sc around in brown (18)
R20: (sc, dec) x6 (12)
R21: sc around in brown (12)
R22: dec x6 (6)
Fasten off. Leave 20 cm tail.
Arms / Front Legs (Make 2)
Yarn: pale yellow — Source: standard amigurumi math
R1: 6 sc in MR (6)
R2: inc x6 (12)
R3-4: sc around (12)
R5: (sc, dec) x4 (8)
R6: sc around (8)
Stuff lightly at paw only.
Fasten off. Leave 18 cm tail.
Back Legs (Make 2)
Yarn: pale yellow — Source: standard amigurumi math
R1: 6 sc in MR (6)
R2: inc x6 (12)
R3: sc around (12)
R4: (sc, dec) x4 (8)
R5: sc around (8)
Fasten off. Leave 18 cm tail.
Wings (Make 2)
Yarn: white — Shape adapted from compact bee wing conventions seen in published patterns
R1: 6 sc in MR (6)
R2: inc x6 (12)
R3: (3 sc, inc) x3 (15)
R4-5: sc around (15)
R6: (3 sc, dec) x3 (12)
R7: (2 sc, dec) x3 (9)
R8: (sc, dec) x3 (6)
Flatten. Sl st through both layers across.
Fasten off. Leave 20 cm tail.
Antennae (Make 2)
Yarn: dark brown — Source: standard amigurumi math
R1: 6 sc in MR (6)
R2: sc around (6)
R3: inc x6 (12)
R4: sc around (12)
R5: dec x6 (6)
R6-8: sc around (6)
Stuff tip only with a pinch of filling.
Fasten off. Leave 15 cm tail.
Tail Bump / Stinger (Make 1)
Yarn: pale yellow — Source: standard amigurumi math
R1: 4 sc in MR (4)
R2: inc x4 (8)
R3: sc around (8)
R4: dec x4 (4)
Fasten off. Leave 12 cm tail.
Cheek Patches (Make 2)
Yarn: pink — Source: standard amigurumi math
R1: 6 sc in MR (6)
Join with sl st.
Fasten off. Leave 12 cm tail.
Sparkle Wing Overlays (Make 2, Optional Accessory)
Material: iridescent tulle or organza — photo-inspired accessory
Cut two oval overlays slightly larger than the crocheted wings. Tack each overlay to the back of a crocheted wing with 2 or 3 hand stitches.
Smile Detail (Make 1)
Material: black embroidery thread
Embroider a shallow curved smile centered one round below the eyes.
Assembly
- Sew the head to the front third of the body, not dead center.
- Angle the head slightly downward so the face looks forward when the bee rests on a flat surface.
- Attach the cheek patches one stitch below the lower outside edge of each eye.
- Embroider the smile between the cheeks.
- Sew the front legs under the head-body join, spaced about 10 stitches apart.
- Sew the back legs near the widest rear section of the body, matched to the front-leg height.
- Stitch the wings on the top centerline just behind the head seam.
- Add the optional sparkle overlays to the wings.
- Sew the antennae on top of the head, about 6 stitches apart, leaning slightly outward.
- Attach the tail bump at the rear underside to soften the body finish.
The piece is complete when it sits level, the stripes read straight from side view, and both wings start behind the head seam.
7 Technical Tips
- Mark the first stitch of every round. Lose one marker shift in the striped body and the brown bands will crawl upward on one side.
- Pack the cheeks firmer than the crown. A soft front panel lets the safety eyes sink and makes the face look flat.
- Use invisible decrease on yellow rounds. Regular decreases leave angled dents that show clearly on pale yarn.
- Install the eyes before the head closes below 24 stitches. Wait too long and the washers fight the stuffing and distort the face.
- Keep the underside stuffing slightly lighter. Overfilling the belly turns this loaf silhouette into a ball and the bee will roll.
- Pin the wings before sewing. The top edge of each wing should begin roughly 1 round behind the head join; farther back makes the body look longer and less bee-like.
- Weave tails through at least 3 direction changes. Short straight tail weaving often works loose around legs and antennae because those parts get handled first.
Conclusion
This bee amigurumi crochet pattern works because the structure stays disciplined: a broad head, short grounded legs, centered blush, level stripes, and wings attached close to the neck line. Keep those points fixed, then adjust yarn color or eye size only after the silhouette is locked in. The next step is practical: crochet the head first, place the eyes, and check the face before committing to the striped body. Share your finished bee on Pinterest and Instagram with #BeeBlushPlush. One question matters for this character more than most: did you place the wings high enough that the bee still reads correctly from the side?









