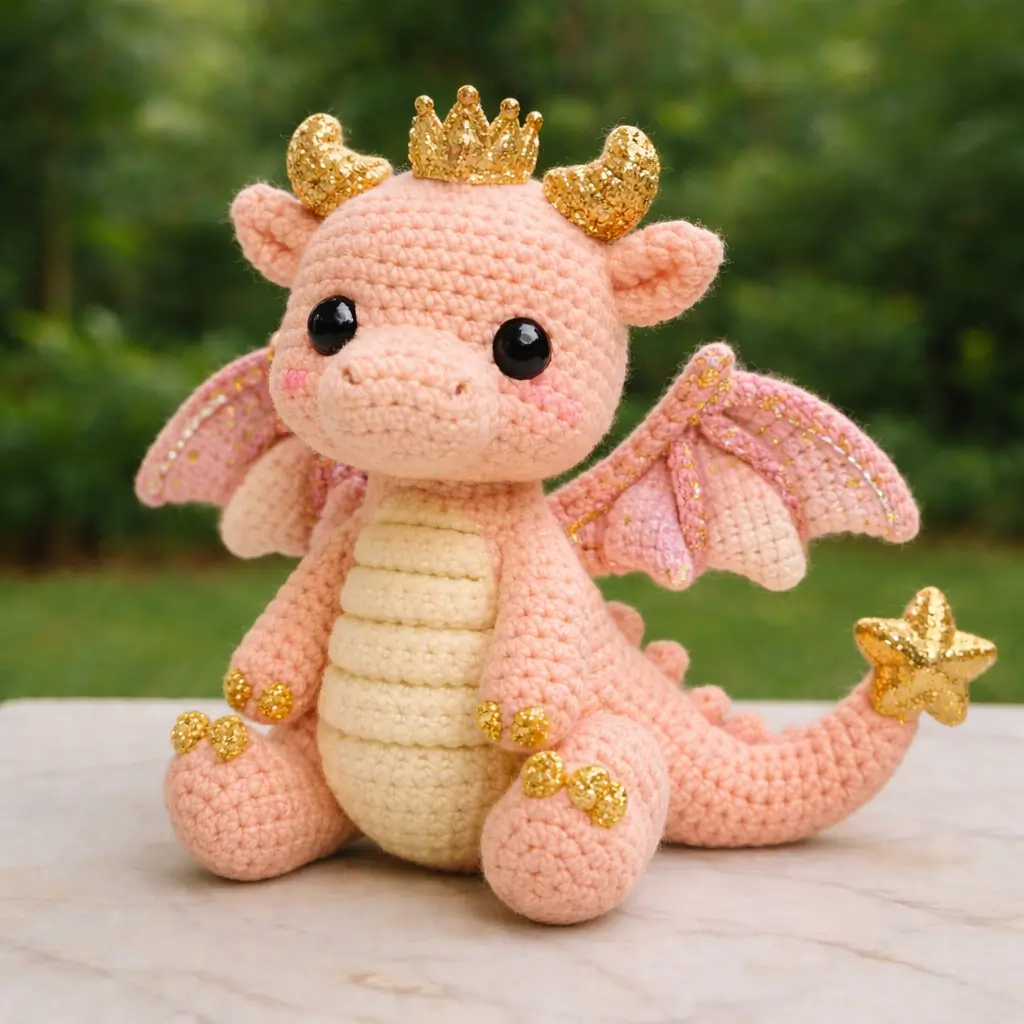
A dragon with a star on its tail needs the tail built for silhouette first. This dragon amigurumi crochet pattern is based on a seated pink princess dragon with worsted yarn, a 3.5 mm hook, 12 mm safety eyes, and a target height of about 23 cm. Skill level sits at intermediate. The result works well for nursery display, themed gifts, or fantasy-market stock.
The Design: What Makes This Dragon Different
You are not building a generic baby dragon here. The head is oversized relative to the body because the image relies on a broad forehead, short muzzle, and large eye spacing to keep the dragon soft rather than reptilian. The belly is worked as a separate visual zone in cream so the torso reads upright when seated. Wings matter more than usual. They are not decorative scraps; they widen the silhouette and stop the plush from reading as a dinosaur.
A common mistake with a baby dragon amigurumi is pushing the snout too long. That shifts the face toward lizard proportions and weakens the crown placement above the eyes. Another issue appears in many dragon crochet pattern free posts: the tail starts too thick and overpowers the seated body. This version keeps the tail tapered, then uses the star tip as the finish point. Comparable dragon patterns show both small cotton builds and medium worsted builds, but very few combine princess styling with a compact seated frame.
Project Info at a Glance
| Skill Level | Time | Finished Size | Hook | Best For |
|---|---|---|---|---|
| Intermediate | 8–10 hours | 23 cm | 3.5 mm | Display plush, nursery shelf, fantasy gift |
Materials and Tools
Yarn
- Blush pink — worsted — about 70 g — Red Heart Super Saver or similar medium acrylic reference
- Cream — worsted — about 20 g — same yarn line for belly and wing inner panels
- Gold sparkle yarn or metallic applique fabric — small amount — horns, claws, crown, star tip
- Light pink — small amount — wing membranes and cheek patches
Tools
- Hook 3.5 mm
- 12 mm safety eyes
- Polyester stuffing
- Yarn needle
- Stitch markers
- Pins
- Fabric glue or sewing thread for crown and star topper
Abbreviations
MR / sc / inc / dec / sl st / ch / BLO / FLO / dc / hdc
Invisible decrease matters here because exposed front-loop gaps will show on the dragon’s face and belly shaping.
Pattern — Step by Step
Continuous spiral unless noted.
Head (Make 1)
Yarn: blush pink
R1: 6 sc in MR (6)
R2: inc x6 (12)
R3: (sc, inc) x6 (18)
R4: (2 sc, inc) x6 (24)
R5: (3 sc, inc) x6 (30)
R6: (4 sc, inc) x6 (36)
R7-R12: sc around (36)
R13: (4 sc, dec) x6 (30)
R14: (3 sc, dec) x6 (24)
Place 12 mm eyes between R9 and R10, about 8 sts apart. Stuff firmly.
R15: (2 sc, dec) x6 (18)
R16: (sc, dec) x6 (12)
R17: dec x6 (6)
Fasten off. Leave 20 cm tail.
Snout (Make 1)
Yarn: blush pink
R1: 6 sc in MR (6)
R2: inc x6 (12)
R3: (sc, inc) x6 (18)
R4-R5: sc around (18)
Fasten off. Leave 18 cm tail.
Add two nostril stitches after assembly.
Body (Make 1)
Yarn: blush pink, with cream belly panel surface detail
R1: 6 sc in MR (6)
R2: inc x6 (12)
R3: (sc, inc) x6 (18)
R4: (2 sc, inc) x6 (24)
R5: (3 sc, inc) x6 (30)
R6-R10: sc around (30)
R11: (3 sc, dec) x6 (24)
R12-R13: sc around (24)
R14: (2 sc, dec) x6 (18)
R15: sc around (18)
R16: (sc, dec) x6 (12)
Stuff lower body firmly, upper neck moderately.
R17: dec x6 (6)
Fasten off. Leave 25 cm tail.
Belly Panel (Make 1)
Yarn: cream
Ch 7.
R1: starting in 2nd ch from hook, 5 sc, 3 sc in last ch, working opposite side 4 sc, inc (14)
R2: inc, 4 sc, 3 inc, 4 sc, 2 inc (20)
R3-R6: sc around (20)
Fasten off. Leave 20 cm tail.
Lightly stuff body first, then stitch belly panel centered to front for the segmented look. Add 4 horizontal embroidered bars in cream.
Arms / Front Legs (Make 2)
Yarn: blush pink with gold claw tips
R1: 6 sc in MR (6)
R2: inc x6 (12)
R3-R4: sc around (12)
R5: (2 sc, dec) x3 (9)
R6-R9: sc around (9)
Stuff lower half only.
R10: flatten and sc through both sides 4 (4)
Fasten off. Leave 18 cm tail.
Add 3 gold claw stitches to each paw.
Back Legs (Make 2)
Yarn: blush pink with gold claw tips
R1: 6 sc in MR (6)
R2: inc x6 (12)
R3: (sc, inc) x6 (18)
R4-R5: sc around (18)
R6: (sc, dec) x6 (12)
R7-R10: sc around (12)
Stuff foot firmly and upper leg lightly.
R11: flatten and sc through both sides 6 (6)
Fasten off. Leave 22 cm tail.
Add 3 gold claw stitches to each foot.
Ears (Make 2)
Yarn: blush pink
R1: 4 sc in MR (4)
R2: (sc, inc) x2 (6)
R3: (2 sc, inc) x2 (8)
R4: sc around (8)
Flatten. Fasten off. Leave 12 cm tail.
Horns (Make 2)
Yarn: gold sparkle
R1: 4 sc in MR (4)
R2: sc around (4)
R3: (sc, inc) x2 (6)
R4-R5: sc around (6)
Fasten off. Leave 12 cm tail.
Do not overstuff; a soft horn sits cleaner under the crown.
Wings (Make 2)
Yarn: blush pink outer edge, light pink inner membrane
Ch 13.
Row 1: sc in 2nd ch from hook and across (12)
Row 2: ch 1, turn, dec, 8 sc, dec (10)
Row 3: ch 1, turn, sc across (10)
Row 4: ch 1, turn, dec, 6 sc, dec (8)
Row 5: ch 1, turn, sc across (8)
Row 6: ch 1, turn, dec, 4 sc, dec (6)
Row 7: ch 1, turn, sc across (6)
Edge round: work sc evenly around, placing 3 picot-like points on lower edge to suggest membrane ribs.
Fasten off. Leave 20 cm tail.
Tail (Make 1)
Yarn: blush pink
R1: 4 sc in MR (4)
R2: sc around (4)
R3: inc, 3 sc (5)
R4: sc around (5)
R5: inc, 4 sc (6)
R6-R7: sc around (6)
R8: inc, 5 sc (7)
R9-R10: sc around (7)
R11: inc, 6 sc (8)
R12-R14: sc around (8)
R15: inc, 7 sc (9)
R16-R20: sc around (9)
Fasten off. Leave 24 cm tail.
Stuff lightly. Bend into a side curve before attaching.
Back Spikes (Make 5 small bumps)
Yarn: blush pink
For each spike:
R1: 4 sc in MR (4)
R2: sc around (4)
Fasten off. Leave 8 cm tail.
Cheek Patches (Make 2)
Yarn: light pink
R1: 6 sc in MR (6)
R2: inc x6 (12)
Fasten off. Leave 10 cm tail.
Flatten and stitch lightly under eyes, or brush pink pastel instead.
Crown (Make 1)
Yarn: gold sparkle or use premade trim
Ch 12, join with sl st.
Round 1: sc around (12)
Round 2: (sl st, ch 3, dc in 2nd ch from hook, sl st in next st) repeat 4 times to create points
Fasten off. Leave 15 cm tail.
Star Tail Topper (Make 2 flat pieces)
Yarn: gold sparkle
Ch 2.
Into 2nd ch from hook work: (sl st, ch 2, sl st) 5 times.
Fasten off on each star. Stitch wrong sides together lightly around tail tip.
Assembly
- Sew the snout centered between the eyes, spanning roughly R10 to R14 on the head.
- Add nostrils with matching pink embroidery two stitches apart.
- Attach the head to the body with the chin tilted slightly forward.
- Stitch the belly panel to the body front and add four horizontal cream bars.
- Pin and sew back legs first so the dragon sits without rolling.
- Attach arms at the upper body sides, angled inward toward the belly.
- Sew ears between the eye line and crown line, then attach horns just inside the ears.
- Place wings on the upper back, one to two rounds below the neck seam, slightly flared outward.
- Sew the tail low on the back, then attach five spikes along the spine and tail base.
- Fix cheek patches, crown, and star tail topper last, then weave in every tail inside the body cavity.
The completed plush should sit upright with the tail acting as a rear stabilizer.
7 Technical Tips
- Eye placement timing: Insert 12 mm eyes before the final head decrease round. Late insertion on a stuffed head often distorts the forehead and shortens the usable eye span.
- Stuffing firmness: Pack the head more firmly than the body. A soft head collapses under the crown and pushes the snout upward.
- Invisible decrease control: Work every face decrease through front loops only. Standard decreases leave a visible ridge on a pale pink fabric surface.
- Wing pinning: Pin each wing at three points before sewing. One-point sewing makes the top edge curl and shifts the membrane angle backward.
- Tail curve: Use light stuffing in the first 8 rounds of the tail and moderate stuffing near the base. Overfilling removes the side sweep that makes the star tip readable.
- Front-leg angle: Set the arms so the paw tips land near the outer belly edge. Too high, and the dragon reads startled; too low, and the torso looks long.
- Tail weaving: Split yarn tails and weave in opposite directions inside the body. Metallic accent yarn can slip out if it is buried in only one path.
Conclusion
This pink princess build turns the standard dragon amigurumi crochet pattern into a more specific silhouette: rounded face, compact seated body, crown line, wing span, and star-finished tail. The next step is practical. Crochet the head first, test your 12 mm eye spacing, then scale the body only after the face reads correctly. That order saves rework. For publishing, pair the finished dragon with one front view and one back-wing view, then send it to Pinterest and Instagram with #PinkPrincessDragonPattern. One final question remains: would you keep the star tail tip, or swap it for a heart to push the princess theme further?









