Introduction
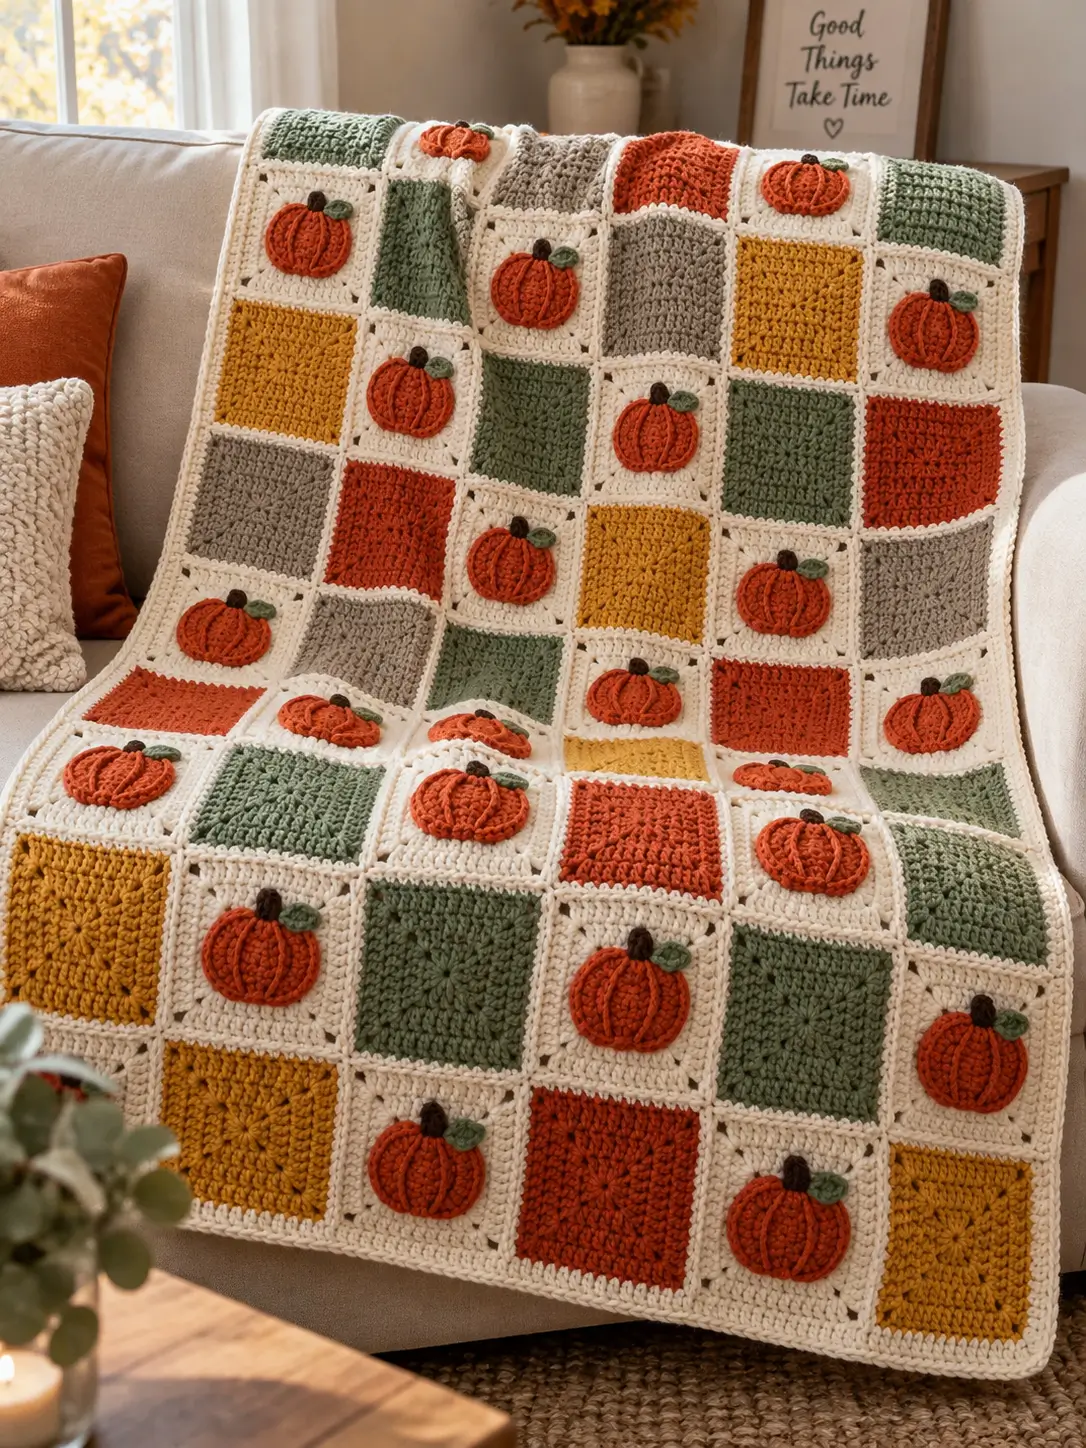
A pumpkin needs visible ribs and a pinched top to read correctly when it is reduced to a flat crochet motif. This pumpkin granny square blanket crochet pattern combines raised orange appliqués with cream, sage, mustard, rust, and taupe blocks. Use #4 worsted yarn and a 4 mm hook; finished dimensions depend on the number and size of squares. The intermediate construction works well when you need washable seasonal sofa décor.
The Design: What Makes This Pumpkin Blanket Different
The photographed blanket separates the pumpkin from the square instead of forcing orange shaping into the background rounds. That decision matters: a separately crocheted pumpkin can carry stronger ribs while the cream block stays geometrically square. Second, the pumpkin blocks are interrupted by sage, mustard, rust, and taupe squares. The spacing prevents a crochet pumpkin granny square motif from becoming visually repetitive across a large throw.
A third decision concerns relief. The pumpkins sit above the cream fabric, but they are not spherical toys. Keeping the pumpkin appliqué crochet pattern relatively flat reduces strain on the background stitches and makes the finished blanket easier to fold.
The common mistake is pulling the sewing yarn too firmly around each pumpkin. That contracts the center of the square, producing cupping that becomes much harder to correct after joining.
Project Info at a Glance
| Skill Level | Time | Finished Size | Hook | Best For |
|---|---|---|---|---|
| Intermediate | Varies by square count | Modular; size to required grid | 4.0 mm | Fall throws, sofa blankets, seasonal display |
A 4 mm hook with #4 worsted yarn is suitable for this construction. Exact blanket dimensions depend on gauge, individual square dimensions, and the number of blocks used.
Materials and Tools
Yarn
Use one yarn family where possible. Differences in fiber, twist, or loft can change square dimensions even when every skein carries the same weight classification.
- Warm ivory/cream — #4 worsted — square backgrounds, joins, and border
- Burnt pumpkin orange — #4 worsted — pumpkin appliqués
- Rust orange — #4 worsted — contrast squares
- Sage green — #4 worsted — contrast squares and pumpkin leaves
- Mustard — #4 worsted — contrast squares
- Taupe/gray — #4 worsted — contrast squares
- Dark brown — #4 worsted — small scrap quantity for stems
A small pumpkin appliqué requires only a limited amount of orange yarn, making the motif suitable for using remnants from larger worsted-weight projects.
Tools
- 4.0 mm crochet hook
- Yarn needle
- Locking stitch markers
- Scissors
- Dressmaking pins
- Measuring tape
- Blocking mats and rust-resistant pins
No safety eyes, stuffing, buttons, or plastic facial components are required.
Abbreviations
- MR — magic ring
- sc — single crochet
- hdc — half double crochet
- dc — double crochet
- inc — increase
- dec — decrease
- sl st — slip stitch
- ch — chain
- BLO — back loop only
- st/sts — stitch/stitches
- RS — right side
An invisible decrease is worked through the front loops of the next two stitches before completing one sc, reducing bulk compared with a standard sc2tog.
Pattern — Step by Step
The construction uses joined rounds for the granny squares. Pumpkins are crocheted separately and attached to selected cream squares afterward.
Solid Autumn Granny Square
Yarn: sage, mustard, rust, taupe, or cream — #4 worsted.
R1: In MR, ch 3, 2 dc, ch 2; (3 dc, ch 2) ×3. Join with sl st. Four 3-dc groups.
R2: Sl st to corner. Ch 3, 2 dc, ch 2, 3 dc in first corner; *ch 1, (3 dc, ch 2, 3 dc) in next corner* ×3. Ch 1. Join.
R3: Sl st to corner. Work *(3 dc, ch 2, 3 dc) in corner, ch 1, 3 dc in next ch-1 space, ch 1* around. Join.
R4: Repeat the established granny-square structure, placing (3 dc, ch 2, 3 dc) in every corner and one 3-dc group in each side space.
R5: Repeat R4, adding one additional side cluster per side as the square expands.
Fasten off. Leave a 15 cm tail unless the joining method requires a longer tail.
Cream Pumpkin Background Square
Yarn: warm ivory — #4 worsted.
Work R1–R5 exactly as for the Solid Autumn Granny Square.
Measure every completed square before attaching an appliqué. All blocks in one blanket should finish within approximately 5 mm of the target width before joining.
Fasten off and weave in the center tail.
Raised Pumpkin Body
Yarn: burnt pumpkin orange — #4 worsted.
Ch 13.
Row 1: Hdc in second ch from hook and each ch across. (12)
Row 2: Ch 1, turn. Hdc BLO across. (12)
Rows 3–10: Ch 1, turn. Hdc BLO across. (12)
Do not fasten off.
Bring Row 1 and Row 10 together. Sl st through corresponding loops across the short seam. The ribbed rectangle now forms a narrow tube.
Fasten off, leaving approximately 50 cm.
Thread the tail through the row-end stitches around one opening. Pull firmly enough to gather the opening, then secure. Flatten the piece so the seam sits at the back.
Thread a second orange strand around the opposite opening. Gather only until the pumpkin becomes a broad oval. Do not pull both ends together as tightly as a three-dimensional pumpkin because the appliqué needs to remain sufficiently flat for attachment.
Use a separate strand to pass from top center to bottom center two or three times. Tighten lightly to establish the central indentation.
Pumpkin Rib Lines
Yarn: burnt pumpkin orange.
Cut four strands approximately 40 cm long.
Beginning at the lower center, take one strand over the front surface beside a raised BLO ridge and return through the upper center.
Repeat on the opposite side.
Add two more shallow channels between the center and outer edges.
The channels should define five to seven visual pumpkin lobes without folding the body into narrow wedges.
Fasten the strands securely on the reverse.
Brown Stem
Yarn: dark brown.
Ch 6.
Row 1: Sc in second ch from hook and next 4 ch. (5)
Row 2: Ch 1, turn. Sc across. (5)
Row 3: Ch 1, turn. Sc across. (5)
Fasten off with a 20 cm sewing tail.
Fold the stem slightly lengthwise before attachment. Keep it short so the stem remains proportional to the pumpkin.
Sage Leaf — Make 1 per Pumpkin
Yarn: sage green.
Ch 7.
Starting in the second ch from hook:
Sl st, sc, hdc, dc, hdc, 3 sc in final ch.
Rotate the work to crochet down the opposite side of the foundation chain.
Hdc, dc, hdc, sc, sl st.
Fasten off with a 20 cm tail.
The leaf should remain relatively flat. Block individual leaves before assembly if the edges twist enough to obscure their shape.
Pumpkin Motif Assembly
Place the brown stem behind the upper center of the pumpkin and sew its lower section securely to the reverse.
Position the sage leaf to one side of the stem. Sew around the central portion of the leaf while leaving part of the outer edge free if a raised appearance is wanted.
Pin the complete pumpkin to the center of a cream square.
Measure from the pumpkin center to the four edges of the block. Correct any visible offset before sewing.
Attach around the pumpkin perimeter with matching orange yarn. Keep the stitches secure but avoid pulling hard enough to distort the cream background.
Blanket Layout
The photographed blanket appears to use approximately six columns by eight rows. This is a visual estimate rather than a fixed requirement, so the grid can be changed to produce a baby blanket, lap blanket, throw, or larger sofa blanket.
Alternate pumpkin blocks with solid sage, mustard, rust, and taupe squares. Avoid forming unintended long diagonal lines of one contrast color.
Lay every completed block on a large flat surface before joining. Photograph the arrangement and inspect the smaller image. Color clusters and misplaced pumpkin blocks are often easier to detect from that reduced view.
Joining the Squares
Yarn: warm ivory.
Place two squares with wrong sides together.
Join the cream yarn through corresponding corner spaces.
Ch 1.
Work sc through both layers along the complete side, matching stitch groups and spaces consistently.
Fasten off at the next corner.
Continue row by row until all horizontal joins are complete. Work the vertical joins afterward.
For a flatter surface, a mattress-style sewn join can be substituted. Use the same joining method throughout the blanket because changing seam construction can alter both the appearance and final dimensions.
Outer Border
Yarn: warm ivory.
Round 1: Join yarn at any outer corner. Sc evenly around the complete blanket, placing (sc, ch 2, sc) at each corner.
Round 2: Ch 3. Dc in every stitch around; work (2 dc, ch 2, 2 dc) in each corner ch-2 space. Join.
Round 3: Ch 1. Sc in every dc, placing (sc, ch 2, sc) in each corner. Join.
Fasten off and weave the tail through at least 5 cm of neighboring stitches. Reverse direction and weave through a second path.
Assembly
- Block every granny square to the same target dimensions before arranging the blanket.
- Finish all cream pumpkin blocks before attaching the orange motifs.
- Sew the brown stem behind the top center of each pumpkin.
- Attach the sage leaf beside the stem, keeping its pointed end visible.
- Pin each pumpkin to its cream square and check all four margins.
- Sew the pumpkin perimeter without tightening or puckering the background fabric.
- Arrange pumpkin and solid-color blocks into the planned blanket grid.
- Join horizontal rows first, checking corner alignment after every seam.
- Complete the vertical joins, then crochet the three-round outer border.
- Block the complete blanket flat and weave every remaining tail through two directional paths.
The completed blanket consists of structurally independent granny squares with raised pumpkin appliqués positioned across selected cream blocks.
7 Technical Tips for a Better Pumpkin Granny Square Blanket
- Control marker drift: Place a removable marker at the first stitch or cluster of every round. Losing the correct corner by one cluster can produce visible rotation after four or five rounds.
- Check appliqué distortion: Keep pumpkin sewing stitches relaxed. If a cream block loses more than approximately 5 mm of width after attachment, remove the tight section and sew it again.
- Avoid rib compression: Do not pull the sculpting strands until the pumpkin folds into narrow wedges. Each strand needs only enough tension to form a shallow channel between the raised ribs.
- Measure pumpkin placement: Check all four margins before sewing the first 5 cm of the perimeter. A motif positioned 5–8 mm away from the intended center becomes much more visible once neighboring blocks create a grid.
- Pin before sewing: Use at least six pins around a larger pumpkin: top, bottom, both sides, and two intermediate positions. Using only one or two pins allows the appliqué to rotate during attachment.
- Prevent joining mismatches: Count the available edge spaces on both squares before beginning each seam. Connecting an extra space on one block forces the neighboring corners out of alignment.
- Secure yarn tails: Weave each structural joining tail for at least 5 cm, reverse direction, and pass through a second stitch path. A single straight woven path is more likely to migrate toward an edge after repeated washing.
Finishing and Blocking
Check the completed blanket for joining tails before blocking. Pay particular attention to the points where four granny-square corners meet because these intersections carry more structural stress than ordinary side seams.
Lay the blanket flat and adjust the outer edges until the grid forms consistent horizontal and vertical lines. Pin the corners first, followed by the centers of the four edges. Add more pins where individual squares pull away from the established grid.
Do not stretch the pumpkin appliqués until their ribbing becomes flat. The orange motifs should retain visible relief after the cream backgrounds have been blocked into regular squares.
Allow the blanket to dry completely in position before removing the pins.
Conclusion
Block one cream square and make one complete pumpkin before committing yarn to the full blanket. That sample establishes the actual square dimensions, pumpkin-to-background ratio, sewing tension, and yarn consumption produced by your gauge. Record those measurements, calculate the required grid, then make the remaining blocks in batches by color. Photograph the final arrangement before joining so misplaced pumpkins or repeated color clusters can be corrected. Share the finished pumpkin granny square blanket crochet pattern project on Pinterest and Instagram with #PumpkinGrannySquareBlanket. For this design, decide one detail before batch production: will every sage leaf point in the same direction, or alternate across the grid?









