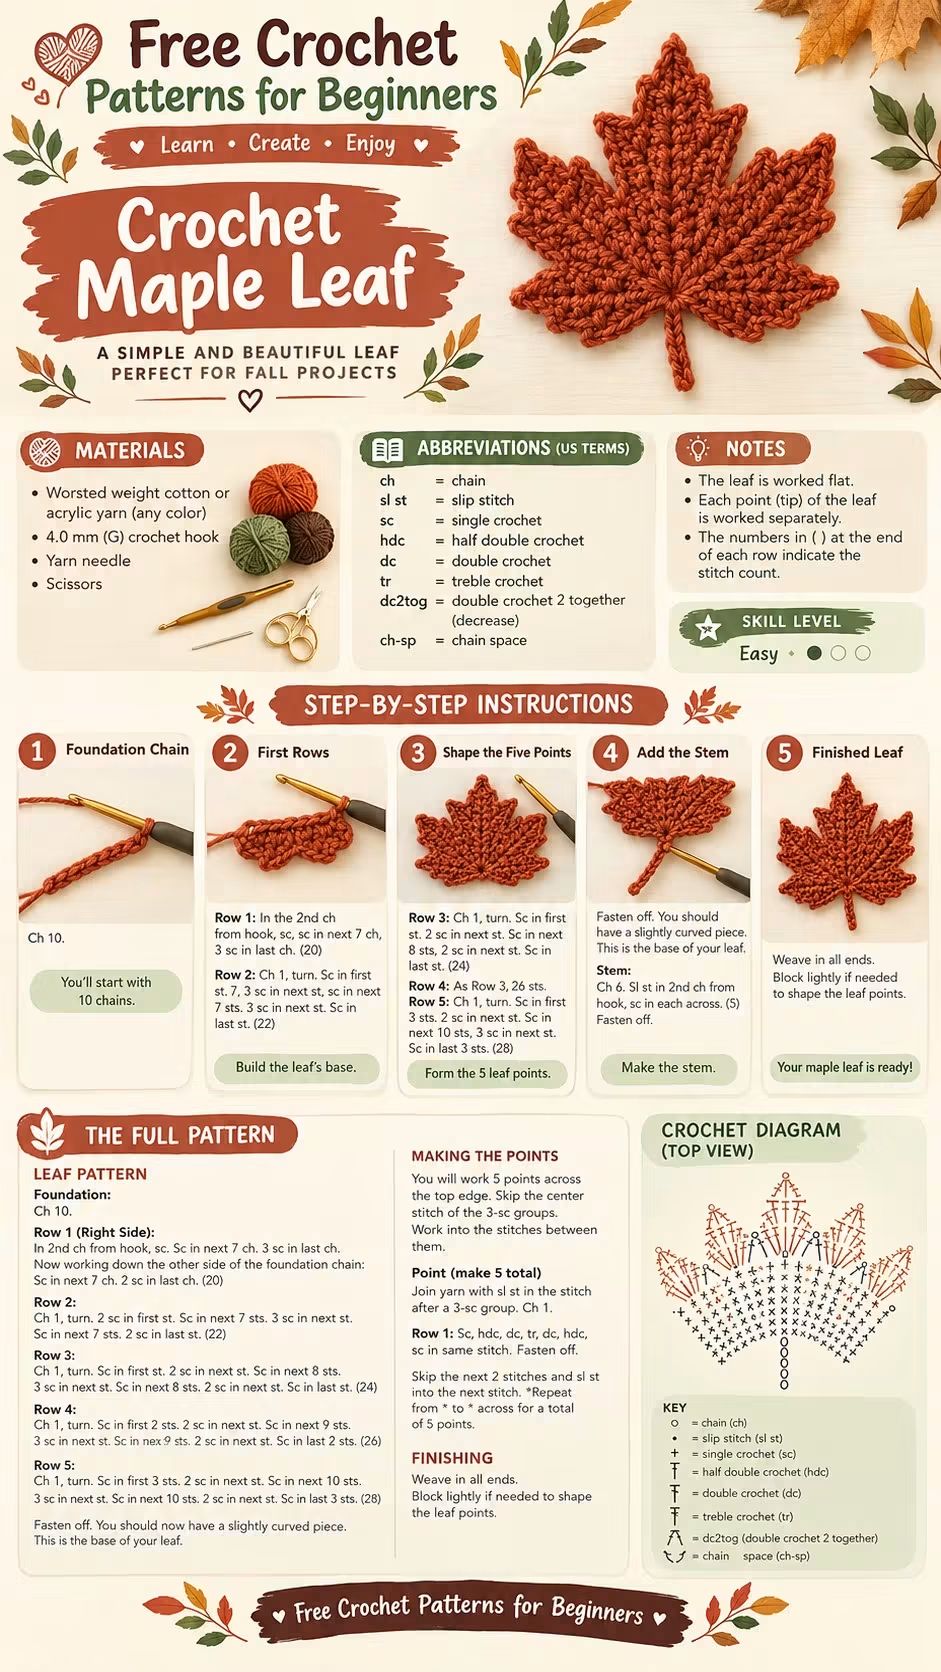
A maple leaf stops looking like a maple leaf when all five points reach the same height. This free crochet maple leaf pattern uses one tall center lobe, two medium side lobes, two shorter lower lobes, and a narrow stem to create the characteristic outline. Work it in worsted-weight cotton or acrylic with a 4 mm hook. The flat motif is suitable for advanced beginners making garlands, table decorations, appliqués, or fall wreaths.
The Design: What Makes This Maple Leaf Different
The silhouette depends more on proportion than stitch complexity. The center point rises highest, the upper side lobes spread outward, and the lower pair stays shorter so the base can taper naturally into the stem. Short stitches form the valleys while dc and tr stitches add height at each point.
A second structural decision is working the five lobes from a compact foundation rather than constructing five identical triangles. This produces a connected crochet maple leaf applique with fewer seams and a flatter reverse side.
The most common mistake is making every point equally tall. That turns an easy crochet maple leaf into a star-shaped motif. Maintain three distinct lobe heights and keep the valleys deep enough to separate neighboring points.
Project Info at a Glance
| Skill Level | Time | Reference Size | Hook | Best For |
|---|---|---|---|---|
| Advanced beginner | 30–60 minutes | Approx. 7–13 cm depending on gauge | 4.0 mm | Garlands, wreaths, appliqués, table décor |
Published maple-leaf patterns vary substantially in finished dimensions. Treat the size range above as a planning reference rather than an exact measurement for this reconstruction.
Materials and Tools
Yarn
- Rust, burnt orange, red, gold, green, or brown worsted-weight yarn — small quantity for one leaf.
Cotton gives the points firm definition, while acrylic produces a slightly softer motif. Use one consistent yarn weight throughout the leaf and stem.
Tools
- 4.0 mm (G) crochet hook
- Yarn needle
- Scissors
- Stitch markers
- Blocking mat and pins
Abbreviations
- ch — chain
- sl st — slip stitch
- sc — single crochet
- hdc — half double crochet
- dc — double crochet
- tr — treble crochet
- st/sts — stitch/stitches
- sp — space
- RS — right side
- WS — wrong side
An invisible decrease is not required for this flat motif; changes in stitch height and strategic slip stitches create the valleys and pointed tips.
Free Crochet Maple Leaf Pattern — Step by Step
Work the leaf flat with the right side facing during the main shaping sections. The instructions create five principal lobes: one large center point, two medium upper points, and two smaller lower points.
Foundation
Yarn: rust or chosen leaf color.
Ch 10.
Beginning in the second chain from the hook, work:
Row 1: Sc in next 8 chains, 3 sc in final chain.
Rotate the work so the unused loops on the opposite side of the foundation chain are accessible.
Sc in each available loop back toward the beginning.
The foundation now forms a narrow rounded base rather than a simple straight row.
Base Expansion
Row 2: Ch 1, turn. Sc across the first side. Work 3 sc into the central turning position. Sc across the opposite side.
Row 3: Ch 1, turn. Sc toward the center, increasing once before the middle section and once after it.
Row 4: Repeat the established increase placement.
Row 5: Work evenly across the outer sections while maintaining the center expansion.
Fasten off only if you prefer to begin each lobe with a fresh join. Otherwise keep the working yarn attached for the first lower point.
The base should lie flat. If it cups noticeably, check that the center increases have not been omitted.
Center Lobe
Mark the center stitches of the expanded base.
Join yarn at the right edge of the center-lobe section.
Center Row 1: Ch 1, sc across the marked section. Turn.
Center Row 2: Ch 1, sc, hdc, dc across the center stitches, then reverse the stitch heights with hdc and sc toward the opposite edge.
Center Row 3: Ch 2. Hdc at the outside edges and dc through the central stitches.
Center Row 4: Ch 3. Work dc, tr stitches toward the center, then reverse the sequence toward the opposite edge.
Center Row 5: Taper toward the final point.
At the tip work:
Ch 3, sl st into the first chain of the ch-3.
Work down the opposite edge using progressively shorter stitches.
Fasten off.
The completed center lobe should extend higher than all four remaining lobes.
Upper Left Lobe
Join yarn immediately to the left of the center lobe.
Row 1: Ch 1 and sc across the allocated stitches.
Row 2: Ch 2. Work hdc at the edges and dc toward the center.
Row 3: Work dc, tr, dc through the central section.
At the highest point work a ch-3 picot.
Return toward the base using dc, hdc, and sc.
Fasten off.
This lobe should finish approximately 10–20% shorter than the center point.
Upper Right Lobe
Repeat the upper-left lobe on the opposite side of the center point.
Before fastening off, lay the leaf flat and compare both upper side lobes.
Their outer tips should sit at approximately equal heights and distances from the central axis.
Lower Left Lobe
Join yarn below the upper-left lobe.
Row 1: Ch 1, sc across the allocated section.
Row 2: Ch 2, hdc, dc through the middle stitches, hdc toward the outside.
At the point work a ch-2 picot.
Return with hdc and sc.
Fasten off.
The lower lobe should remain visibly shorter than the upper side lobe.
Lower Right Lobe
Repeat the lower-left instructions in mirror orientation.
Check the full five-lobe outline before adding the perimeter definition.
Secondary Points
The maple silhouette can be sharpened by adding small points between the five dominant lobes.
Join yarn in one valley.
Work sc along the lobe edge.
At a secondary point work:
(sc, ch 2, sl st in second ch from hook, sc).
Continue toward the next valley.
Use a sl st at the deepest part of each valley so neighboring lobes remain visually separate.
Repeat around the upper perimeter.
Stem
Join yarn at the bottom center of the leaf.
Ch 7.
Beginning in the second chain from the hook, sl st in each chain back toward the leaf.
Join with sl st at the base.
For a slightly heavier stem, substitute sc for the final four slip stitches.
Fasten off and leave a tail long enough for weaving.
Shaping the Five Maple Points
A maple leaf should not be divided into five equal triangles.
The center lobe establishes the vertical axis. It must be the longest point.
The two upper side lobes should spread diagonally and finish slightly lower than the center. Their width gives the motif most of its horizontal span.
The two lower lobes remain shorter and angle outward from the stem.
Between all five principal lobes, use short stitches or slip stitches to create valleys. Deep valleys matter because they separate the points visually.
If the leaf resembles a five-point star before blocking, the side lobes are probably too similar in height.
Creating Sharper Tips
Picots provide a compact method for sharpening each point without adding another full row.
At a major tip, ch 3 and sl st into the first chain.
For a smaller secondary point, ch 2 and sl st into the second chain from the hook.
Keep these chains firm. Loose picots become rounded loops rather than pointed extensions.
Do not add identical picots everywhere. The central point can carry the strongest tip, while the lower lobes should remain smaller.
Assembly and Finishing
- Complete the expanded leaf foundation and confirm that it lies flat.
- Mark the center axis before shaping any of the five principal lobes.
- Work the tallest center lobe first and establish its final point.
- Make the upper-left and upper-right lobes at matching heights.
- Add the two shorter lower lobes beside the stem position.
- Work any secondary perimeter points without filling the valleys between the five major lobes.
- Crochet the stem directly from the lower-center axis.
- Weave each yarn tail through dense stitches on the reverse side.
- Dampen the motif and arrange it on a blocking mat.
- Pin the stem, five main tips, secondary points, and valleys until the leaf is completely dry.
The finished leaf should have one dominant central point, two balanced upper side lobes, two shorter lower lobes, clearly recessed valleys, and a stem aligned with the center axis.
7 Technical Tips
- Mark the center axis before starting the lobes. Moving the central point by even two foundation stitches makes one half of the leaf visibly wider than the other.
- Keep the center lobe roughly 10–20% taller than the upper side lobes. Five equal-height points create a star-shaped outline rather than a recognizable maple leaf.
- Use slip stitches at the deepest valleys. Filling a valley with tall stitches joins neighboring lobes visually and makes the perimeter too round.
- Compare the paired side points before fastening off. A difference greater than about 5 mm is conspicuous on a leaf only 10–13 cm across.
- Keep the 4 mm hook if the fabric lies flat and firm. If the motif becomes stiff and curls upward, increase the hook by approximately 0.5 mm rather than adding random stitches.
- Pin every major point during blocking. Pinning only the outside width leaves the small valleys rounded and removes much of the maple silhouette.
- Weave tails through at least 4 cm of dense crochet. A short tail near a lobe point can work loose when the motif is stretched during blocking or attached to a garland.
Choosing Yarn for Crochet Maple Leaves
Worsted-weight cotton or acrylic works well for a medium decorative leaf. The uploaded reference specifies worsted yarn and a 4 mm hook, and independent published maple-leaf patterns also use size-4 medium or Aran yarn with a 4 mm hook.
Cotton produces firmer points and usually requires less aggressive blocking. Acrylic is lighter and provides more elasticity, which can be useful when leaves will be sewn onto blankets, hats, bags, or cushions.
Rust is the closest match to the photographed example. Burnt orange, mustard, burgundy, olive, brown, and deep red can be substituted without changing the construction.
For a fall garland, make several leaves from the same yarn family so their thickness remains consistent even when the colors change.
How to Change the Leaf Size
Changing yarn weight is safer than adding arbitrary rows to individual lobes.
Published worsted maple-leaf designs can finish around 7–9 cm wide, while other constructions reach approximately 11–13 cm or more. The stitch pattern therefore matters as much as yarn thickness.
For smaller appliqués, use sport or DK yarn with a matching smaller hook.
For larger table decorations, move to a heavier worsted or bulky yarn and increase the hook accordingly.
Make one sample before producing a set. Record the finished width from the left upper lobe to the right upper lobe and the height from the center tip to the bottom of the stem.
Blocking the Maple Leaf
Blocking has a structural role in this motif because each lobe needs a different angle.
Dampen the completed leaf according to the yarn’s care instructions.
Place the stem on a vertical line and pin it first.
Pin the center lobe directly above the stem. These two pins establish the main axis.
Next pin the upper-left and upper-right lobes at equal distances from the center.
Add pins to the two lower lobes.
Push each valley inward before pinning the secondary points.
Measure the two halves from the center axis. Adjust the pins until the overall shape is balanced without forcing both sides to become mathematically identical.
Leave the motif pinned until completely dry.
Using the Finished Crochet Leaves
A single leaf works as an appliqué on a tote bag, cushion, hat, blanket corner, or wrapped gift.
For a garland, make leaves in several autumn colors and attach their stems to a long crochet chain. Leave enough space between motifs for the five-point outlines to remain visible.
Several leaves can also be arranged around a wreath form. Rotate their center lobes rather than positioning every leaf vertically.
For table décor, use cotton yarn and block the leaves firmly. Three or five motifs in rust, mustard, burgundy, and olive create a coordinated arrangement without changing the pattern.
If the leaves will be sewn onto another crochet project, leave a longer finishing tail at the stem rather than weaving it in.
Conclusion
The unequal lobe heights are the critical measurement in this free crochet maple leaf pattern. Make the center point tallest, reduce the two upper side lobes slightly, and keep the lower pair shorter so the finished outline reads as a maple leaf rather than a star. After crocheting the stem, block every point and valley separately before using the motif in a larger project. Make the first rust-colored sample with worsted yarn and a 4 mm hook, then record its dimensions before changing yarn. Share finished fall projects on Pinterest or Instagram with #RustMapleLeafCrochet. Would you make your next leaf mustard, burgundy, or olive?









