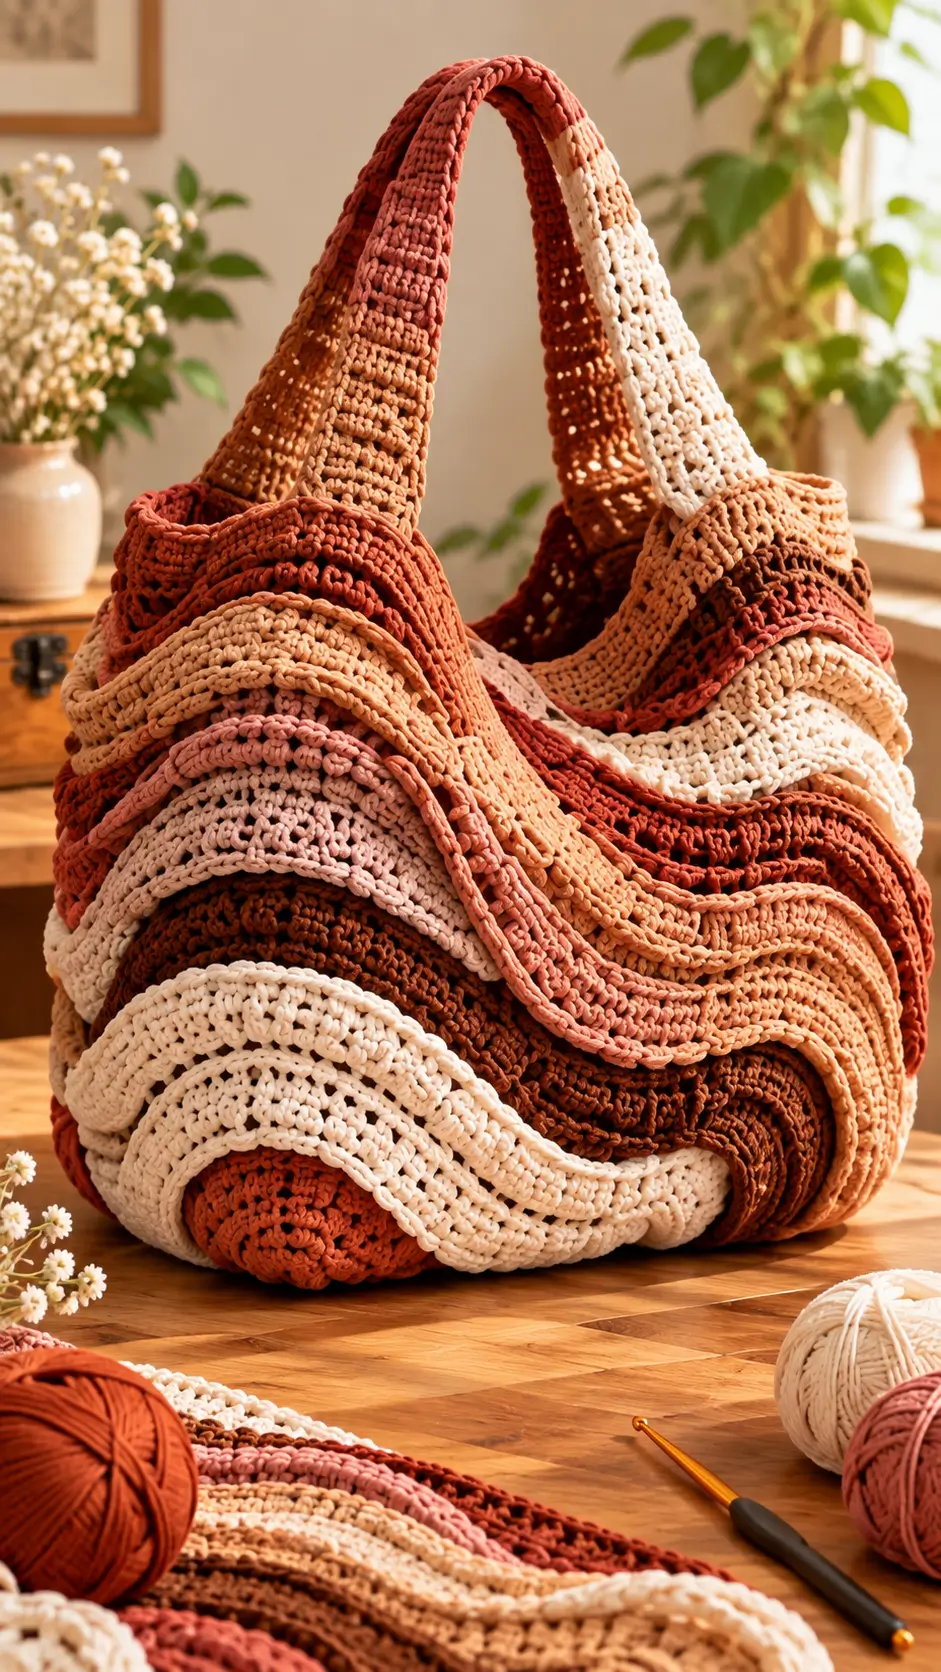
Five overlapping ruffle bands turn this tote into a piece of crochet architecture rather than a plain rectangular carrier. This crochet ruffle tote bag pattern uses medium-to-heavy yarn, a 5.5 mm hook, an oval base and wide shoulder handles to produce a roughly 38 cm bag. The skill level is intermediate. Its layered construction also makes it useful for consuming coordinated partial skeins.
The Design: What Makes This Ruffle Tote Different
The photographed bag relies on three structural decisions: a broad rounded body, very wide handles and ruffles deep enough to overlap the bands beneath them. That combination matters. A narrow rectangular body would make five ruffle layers look disproportionately heavy, while thin straps would visually disappear against the dense surface.
This pattern therefore starts with an oval base and develops a 96-stitch circumference before the decorative layers are added. The layered ruffle bag uses five color zones, while the crochet shoulder tote receives two reinforced handles.
A common mistake is treating every ruffle as an independent strip and sewing it onto finished fabric. That adds unnecessary seam bulk. Working decorative stitches directly into reserved loops gives each tier a fixed attachment line while keeping the inside cleaner.
Project Info at a Glance
| Skill Level | Time | Finished Size | Hook | Best For |
|---|---|---|---|---|
| Intermediate | 10–14 hours | Approx. 38 × 40 cm, excluding handles | 5.5 mm | Shoulder tote / project bag |
The finished measurement is the target size for this photo-inspired version rather than an exact measurement taken from the photographed bag. Actual dimensions depend heavily on yarn thickness, hook size and individual tension.
Materials and Tools
Yarn
For a bag with the visual weight shown in the photograph, select firm worsted yarn held double or a comparable bulky ribbon or fabric yarn. Make a gauge sample first because ribbon yarn can change the finished dimensions considerably.
- Rust/terracotta: worsted held double or comparable bulky yarn — approximately 300 g.
- Cream/ivory: same thickness — approximately 100 g.
- Caramel: same thickness — approximately 75 g.
- Blush pink: same thickness — approximately 60 g.
- Dark brown: same thickness — approximately 65 g.
Cotton and cotton-blend yarns are suitable choices because the finished bag needs enough structure to support the layered ruffles. Yarn consumption can vary substantially according to fiber, gauge and ruffle depth.
Tools
- 5.5 mm crochet hook
- 6 stitch markers
- Tapestry needle
- Scissors
- Measuring tape
- Optional cotton lining
- Optional removable bag-base insert
Abbreviations
- ch — chain
- sc — single crochet
- hdc — half double crochet
- dc — double crochet
- sl st — slip stitch
- st/sts — stitch/stitches
- FLO — front loop only
- BLO — back loop only
- RS — right side
- rep — repeat
Amigurumi-style invisible decreases are not required because this project is constructed as a bag shell rather than a stuffed form.
Crochet Ruffle Tote Bag Pattern — Step by Step
Work the base in joined rounds. Work the main body continuously unless a color-change round specifies otherwise.
Oval Base
Yarn: rust/terracotta.
Foundation: Ch 31.
Rnd 1: Sc in second ch from hook and next 28 ch, 3 sc in final ch. Work along the opposite side of the foundation chain: sc in next 28 ch, 2 sc in final ch. (62)
Rnd 2: Inc, sc 28, inc ×3, sc 28, inc ×2. (68)
Rnd 3: [Sc 1, inc], sc 28, [sc 1, inc] ×3, sc 28, [sc 1, inc] ×2. (74)
Rnd 4: [Sc 2, inc], sc 28, [sc 2, inc] ×3, sc 28, [sc 2, inc] ×2. (80)
Rnd 5: [Sc 3, inc], sc 28, [sc 3, inc] ×3, sc 28, [sc 3, inc] ×2. (86)
Rnd 6: [Sc 4, inc], sc 28, [sc 4, inc] ×3, sc 28, [sc 4, inc] ×2. (92)
Rnd 7: Work 4 increases evenly around. (96)
Rnd 8: BLO sc around. (96)
Do not cut the yarn. The BLO round creates a defined fold between the bottom and side wall.
Main Bag Body
Yarn: rust/terracotta with planned accent changes.
Rnds 9–14: Sc around. (96)
Rnd 15: BLO sc around. (96)
Rnds 16–21: Sc around. (96)
Rnd 22: BLO sc around. (96)
Rnds 23–28: Sc around. (96)
Rnd 29: BLO sc around. (96)
Rnds 30–35: Sc around. (96)
Rnd 36: BLO sc around. (96)
Rnds 37–42: Sc around. (96)
Rnd 43: BLO sc around. (96)
Rnds 44–48: Sc around. (96)
Measure the bag at this stage. The body should be approximately 36–40 cm high depending on yarn thickness, compression and gauge.
The unused front loops from Rounds 15, 22, 29, 36 and 43 become attachment tracks for the five decorative ruffle bands.
Bottom Ruffle
Yarn: cream.
Join the cream yarn to an unused front loop from Round 15.
Ruffle R1: Ch 2, work 2 hdc in every front loop around. Join with sl st. (192)
Ruffle R2: Ch 2, hdc in every st around. (192)
Ruffle R3: Ch 3, dc in every st around. (192)
Ruffle R4: Ch 1, sc around. (192)
Fasten off and weave the yarn tail toward the inside of the bag.
The 2:1 first-round ratio creates substantial flare. If the selected ribbon yarn is particularly stiff, alternate 2 hdc in one loop and 1 hdc in the next instead of doubling every loop.
Second Ruffle
Yarn: dark brown.
Join yarn to the unused loops from Round 22.
R1: Ch 2, 2 hdc in each loop. (192)
R2: Hdc around. (192)
R3: Dc around. (192)
R4: Sc around. (192)
Fasten off.
The second band should overlap the upper portion of the cream tier without completely hiding its lower edge.
Center Ruffle
Yarn: caramel.
Join yarn to the unused front loops from Round 29.
R1: 2 hdc in each loop. (192)
R2: Hdc around. (192)
R3: Dc around. (192)
R4: Dc around. (192)
R5: Sc around. (192)
Fasten off.
This tier is one round deeper than the neighboring ruffles. The extra depth produces the pronounced overlapping folds visible through the center of the design.
Fourth Ruffle
Yarn: blush pink.
Join yarn to the unused loops from Round 36.
R1: 2 hdc in each loop. (192)
R2: Hdc around. (192)
R3: Dc around. (192)
R4: Sc around. (192)
Fasten off.
Position the join toward a side edge. Placing all five joins at the center front can create an obvious vertical interruption through the decorative surface.
Top Ruffle
Yarn: rust or cream.
Join yarn to the unused loops from Round 43.
R1: 2 hdc in each loop. (192)
R2: Hdc around. (192)
R3: Dc around. (192)
R4: Sc around. (192)
Fasten off.
Check that the finished ruffle ends below the handle attachment area. A decorative band positioned directly beneath a loaded handle can distort the upper rim.
Upper Rim
Yarn: rust/terracotta.
Return to the working yarn at the body.
Rnd 49: Sc around. (96)
Rnd 50: BLO sc around. (96)
Rnd 51: Sc around. (96)
Rnd 52: Sl st loosely around. (96)
Fasten off only after checking the handle positions.
Handles — Make 2
The photographed design uses unusually wide handles. Narrow chain straps will change both the proportions and the load distribution of the finished tote.
Yarn: rust, cream or another coordinating color.
Foundation: Ch 81.
Row 1: Sc in second ch from hook and across. (80)
Rows 2–7: Ch 1, turn, sc across. (80)
Row 8: Ch 1, turn, BLO sc across. (80)
Rows 9–12: Sc across. (80)
Fasten off, leaving approximately 40 cm of sewing tail at both ends.
The finished strap should measure roughly 5–7 cm wide. To alter the width, change the number of rows rather than the 80-stitch handle length.
Handle Reinforcement
Yarn: matching handle color.
Join yarn to one long side of each handle.
Edging 1: Sl st evenly along the entire long edge.
Repeat along the opposite edge.
Fasten off.
The edging limits lateral stretching. If the bag will regularly carry books, bottles or other dense contents, cotton webbing sewn to the hidden underside of each handle provides additional structural support.
Optional Interior Base
Cut a removable plastic-canvas or firm bag-base insert approximately 1 cm smaller than the crocheted oval on every side. Round each corner so it cannot push through the crochet.
Keep the insert removable instead of permanently crocheting it into the base. This allows the bag to be cleaned and reshaped more easily.
Assembly
- Lay the completed body flat and mark the exact center of the front and back.
- Position the first handle so its two ends sit symmetrically on the front half of the upper rim, approximately 15–17 cm apart.
- Pin each handle end at least 4 cm down the inside wall rather than attaching the strap only to the uppermost round.
- Sew each attachment rectangle around all four edges, then add a diagonal cross through the rectangle to distribute pulling force.
- Repeat the same placement on the back using the second handle. Match its spacing to the first handle before sewing.
- Arrange all five ruffle tiers downward. Separate folds trapped behind the tier beneath them so every color band remains visible.
- Inspect the front-loop attachment lines and secure any yarn tails that have migrated toward the decorative surface.
- Add the optional fabric lining after the handles have been attached. Hand-sew its upper edge just below Round 50 so the seam remains behind the rim.
- Insert the optional base panel and check that it lies flat without forcing the oval corners outward.
- Steam only when the yarn manufacturer’s care instructions permit it. Otherwise, shape the bag dry and allow the crochet structure to settle naturally.
The completed tote has one oval base, a 96-stitch body, five attached ruffle tiers and two reinforced shoulder handles.
7 Technical Tips for a Better Ruffle Tote
- Control marker drift. Put one contrasting marker at the beginning of the body round and another exactly 48 stitches later. A misplaced starting point can gradually shift every ruffle join toward the visible front of the bag.
- Watch ruffle crowding. Maintain approximately six body rounds between the attachment tracks. Less spacing can cause neighboring 192-stitch ruffles to compress into one dense layer.
- Reinforce the handle anchors. Sew each strap at least 4 cm down the interior wall. Attaching the handle only through the final one or two rounds concentrates the load on the rim.
- Test handle stretch. Hang a finished handle with approximately 1 kg of temporary weight before final assembly. If its length increases by more than about 10%, add fabric webbing or another reinforcement layer.
- Correct stiff ruffles. When doubling every attachment loop makes the fabric project horizontally, reduce the first ruffle round to approximately a 3:2 increase ratio. Thick ribbon and fabric yarn often need less gathering than softer yarn.
- Measure before pinning. Position both handle endpoints from the center marker rather than judging placement visually. A difference of even 2 cm becomes noticeable once the loaded tote hangs from the shoulder.
- Prevent visible yarn tails. Weave every ruffle tail through at least 5 cm of dense body stitches on the inside. Avoid weaving through the loose decorative edge, where repeated movement can expose the tail.
Finishing the Crochet Ruffle Tote Bag
Before starting the full crochet ruffle tote bag pattern, make a 10 cm swatch with the actual yarn and hook, then crochet a short doubled ruffle section. The sample will show whether the selected material can support five overlapping tiers without becoming excessively stiff.
Record the finished gauge before beginning the oval base, particularly when substituting ribbon or fabric yarn for worsted strands held together. After assembly, check the handles under load and add reinforcement before installing an optional lining.
Save the finished project to Pinterest and share your completed color sequence on Instagram with #LayeredRuffleTote. For another version, consider changing one structural variable: would this earth-tone layout work better with the darkest ruffle at the bottom or at the center?









