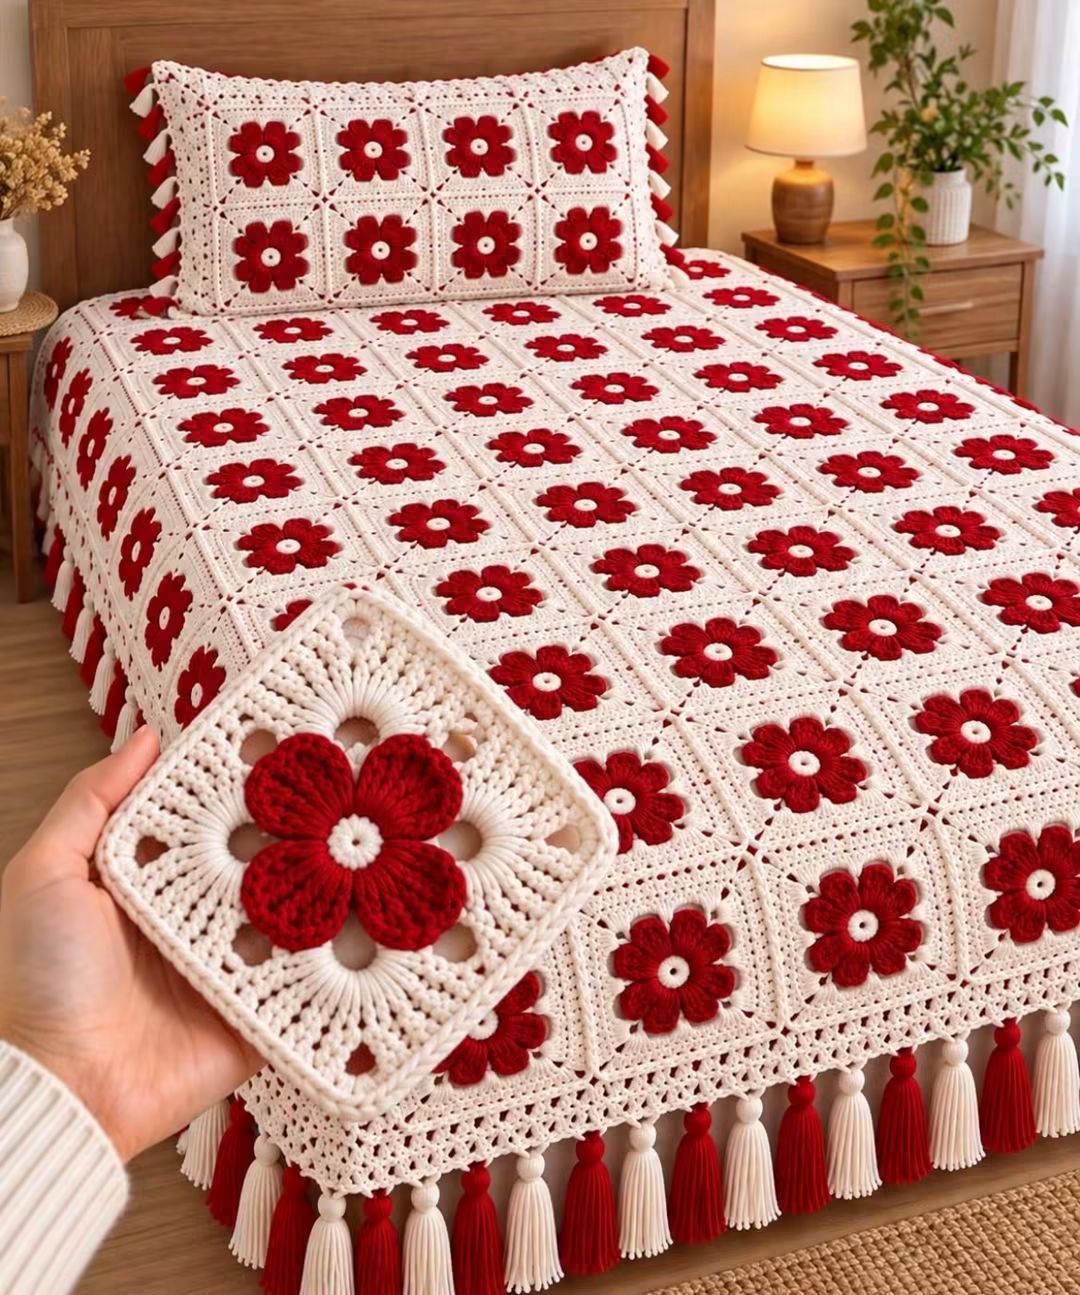
Five red petals have to rise above each cream square without pulling its four corners inward. This 3D flower granny square blanket pattern handles those competing shapes with a compact cream center, dimensional red petals, openwork corner sections, a joined ivory grid, lace edging, and alternating tassels. Use DK or worsted yarn with a hook matched to the chosen weight. The intermediate modular construction scales from a cushion cover to a full bedspread.
The Design: What Makes This Flower Blanket Different
The flower and square perform different structural jobs. Raised red petals supply the dimensional surface, while the cream background carries the joining load and keeps every motif square. Open spaces around the flower reduce bulk and create the small diamond-shaped holes visible where neighboring blocks meet.
Color placement is deliberately restricted. Deep red is concentrated in the petals, while cream controls the center, square background, seams, and lace border. That separation keeps the repeated flowers distinct across a large bedspread.
A common problem with a crochet flower granny square is allowing the petal round to dictate the square’s dimensions. If the petals are too wide, they push into the corner structure. Build the cream framework independently and keep the raised flower inside its boundary.
Project Info at a Glance
| Skill Level | Construction | Comparable Square Size | Hook Range | Best For |
|---|---|---|---|---|
| Intermediate | Individual joined motifs | Approx. 11.5–15 cm | 3.5–5.5 mm depending on yarn | Blankets, bedspreads, cushions |
Published flower-square patterns vary from approximately 11.5 cm to 15 cm for common light and worsted yarn constructions. The photographed blanket provides no reliable physical scale, so calculate its final dimensions from one blocked sample square rather than from the image.
Materials and Tools
Yarn
- Deep red DK or worsted yarn — raised flower petals and red tassels.
- Cream or warm ivory DK or worsted yarn — flower centers, square backgrounds, joining, border, and cream tassels.
Choose both colors from the same yarn line where possible. Equal fiber content and meterage help the red flower and cream framework respond similarly to washing and blocking.
Tools
- 3.5–5.5 mm crochet hook, selected for yarn weight and desired density
- Yarn needle
- Locking stitch markers
- Scissors
- Tape measure
- Blocking mats
- Rustproof pins
- Cardboard tassel template
Abbreviations
- MR — magic ring
- ch — chain
- sc — single crochet
- hdc — half double crochet
- dc — double crochet
- tr — treble crochet
- sl st — slip stitch
- sp — space
- st/sts — stitch/stitches
- RS — right side
- WS — wrong side
An invisible decrease is unnecessary in this flat modular construction; petal shaping comes from graduated stitch heights and the square is controlled by corner increases.
3D Flower Granny Square Blanket Pattern
Make one complete sample motif before beginning blanket production. Block it, measure it, and record the finished dimensions. Every subsequent square should match that master motif before joining.
Cream Flower Center
Yarn: cream.
Round 1: Make an MR. Ch 1 and work 10 sc into the ring. Join with sl st. (10)
Round 2: Ch 1. Work 2 sc in each stitch around. Join. (20)
Fasten off cream.
The center should remain compact. Do not enlarge it to compensate for oversized petals because that changes the proportions of every motif.
Red Petal Foundation
Yarn: deep red.
Join red to the back of the cream center.
Create five evenly distributed petal spaces around the center.
Foundation Round: *Ch 4, skip the corresponding section of the center, sl st into the next anchor point; repeat until five chain loops are formed.
Check the loops before beginning the petals. Each should be approximately the same size.
Raised Red Petal 1
Work into the first ch-4 loop:
(sc, hdc, 3 dc, 2 tr, 3 dc, hdc, sc).
Sl st into the anchor between the first and second loops.
The tall treble stitches establish the rounded outer end while the shorter stitches taper the petal toward its base.
Raised Red Petal 2
Repeat (sc, hdc, 3 dc, 2 tr, 3 dc, hdc, sc) in the second loop.
Sl st at the next anchor.
Raised Red Petal 3
Repeat the same petal sequence in the third loop.
Keep the working tension equal to the first two petals. A tighter third petal will sit closer to the center and make the flower look asymmetrical.
Raised Red Petal 4
Repeat the established sequence in the fourth loop.
Sl st at the next anchor.
Raised Red Petal 5
Repeat the petal sequence in the final loop.
Join with sl st behind the first petal and fasten off.
Spread the five petals with the fingers. Their outside edges may overlap slightly, but none should extend into the future square corners.
Petal Edge Definition
If a stronger raised edge is wanted, join red at the base of one petal.
Work loose surface slip stitches around the outer petal edge.
Continue around each petal separately rather than joining all five into one continuous outer circle.
Fasten off behind the flower.
Skip this step if the petals become stiff or begin curling toward the center.
Cream Square Foundation
Yarn: cream.
Turn the flower so its reverse side is visible.
Join cream to an unused loop or structural space behind the petals.
Square Round 1: Ch 3. Work dc groups around the flower, distributing the stitches evenly.
Establish four corner positions at equal intervals.
In each corner work:
(2 dc, ch 2, 2 dc).
Join with sl st.
The flower should remain centered after the four corners are established.
Openwork Background Round
Square Round 2: Ch 3.
Work dc across the first side, inserting ch-1 spaces at regular intervals.
At the corner ch-2 space work:
(2 dc, ch 2, 2 dc).
Repeat around all four sides.
Join with sl st.
The chain spaces reproduce the airy cream background visible around the red flower.
Square Expansion Round
Square Round 3: Ch 3.
Work one dc in each dc and one dc into each previous ch-1 space.
At every corner work:
(2 dc, ch 2, 2 dc).
Join with sl st.
Measure the square from edge to edge. All four sides should match before the final round.
Final Cream Square Round
Square Round 4: Ch 1.
Sc evenly across each side.
In each corner ch-2 space work:
(sc, ch 2, sc).
Join with sl st and fasten off.
Use this round to establish a stable joining edge. Do not tighten it enough to pull the corners inward.
Making a Master Square
Wet-block the first motif before producing dozens of squares.
Pin all four corners to right angles and measure the finished width.
Check the two diagonals as well. A square with equal sides can still be skewed if one diagonal is substantially longer than the other.
Record the hook size, yarn, finished width, number of rounds, and weight of the blocked motif.
This becomes the master specification for the complete blanket.
Planning the Blanket
The photographed bedspread uses a regular grid rather than offset motifs. Every red flower therefore aligns horizontally and vertically with neighboring flowers.
Determine the required blanket width first.
If one blocked motif measures 14 cm and the target width is 196 cm, approximately 14 square positions are required before accounting for the joining method and border.
Next calculate the length using the same blocked measurement.
Make a short strip of three joined motifs and measure it. This test reveals how much width the joining seam adds or removes.
Joining the Granny Squares
Block every motif before assembly.
Arrange the squares with all flowers facing the same direction.
Place two motifs with their edges aligned.
Using cream yarn, join corresponding edge stitches with slip stitch, single crochet, or mattress stitch.
The reference has narrow cream divisions between flowers, so avoid a bulky contrasting seam.
Join motifs into horizontal strips first.
Once all strips are complete, join the strips vertically.
At every four-square intersection, check that the corner chain spaces meet without forming a thick knot.
Maintaining the Open Corner Detail
The small diamond openings between squares are part of the visual structure.
Do not close every corner space while joining.
Instead, anchor the surrounding stitches and leave the central chain-space intersection open.
Check each four-square junction from the right side before continuing.
If the opening is substantially larger than neighboring intersections, add one concealed joining stitch behind it rather than filling the hole with a dense cluster.
Cream Lace Border
Join cream yarn to one blanket corner.
Border Round 1: Sc evenly around the complete blanket. Place 3 sc at each corner.
Border Round 2: Ch 4, skip 2 stitches, sc in the next stitch. Repeat to form chain arches around the perimeter.
Adjust the final repeat on each side so the corners remain symmetrical.
Border Round 3: Into each chain arch work (sc, hdc, 3 dc, hdc, sc).
At each blanket corner, work an enlarged shell with enough stitches to turn the corner without cupping.
Border Round 4: Work a narrow sc or picot finish around the shells.
Fasten off and weave the tail into the cream border.
Red Tassels
Cut a cardboard template to the required tassel length.
Wrap red yarn around the template approximately 25–35 times.
Tie the top securely before cutting the lower loops.
Wrap a separate strand around the tassel neck approximately 1–1.5 cm below the attachment point.
Trim the lower edge evenly.
Make enough red tassels for alternating positions along the lower and side borders.
Cream Tassels
Repeat the same process with cream yarn.
Use the same cardboard template and number of wraps so the cream tassels match the red ones in length and fullness.
The photograph alternates red and cream tassels. Lay the entire sequence beside the blanket before attaching any of them.
Attaching the Tassels
Mark evenly spaced attachment points along the selected border edges.
Attach one red tassel, then one cream tassel, continuing the sequence.
Keep each attachment inside a stable border stitch rather than a delicate chain arch.
After every five or six tassels, hang the blanket edge vertically and compare their lengths.
Trim only after all tassels have been attached.
Matching Flower Pillow Sham
The reference includes a rectangular pillow sham built from the same red flower squares.
Make enough motifs to cover the pillow front. A layout such as four squares across by two squares high can be adapted to the dimensions of the insert.
Join the motifs using the same cream seam as the blanket.
Add a narrow cream border around the assembled front.
For the back, crochet two plain cream rectangles or use two overlapping crochet panels to create an envelope opening.
Join the front and back around the perimeter.
Add red and cream tassels only if their position will not interfere with sleeping or removing the pillow insert.
Assembly
- Make one complete red-and-cream flower square and block it to establish the master dimensions.
- Produce the remaining motifs, checking every fifth square against the master sample.
- Block all squares to identical measurements and square each corner to approximately 90 degrees.
- Arrange the motifs in a regular grid with every raised red flower facing the same direction.
- Join individual squares into horizontal strips using cream yarn.
- Join the completed strips while preserving the small open spaces at four-square intersections.
- Work the cream foundation border around the complete assembled blanket.
- Add the decorative lace rounds without covering the outer flower squares.
- Attach alternating red and cream tassels at evenly measured border positions.
- Make the matching pillow front from identical motifs, then weave in all remaining tails and complete a final light blocking.
The completed blanket should have a regular cream grid, centered red flowers, consistent open corner spaces, a flat lace perimeter, and evenly spaced two-color tassels.
7 Technical Tips
- Measure every fifth square against the master motif. A 5 mm difference multiplied across twelve motifs changes the blanket width by approximately 6 cm.
- Keep all five petal loops equal before filling them. One chain loop worked a stitch shorter produces a visibly smaller petal that blocking will not correct.
- Keep raised petals inside the square boundary. A petal extending more than several millimeters over the joining edge becomes trapped beneath the neighboring seam.
- Check both diagonals while blocking. A difference greater than roughly 5 mm on a 14 cm motif indicates that the square is skewed even when all four sides measure correctly.
- Do not pull the joining yarn tighter than the square edges. A contracted seam causes the finished bedspread to form channels between rows of flowers.
- Attach tassels to solid border stitches rather than chain arches. The weight of a tassel can stretch an open arch and create uneven scallops along the blanket edge.
- Weave yarn tails through at least 4–5 cm of dense cream stitches. Avoid hiding red ends in open background spaces because the contrasting yarn remains visible from the front.
Calculating the Number of Granny Squares
Start with the blocked measurement of one motif. Do not calculate from the unblocked square because the dimensions can change after washing and pinning.
Suppose one square finishes at 14 cm. Ten motifs across provide approximately 140 cm before considering seams and border width. Fourteen motifs provide approximately 196 cm.
Measure the intended bed from the left drop to the right drop rather than measuring only the mattress surface. Repeat from the head position to the desired lower edge.
Divide each target dimension by the effective joined-square measurement and round to a whole motif count.
Join three test squares before finalizing the calculation because different seam methods change the effective width.
Estimating Yarn for the Blanket
Large modular blankets are best estimated by weighing finished samples.
Make five complete squares. Weigh them together after all tails are trimmed, then divide by five to determine the average yarn weight per motif.
Multiply that figure by the total planned square count.
Because the design uses considerably more cream than red, weigh the colors separately while making the sample motifs if an accurate purchasing estimate is required.
Add cream yarn for all seams and the wide lace border. Calculate tassel yarn separately because dozens of dense tassels can consume a substantial additional quantity.
Reserve extra yarn from the same dye lots for repairs and replacement tassels.
Keeping the Raised Flowers Consistent
Petal consistency begins with the foundation loops. Count them before working any tall stitches.
Use the same hook and working tension for every red flower. Changing to a smaller hook only for the petals can make them too rigid and expose more of the cream background.
After completing a flower, place it over the master motif and compare petal diameter.
Do not flatten the red petals during blocking. Pin the cream square around them and arrange the petals by hand while the motif dries.
When stacking completed squares, alternate their orientation or place tissue between layers so the flowers are not permanently compressed.
Blocking the Finished Squares
Dampen each square according to the yarn’s care instructions.
Pin the four corners first.
Measure all four sides, then measure both diagonals.
Add pins along the cream edges only after the geometry is correct.
Keep pins away from the raised red petals. The objective is to square the cream framework while preserving the dimensional flower.
Allow every motif to dry completely before joining.
After the full blanket is assembled, a second light blocking can correct minor seam variation without flattening the flowers.
Choosing Colors for the Flower Blanket
Red and cream create the strong two-color repeat shown in the photograph, but the construction can be adapted without changing the motif.
Burgundy petals with natural cotton produce a darker version. Dusty rose with ivory reduces contrast, while green petals with cream create a botanical alternative.
For a multicolor blanket, keep the cream square background constant and change only the flower color. That preserves the grid even when several petal colors are introduced.
When making the matching pillow, repeat colors already present in the blanket rather than adding a separate palette.
Conclusion
The master square determines the accuracy of this 3D flower granny square blanket pattern. Make and block one motif first, record its dimensions, and use it to check every batch before assembly. Keep the five red petals clear of the joining edge, preserve the small openings where four cream corners meet, and attach tassels only to stable border stitches. Once the blanket and matching pillow sham are complete, photograph the repeated flower grid for Pinterest or Instagram with #RedFlowerGrannyBlanket. For this specific red-and-cream version, would you keep the five-petal flowers throughout or alternate them with plain cream squares?









