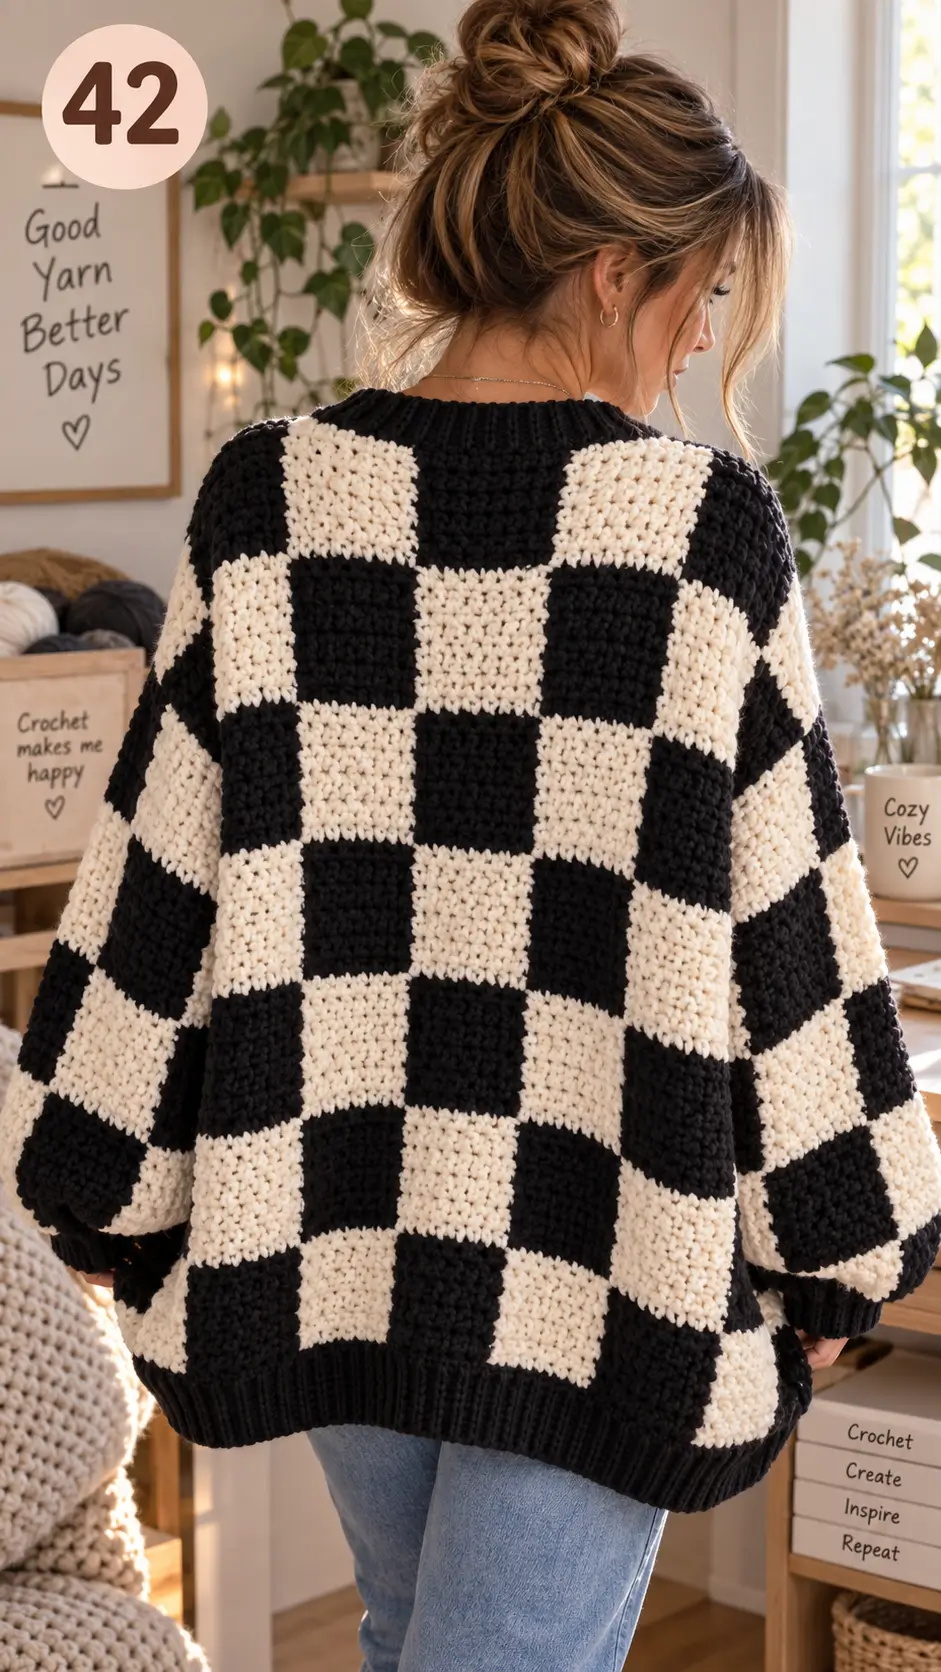
A checkerboard cardigan fails visually as soon as one square becomes a rectangle beside its neighbors. This checkerboard crochet cardigan pattern controls that problem with measured blocks, mirrored color placement, and black ribbing. Use worsted yarn with a 4–4.5 mm hook and size the panels from an 8 × 7 cm reference block. The construction suits intermediate crocheters and makes an oversized layering garment whose dimensions can be adjusted before assembly.
The Design: What Makes This Checkerboard Cardigan Different
The pictured cardigan depends on three structural choices. First, large cream and black blocks create the graphic pattern without carrying yarn through every stitch. Second, a dropped shoulder transfers most shaping from the armhole into the sleeve, which keeps the back nearly rectangular. Third, narrow black ribbing frames the high-contrast body and controls the oversized fabric at the wrists and lower edge.
A checkered crochet cardigan can look skewed when the maker counts stitches but ignores finished block dimensions. Row gauge matters just as much as stitch gauge here. The oversized crochet cardigan silhouette also needs controlled sleeve narrowing; otherwise the cuff inherits the full upper-arm width. Checkerboard cardigans can be constructed from joined blocks or worked as continuous panels with planned color changes.
Project Info at a Glance
| Skill Level | Time | Finished Size | Hook | Best For |
|---|---|---|---|---|
| Intermediate | Multi-session garment project | Reference S/M circumference: 108 cm | 4–4.5 mm | Oversized layering and color-block practice |
The 108 cm measurement is a published comparable crochet-cardigan measurement rather than a measurement extracted from the reference photograph. Adjust the finished dimensions according to your gauge and required fit.
Materials and Tools
Yarn
The reference photograph shows worsted-weight black and cream yarn. Because an oversized cardigan consumes considerably more material than a fitted garment, purchase enough yarn from one dye lot and keep unused skeins until assembly is complete.
- Black — worsted-weight yarn — quantity determined by size and gauge — smooth acrylic, wool/acrylic, or cotton-blend yarn.
- Cream / warm ivory — worsted-weight yarn — approximately the same checker-fabric quantity as black, excluding black ribbing — use the same yarn line and fiber content as the black yarn.
A small checkerboard cardigan may use around 500 g of yarn, but an oversized version can require substantially more. Calculate the final requirement from your gauge blocks instead of treating 500 g as a fixed quantity.
Tools
- 4.5 mm crochet hook for the main checker fabric
- 4 mm crochet hook for firmer ribbing if required
- Tapestry needle
- Locking stitch markers
- Scissors
- Flexible measuring tape
- Blocking mats and pins
- Optional buttons for a button-front variation
Abbreviations
- ch — chain
- sc — single crochet
- hdc — half double crochet
- sl st — slip stitch
- BLO — back loop only
- st(s) — stitch(es)
- RS — right side
- WS — wrong side
- rep — repeat
Unlike amigurumi, this garment does not require an invisible decrease; sleeve shaping is cleaner when decreases are positioned symmetrically at the row edges.
Gauge and Checker Block
A useful construction benchmark is a checker block measuring approximately 8 cm wide × 7 cm tall. Crochet a test block before beginning any cardigan panel.
Test Block
Yarn: black or cream worsted weight.
Foundation: Ch 17, or chain enough stitches to measure approximately 8 cm without stretching.
Row 1: Hdc in second ch from hook and in each ch across.
Row 2: Ch 1, turn. Hdc across.
Repeat Row 2 until the piece measures approximately 7 cm high.
Fasten off.
Your exact stitch number may differ because yarn fiber, hook size, and individual tension affect gauge. The finished measurement controls the pattern. Do not proceed by stitch count alone.
Checkerboard Crochet Cardigan Pattern — Step by Step
Checker Square
Yarn: black or cream.
Using the test-block instructions, make blocks that all finish at the same dimensions. A joined-square construction closely matches the assembly method shown in the reference.
Block every square to its target dimensions before joining. Alternate black and cream so every horizontal and vertical neighboring block uses the opposite color.
Fasten off with a 20 cm joining tail whenever the tail will be used for seaming.
Back Panel
Yarn: alternating black and cream.
Use a starting layout of 7 blocks wide. Adjust the number of vertical rows according to the required shoulder-to-hem measurement. The photographed cardigan has an elongated oversized body, so additional checker rows may be required.
Row A: Cream – Black – Cream – Black – Cream – Black – Cream
Row B: Black – Cream – Black – Cream – Black – Cream – Black
Repeat Rows A and B alternately until the required body length is reached.
Before joining, arrange the complete panel on a flat surface. For a wider oversized garment, add columns in pairs where practical so the centerline and checker sequence remain balanced.
Join the squares using whip stitch, mattress seam, or slip-stitch seaming. Use the same method throughout the garment because changing seam techniques can alter the dimensions between sections.
Left Front Panel
Yarn: alternating black and cream.
Begin with approximately 3 columns of checker blocks for a medium reference construction. Build the panel to exactly the same vertical block count as the back.
Start with the color required to continue the checker sequence around the side seam. For a cardigan that closes at center front, the combined width of both fronts plus the edging should correspond closely to the back-panel width.
For a more open-front fit, reduce width at the inner front edge rather than at the side seam.
Join all blocks and fasten off.
Right Front Panel
Yarn: alternating black and cream.
Mirror the left front instead of producing an identical copy. This prevents matching colors from accidentally meeting at the center opening.
Place both front panels beside each other before sewing the shoulders. Confirm that the checker sequence remains alternating across the imaginary center line.
Join the blocks and fasten off.
Shoulder Seams
Place each front panel against the back with right sides together.
Pin the outer shoulder sections first. Leave the central portion of the back open for the neckline.
Seam both shoulders using the same joining method used between the checker blocks. Match corresponding block edges instead of stretching one panel until it reaches the other.
Turn the cardigan right side out and check that the neckline sits centrally between the shoulders.
Side Seams
Place stitch markers at equal depths below each shoulder. An armhole opening of approximately 18 cm can be used as a starting reference for a medium garment, but the final depth must correspond to the wearer and sleeve circumference.
Sew from the lower body upward to the first armhole marker.
Repeat on the opposite side.
Measure both finished armholes before constructing the sleeves. Their circumferences should match.
Sleeves — Make 2
Yarn: alternating black and cream with black cuffs.
The reference cardigan uses wide dropped sleeves that narrow sharply into dark ribbed cuffs. A 5 × 5 checker-block layout can serve as an initial sleeve reference, although the exact number of blocks must follow the armhole circumference and required sleeve length.
Arrange alternating blocks into a sleeve panel. At the upper edge, the finished panel must fit around the armhole without aggressive stretching.
Toward the wrist, reduce the width gradually by modifying the final checker sections or by distributing the extra fabric evenly when attaching the cuff.
Keep the upper sleeve generous to reproduce the oversized silhouette. The wrist edge should be narrower so the black ribbing can control the sleeve volume.
Join the long sleeve seam.
Fasten off, leaving enough yarn for attachment.
Sleeve Cuffs — Make 2
Yarn: black.
Row 1: Ch 9. Sc in second ch from hook and across (8).
Row 2: Ch 1, turn. Sc BLO across (8).
Repeat Row 2 until the ribbing fits comfortably around the wrist.
Join the short ends to form a ring.
Attach the cuff evenly around the sleeve opening. When the checker sleeve is wider than the cuff, distribute the excess fabric at regular intervals rather than concentrating all gathers at one point.
Fasten off.
Lower Hem Ribbing
Yarn: black.
Row 1: Ch 11. Sc in second ch from hook and across (10).
Row 2: Ch 1, turn. Sc BLO across (10).
Repeat Row 2 until the ribbing spans the entire lower edge of the cardigan.
The reference design has a substantial black lower band. Keep the ribbing firm enough to stabilize the checker fabric but not so short that it pulls the bottom edge inward or creates visible puckering.
Pin the ribbing around the lower edge before sewing. Join it using evenly distributed stitches.
Fasten off.
Front and Neck Ribbing
Yarn: black.
The black edging should run continuously from one lower front edge, around the neckline, and down the opposite front.
Row 1: Ch 7. Sc in second ch from hook and across (6).
Row 2: Ch 1, turn. Sc BLO across (6).
Repeat Row 2 until the band measures from the lower right front, around the complete neckline, to the lower left front.
Pin the band before sewing. Pay particular attention to the back neckline. Too little ribbing length at this point pulls the shoulders inward; too much creates a rippled neckline.
Sew the band evenly along the opening.
Fasten off.
Optional Buttonholes
The rear reference does not establish whether the original cardigan has functional buttons, so buttonholes should be treated as an optional modification.
For a buttoned version, mark the button positions on one front band before completing the opposite band. Space the openings evenly and make each buttonhole only slightly larger than the selected button diameter.
For the open-front version, omit the buttonholes.
Assembly
- Block all black and cream checker pieces to identical target dimensions before seaming.
- Arrange and join the back panel, checking the alternating color sequence after every block row.
- Build the left and right front panels as mirror images and compare their finished lengths.
- Join the shoulder seams while leaving the center section open for the neckline.
- Pin the side seams and mark identical armhole depths on both sides before sewing.
- Assemble each sleeve, close its underarm seam, and compare both finished sleeve dimensions.
- Sew the sleeves into the armholes with each sleeve seam aligned to its corresponding cardigan side seam.
- Attach the black cuffs and lower hem ribbing, distributing excess checker fabric evenly.
- Add the continuous black front-and-neck band, then add optional buttonholes and buttons after checking the finished front overlap.
- Weave every yarn tail through several stitches on the wrong side, block the assembled cardigan to its final measurements, and allow it to dry flat.
The completed garment should have square checks, mirrored front panels, equal sleeves, level ribbing, and a centered neckline.
7 Technical Tips for a Cleaner Checkerboard Cardigan
- Mark every block row. A missed row can shift one checker boundary enough to produce rectangles rather than squares. Place a marker at each block corner until the panel has been measured.
- Measure the 8 × 7 cm reference block instead of trusting the starting chain. Different worsted yarns can produce different dimensions from the same stitch count. A 5 mm width error repeated across seven blocks creates a 3.5 cm panel error.
- Control seam bulk. Weaving several yarn tails into the same joining seam can create a hard ridge inside the cardigan. Direct neighboring tails in opposite directions.
- Check color placement before joining. Two matching colors touching at a seam immediately interrupt the checkerboard. Photograph the complete loose layout before joining one horizontal row at a time.
- Pin each sleeve at four reference points. Match the shoulder center, underarm seam, and two quarter points before filling the remaining gaps. Stretching only one section can rotate the checker pattern toward the back.
- Size cuff ribbing against the wrist. Excessive negative ease makes the cuff too tight and forces the sleeve fabric into a dense ring of gathers. Test the joined ribbing around the wrist before attaching it.
- Secure yarn tails through matching-color fabric. Short tails can escape at high-stress shoulder and underarm seams. Avoid carrying a cream tail through visible black stitches or a black tail through cream fabric.
Sizing the Cardigan From Your Own Measurements
A made-to-measure calculation is more reliable than assigning a fixed XS, S, M, L, or XL label to a cardigan reconstructed from a photograph.
Measure the wearer’s bust circumference and add the required positive ease. The reference silhouette is deliberately oversized, so the target garment circumference should be larger than the actual body measurement.
Divide the target garment circumference by two to obtain an approximate back-panel width.
Next, divide the required back width by the measured width of one finished checker block. Round the result to a practical whole number of blocks.
For example, if one blocked square measures 8 cm and the required back width is approximately 56 cm:
56 ÷ 8 = 7 blocks
That calculation is more dependable than copying another crocheter’s foundation-chain count because it incorporates your actual yarn, hook, and tension.
Use the same calculation for garment length. Divide the required shoulder-to-ribbing measurement by the actual height of one checker block. Add or remove complete checker rows where possible because partial blocks change the visual rhythm of the design.
How to Keep the Checkerboard Square
Checkerboard garments expose gauge errors more visibly than solid-color fabric because every black block is compared directly with a neighboring cream block.
Make at least two test blocks: one black and one cream. Even different colors from the same yarn line can behave slightly differently after washing and blocking.
If a block is too narrow, changing hook size may correct the width, but measure the height again after making that adjustment. If a block is too tall, reducing the number of rows is generally cleaner than stretching the width aggressively during blocking.
The target is repeatable geometry. Once the correct combination of stitch count and row count produces the required block dimensions, record those numbers and use them consistently throughout the garment.
Joined Squares vs. Continuous Checkerboard Panels
There are two practical methods for constructing a checkerboard crochet cardigan pattern: individually joined blocks or continuous color-change panels.
Joined squares closely match the process shown in the reference images. They allow individual blocking, easy rearrangement, and replacement of an incorrectly sized or incorrectly colored square. The tradeoff is finishing time because the garment contains more seams and yarn tails.
Continuous panels reduce finishing work. The crocheter changes between black and cream at predetermined stitch boundaries, then reverses the color sequence for the next checker row. This produces fewer separate pieces but makes tension differences at color changes more visible.
For a first version of this design, separate blocks provide greater control over the finished geometry. Once the correct gauge and dimensions are established, continuous panels can reduce construction time on subsequent versions.
Color Changes and Yarn Management
Black and cream create strong visual contrast, so loose yarn tails and irregular joins are particularly visible. Complete the final stitch of every block cleanly and maintain the same seam tension throughout the garment.
When changing color inside a continuous panel, complete the final yarn-over of the preceding stitch with the new color. This produces a cleaner boundary between checker sections.
Avoid pulling inactive yarn tightly across the wrong side of a wide block. Long floats can restrict the fabric and may snag during wear. For large checker sections, separate yarn sources or individually crocheted blocks are generally easier to control.
Conclusion
The finished checkerboard crochet cardigan pattern depends on measurable geometry rather than a fixed clothing label: establish the block size, calculate the required panel width, mirror the fronts, and fit the sleeves only after assembling the body. The next practical step is to crochet one black and one cream gauge block and record both dimensions before making a complete panel. Save the finished cardigan to Pinterest and share your version on Instagram with #BlackCreamCheckerCardigan. After blocking, check one detail before calling the project complete: do the cream and black sections remain square when the cardigan hangs under its own weight?









