Introduction
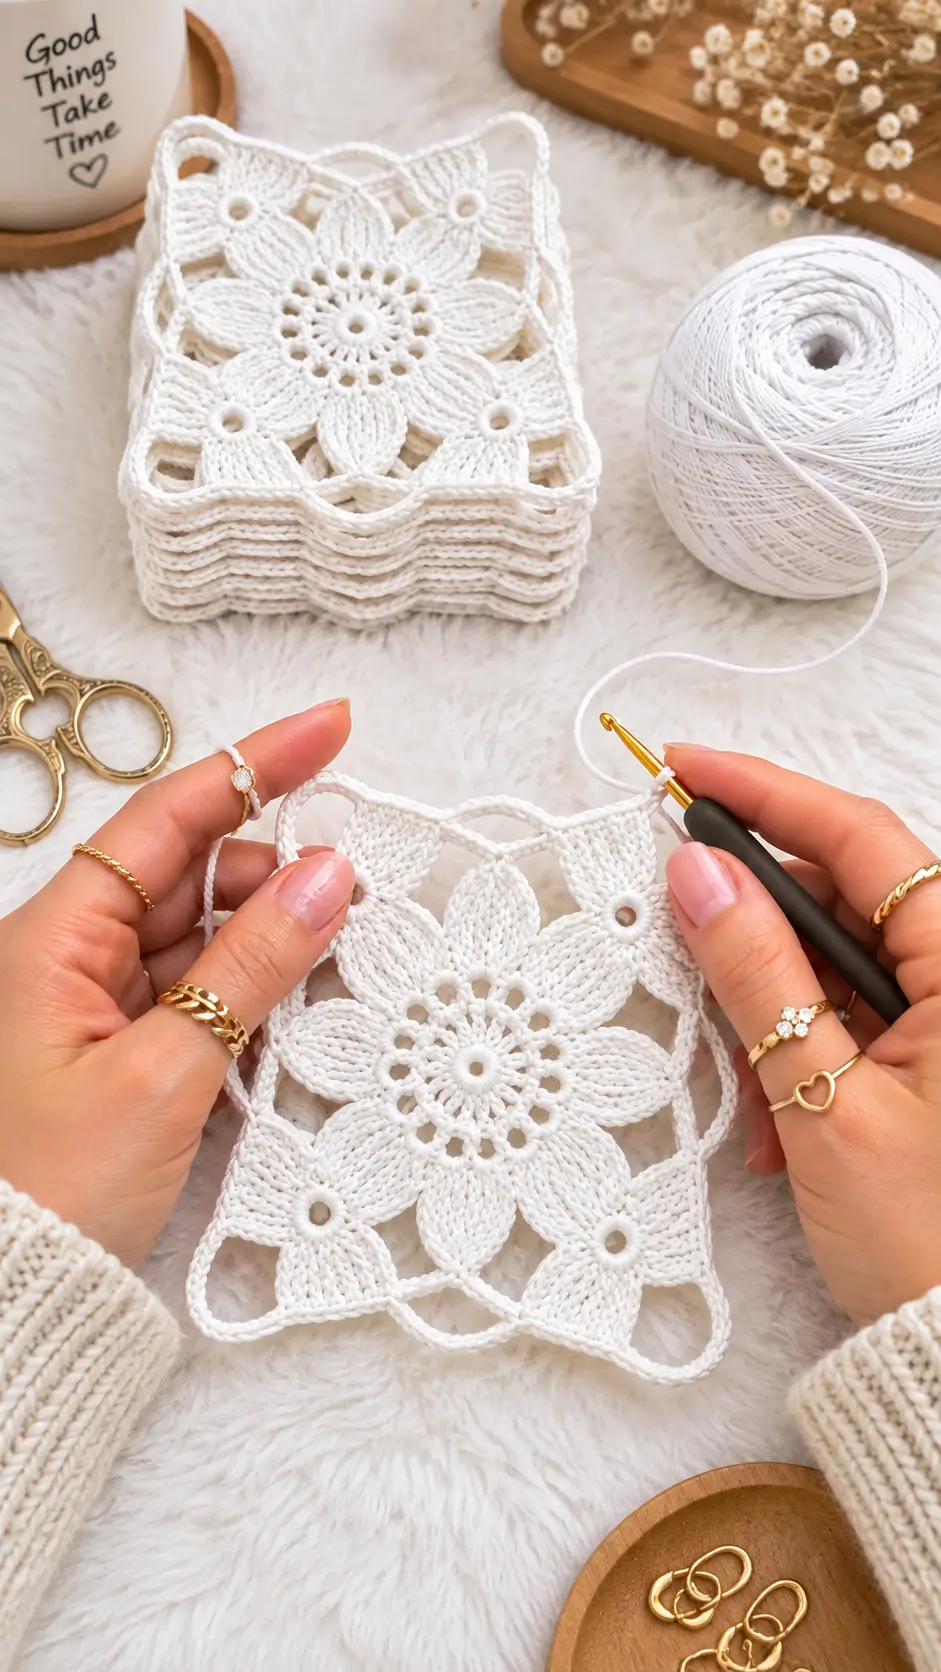
Eight long petals occupy the center while four smaller flowers hold the corners apart. This crochet flower square pattern recreates that specific geometry with sport-weight cotton, a 3 mm hook and an approximately 13 cm finished size. The project suits an intermediate crocheter who can work chains, double crochet and joined rounds. Make several identical squares when you need a modular panel for a table runner, bag or cushion.
The Design: What Makes This Flower Square Different
The central flower uses eight elongated petals rather than the compact clusters found in a conventional flower granny square pattern. That choice keeps the flower dominant while preserving the open areas visible between its petals and the outer frame. Four smaller corner flowers then distribute visual weight at the square’s corners instead of filling those spaces with dense granny clusters.
The outer chain framework has another job: it controls the square dimensions without covering the floral structure. A white crochet flower square made this way depends more on negative space than color changes. The crochet floral square motif therefore needs consistent chain tension.
One common mistake is pulling the perimeter chains tighter than the petal stitches. The center then stays flat while all four corners curl inward. Blocking can correct a minor difference, but it cannot fully correct a severely undersized perimeter.
Project Info at a Glance
| Skill Level | Time | Finished Size | Hook | Best For |
|---|---|---|---|---|
| Intermediate | 60–90 minutes | Approx. 13 × 13 cm | 3 mm | Table runners, bags, cushions, joined panels |
The size, yarn class and hook pairing are based on a published 13 cm sport-weight cotton flower-square reference.
Materials and Tools
Yarn
- White or soft ivory — sport / size 2 cotton — approximately 10–15 g per square — suggested type: mercerized cotton with firm twist.
- Accent yarn — none — 0 g. The photographed construction is monochrome.
A smooth cotton is preferable here because the design depends on narrow petals and clearly separated open spaces. Changing the yarn thickness will also change the final dimensions of the square.
Tools
- 3 mm crochet hook
- Tapestry needle
- Small sharp scissors
- 4 locking stitch markers
- Blocking pins
- Blocking mat
- Tape measure
No stuffing or safety eyes are required because this is a flat crochet motif rather than amigurumi.
Abbreviations
- MR — magic ring
- sc — single crochet
- hdc — half double crochet
- dc — double crochet
- tr — treble crochet
- sl st — slip stitch
- ch — chain
- sp — space
- st/sts — stitch/stitches
- rep — repeat
Invisible decrease is an amigurumi shaping technique and is not required for this flat lace construction.
Pattern — Step by Step
Work joined rounds unless a section specifically says otherwise. This is an original photo-inspired construction based on the geometry of the flower square shown in the reference image.
Central Flower Center
Yarn: white sport cotton.
R1: Make MR, ch 1, work 16 sc into MR. Join with sl st to first sc. (16 sc)
Pull the ring closed firmly but do not distort the stitches.
R2: Ch 1, sc in same st, ch 2, skip next st; *sc in next st, ch 2, skip next st* around. Join with sl st. (8 sc, 8 ch-2 sp)
The eight chain spaces establish one anchor for each petal.
Central Petals — Make 8
Yarn: white.
Work each petal into one R2 ch-2 space:
Sl st into ch-2 sp, ch 2, 2 dc, 3 tr, 2 dc, ch 2, sl st into the same ch-2 sp.
Repeat once in each remaining space. (8 petals)
The treble stitches form the longest section of each petal. If the petals cup strongly instead of lying approximately flat, the center is too tight or the treble tension is too loose.
Do not cut the yarn.
Lace Ring Behind the Petals
Yarn: white.
R3: Working behind the petals, *sc around the R2 sc between two petals, ch 5* eight times. Join with sl st to first sc. (8 sc, 8 ch-5 sp)
R4: Sl st into first ch-5 sp. Ch 3, 4 dc in same sp; ch 3. *5 dc in next ch-5 sp, ch 3* around. Join. (40 dc, 8 ch-3 sp)
This backing round creates attachment points without filling the open areas between petals.
Square Transition
Yarn: white.
R5: Sl st to the middle dc of the first 5-dc group. Ch 1, sc in same st, ch 5, sc in next ch-3 sp, ch 5, sc in middle dc of next group. Continue around. Join. (16 ch-5 spaces)
Place a marker at every fourth major division. Those four markers identify the eventual corners.
R6: Work *3 sc in next ch-5 sp, ch 5* around, replacing each marked corner chain with ch 8. Join with sl st. (12 ch-5 side spaces, 4 ch-8 corner spaces)
The longer corner chains convert the circular flower backing into a square framework.
Corner Flowers — Make 4
Yarn: white.
Each corner flower is worked into one R6 ch-8 corner space.
Petal 1: Sl st into corner space, ch 2, 2 dc, ch 2, sl st into same space.
Petal 2: Ch 2, 2 dc, ch 2, sl st into same space.
Petal 3: Ch 2, 2 dc, ch 2, sl st into same space.
Petal 4: Ch 2, 2 dc, ch 2, sl st into same space.
(4 small petals per corner flower)
The corner flowers should remain shallower than the central petals. That keeps the eight-petal center as the dominant feature while retaining the floral detail visible at each corner.
Side Lace — Make 4 Sides
Yarn: white.
Join yarn immediately after a corner flower.
Side sequence: ch 7, sc in first side ch-5 space; ch 5, sc in second side ch-5 space; ch 5, sc in third side ch-5 space; ch 7, sl st at base of next corner flower.
Repeat on all four sides.
The ch-7 sections provide extra reach near the corners, where the perimeter has farther to travel.
Outer Square Frame
Yarn: white.
R7: Join yarn at the top of any corner flower. Ch 1, sc in same point.
Across each side, work:
Ch 5, sc into next available side-loop anchor until reaching the next corner.
At each corner work sc, ch 5, sc into the corner’s uppermost anchoring space.
Repeat around and join with sl st. The frame should lie flat before the final edging is added.
R8: Sl st into first ch-5 sp. Work 5 sc in each ordinary ch-5 space. In every corner ch-5 space work 3 sc, ch 2, 3 sc. Join with sl st.
This round stabilizes the chains and creates a more defined outline similar to the corded border visible in the reference square.
Final Chain Edging
Yarn: white.
R9: Ch 1, sc in each sc around. At each corner ch-2 space work sc, ch 3, sc.
Join with sl st to first sc.
Fasten off. Leave a 12 cm tail for weaving.
The final perimeter should form four distinct sides without forcing the center flower to stretch.
Optional Second Outline
The stacked motifs in the reference image show a substantial perimeter. For a firmer result, add one additional round.
Join in any corner ch-3 space. Ch 1, sc around, working sc, ch 2, sc in each corner.
Fasten off and weave in the tail.
This extra round is useful when the squares will be joined into a bag or cushion because the seam can pass through perimeter stitches instead of decorative chains.
Assembly and Finishing
- Lay the completed motif face up and identify all four corner flowers.
- Pull the center MR tail closed and weave it through at least three directional changes on the reverse.
- Arrange the eight large petals so each occupies one equal segment of the center.
- Position the four corner flowers on the square’s diagonal axes.
- Check that opposite side measurements differ by no more than approximately 5 mm before blocking.
- Weave the remaining yarn tails through dense stitches rather than exposed chain loops.
- Wet-block or damp-block the square to approximately 13 × 13 cm.
- Pin the four corners first, then place pins at the midpoint of every side.
- Allow the square to dry completely before removing the pins or stacking motifs.
- For a multi-square project, block every motif to the same dimensions before joining.
The completed unit is one eight-petal floral lace square with four corner flower details and a stable joining perimeter.
7 Technical Tips
- Mark all four corners before squaring the motif. Moving one corner anchor by a single repeat produces a rhombus-like square and changes the number of spaces along opposite sides.
- Measure chain tension after the first side. If a ch-5 loop measures 15 mm on one side and 20 mm on another, the finished perimeter will wave even when the stitch counts match.
- Keep the center MR firm, not compressed. A center tightened until the 16 sc overlap can make the eight petals rise into a cone rather than radiate across one plane.
- Check petal length before completing all eight. The top of each central petal should finish at approximately the same radius from the MR; a difference above about 5 mm becomes obvious in a monochrome flower.
- Pin the square at eight points during blocking. Use four corner pins plus one midpoint pin per side before adding secondary pins; otherwise an apparently square motif can dry with bowed edges.
- Do not weave tails through open chains. A tail carried through a ch-5 loop can remain visible and can pull the lace opening closed when the motif is stretched.
- Match every repeated square to one blocking template. A 12.5 cm motif beside a 13.5 cm motif introduces a full centimeter of discrepancy before the joining seam is worked.
Why Sport Cotton Works for This Motif
The photograph depends on stitch definition. Fine petals sit close together at the center, yet their edges remain readable, and the outer chains form narrow lines rather than thick cords. Sport cotton fits that requirement well.
A comparable published flower square measures approximately 13 × 13 cm when made from sport-weight mercerized cotton with a 3 mm hook. Similar motifs made with the same general yarn category can finish smaller or larger according to tension and construction.
For that reason, treat 13 cm as a target dimension, not an automatic result. Personal tension, yarn twist and cotton thickness can all alter the final size.
How to Keep the Flower Square Flat
A flat crochet lace square is a balance between the dense center and the longer outer circumference. Too few chains around the petals pull the edges inward. Excessive chain length creates ripples.
Test the geometry after the first square-transition round. Place the work on a flat surface without stretching it. The four corner points should naturally begin moving away from the center.
If the piece forms a bowl, add a little chain length to the transition spaces. If the outer framework ruffles, shorten those chains before continuing.
This correction is more effective than trying to fix severe distortion during blocking. Blocking should refine the dimensions and align the petals rather than compensate for a major mismatch in circumference.
Joining Multiple Flower Squares
The reference image shows a stack of completed squares, which makes repetition central to the project. Finish and block the first motif before producing a large batch. Its final measurement becomes the reference template for every remaining square.
For an airy panel, join corresponding outer chain spaces with slip stitches or single crochet. A mattress-style sewn join gives a less visible connection when the perimeter is dense enough to accept a tapestry needle.
Join-as-you-go is another option when you want to connect each new motif while working its final round.
A table runner can use one long column of motifs. A cushion front can be planned as a square grid. Bags need additional reinforcement at load-bearing seams, so the optional second perimeter round is particularly useful for that construction.
Conclusion
Block one completed square before committing the full yarn supply to a batch. That sample establishes the actual petal span, chain tension and finished dimensions produced by your cotton and hook combination. Record its blocked width and use the same measurement for every subsequent motif. This crochet flower square pattern can then be repeated for a runner, cushion panel or lightweight bag without accumulating size differences between units. Save the finished square to Pinterest and share the completed grid on Instagram with #WhiteFlowerLaceSquare. For the next sample, test one construction variable only: would you keep the eight central petals this long, or shorten them to expose more of the lace ring?









