Introduction
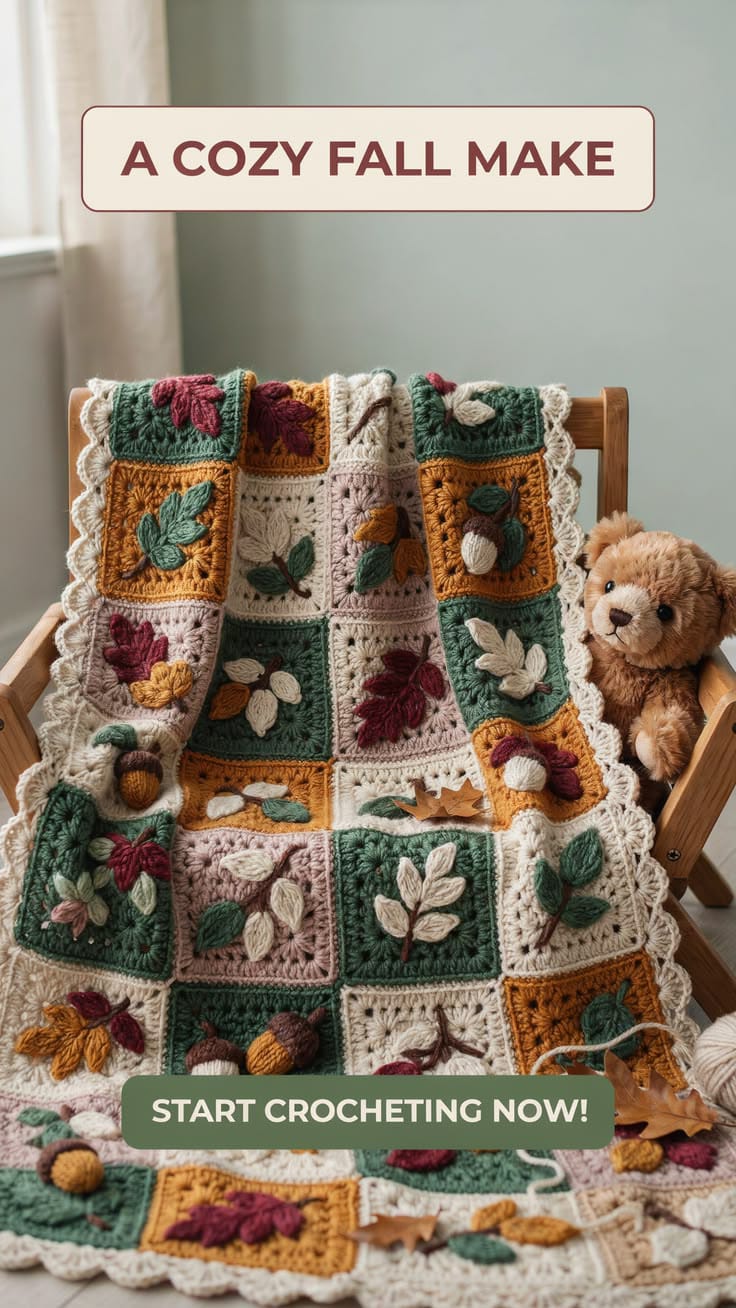
Acorns, oak-like leaves, and scattered seed pods turn these granny squares into a botanical October sampler rather than a standard patchwork throw. This autumn granny square blanket crochet pattern uses worsted-weight yarn, a 5 mm hook, dimensional appliqués, and a cream scalloped border. Make 48 squares for a throw approximately 120 × 160 cm. The modular construction also makes individual squares practical for cushions, table runners, or smaller lap blankets.
The Design: What Makes This Autumn Blanket Different
The blanket combines square construction with raised botanical motifs instead of building every fall detail directly into the background rounds. That distinction matters. Flat granny blocks provide predictable dimensions for joining, while separately crocheted leaves and acorns can cross the surface without changing square geometry. The reference also alternates forest green, mustard, cream, dusty rose, and neutral backgrounds, preventing the fall granny square blanket from becoming one continuous field of orange and brown.
Published autumn blocks provide useful scale references: leaf granny squares are commonly made around 15 cm with DK or Aran yarn, while a 2025 worsted-weight leaf square measures about 20.3 cm with a 5 mm hook. This version targets approximately 18 cm before joining. The main failure point in an autumn crochet blanket is inconsistent square size after appliqués are attached. Complete and block every base square before sewing on raised motifs.
Project Info at a Glance
| Skill Level | Estimated Time | Finished Size | Hook | Best For |
|---|---|---|---|---|
| Intermediate | 30–40 hours | Approx. 120 × 160 cm | 5 mm / 4 mm appliqués | Sofa throws, fall decor, seasonal blankets |
Finished size is based on 48 squares arranged six across by eight down, with each blocked square measuring approximately 18 cm plus joining and border. Published autumn granny blankets vary considerably: examples include 98 × 98 cm throws and larger designs around 130 × 180 cm.
Materials and Tools
Yarn
- Cream / natural — worsted #4 — approximately 550–650 g
- Forest green — worsted #4 — approximately 300–350 g
- Mustard / ochre — worsted #4 — approximately 250–300 g
- Dusty rose / pale taupe — worsted #4 — approximately 200–250 g
- Burgundy — worsted #4 — approximately 100–130 g
- Chestnut brown — worsted #4 — approximately 80–100 g
- Ivory accent — worsted #4 — approximately 80–100 g
Published fall granny blankets show that motif-heavy colorwork consumes substantial amounts of several colors rather than one dominant shade. A nine-square fall blanket, for example, lists separate quantities for cream, brown, gold, green, orange, burgundy, and additional accents. Purchase extra cream if you plan to enlarge the border.
Tools
- 5 mm crochet hook for granny squares
- 4 mm crochet hook for leaves and acorns
- Tapestry needle
- Scissors
- Locking stitch markers
- Blocking mats
- Rust-resistant blocking pins
- Tape measure
Abbreviations
- MR — magic ring
- ch — chain
- sc — single crochet
- hdc — half double crochet
- dc — double crochet
- tr — treble crochet
- inc — two stitches in one stitch
- dec — decrease
- sl st — slip stitch
- sp — space
- st/sts — stitch/stitches
An invisible decrease is worked through the front loops of two consecutive stitches before completing one single crochet; use it on the stuffed acorns so their lower shaping remains smooth.
Blanket Layout
Make 48 squares for the full throw.
Arrange them as 6 columns × 8 rows.
A balanced color distribution is:
- 12 forest-green squares
- 12 cream squares
- 10 mustard squares
- 8 dusty-rose squares
- 6 mixed or contrasting squares
Do not place all identical motifs on the same background color. Rotate burgundy leaves, green leaves, ivory branches, and acorns throughout the layout to reproduce the sampler effect visible in the reference.
Pattern — Step by Step
Basic Solid Granny Square
Yarn: choose cream, green, mustard, or dusty rose.
R1: MR, ch 3, work 2 dc, ch 2, *3 dc, ch 2* three times into ring. Join with sl st. You have four 3-dc groups and four corner spaces.
R2: Sl st to corner. Ch 3, 2 dc, ch 2, 3 dc in same corner. *Ch 1, (3 dc, ch 2, 3 dc) in next corner* three times. Ch 1, join.
R3: Sl st to corner. Ch 3, 2 dc, ch 2, 3 dc in corner. Ch 1, 3 dc in next side space, ch 1. *(3 dc, ch 2, 3 dc) in corner, ch 1, 3 dc in side space, ch 1* around. Join.
R4: Work (3 dc, ch 2, 3 dc) in each corner. Work 3 dc into each ch-1 side space with ch 1 between groups. Join.
R5: Repeat the established granny-square construction, adding one additional 3-dc group to each side.
R6: Ch 1, sc in each dc and each ch-1 space around. Work 3 sc in each corner ch-2 space. Join with sl st.
Fasten off and leave approximately 15 cm for weaving.
Block the square to approximately 18 × 18 cm.
Optional Textured Square Center
Some squares in the reference contain denser centers instead of an entirely traditional granny structure. Use this variation to prevent the blanket from looking mechanically repetitive.
Textured Center Square
R1: MR, ch 3, work 15 dc into ring. Join (16 dc).
R2: Ch 1, sc in same stitch, *ch 3, skip 1 stitch, sc in next stitch* around. Join.
R3: Sl st into first ch-3 space. Ch 3, 3 dc in same space, *ch 1, 4 dc in next ch-3 space* around. Join.
R4: Begin squaring the circle. Work *(3 dc, ch 2, 3 dc) in one space, 3 dc in next space* four times around, distributing the four corners evenly.
R5: Continue as a standard granny square, working corner groups in each ch-2 corner and 3-dc groups across the sides.
R6: Sc evenly around with 3 sc in each corner.
Block to the same dimensions as every other square.
Large Autumn Leaf Appliqué
Make in burgundy, forest green, mustard, or ivory.
Ch 11.
Starting in the second chain from the hook:
Row 1: sl st, sc, hdc, dc, tr, tr, dc, hdc, sc, 3 sc in final chain.
Continue along the opposite side:
sc, hdc, dc, tr, tr, dc, hdc, sc, sl st.
Do not fasten off if adding pointed lobes.
Edging: *sl st in next stitch, ch 3, sl st in second chain, sc in next chain, sl st into next leaf stitch.* Repeat at three or four evenly spaced positions around each side.
Fasten off, leaving approximately 30 cm for sewing.
The completed leaf should measure approximately 8–10 cm long.
Three-Lobed Maple-Style Leaf
The photograph includes broader leaves with several distinct points. Use this version for the burgundy and mustard motifs.
Ch 8.
Starting in the second chain:
sl st, sc, hdc, dc, tr, dc, 5 dc in final chain.
Continue down the opposite side:
dc, tr, dc, hdc, sc, sl st.
Do not fasten off.
Along one side, work:
Ch 4, sl st in second chain, sc, hdc, sl st into leaf edge.
Move approximately two stitches along the edge.
Ch 5, sl st in second chain, sc, hdc, dc, sl st into edge.
Repeat a smaller ch-4 point closer to the leaf base.
Work corresponding points along the opposite side.
Fasten off, leaving a sewing tail.
Small Oval Leaf
Make multiple pieces in green, ivory, burgundy, mustard, and dusty rose.
Ch 7.
Starting in second chain:
sl st, sc, hdc, dc, hdc, 3 sc in final chain.
Continue along opposite side:
hdc, dc, hdc, sc, sl st.
Fasten off, leaving approximately 20 cm.
These small leaves work well in groups of three or five around a central embroidered branch.
Raised Leaf Vein
Join matching or contrasting yarn at the base of a completed leaf.
Surface slip stitch along the foundation chain toward the point.
Fasten off at the tip.
For larger leaves, add one short diagonal surface-stitch branch on either side of the central vein.
Raised veins are particularly useful on green-on-green motifs because they create separation without introducing another color.
Small Acorn — Make as Required
Yarn: mustard, ivory, or brown for nut; dark brown or burgundy for cap.
Acorn Nut
R1: 6 sc in MR (6)
R2: inc ×6 (12)
R3: (1 sc, inc) ×6 (18)
R4: sc around (18)
R5: sc around (18)
R6: (1 sc, dec) ×6 (12)
Add a very small amount of stuffing.
R7: dec ×6 (6)
Fasten off and close.
Acorn Cap
R1: 6 sc in MR (6)
R2: inc ×6 (12)
R3: (1 sc, inc) ×6 (18)
R4: BLO sc around (18)
Fasten off, leaving a 25 cm sewing tail.
Place the cap over the wider end of the nut and sew around R4.
For the stem, join brown yarn to the cap and ch 4. Sl st back through the chain and fasten off.
Flat Acorn Appliqué
Use flat acorns on squares where a fully stuffed motif would create excessive thickness.
Ch 5.
Row 1: sc in second chain and across (4)
Row 2: ch 1, turn, inc, 2 sc, inc (6)
Row 3: ch 1, turn, sc across (6)
Row 4: ch 1, turn, dec, 2 sc, dec (4)
Row 5: ch 1, turn, dec ×2 (2)
Fasten off.
For the cap, join brown yarn across the four-stitch top edge.
Cap Row: ch 1, work 6 sc evenly across the top.
Next Row: ch 1, turn, sc across (6).
Fasten off.
Add a short embroidered brown stem.
Leaf Branch Motif
The reference includes several clusters where small leaves emerge from a brown central branch.
Using brown yarn and the 4 mm hook, ch 12.
Sl st back along the chain to create a narrow cord.
Fasten off, leaving a 20 cm tail.
Make five small oval leaves.
Pin the brown cord diagonally across one granny square.
Arrange two leaves on each side and one at the tip.
Sew the branch first, then attach only the lower half of each leaf so the tips remain slightly raised.
Three-Leaf Cluster
Make three small oval leaves in one color or three related fall shades.
Place the leaf bases together with the points spreading outward.
Sew the bases to the square.
Use brown yarn to embroider a short stem extending approximately 2–3 cm beneath the cluster.
This motif works particularly well on mustard and cream backgrounds.
Dimensional Burgundy Leaf Cluster
Make three large autumn leaves in burgundy.
Arrange them with the bases touching and points facing in three different directions.
Sew only along each central vein and the lower 2 cm of the leaf.
Leave the outer lobes free.
The raised edges produce the three-dimensional effect visible across several squares in the reference.
Motif Placement
Do not attach a motif to every square in exactly the same position.
Rotate the design deliberately.
Place some leaves diagonally from lower left to upper right.
Reverse others.
Center acorns on selected squares, while placing leaf clusters closer to corners on others.
Leave several squares with relatively restrained motifs. Visual gaps prevent the raised elements from merging into one continuous textured surface.
Blocking the Squares
Block every base square before attaching three-dimensional motifs.
Pin each square to approximately 18 × 18 cm.
Measure diagonally from corner to corner. Both diagonal measurements should match within approximately 5 mm.
Allow the square to dry completely.
Once blocked, attach the appliqués without pulling the square inward.
Do not aggressively block dimensional leaves after attachment. Their raised edges are part of the intended surface.
Joining the Granny Squares
Lay all 48 completed squares on a large flat surface before joining.
Arrange six squares across and eight down.
Check the distribution of background colors first.
Then inspect motif direction. Rotate squares so neighboring leaves do not all point the same way.
Flat Slip-Stitch Join
Place two squares side by side with right sides facing upward.
Using cream yarn, insert the hook through the corresponding outer loops of both squares.
Work a loose slip stitch through each matched pair of stitches.
Continue across the complete edge.
Add the next square in the row.
Join all horizontal seams first, then work the vertical seams.
Keep the joining tension looser than ordinary slip stitch. Tight seams shorten the square edges and create ridges between blocks.
Alternative Whipstitch Join
For a softer seam, use a tapestry needle and cream yarn.
Place the squares with right sides facing upward.
Whipstitch through corresponding outer loops.
Make one pass per stitch.
Do not pull the yarn until the square edges overlap.
A correctly tensioned whipstitch seam should allow both blocks to lie flat without a visible gap.
Cream Blanket Border
The reference uses a substantial cream frame followed by a decorative scalloped outer edge.
Border Round 1
Join cream yarn at any outer corner.
Ch 1.
Sc evenly around the complete blanket.
Work 3 sc in each corner.
At every square junction, avoid adding unnecessary stitches. The seam itself already contributes extra thickness.
Join with sl st.
Border Round 2
Ch 2.
Hdc in each stitch around.
Work 3 hdc in each corner stitch.
Join.
Border Round 3
Ch 1.
Sc in every stitch around.
Work 3 sc in each corner.
Join.
Scalloped Border Round
Sl st in first stitch.
*Skip 2 stitches, work 7 dc in next stitch, skip 2 stitches, sl st in next stitch.*
Repeat around.
At corners, adjust the skipped stitches slightly so one complete 7-dc shell sits across each corner.
Join and fasten off.
The scalloped border should lie flat rather than forming dense ruffles.
Assembly
- Complete all 48 granny-square bases and weave in the background-color tails before beginning the appliqués.
- Block every square to approximately 18 × 18 cm and confirm that both diagonals match within about 5 mm.
- Make the large leaves, small leaves, branches, acorns, and other fall motifs in the planned color quantities.
- Pin each motif to a blocked square and keep bulky acorns away from the exact outer seam lines.
- Sew leaves mainly through their center veins and lower sections so the outer points retain dimensional lift.
- Arrange the completed squares six across by eight down and balance cream, green, mustard, and dusty-rose backgrounds before joining.
- Join the horizontal square edges first with cream yarn, then complete the vertical seams using the same tension.
- Work three stabilizing cream border rounds around the assembled blanket before beginning decorative shells.
- Add the scalloped outer edge, adjusting the spacing only at corners rather than forcing an incorrect shell count.
- Weave all remaining tails, shape the border flat, and measure the completed blanket after its final light blocking.
The finished blanket should contain a varied patchwork of autumn backgrounds, raised botanical motifs, dimensional acorns, balanced cream seams, and a continuous scalloped outer frame.
7 Technical Tips
- Squares finish at different sizes: Block every base to the same 18 cm measurement before adding appliqués. A difference of only 5–8 mm per square can accumulate into several centimeters across a six-square row.
- Appliqués pull the square inward: Sew through the motif and only one or two strands of the background stitch. Pulling the sewing yarn tightly through the entire square thickness can reduce its blocked dimensions.
- Leaf points curl underneath: Attach the central vein and lower 15–20 mm while leaving the outer lobes free. Sewing around the complete perimeter removes the dimensional leaf effect.
- Stuffed acorns create hard bumps: Use only a small pinch of fiberfill inside each 18-stitch nut. Overstuffing makes the motif spherical and uncomfortable on a functional blanket.
- Joined rows become shorter: Work slip-stitch seams with visibly relaxed loops. Tight joins can remove 1 cm or more from a row containing several square seams.
- The border begins to wave: Reduce extra stitches along square junctions and check the blanket after every border round. Excess perimeter stitches create ruffling before the decorative shells are added.
- The color layout forms accidental stripes: Photograph the complete 6 × 8 arrangement before joining and inspect it in grayscale. Reposition repeated backgrounds when three or more identical values form an unintended continuous line.
How Many Granny Squares Are Needed?
The photographed blanket has a long throw proportion rather than a square lapghan. A 6 × 8 arrangement gives 48 squares and preserves that shape.
With 18 cm blocks, the unbordered joined field is approximately 108 × 144 cm before seam behavior is considered.
A border of roughly 5–7 cm on each side brings the target close to 120 × 155–160 cm.
For a smaller lap blanket, use 5 × 6 squares for 30 total blocks.
A baby-size decorative blanket can use 4 × 5 squares, although raised acorns should be omitted from items intended for unsupervised infant use.
For a larger throw, use 7 × 9 squares for 63 blocks.
How Much Yarn Does the Blanket Need?
Motif-heavy blankets require more yarn than their square dimensions initially suggest. Every raised leaf adds another layer of crochet, and stuffed acorns consume yarn without increasing the blanket’s measured area.
For the 48-square version, plan approximately 1.4–1.7 kg of worsted yarn in total, depending on stitch density and the number of dimensional motifs.
Cream should receive the largest allowance because it appears in background squares, seams, ivory motifs, and the complete border.
Published fall-themed granny blankets demonstrate similarly broad color requirements. One nine-square design uses hundreds of yards each of cream, brown, green, orange, gold, and red across its motifs and background construction.
Purchase an additional skein of the border color if exact yarn consumption is uncertain.
Choosing the Fall Color Palette
The image uses muted woodland colors rather than highly saturated Halloween shades.
Start with forest green and warm cream as the two anchors.
Add ochre mustard for the brightest background.
Use burgundy primarily for dimensional leaves rather than for large continuous areas.
Dusty rose or pale mushroom provides a low-contrast neutral between cream and the darker colors.
Chestnut brown should remain concentrated in branches and acorn caps.
This distribution keeps the blanket recognizably autumnal without relying entirely on orange.
Making the Leaves Look Dimensional
The photograph depends heavily on raised appliqués. Flat colorwork alone will produce a different surface.
Use a hook approximately 1 mm smaller for the leaves than for the granny squares. Denser leaf fabric holds its shape above the softer blanket background.
Add a central surface-slip-stitch vein before attachment.
Pin the leaf to the square and sew through the center vein.
Add one or two small securing stitches near the base.
Leave the outer lobes unattached.
When the blanket moves, those points can lift slightly while the center remains stable.
Creating Different Squares from the Same Motifs
A sampler appearance does not require 48 completely different patterns.
Rotate a five-leaf branch 90 degrees and change its colors. The same construction immediately reads as another square.
Place one acorn on a mustard block and two smaller acorns on a green block.
Use burgundy leaves against cream, then repeat the leaf shape in ivory against forest green.
Reverse a branch direction.
Combine three small leaves instead of one large leaf.
These changes create visual variety without requiring dozens of unrelated stitch patterns.
Working the Acorns Safely into the Blanket
Keep stuffed acorns small and lightly filled.
Position them away from square corners and joining seams because bulky motifs can interfere with assembly.
Sew through the complete circumference of the acorn cap rather than anchoring only the stem.
The stem is decorative and should not carry attachment tension.
For blankets used primarily as sofa decor, dimensional acorns reproduce the reference closely.
For blankets intended for frequent sleeping use, replace most stuffed acorns with the flat appliqué version. The surface will remain more comfortable while retaining the woodland motif.
Planning the Square Layout
Lay the blocks on the floor or a large table before joining.
Begin by distributing the darkest green squares. Avoid placing more than two adjacent green backgrounds unless the intended layout calls for a deliberate cluster.
Add mustard next.
Use cream to separate the darker colors.
Insert dusty rose in the remaining positions.
Then inspect the appliqués rather than the backgrounds.
If three burgundy leaves form a diagonal line, rotate or exchange one square. Repeat the process for ivory leaves and acorns.
Take a photograph of the final arrangement. Use that image as the joining map so the squares are not accidentally reordered.
Keeping the Blanket Flat
Dimensional motifs add weight unevenly across the fabric. Good blocking and seam tension therefore matter more than they do on a basic granny-square throw.
Block the bases before assembly.
Do not stretch one square merely because its appliqué has made the center appear smaller.
Match the edges stitch by stitch while joining.
After assembly, lay the blanket flat before adding the border.
If one seam is visibly shorter, correct it at that stage rather than expecting the border to compensate.
The border can stabilize a correct rectangle, but it cannot reliably repair several inconsistent square dimensions.
Making the Scalloped Border
The cream lace-like edge in the reference softens the straight geometry of the patchwork.
Three plain preparation rounds are useful because shells require a predictable perimeter.
Work the first sc round carefully around every joined square edge.
Add hdc for the second round to build width.
Return to sc before beginning the shells.
A seven-dc shell creates a substantial scallop in worsted yarn.
If the shells crowd each other, increase the number of skipped stitches between them. If large gaps appear, reduce the spacing.
Corner placement matters more than forcing an identical mathematical repeat along every side.
Care and Blocking
Follow the care instructions for the selected yarn.
Before washing the complete blanket, test one spare appliqué square if several yarn colors are being combined. Dark burgundy and forest-green shades should be checked for color transfer against cream.
Support the wet blanket rather than lifting it from one corner.
Lay it flat and square the outer border.
Arrange raised leaves with your fingers while damp.
Do not press the botanical motifs flat with an iron. Their height is an intentional part of the design.
Allow stuffed acorns to dry completely before folding the blanket for storage.
Conclusion
The botanical appliqués are the defining construction step in this blanket, so complete the square geometry before adding any raised decoration. Start by making and blocking one 18 cm test square, then crochet one large leaf and one acorn to check their scale against it. Once those proportions work, batch the 48 backgrounds by color and make the motifs separately before final layout. Keep the seams relaxed and reserve enough cream yarn for the wide scalloped frame. Save this autumn granny square blanket crochet pattern to Pinterest or share the finished sampler on Instagram with #AutumnGrannySquareBlanket. Which motif would you repeat most often: the burgundy leaves or the dimensional acorns?









