Introduction
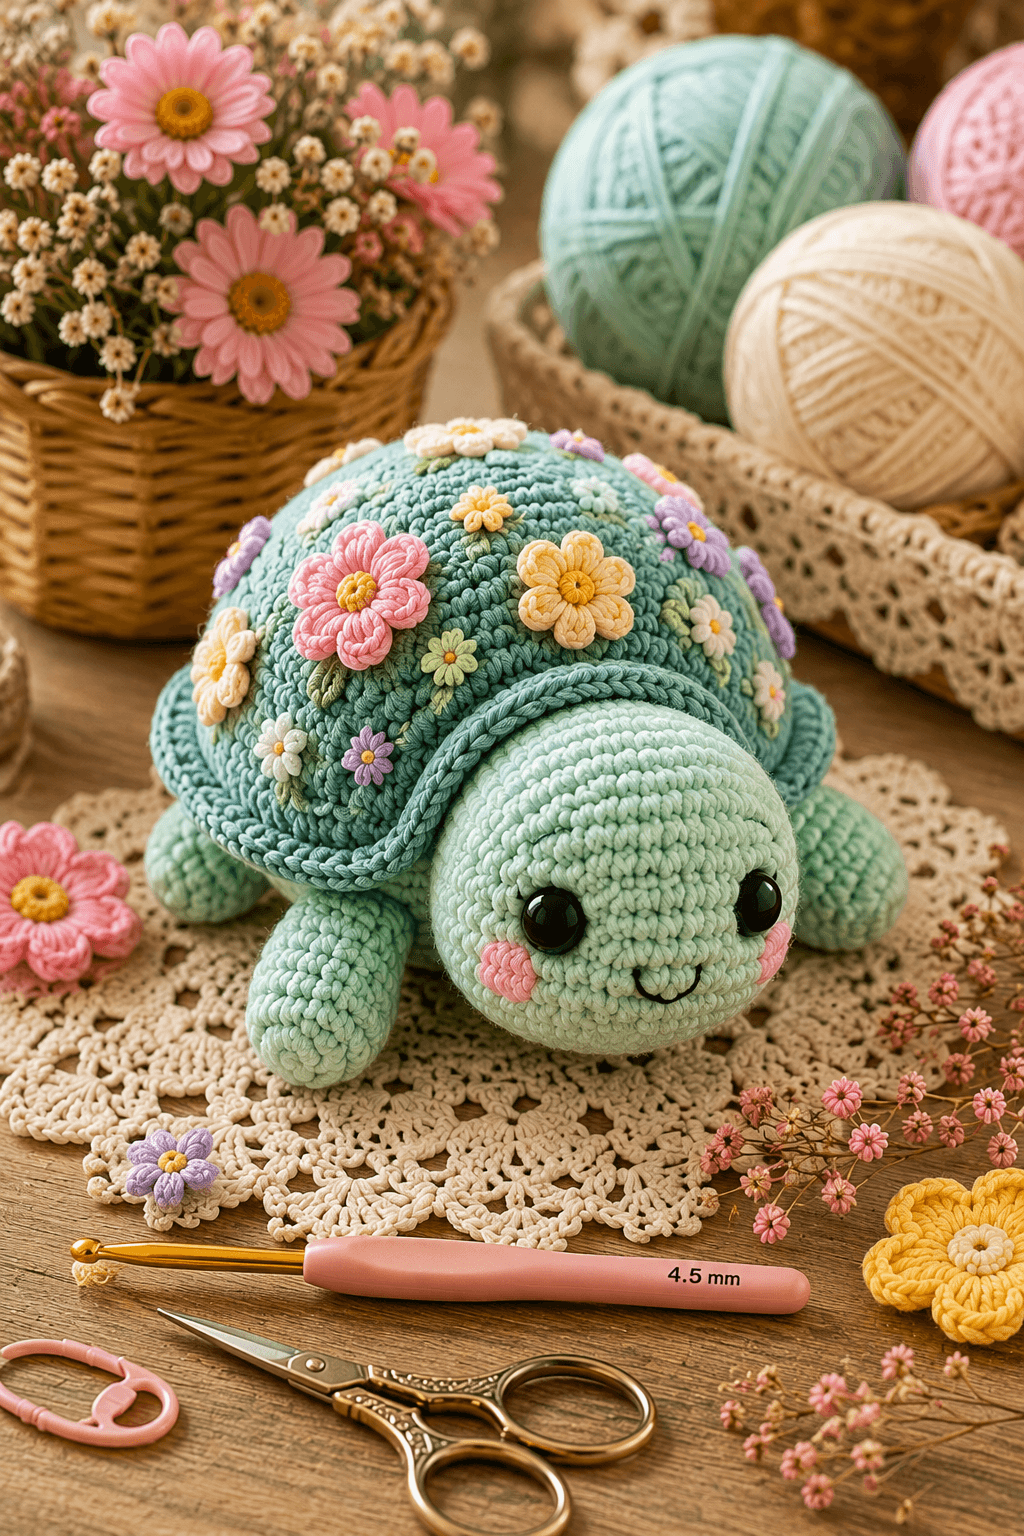
A turtle shell can carry flowers without losing its dome only when the decoration stays lighter than the stuffed shell beneath it. This flower turtle amigurumi crochet pattern builds a mint turtle around a 42-stitch head, four broad legs and a sage shell covered with raised blossoms. Use worsted-to-chunky yarn and a 4.5 mm hook for a figure approximately 26–30 cm long. The construction is intermediate and requires shaped sewing, surface decoration and controlled stuffing.
The Design: What Makes This Flower Turtle Different
The shell is treated as a separate high dome rather than a flat back panel. That structure gives the floral turtle crochet pattern enough depth for raised flowers without forcing their attachment stitches into the body stuffing. A corded border follows the lower shell edge and creates the strong outline visible in the reference image. The head reaches 42 stitches, while the internal body stops at 36; that difference makes the face appear broad without turning the torso into another sphere. Flower placement also changes by scale. Large pink and yellow blossoms establish focal points, while smaller cream and lavender flowers fill spaces between them. A frequent turtle-making error is attaching the front legs parallel to the body. Their outer edges should angle forward by roughly 20 degrees so the finished turtle reads as walking rather than lying flat.
Project Information at a Glance
| Skill Level | Time | Finished Size | Hook | Best For |
|---|---|---|---|---|
| Intermediate | 11–14 hours | Approx. 26–30 cm long | 4.5 mm | Display toys, floral collections and detailed gifts |
The 4.5 mm hook is taken directly from the reference photograph. Published turtle projects provide useful comparison points: a worsted-weight design uses a 3.5 mm hook, a plush version uses 4 mm, and a current flower-turtle pattern specifies chenille or velvet yarn with a 5 mm hook. The photographed project falls naturally between those scales.
Materials and Tools
Yarn
- Mint green — worsted/chunky cotton-style yarn — approximately 65 g — head, body and legs
- Sage green — worsted/chunky cotton-style yarn — approximately 50–55 g — shell and edging
- Pink — matching weight — approximately 8 g — flowers and cheeks
- Pale yellow — matching weight — approximately 8 g — flowers and centres
- Cream — matching weight — approximately 6 g — daisies
- Lavender — matching weight — approximately 4 g — small flowers
- Dark sage — matching weight scrap — leaves
- Black embroidery thread — mouth
Tools
- 4.5 mm crochet hook
- Two 14–16 mm safety eyes, selected after checking the finished head
- Polyester stuffing
- Yarn needle
- Locking stitch markers
- Dressmaking pins
- Scissors
The visible eye size is an image-based estimate rather than a manufacturer specification. Published worsted turtle patterns commonly use smaller 9–10 mm eyes, so test the eye diameter against the completed 42-stitch head before locking the washers.
Plastic safety eyes should not be used on an item intended for a child who may pull, chew or detach small components. Embroidered eyes are the appropriate substitution in that case.
Abbreviations
- MR — magic ring
- sc — single crochet
- inc — two single crochet stitches in one stitch
- dec — decrease over two stitches
- sl st — slip stitch
- ch — chain
- hdc — half double crochet
- dc — double crochet
- BLO — back loop only
- FLO — front loop only
An invisible decrease is made by working through the front loops of the next two stitches and completing them together as one single crochet.
Pattern — Step by Step
Work continuous spiral rounds unless a section specifies rows or joined rounds. Mark the first stitch of every round and verify the bracketed count before continuing.
Head
Yarn: mint green — standard six-stitch sphere calculation.
R1: 6 sc in MR (6)
R2: inc × 6 (12)
R3: (sc, inc) × 6 (18)
R4: (2 sc, inc) × 6 (24)
R5: (3 sc, inc) × 6 (30)
R6: (4 sc, inc) × 6 (36)
R7: (5 sc, inc) × 6 (42)
R8–R14: sc around (42)
R15: (5 sc, dec) × 6 (36)
R16: sc around (36)
Insert the safety-eye stems between R11 and R12 with approximately nine stitches between them. Add the washers now. Begin stuffing with small sections of fiberfill around the hardware.
R17: (4 sc, dec) × 6 (30)
R18: (3 sc, dec) × 6 (24)
R19: (2 sc, dec) × 6 (18)
R20: (sc, dec) × 6 (12)
R21: dec × 6 (6)
Fasten off. Leave a 20 cm tail, close the opening through the final front loops and hide the yarn inside the head.
Body
Yarn: mint green.
R1: 6 sc in MR (6)
R2: inc × 6 (12)
R3: (sc, inc) × 6 (18)
R4: (2 sc, inc) × 6 (24)
R5: (3 sc, inc) × 6 (30)
R6: (4 sc, inc) × 6 (36)
R7–R12: sc around (36)
R13: (4 sc, dec) × 6 (30)
R14: (3 sc, dec) × 6 (24)
R15: (2 sc, dec) × 6 (18)
Stuff firmly through the centre. Keep the neck-facing section slightly softer so it can compress against the back of the head.
R16: (sc, dec) × 6 (12)
R17: dec × 6 (6)
Fasten off and leave a 40 cm tail for structural assembly.
Front Legs — Make Two
Yarn: mint green.
R1: 6 sc in MR (6)
R2: inc × 6 (12)
R3: (sc, inc) × 6 (18)
R4–R7: sc around (18)
R8: (sc, dec) × 6 (12)
R9–R11: sc around (12)
R12: dec × 6 (6)
Stuff R1–R7 to medium firmness. Leave the attachment end softer so the leg can angle forward.
Fasten off and leave a 30 cm tail.
Back Legs — Make Two
Yarn: mint green.
R1: 6 sc in MR (6)
R2: inc × 6 (12)
R3: (sc, inc) × 6 (18)
R4–R6: sc around (18)
R7: (sc, dec) × 6 (12)
R8–R9: sc around (12)
R10: dec × 6 (6)
Stuff evenly but keep the upper round flexible. Shape each back leg slightly flatter than the front pair.
Fasten off and leave a 30 cm sewing tail.
Cheek Patches — Make Two
Yarn: pink.
R1: 6 sc in MR (6)
R2: inc × 6 (12)
Slip stitch into the next stitch. Fasten off and leave a 15 cm tail. Pull the small circles into horizontal ovals while sewing.
Shell Dome
Yarn: sage green.
R1: 6 sc in MR (6)
R2: inc × 6 (12)
R3: (sc, inc) × 6 (18)
R4: (2 sc, inc) × 6 (24)
R5: (3 sc, inc) × 6 (30)
R6: (4 sc, inc) × 6 (36)
R7: (5 sc, inc) × 6 (42)
R8–R11: sc around (42)
R12: (5 sc, dec) × 6 (36)
R13: sc around (36)
Do not close the dome. The open 36-stitch edge is attached over the body after the legs have been positioned.
Fasten off and leave a 60 cm tail.
Shell Lower Panel
Yarn: mint green.
R1: 6 sc in MR (6)
R2: inc × 6 (12)
R3: (sc, inc) × 6 (18)
R4: (2 sc, inc) × 6 (24)
R5: (3 sc, inc) × 6 (30)
R6: (4 sc, inc) × 6 (36)
Fasten off and leave a 50 cm tail. This flat panel sits beneath the shell dome and helps keep the body stuffing separate from the floral decoration.
Raised Shell Border
Yarn: dark sage.
Join yarn to the outer shell seam after the dome and lower panel have been attached. Work 42–48 surface slip stitches around the visible perimeter, spacing them evenly.
R2: ch 1, sc into each surface stitch around.
Fasten off and weave the tail into the shell. The border should sit approximately 4–6 mm above the shell seam rather than pulling it inward.
Large Five-Petal Flowers — Make Four
Yarn: pink, pale yellow and cream as required.
R1: 6 sc in MR (6)
R2: inc × 6 (12)
For each petal, work into two consecutive stitches: (sl st, ch 3, 2 dc, ch 3, sl st). Repeat five times around the outer section, distributing the petals as evenly as possible.
Fasten off and leave a 20 cm tail. Sew a contrasting six-stitch circle or several embroidery stitches into the centre.
Medium Six-Petal Flowers — Make Four
Yarn: cream, lavender or pink.
R1: 6 sc in MR (6)
Into each stitch work: sl st, ch 2, hdc, ch 2, sl st. Repeat once per base stitch to form six petals.
Fasten off and leave a 15 cm attachment tail.
Small Daisies — Make Eight
Yarn: cream, pale yellow or lavender.
R1: 6 sc in MR (6)
For each petal: ch 3, hdc in second chain from hook, sl st in next chain, sl st into the next base stitch. Repeat six times.
Fasten off and leave a 12 cm tail. Add a tiny contrasting centre with two or three embroidery stitches.
Leaves — Make Ten
Yarn: dark sage or light green.
Ch 5. Starting in the second chain from the hook, sl st, sc, hdc, 3 hdc in the final chain. Work along the opposite side with hdc, sc, sl st (9).
Fasten off and leave a 12 cm sewing tail. Fold each leaf gently along the starting chain before attachment.
Optional Tiny Flower Buds — Make Four
Yarn: yellow, cream or lavender.
R1: 6 sc in MR (6)
Pull the ring almost closed, work one slip stitch into the first stitch and fasten off. Use these compact discs where a full flower would crowd the shell.
Assembly
- Position the head against the front of the body with its lowest point slightly below the body’s horizontal centre. Sew around the contact area twice with the long body tail.
- Attach the cheek patches one round below the eyes and approximately two stitches outward from each eye edge. Embroider a shallow black U-shaped mouth between them.
- Pin the front legs beside the forward half of the body. Angle each one approximately 20 degrees toward the head and sew around the full attachment circumference.
- Attach the back legs farther outward and approximately two body rounds behind the front pair. Compare both sides from above before tightening the seams.
- Place the flat shell panel across the top of the body and stitch it through the upper body fabric without compressing the stuffing.
- Fit the sage shell dome over the flat panel. Add a moderate layer of stuffing beneath the centre, then sew the 36-stitch opening around the shell base.
- Work the raised dark-sage shell border around the seam. Correct any areas that pull inward before weaving in the working yarn.
- Pin the four largest flowers first, keeping one large pink bloom off-centre toward the front-left area of the shell and balancing it with yellow and cream flowers elsewhere.
- Fill open shell areas with medium flowers, small daisies and leaves. Keep at least 1 cm between most large blossoms so the sage shell remains visible.
- Check the turtle from the front, both sides and above. Hide all flower tails inside the shell rather than carrying them through the body stuffing.
The completed turtle should rest on all four legs with the head slightly elevated and the floral shell remaining clearly domed from every side.
7 Technical Tips
- Shell collapse: Too little stuffing beneath the centre lets heavy flowers flatten the dome. Add stuffing until thumb pressure creates an indentation of about 5 mm and then rebounds.
- Marker drift: Losing the start of a 42-stitch head round shifts both eye positions. Count R8, R11 and R14 before moving the marker to the next round.
- Visible decrease ridges: Standard decreases form horizontal bars on the mint face. Work all reduction rounds through the front loops of the next two stitches.
- Late eye installation: Large washers become difficult to reach when the head drops below 24 stitches. Install and lock both eyes before completing Head R18.
- Uneven leg angle: A front leg rotated by only 10–15 degrees can make the turtle appear to lean. Pin all four legs before sewing the first one permanently.
- Flower overcrowding: Covering more than roughly 70 percent of the shell hides the dome and turns the back into a flat flower mat. Leave visible sage gaps of 5–10 mm between several neighboring blossoms.
- Loose decorative tails: Short flower tails can pull through the shell during handling. Leave at least 12–20 cm for each blossom and weave through three different shell stitches before trimming.
Shaping the Turtle Head
The head carries more visual weight than the body in this crochet turtle with flowers. Its 42-stitch plateau needs enough plain rounds to create a long oval rather than a ball. R8 through R14 supply that length. Removing two of those rounds produces a more spherical head and moves the eyes too close to the shell.
Place the eyes low enough that the forehead remains broad. Their stems sit between R11 and R12, while the cheek patches occupy the next one to two rounds below. Do not centre the cheeks directly under the eye stems; shift them slightly outward so the mouth has clear space in the middle.
The mouth needs only a short curved line. A large embroidered smile competes with the flower shell and changes the scale of the face. Keep the lowest point of the mouth approximately one round below the cheek centres.
Building a Stable Flower Shell
The shell must support two different loads: stuffing from below and decoration from above. Separating the dome from the body solves both problems. The flat lower panel creates a sewing surface, while the stuffed sage dome carries the flower attachments.
Add the raised border only after the dome is fully attached. Surface crochet works particularly well because it outlines the perimeter without requiring another bulky sewn tube. Keep every surface stitch shallow; passing the hook deep into the stuffing can pull fibers through to the outside.
The garden turtle amigurumi shown in the reference uses flower size to create depth. Place large blossoms where the shell curves upward and smaller ones near the side edges. Tiny flowers can overlap leaves, but large petals should not extend over the shell border because they hide its clean outline.
Flower Placement Map
Begin with one large pink flower in the forward-left quadrant. Position a pale yellow flower a few centimetres to its right and another cream or pink blossom toward the rear. The fourth large flower belongs on the opposite side where it remains visible in a three-quarter view.
After the four anchors are pinned, distribute medium lavender and cream flowers through the spaces between them. Rotate every blossom before sewing. Five identical flowers with the same petal orientation produce an artificial grid even when their colors differ.
Add leaves last. One or two dark-sage leaves beneath each large flower are enough to connect the decoration visually to the shell. Do not place a leaf beneath every small daisy; several exposed sage sections are needed to keep the shell readable.
Choosing Yarn for the 4.5 mm Hook
The hook size visible in the image is 4.5 mm, which is larger than the 3.5 mm hook specified for the worsted Tilly turtle but smaller than the 5 mm recommendation attached to a current chenille flower-turtle pattern. That makes dense worsted, light chunky or firm cotton-style tube yarn practical choices for this photo-matched version.
Make a small test sphere before starting the head if the yarn is unfamiliar. Six rounds of expansion should produce fabric that does not expose stuffing when bent. If gaps wider than about 1 mm appear, move down to a 4 mm hook. When the stitches become difficult to enter, the yarn is too dense for that hook size.
Use the same yarn family for the shell and turtle whenever possible. Flowers may use slightly lighter yarn because they are decorative, but a dramatically thicker blossom yarn adds unnecessary weight to the shell.
Changing the Flower Palette
The construction works without changing stitch counts when the flower palette changes. A woodland version can use cream, rust and mustard blossoms. For a spring version, keep mint and sage as the base while increasing lavender, pink and pale yellow.
Color distribution matters more than exact flower count. Avoid placing two large blossoms of the same color directly beside each other. Repeat each accent in at least two different shell areas so no single color appears accidental.
The shell border should remain darker than either the head or main shell. That contrast is what separates the dome from the body when the turtle is viewed from the front.
Finishing Checks
Place the completed turtle on a hard, level surface before hiding the last structural tails. All four legs should make contact without forcing the body downward. If one front leg floats above the surface, loosen its upper attachment stitches and rotate it slightly rather than adding more stuffing.
View the flower shell from directly above. No large bare area should remain in the centre, but a ring of visible sage yarn should still appear between several blossoms. Check the raised border from the side for sections that dip toward the body.
Finally, inspect the eyes and cheeks from the front. Both safety eyes should sit at the same height, and neither cheek should touch the shell edge when the head is turned slightly to either side.
Conclusion
Measure the finished turtle from the nose to the rear edge of the shell and record that number before changing yarn or hook size for another version. Next, photograph the shell directly from above; that angle reveals clustered flowers, empty sections and uneven border shaping more clearly than a front view. Save this flower turtle amigurumi crochet pattern to Pinterest and share the completed project on Instagram with #GardenShellTurtle. Keep the largest blossoms spaced far enough apart for the sage shell to remain visible between them. For a second turtle, would you keep the mixed garden of pink, yellow, cream and lavender flowers, or build the entire shell from one daisy color?
Sources
- Amigurumi.com / Ravelry — Tilly the Turtle: worsted-weight yarn, 3.5 mm crochet hook and 9–10 mm safety eyes.
- Free Amigurumi — 2024 Turtle Pattern: plush yarn 100 g/120 m, YarnArt Jeans 50 g/160 m, 4 mm and smaller detail hooks; published head and shell shaping data.
- Etsy — CrochetByTopaz Flower Turtle: chenille or velvet yarn with a 5 mm hook.
- Little Crochet Farm — Turtle Amigurumi Tutorial: separate head, front flippers, rear flippers, tail and shell construction.









