Introduction
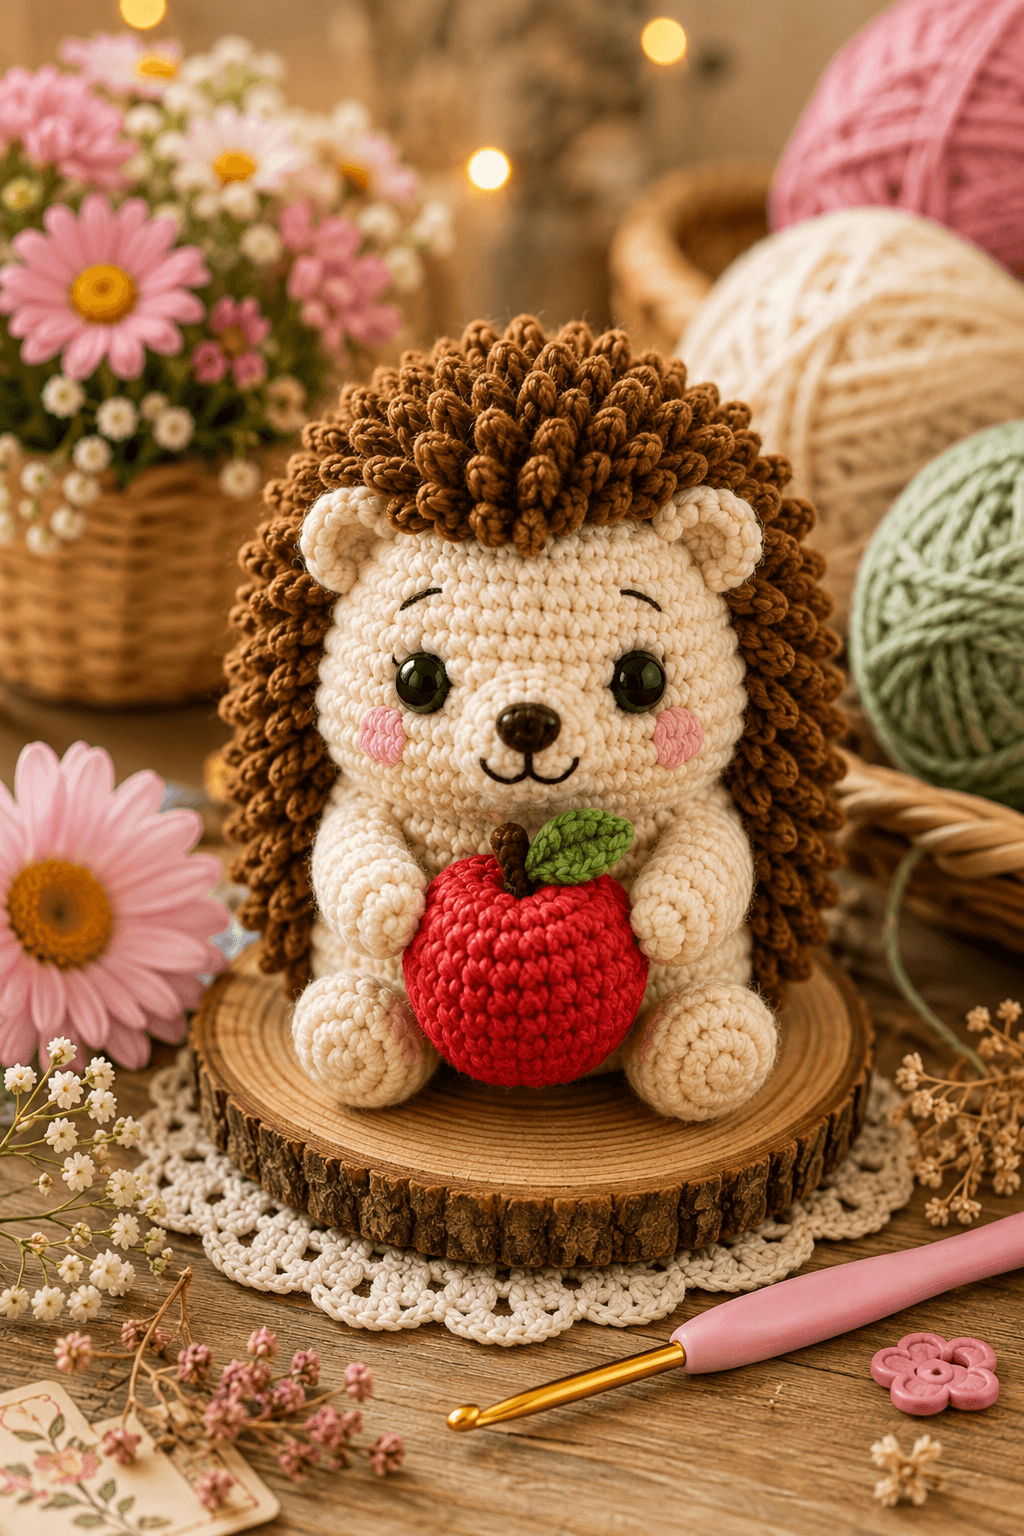
A hedgehog’s spines stop at the face, so the critical construction line is the curved border running from one ear across the crown to the other. This hedgehog amigurumi crochet pattern uses sport-weight yarn, a 2.5 mm hook and 10 mm safety eyes to build a compact intermediate-level figure. Separate spine texture and a stuffed apple reproduce the most distinctive parts of the photographed design.
The Design: What Makes This Hedgehog Different
The cream head remains visible beneath a separate brown spine cap rather than changing yarn midway through the facial sphere. That decision creates a controlled hairline and allows the spike density to be adjusted after the face has been completed. A projecting muzzle is sewn over the lower center of the head, placing the nose forward of the eye line and producing the long profile expected in a crochet hedgehog pattern. Large oval back feet form the seated base while the arms remain narrow enough to wrap around the apple. One frequent failure with a woodland amigurumi hedgehog is extending the brown texture too far toward the eyes. The character then loses its pale facial mask. Keeping a clear cream area around the muzzle, cheeks and ears preserves the hedgehog anatomy while leaving enough brown surface for dense looped spines.
Project Info at a Glance
| Skill Level | Time | Finished Size | Hook | Best For |
|---|---|---|---|---|
| Intermediate | 7–9 hours | About 10 cm with sport-weight yarn | 2.5 mm | Woodland displays, seasonal decor and photographed handmade collections |
Materials and Tools
Yarn
- Warm cream — sport/fine cotton-acrylic or cotton blend — approximately 35–45 g — YarnArt Jeans or a comparable smooth amigurumi yarn.
- Chocolate brown — sport/fine yarn — approximately 30–40 g — needed for the spine cap, textured loops and apple stem.
- Apple red — sport/fine cotton — approximately 10–15 g — used for the complete apple.
- Leaf green — sport/fine cotton — approximately 2–3 g — used for the apple leaf.
- Blush pink — sport cotton or embroidery yarn — approximately 2 g — used for both cheeks.
- Black or very dark brown — embroidery floss — less than 1 g — used for the mouth and eyebrows.
Tools
- 2.5 mm crochet hook
- 10 mm safety eyes
- Polyester stuffing, approximately 20–25 g
- Yarn needle
- Embroidery needle
- Locking stitch markers
- Dressmaking pins
- Scissors
Replace plastic eyes with securely embroidered eyes when the finished hedgehog is intended for a child under three, because detachable components can create a choking hazard.
Abbreviations
- MR — magic ring
- sc — single crochet
- inc — two single crochet stitches in one stitch
- dec — invisible single crochet decrease
- sl st — slip stitch
- ch — chain
- hdc — half double crochet
- dc — double crochet
- BLO — back loop only
- FLO — front loop only
An invisible decrease passes through the front loops of the next two stitches before one single crochet is completed through both loops.
Pattern — Step by Step
Work in a continuous spiral unless a joined round or row is specified. Mark the first stitch of every round and move the marker only after the final stitch has been counted.
Head
Yarn: warm cream — Source: Standard six-stitch amigurumi sphere math.
R1: 6 sc in MR (6)
R2: inc ×6 (12)
R3: (sc, inc) ×6 (18)
R4: (2 sc, inc) ×6 (24)
R5: (3 sc, inc) ×6 (30)
R6: (4 sc, inc) ×6 (36)
R7–R12: sc around (36)
R13: (4 sc, dec) ×6 (30)
R14: (3 sc, dec) ×6 (24)
R15: (2 sc, dec) ×6 (18)
R16: (sc, dec) ×6 (12)
R17: dec ×6 (6)
Insert 10 mm eyes between R9 and R10 with eight visible stitches between their posts. Stuff after R13 and distribute small pieces behind both eye washers before closing.
Fasten off. Leave a 20 cm tail and close the six remaining front loops.
Body
Yarn: warm cream — Source: Standard six-stitch amigurumi math.
R1: 6 sc in MR (6)
R2: inc ×6 (12)
R3: (sc, inc) ×6 (18)
R4: (2 sc, inc) ×6 (24)
R5: (3 sc, inc) ×6 (30)
R6: (4 sc, inc) ×6 (36)
R7–R11: sc around (36)
R12: (4 sc, dec) ×6 (30)
R13–R14: sc around (30)
R15: (3 sc, dec) ×6 (24)
R16: sc around (24)
R17: (2 sc, dec) ×6 (18)
R18: (sc, dec) ×6 (12)
R19: dec ×6 (6)
Fill R1–R12 firmly enough to hold a seated form. Reduce the stuffing density near the upper opening to prevent a hard ridge beneath the head.
Fasten off. Leave a 30 cm tail for sewing.
Muzzle
Yarn: warm cream — Source: Original tapered muzzle based on standard six-stitch expansion.
R1: 6 sc in MR (6)
R2: inc ×6 (12)
R3: sc around (12)
R4: (sc, inc) ×6 (18)
R5–R6: sc around (18)
R7: (sc, dec) ×6 (12)
Add a small amount of stuffing, concentrating it at the wide end rather than the nose end. Flatten the final opening slightly before pinning.
Fasten off. Leave a 25 cm sewing tail.
Nose
Yarn: dark brown or black.
R1: 6 sc in MR (6)
R2: inc ×6 (12)
R3: sc around (12)
R4: dec ×6 (6)
Stuff with a pinch of filling only. Shape the finished piece into a short oval before sewing it to the narrow end of the muzzle.
Fasten off. Leave a 15 cm tail.
Arms / Front Legs (Make 2)
Yarn: warm cream — Source: Standard small-limb math.
R1: 6 sc in MR (6)
R2: inc ×6 (12)
R3–R5: sc around (12)
R6: (sc, dec) ×4 (8)
R7–R10: sc around (8)
Stuff R1–R5 lightly. Leave the upper section flat so each arm can curve toward the apple.
Fasten off. Leave a 20 cm sewing tail.
Back Legs and Feet (Make 2)
Yarn: warm cream — Source: Standard seated-foot shaping.
R1: 6 sc in MR (6)
R2: inc ×6 (12)
R3: (sc, inc) ×6 (18)
R4–R6: sc around (18)
R7: (sc, dec) ×6 (12)
R8–R9: sc around (12)
R10: dec ×6 (6)
Pack the first six rounds firmly. Keep the ankle section softer so the feet can turn forward without pulling the body out of position.
Fasten off. Leave a 25 cm sewing tail and close the opening.
Ears (Make 2)
Yarn: warm cream — Source: Original compact ear construction.
R1: 6 sc in MR (6)
R2: inc ×6 (12)
R3: sc around (12)
R4: (sc, dec) ×4 (8)
Do not stuff. Flatten each ear and fold the lower corners toward one another by approximately 4 mm before sewing.
Fasten off. Leave an 18 cm tail on each ear.
Cheek Patches (Make 2)
Yarn: blush pink — Source: Standard flat-circle math.
R1: 6 sc in MR (6)
R2: inc ×6 (12)
Keep both circles completely flat. Do not stuff them.
Join with a sl st. Fasten off and leave a 15 cm sewing tail.
Spine Cap
Yarn: chocolate brown — Source: Original cap construction using standard flat-circle expansion.
R1: 6 sc in MR (6)
R2: inc ×6 (12)
R3: (sc, inc) ×6 (18)
R4: (2 sc, inc) ×6 (24)
R5: (3 sc, inc) ×6 (30)
R6: (4 sc, inc) ×6 (36)
R7–R11: sc around (36)
R12: (4 sc, dec) ×6 (30)
Do not stuff. Place the cap over the back of the head and upper body before adding texture. The front edge should form a curved line above the eyebrows and terminate behind both ears.
Fasten off. Leave a 35 cm tail.
Spine Loops
Yarn: chocolate brown — Work over the completed cap.
Join the yarn to any exposed stitch near the lower back. *Ch 5, sl st into the same base stitch, ch 4, sl st into the same base stitch; sl st in next cap stitch.* Repeat across the exposed brown surface.
On every third base stitch, substitute a longer cluster: ch 6, sl st into the same stitch, ch 5, sl st into the same stitch. Alternate these longer loops so the texture does not form horizontal rows.
Fill approximately 75–80 percent of visible cap stitches with loop clusters. Leave the edge stitches less crowded so the cream facial border remains readable.
Fasten off. Weave the yarn through the underside of the cap.
Apple
Yarn: apple red — Source: Original sphere shaping using standard six-stitch math.
R1: 6 sc in MR (6)
R2: inc ×6 (12)
R3: (sc, inc) ×6 (18)
R4: (2 sc, inc) ×6 (24)
R5–R8: sc around (24)
R9: (2 sc, dec) ×6 (18)
R10: (sc, dec) ×6 (12)
R11: dec ×6 (6)
Stuff firmly after R9. Before closing, press the starting and finishing points slightly inward to create the shallow top and bottom indentations of an apple.
Fasten off. Leave a 25 cm tail, close the opening and pass the tail through the center from bottom to top once to deepen the shape.
Apple Stem
Yarn: chocolate brown.
R1: 6 sc in MR (6)
R2–R4: sc around (6)
Do not stuff. Flatten the bottom round before attachment.
Fasten off. Leave a 15 cm sewing tail.
Apple Leaf
Yarn: leaf green — Source: Original flat leaf construction.
Row 1: ch 8
Row 2: starting in second ch from hook: sl st, sc, hdc, 2 dc, hdc, sc; work 2 sc into final chain, then continue along the opposite side with sc, hdc, 2 dc, hdc, sc, sl st.
Pinch the chain edge along the center to form a shallow vein. The finished leaf should measure approximately 3 cm from tip to base with sport yarn.
Fasten off. Leave a 15 cm sewing tail.
Mouth and Eyebrows
Yarn: black or dark brown embroidery floss.
Bring the mouth thread out directly beneath the nose. Make one vertical stitch approximately 5 mm long, then add two shallow curved stitches extending left and right to form the photographed split smile.
Place each eyebrow roughly two crochet rounds above its eye and span approximately three stitches with a shallow downward curve.
Secure the embroidery inside the head and bury all thread ends.
Assembly
- Center the completed head above the body and sew the two pieces together with small mattress stitches, adding a narrow amount of stuffing inside the neck before closing.
- Pin the muzzle between and below the eyes, with its upper edge around head R9–R10, then sew around the 12-stitch opening.
- Attach the dark nose to the muzzle tip, embroider the mouth and eyebrows, then sew the pink cheek patches level with the lower halves of the eyes.
- Pin the ears between approximately head R5 and R8, keeping the inner edges clear of the future brown spine border.
- Attach the arms to the upper body with their lower ends angled inward so both paws can rest against the red apple.
- Position the two back feet across the lower front of the body and place the hedgehog on a flat surface before sewing them permanently.
- Fit the brown spine cap from the crown down the back, keep its front edge symmetrical around both ears and sew the underlying cap firmly before adding any final loops.
- Complete sparse spine loops around the cap seam after attachment, covering visible sewing stitches without extending the texture onto the cream muzzle.
- Sew the brown stem into the apple’s top indentation, attach the green leaf beside it and position the apple between the two arms.
- Secure the apple to both paws with hidden red stitches, then weave every remaining tail through at least 3 cm of dense fabric before reversing direction and trimming.
The completed hedgehog should remain seated on its lower body and two feet while the apple rests against the torso without carrying the weight of either arm.
7 Technical Tips
- Spine-border creep: Adding loops to every front cap stitch can move the apparent hairline 5–10 mm toward the eyes. Leave the first edge row relatively sparse and keep all brown texture behind the ear centers.
- Flattened muzzle: Packing the muzzle too tightly can turn the tapered profile into a short cylinder. Fill only the rear two-thirds and keep the area immediately behind the nose compressible.
- Visible decrease gaps: Standard decreases can expose pale stuffing around the head closure. Work every decrease through the two front loops and compare its tension with the adjacent single crochet before proceeding.
- Incorrect eye timing: Installing the eyes after R14 leaves little room to seat their washers. Fit both 10 mm eyes immediately after R12 and confirm the eight-stitch spacing before beginning R13.
- Uneven spine density: Working identical loops in every stitch produces rigid horizontal bands rather than irregular quills. Insert the longer six-chain clusters approximately every third base stitch and offset them on the next textured row.
- Unstable feet: Sewing one back foot before pinning its partner can tilt the body several millimeters to one side. Pin both feet, place the figure on a hard surface and confirm that both toe fronts contact the surface before stitching.
- Loose apple attachment: Sewing only through the outer arm stitches allows the apple to sag below the paws. Pass each fixing stitch through the apple fabric, the inner arm wall and at least 5 mm of the adjoining body fabric.
Conclusion
Check the cream facial border from both sides before finishing the last spine clusters; uneven brown coverage is more difficult to correct after the loops become dense. Next, pin the apple between the paws and photograph the hedgehog from the front and in profile before making the fixing stitches. Those views expose a tilted muzzle, mismatched feet or a spine cap that extends too far toward one eye. Share the completed hedgehog amigurumi crochet pattern project on Pinterest with a vertical finished image, then post it on Instagram using #AppleHedgehogAmigurumi. For this hedgehog specifically, would you position the green apple leaf toward the face or rotate it outward so the full leaf remains visible?









