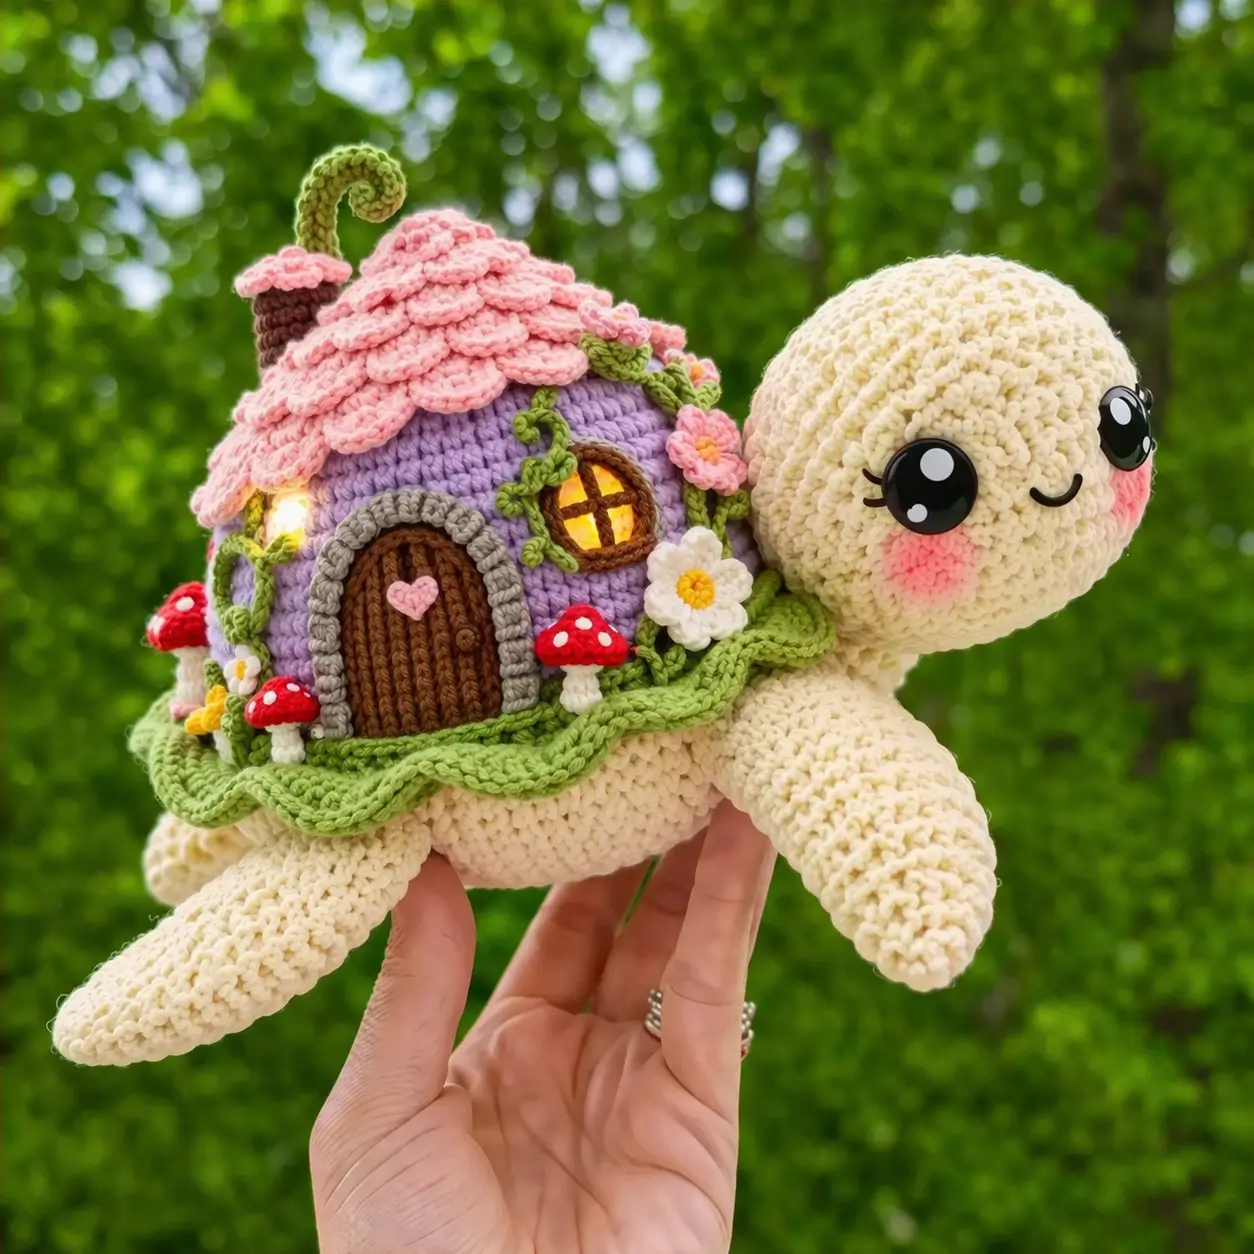
A turtle cannot retract into a cottage roof, so the shell has to act like a platform first. This turtle amigurumi crochet pattern turns that structural problem into the whole design: medium worsted yarn, a 4.0 mm hook, layered appliqué pieces, and an advanced beginner to intermediate build that finishes as a compact display piece and a practical desk or shelf project.
The Design: What Makes This Turtle Different
The head is oversized on purpose. That shift pulls the visual weight forward, which keeps the turtle readable even after the shell becomes a full fairy house instead of a rounded dome. The body also needs a flatter top than a standard sea turtle build, so the shell base is treated more like a support disc than a hemisphere. That keeps the house from tipping sideways once the roof, chimney, and flowers go on.
A second decision sits at the shell edge. Rather than hiding the join between body and house, the pattern uses a leafy border to cover it and to widen the silhouette. That matters because most turtle crochet pattern guides assume the shell is the hero shape; here the house carries that job. A common mistake with this character type is scaling the cottage too tall while leaving the neck too narrow. The result looks like a mushroom on stilts, not a turtle. For a stable fairy turtle crochet, keep the body at a medium 36-stitch plateau and let the roof spread outward, not upward.
Project Info at a Glance
| Skill Level | Time | Finished Size | Hook | Best For |
|---|---|---|---|---|
| Advanced beginner / intermediate | 1–2 hour turtle base reference; longer with house detailing | 12.7 cm base reference | 4.0 mm | Display piece / gift topper / desk décor |
Base size and hook reference from worsted turtle patterns; decorative build time rises because of the added house shell and appliqués.
Materials and Tools
Yarn
- Cream — medium (4) worsted — about 30 g — Lion Brand Vanna’s Choice Fisherman or a similar smooth acrylic/cotton blend
- Light lavender — medium (4) worsted — about 20–25 g — any firm amigurumi yarn for the house walls
- Pink — medium (4) worsted — about 20 g — for roof scales
- Leaf green — medium (4) worsted — about 10–15 g — for edge trim, vines, leaves, stem
- Brown — medium (4) worsted — small amount — for door, window frames, chimney base
- Gray — medium (4) worsted — small amount — for door arch
- Red, white, yellow — scraps — mushrooms and flower centers
Tools
- Hook 4.0 mm / safety eyes / stuffing / tapestry needle / stitch markers / embroidery needle / optional blush powder or pink yarn for cheeks
Abbreviations
MR / sc / inc / dec / sl st / ch / BLO / FLO / hdc / dc / tr
Invisible decrease works through the front loops of the next two stitches so the closing rounds stay flatter and less gapped.
Pattern — Step by Step
Continuous spiral unless noted. The turtle base is drafted from the photo using standard amigurumi math and a 36-stitch medium plateau. Decorative parts are scaled to fit the photographed proportions.
Head (Make 1)
Yarn: cream — drafted from photo; size range informed by worsted turtle references.
R1: 6 sc in MR (6)
R2: inc x6 (12)
R3: (sc, inc) x6 (18)
R4: (2 sc, inc) x6 (24)
R5: (3 sc, inc) x6 (30)
R6–10: sc around (30)
R11: (3 sc, dec) x6 (24)
R12: sc around (24)
R13: (2 sc, dec) x6 (18)
Insert safety eyes between R7 and R8, 8 stitches apart. Add blush later.
R14: (sc, dec) x6 (12)
Stuff firmly but keep the lower edge slightly flatter than the crown.
R15: dec x6 (6)
Fasten off. Leave 20 cm tail.
Body Base (Make 1)
Yarn: cream — standard amigurumi math using a medium 36-stitch plateau.
R1: 6 sc in MR (6)
R2: inc x6 (12)
R3: (sc, inc) x6 (18)
R4: (2 sc, inc) x6 (24)
R5: (3 sc, inc) x6 (30)
R6: (4 sc, inc) x6 (36)
R7–11: sc around (36)
R12: (4 sc, dec) x6 (30)
R13: (3 sc, dec) x6 (24)
Stuff the lower body, but leave the top face flatter to support the shell platform.
R14: (2 sc, dec) x6 (18)
R15: (sc, dec) x6 (12)
R16: dec x6 (6)
Fasten off. Leave 20 cm tail.
Front Legs (Make 2)
Yarn: cream
R1: 6 sc in MR (6)
R2: (sc, inc) x3 (9)
R3–7: sc around (9)
R8: (sc, dec) x3 (6)
Light stuffing only at the tip.
Fasten off. Leave 18 cm tail.
Back Legs (Make 2)
Yarn: cream
R1: 6 sc in MR (6)
R2: (sc, inc) x3 (9)
R3–6: sc around (9)
R7: (sc, dec) x3 (6)
Fasten off. Leave 18 cm tail.
Tail (Make 1)
Yarn: cream
R1: 4 sc in MR (4)
R2: sc around (4)
R3: (sc, inc) x2 (6)
R4: sc around (6)
Flatten and sc through both sides across 3 stitches (3)
Fasten off. Leave 12 cm tail.
Shell Platform (Make 1)
Yarn: leaf green
R1: 6 sc in MR (6)
R2: inc x6 (12)
R3: (sc, inc) x6 (18)
R4: (2 sc, inc) x6 (24)
R5: (3 sc, inc) x6 (30)
R6: (4 sc, inc) x6 (36)
R7: (5 sc, inc) x6 (42)
R8: BLO sc around (42)
R9: sc around (42)
Fasten off. Leave 25 cm tail.
Leafy Shell Edge (Make 1)
Yarn: leaf green
Ch 42.
Row 1: Starting in 2nd ch from hook, sc 41, turn.
Row 2: (sl st, sc, hdc, 2 dc, hdc, sc) in next 6 sts, sl st in next st; repeat to end.
Fasten off. Leave 25 cm tail.
House Walls (Make 1)
Yarn: lavender
R1: 6 sc in MR (6)
R2: inc x6 (12)
R3: (sc, inc) x6 (18)
R4: (2 sc, inc) x6 (24)
R5: (3 sc, inc) x6 (30)
R6: FLO sc around (30)
R7–12: sc around (30)
Fasten off. Leave 30 cm tail.
Roof Scales (Make 12)
Yarn: pink
Ch 7.
Row 1: Starting in 2nd ch, sc 2, hdc 2, dc 2.
Row 2: Ch 1, rotate to work along the lower edge, sl st 6 evenly to form a petal tab.
Fasten off. Leave 10 cm tail.
Roof Cap (Make 1)
Yarn: pink
R1: 6 sc in MR (6)
R2: inc x6 (12)
R3: (sc, inc) x6 (18)
R4: (2 sc, inc) x6 (24)
R5: (3 sc, inc) x6 (30)
R6: (4 sc, inc) x6 (36)
R7–8: sc around (36)
Fasten off. Leave 25 cm tail.
Chimney Base (Make 1)
Yarn: brown
R1: 6 sc in MR (6)
R2–5: sc around (6)
Fasten off. Leave 15 cm tail.
Chimney Ruffle (Make 1)
Yarn: pink
Ch 12.
Row 1: 2 sc in each ch from 2nd ch to end (22)
Fasten off. Leave 12 cm tail.
Door (Make 1)
Yarn: brown
Ch 9.
Row 1: Starting in 2nd ch, sc 7, 3 sc in last ch; work opposite side of chain with 6 sc, 2 sc in last ch (18)
Row 2–5: sc around (18)
Fasten off. Leave 20 cm tail.
Door Arch (Make 1)
Yarn: gray
Ch 22.
Row 1: Starting in 2nd ch, sl st 21.
Fasten off. Leave 20 cm tail.
Heart Applique (Make 1)
Yarn: pink
In MR: 2 dc, 2 tr, 1 dc, ch 1, 1 dc, 2 tr, 2 dc. Pull ring closed.
Fasten off. Leave 10 cm tail.
Windows (Make 2)
Yarn: brown
R1: 8 sc in MR (8)
R2: inc x8 (16)
Fasten off. Leave 15 cm tail.
Embroider a crossbar with yellow or gold yarn after sewing in place.
Cheek Patches (Make 2)
Yarn: pink
R1: 6 sc in MR (6)
R2: inc x6 (12)
Fasten off. Leave 10 cm tail.
Flowers (Make 3)
Yarn: white or pink petals, yellow center
With petal color:
R1: 5 sc in MR, join with sl st.
Petals: (ch 3, 2 dc, ch 3, sl st in same st) x5.
Add a yellow French knot or tiny center circle.
Fasten off. Leave 10 cm tail.
Vine Tendrils (Make 2)
Yarn: leaf green
Ch 18.
Work 2 sc in each chain across to force the spiral.
Fasten off. Leave 10 cm tail.
Leaves (Make 6)
Yarn: leaf green
Ch 6.
Starting in 2nd ch: sl st, sc, hdc, sc, sl st.
Fasten off. Leave 8 cm tail.
Mushrooms (Make 2)
Stem, yarn: white
R1: 4 sc in MR (4)
R2–3: sc around (4)
Fasten off. Leave 10 cm tail.
Cap, yarn: red
R1: 6 sc in MR (6)
R2: inc x6 (12)
R3: (sc, inc) x6 (18)
Fasten off. Leave 10 cm tail.
Add white French knots or embroidered dots before assembly.
Assembly
- Sew the head to the front third of the body base, angled slightly upward.
- Attach the front legs beneath the head line, spaced so the turtle sits level.
- Sew the back legs slightly wider than the front pair for a planted stance.
- Attach the tail at the rear center.
- Sew the shell platform to the top of the body, keeping the disc centered and flat.
- Attach the leafy shell edge around the platform perimeter so the scallops face outward.
- Sew the lavender house walls to the center of the platform.
- Overlap and stitch the 12 roof scales around the upper wall section, then secure the roof cap on top and add the chimney.
- Add the door, gray arch, heart, and both windows; then sew on flowers, leaves, and vine tendrils.
- Assemble the mushrooms and attach them near the shell edge; sew on the cheek patches, then weave in all tails inside the body and house.
The piece is complete when the turtle stands flat on all four legs and the house roof overhang stays balanced front to back.
7 Technical Tips
- Mark the front center before limb placement. If the head shifts even 2 stitches off center, the house reads crooked once the windows go on.
- Keep stuffing firmer in the head than in the body. A soft head collapses backward under the visual weight of the roof and makes the neck line look too thin.
- Use invisible decreases on every closing round. Open decreases leave pinholes that show badly in cream yarn, especially on the head underside.
- Place safety eyes before the last two head decrease rounds. Waiting until after R13 makes the eye washers fight against the stuffing and distorts the round shape.
- Do not overfill the body top. The shell platform needs a flatter landing zone; a domed fill pushes the house walls outward and opens seams.
- Pin the windows and door before sewing. On a 30-stitch wall cylinder, one stitch of drift is visible, and the whole cottage face looks off-axis.
- Weave accessory tails inward, then across, then back. Short direct trims can loosen mushrooms, leaves, and roof scales after handling because those parts sit on exposed surface layers.
Conclusion
This version shifts the usual shell-first logic into a staged platform build, which is why the turtle amigurumi crochet pattern works best when the turtle body is finished and balanced before any cottage detail goes on. Next step: crochet the base turtle in cream and green first, test the stance, then add the house in separate layers. Save the finished piece to Pinterest, post the result on Instagram, and tag it with #FairyHouseTurtle. One question matters with this character more than most: did you angle the roof to the left like the photo, or center it directly over the shell?









