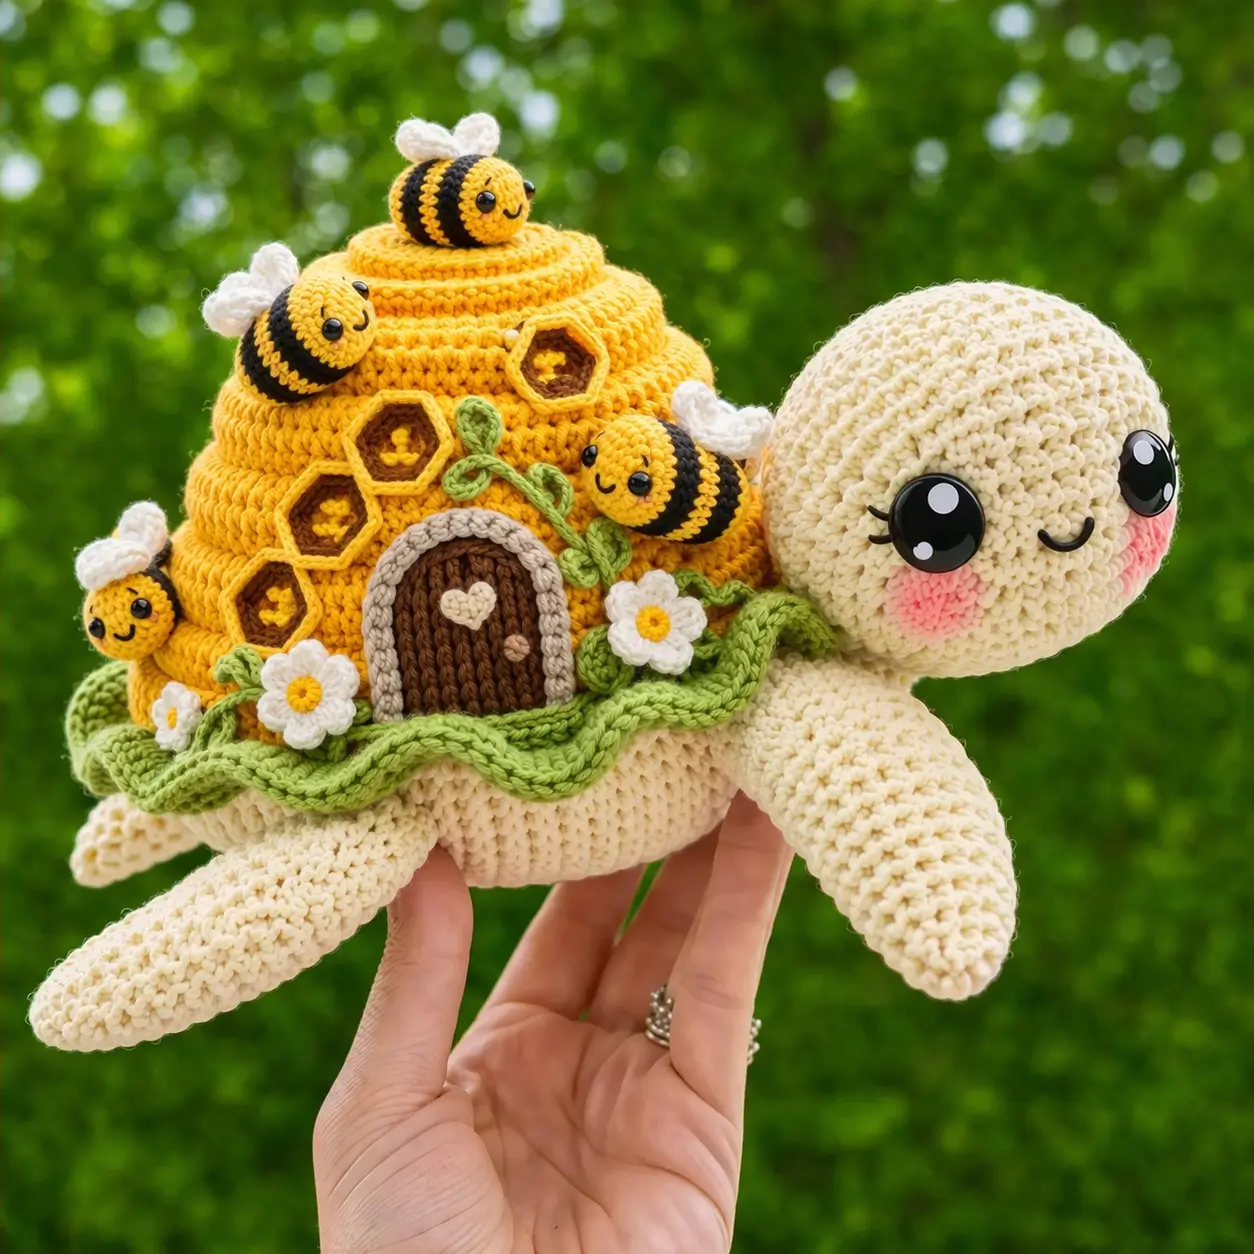
A turtle shell does not usually need a front door, but this turtle amigurumi crochet pattern does. The build uses worsted-to-light-worsted yarn, and a medium-size 36-stitch structure that finishes as a display plush rather than a keychain. It suits an intermediate maker who wants a spring market piece with stronger shelf appeal than a plain shell.
The Design: What Makes This Turtle Different
The shell is not treated as a dome with color changes. It is treated as architecture. That shift changes the sequence immediately: first a stable turtle base, then a separate stepped hive cover, then surface decoration that reads as comb, doorway, and garden edging. The rounded head stays oversized because the photo favors a soft caricature, not a natural sea-turtle proportion.
Another structural choice is the flatter body underside. A standard puffed shell can tip forward once the head is enlarged. Here, the body holds a broader contact area so the finished piece sits level under the added hive weight. A third choice is removable-looking decoration that is still sewn down in zones. That keeps the bees and flowers from twisting.
A common mistake with any crochet turtle pattern is making the shell too shallow. Then the head looks oversized for the back half. In this version, the hive height intentionally exceeds a normal shell arc. That is what gives the mini turtle crochet pattern its silhouette and keeps the turtle plush crochet theme readable from a distance.
Project Info at a Glance
| Skill Level | Time | Finished Size | Hook | Best For |
|---|---|---|---|---|
| Intermediate | 8–10 hours | approx. 18 cm long base; 14–16 cm tall with hive | 3.0 mm | display plush, spring decor, market table sample |
Finished size and hook are aligned to comparable published turtle patterns; final height varies because this version adds a raised decorative shell structure.
Materials and Tools
Yarn
Comparable turtle patterns use DK to light-worsted yarn with 3.0–3.5 mm hooks, while some larger decorative turtles use worsted yarn with more extensive accent colors. This version follows that middle zone.
- Cream — light worsted/worsted — 45 g — Stylecraft Special DK or similar
- Golden yellow — light worsted/worsted — 55 g — Stylecraft Special DK, Paintbox Cotton DK, or similar
- Black — small amount — 8 g — for bee stripes
- White — 12 g — for wings and flowers
- Brown — 15 g — for door and honeycomb centers
- Light green — 18 g — for vine trim and leaves
- Pink — scrap amount — for blush embroidery or brushed-on blush
Tools
- Hook 3.0 mm
- Safety eyes 6 mm for bees and 12–18 mm for the large turtle face, matched to your yarn scale
- Stuffing
- Tapestry needle
- Stitch markers
- Pins
Abbreviations
MR / sc / inc / dec / sl st / ch / BLO / FLO / fo
Use invisible decrease for the head, body, and hive shaping because the closing rounds sit on the front-facing curves and visible paired decreases leave a rougher line.
Pattern — Step by Step
Continuous spiral unless noted.
Head (Make 1)
Yarn: cream
R1: 6 sc in MR (6)
R2: inc x6 (12)
R3: (sc, inc) x6 (18)
R4: (2 sc, inc) x6 (24)
R5: (3 sc, inc) x6 (30)
R6: (4 sc, inc) x6 (36)
R7–11: sc around (36)
R12: (4 sc, dec) x6 (30)
R13: (3 sc, dec) x6 (24)
Insert eyes between R8 and R9, 8–10 sts apart. Add blush below each eye.
R14: (2 sc, dec) x6 (18)
Stuff firmly at the muzzle and upper crown.
R15: (sc, dec) x6 (12)
R16: dec x6 (6)
Fasten off. Leave 25 cm tail.
Body Base (Make 1)
Yarn: cream
R1: 6 sc in MR (6)
R2: inc x6 (12)
R3: (sc, inc) x6 (18)
R4: (2 sc, inc) x6 (24)
R5: (3 sc, inc) x6 (30)
R6: (4 sc, inc) x6 (36)
R7–14: sc around (36)
R15: (4 sc, dec) x6 (30)
R16: (3 sc, dec) x6 (24)
Stuff the body low and broad, not ball-firm.
R17: (2 sc, dec) x6 (18)
R18: (sc, dec) x6 (12)
R19: dec x6 (6)
Fasten off. Leave 25 cm tail.
Front Flippers (Make 2)
Yarn: cream
R1: 6 sc in MR (6)
R2: (sc, inc) x3 (9)
R3–8: sc around (9)
R9: flatten, 4 sc through both sides (4)
Fasten off. Leave 20 cm tail.
Back Flippers (Make 2)
Yarn: cream
R1: 6 sc in MR (6)
R2: sc around (6)
R3: (sc, inc) x3 (9)
R4–6: sc around (9)
R7: flatten, 4 sc through both sides (4)
Fasten off. Leave 18 cm tail.
Tail (Make 1)
Yarn: cream
R1: 6 sc in MR (6)
R2–3: sc around (6)
R4: flatten, 3 sc through both sides (3)
Fasten off. Leave 15 cm tail.
Beehive Shell Lower Dome (Make 1)
Yarn: golden yellow
R1: 6 sc in MR (6)
R2: inc x6 (12)
R3: (sc, inc) x6 (18)
R4: (2 sc, inc) x6 (24)
R5: (3 sc, inc) x6 (30)
R6: (4 sc, inc) x6 (36)
R7: BLO sc around (36)
R8–10: sc around (36)
R11: (4 sc, dec) x6 (30)
R12: sc around (30)
Fasten off.
Beehive Shell Middle Tier (Make 1)
Yarn: golden yellow
R1: 6 sc in MR (6)
R2: inc x6 (12)
R3: (sc, inc) x6 (18)
R4: (2 sc, inc) x6 (24)
R5: (3 sc, inc) x6 (30)
R6: BLO sc around (30)
R7–8: sc around (30)
R9: (3 sc, dec) x6 (24)
R10: sc around (24)
Fasten off.
Beehive Shell Top Tier (Make 1)
Yarn: golden yellow
R1: 6 sc in MR (6)
R2: inc x6 (12)
R3: (sc, inc) x6 (18)
R4: (2 sc, inc) x6 (24)
R5: BLO sc around (24)
R6–7: sc around (24)
R8: (2 sc, dec) x6 (18)
Fasten off.
Beehive Cap (Make 1)
Yarn: golden yellow
R1: 6 sc in MR (6)
R2: inc x6 (12)
R3: (sc, inc) x6 (18)
R4–5: sc around (18)
R6: (sc, dec) x6 (12)
Lightly stuff.
R7: dec x6 (6)
Fasten off. Leave 15 cm tail.
Honeycomb Panels (Make 4)
Yarn: outer yellow, inner brown
With brown:
R1: ch 2, work 6 sc into second ch from hook; sl st to first sc to form a tiny ring (6)
With yellow, join to any stitch:
Round 2: ch 2, 1 dc in same st, 2 dc in next st repeat around 3 times to create 6 sides
Fasten off. Leave 15 cm tail.
Door Frame (Make 1)
Yarn: light beige or cream
Ch 11.
Row 1: starting in second ch, 10 sc, ch 1, turn (10)
Rows 2–5: 10 sc, ch 1, turn (10)
Row 6: dec, 6 sc, dec, ch 1, turn (8)
Row 7: 8 sc, ch 1, turn (8)
Row 8: dec, 4 sc, dec, ch 1, turn (6)
Row 9: 6 sc
Fasten off.
Door Panel (Make 1)
Yarn: brown
Ch 9.
Row 1: starting in second ch, 8 sc, ch 1, turn (8)
Rows 2–6: 8 sc, ch 1, turn (8)
Row 7: dec, 4 sc, dec, ch 1, turn (6)
Row 8: 6 sc
Fasten off. Embroider one tiny cream heart and one French-knot knob.
Vine Trim (Make 1)
Yarn: light green
Ch 55.
Row 1: 2 sc in second ch from hook, 3 sc in next ch, 1 sc in next ch repeat across to create a ruffled edging.
Fasten off. Leave 20 cm tail.
Leaves (Make 6)
Yarn: light green
Ch 7.
Work: sl st in second ch, sc, hdc, dc, hdc, sc.
Fasten off. Leave 12 cm tail.
Flowers (Make 3)
Yarn: white and yellow
With yellow:
R1: 6 sc in MR (6), sl st to join.
With white:
ch 3, 2 dc in same st, ch 3, sl st in next st repeat 5 times for petals.
Fasten off. Leave 15 cm tail.
Cheek Patches (Make 2)
Yarn: pink
R1: 6 sc in MR (6)
R2: inc x6 (12)
Fasten off. Flatten lightly. Leave 10 cm tail.
Bees (Make 4)
Yarn: yellow and black
With yellow:
R1: 6 sc in MR (6)
R2: inc x6 (12)
R3: sc around (12)
Change to black:
R4: sc around (12)
Change to yellow:
R5: sc around (12)
Change to black:
R6: sc around (12)
Change to yellow:
R7: (sc, dec) x4 (8)
Insert 6 mm eyes between R2 and R3, about 4 sts apart. Stuff lightly.
R8: dec x4 (4)
Fasten off. Leave 20 cm tail.
Bee Wings (Make 8)
Yarn: white
R1: 6 sc in MR (6)
R2: (sc, inc) x3 (9)
Fasten off. Flatten. Leave 10 cm tail.
Optional Smile Embroidery
Use black thread for a shallow curved smile on turtle and bees.
Assembly
- Sew the head to the front third of the body base, slightly angled upward so the face projects beyond the shell line.
- Sew the front flippers on each side of the body just below head level; sew the back flippers farther rearward and slightly wider apart.
- Sew the tail at center back.
- Place the lower dome on the body and pin it before sewing; keep the shell centered so the body remains level.
- Stack the middle tier, top tier, and cap on the lower dome, sewing each one concentrically to create the stepped hive profile.
- Sew the door panel to the shell front, then attach the door frame around it.
- Add the honeycomb panels in an uneven cluster on the hive front and upper side; overlap one slightly for a denser wall effect.
- Sew the vine trim around the shell base edge, then add leaves and flowers at the front corners and side.
- Sew two wings to each bee, then stitch the bees onto the shell at different angles so they look in motion rather than lined up.
- Attach or embroider the cheek patches on the turtle face, weave in all tails, and shape the hive tiers by hand.
The finished piece should sit flat with the hive centered over the turtle’s widest body section.
7 Technical Tips
- Mark the midpoint of the shell before sewing. A shell shifted even 4–5 mm to one side will make the turtle lean visually.
- Stuff the head firmer than the body. A soft head collapses under large safety eyes and pulls the smile out of line.
- Use invisible decrease on every visible shaping round. Standard decrease leaves a ridge that shows on cream yarn, especially around the muzzle and hive cap.
- Insert the turtle eyes before the final two decrease rounds. Waiting until the head is nearly closed makes symmetry harder and increases stress on the stitches.
- Keep bee stuffing light. Overstuffed bees lose their oval shape and push the wing bases outward.
- Pin every honeycomb panel before sewing. A hexagon that rotates off-axis by one side reads as random applique, not comb.
- Weave tails back through at least 3 direction changes. Decorative parts on a display plush get handled at the shell edge first, and single-pass weaving loosens there fastest.
Conclusion
This beehive variation takes the standard turtle amigurumi crochet pattern in a more structural direction. The turtle base stays simple. The shell does the heavy lifting. Build the body first, check that it sits level, then add the hive in tiers so the silhouette remains controlled from every angle. After that, the bees and flowers are placement work, not rescue work. Save one front view and one side view for Pinterest, then post the finished plush on Instagram with #BeehiveTurtlePattern. Before you publish it, answer one design question: did you place the top bee off-center enough to make the hive look active?









