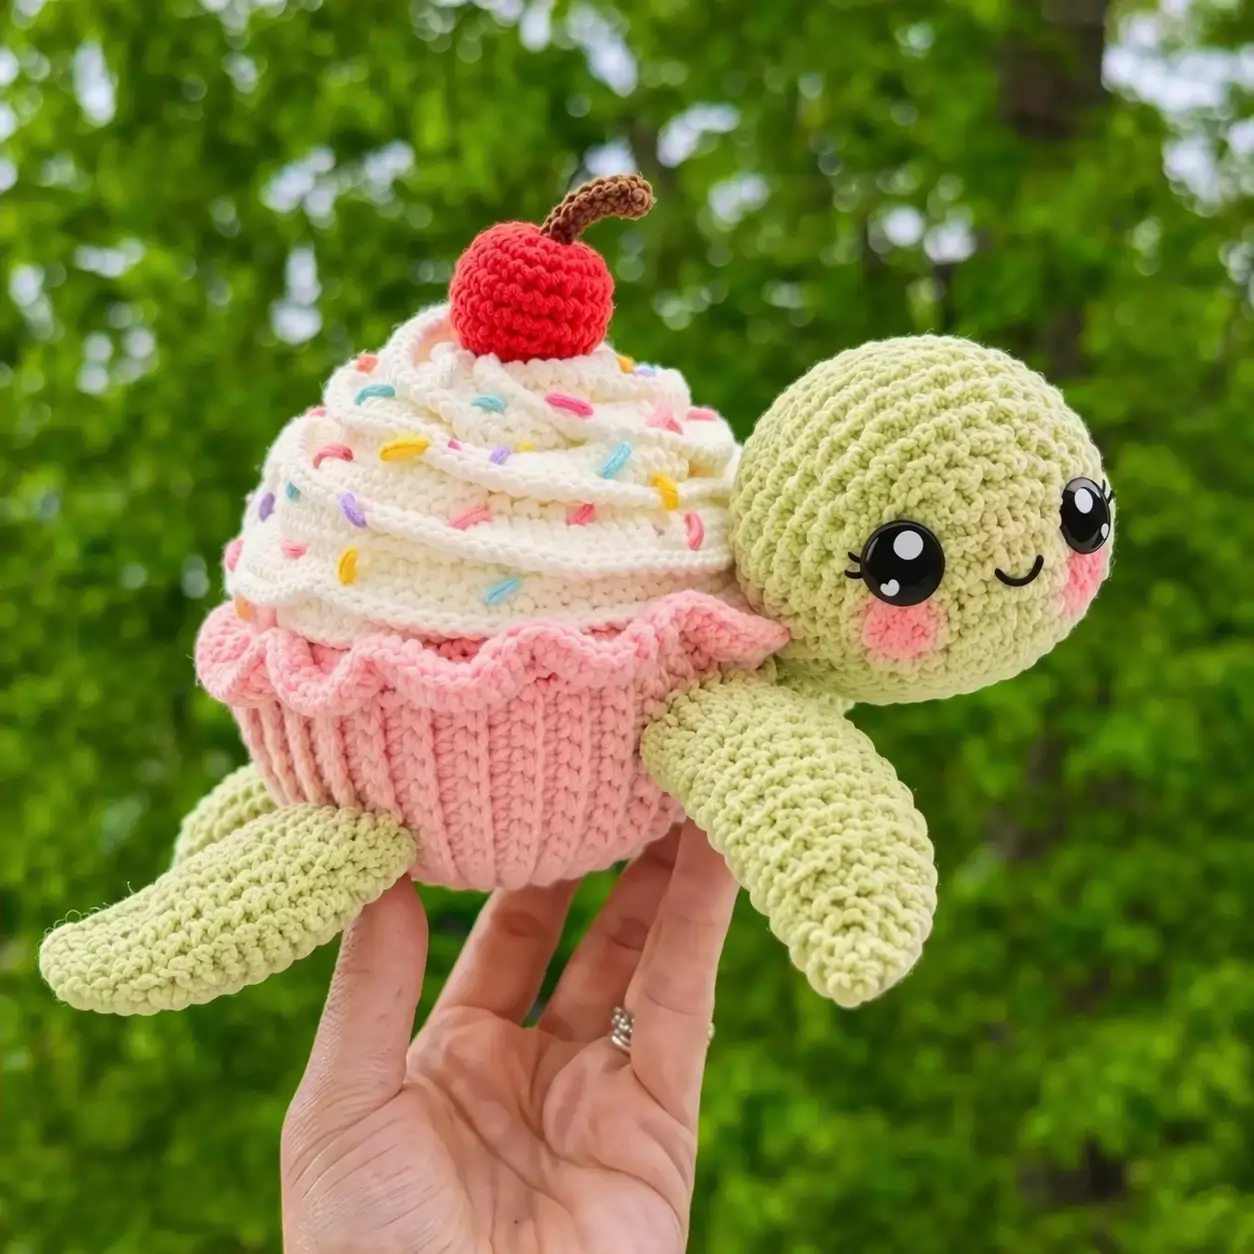
A turtle shell that has to read as piped frosting is a geometry problem before it is a plush. This cupcake turtle amigurumi crochet pattern uses super bulky chenille yarn, a 4 mm hook, and 16 mm safety eyes to make a piece about 17 cm long. You make it for gift stock, party decor, or a market table item that reads clearly from a distance.
The Design: What Makes Cupcake Turtle Different
The shell is not doing normal turtle work here. It has to hold two identities at once: turtle back and whipped topping. That is why published cupcake turtle designs push the body wider than the head and often use a larger stitch plateau for the shell than the face. The indexed cupcake turtle shell reaches 48 stitches, while the head peaks at 42, which gives the top enough spread for frosting detail without making the face look flat.
A second structural choice is the cupcake wrapper edge. In the photo, the lower shell reads as a pleated liner, not a smooth dome. The article version handles that with a ribbed pink band sewn around the lower body, because plain rounds do not create that bakery shape cleanly. Most cupcake turtle pattern pages mention hook size and yarn but skip this design logic.
The third choice is eye scale. Oversized eyes soften the face and shift the piece toward kawaii styling. A common mistake with a birthday turtle crochet pattern is placing the eyes too low, which makes the head look compressed once the frosting shell is attached. Published versions place eyes in the 16 mm to 30 mm range depending on yarn bulk, so timing and spacing matter more than brand choice.
Project Info at a Glance
| Skill Level | Time | Finished Size | Hook | Best For |
|---|---|---|---|---|
| Easy–Intermediate | 4–6 hours | about 17 cm long | 4.0 mm | gifts, birthdays, market plush |
Materials and Tools
Yarn
- Pale green chenille — super bulky — about 35–40 g — Himalaya Dolphin Baby, Premier Parfait Chunky, or Hobbii Honey Bunny type yarn
- Soft pink chenille — super bulky — about 15–18 g — for wrapper and cheek circles
- Cream or white chenille — super bulky — about 10–12 g — for frosting spiral
- Red chenille — small amount — for cherry
- Brown chenille or cotton — small amount — for stem
- Pastel cotton scraps — very small amounts — for sprinkles
Tools
- Hook 4.0 mm
- 16 mm safety eyes
- Polyfill or fiberfill
- Tapestry needle
- Stitch markers
- Pins
Abbreviations
MR = magic ring, sc = single crochet, inc = increase, dec = decrease, sl st = slip stitch, ch = chain, BLO = back loop only, FLO = front loop only, dc = double crochet.
Use invisible decrease on the visible shaping rounds so the head and wrapper edge do not show hard diagonal notches.
Pattern — Step by Step
Continuous spiral unless noted.
Head (Make 1)
Yarn: pale green
R1: 6 sc in MR (6)
R2: inc x6 (12)
R3: (sc, inc) x6 (18)
R4: (2 sc, inc) x6 (24)
R5: (3 sc, inc) x6 (30)
R6: (4 sc, inc) x6 (36)
R7: (5 sc, inc) x6 (42)
R8–14: sc around (42)
R15: (5 sc, dec) x6 (36)
Insert 16 mm eyes between R6 and R7, about 8 stitches apart.
R16: (4 sc, dec) x6 (30)
Stuff firmly at the snout and crown.
R17: (3 sc, dec) x6 (24)
R18: (2 sc, dec) x6 (18)
R19: (sc, dec) x6 (12)
R20: dec x6 (6)
Fasten off. Leave a 25 cm tail.
Front Flippers (Make 2)
Yarn: pale green
R1: 6 sc in MR (6)
R2: inc x6 (12)
R3: (sc, inc) x6 (18)
R4: (2 sc, inc) x6 (24)
R5: (3 sc, inc) x6 (30)
R6: (4 sc, inc) x6 (36)
Do not stuff. Fold flat.
Closing row: sc through both layers across (18)
Fasten off. Leave a 20 cm tail.
Back Flippers (Make 2)
Yarn: pale green
R1: 6 sc in MR (6)
R2: inc x6 (12)
R3: (sc, inc) x6 (18)
R4: (2 sc, inc) x6 (24)
R5: (3 sc, inc) x6 (30)
Do not stuff. Fold flat.
Closing row: sc through both layers across (15)
Fasten off. Leave a 20 cm tail.
Tail (Make 1)
Yarn: pale green
R1: 6 sc in MR (6)
R2: (inc, 2 sc) x2 (8)
R3: (inc, 3 sc) x2 (10)
R4–5: sc around (10)
Do not stuff. Fold flat.
Closing row: sc through both layers across (5)
Fasten off. Leave a 15 cm tail.
Cupcake Body Core (Make 1)
Yarn: pale green
R1: 6 sc in MR (6)
R2: inc x6 (12)
R3: (sc, inc) x6 (18)
R4: (2 sc, inc) x6 (24)
R5: (3 sc, inc) x6 (30)
R6: (4 sc, inc) x6 (36)
R7: (5 sc, inc) x6 (42)
R8: (6 sc, inc) x6 (48)
R9–14: sc around (48)
R15: BLO sc around (48)
R16–19: sc around (48)
R20: (6 sc, dec) x6 (42)
R21: (5 sc, dec) x6 (36)
R22: (4 sc, dec) x6 (30)
R23: (3 sc, dec) x6 (24)
Stuff the body evenly; keep the lower half dense so the turtle does not tip backward.
R24: (2 sc, dec) x6 (18)
R25: (sc, dec) x6 (12)
R26: dec x6 (6)
Fasten off. Weave closed.
Cupcake Wrapper Band (Make 1)
Yarn: soft pink
Ch 9.
Row 1: Starting in 2nd ch from hook, 8 sc, ch 1, turn (8)
Rows 2–36: BLO 8 sc, ch 1, turn (8)
Wrap around the widest lower section of the body. Add or subtract rows so the band fits snugly. Sew short ends together.
Fasten off. Leave a 30 cm tail.
Frosting Shell Cap (Make 1)
Yarn: cream/white
R1: 6 sc in MR (6)
R2: inc x6 (12)
R3: (sc, inc) x6 (18)
R4: (2 sc, inc) x6 (24)
R5: (3 sc, inc) x6 (30)
R6: (4 sc, inc) x6 (36)
R7: (5 sc, inc) x6 (42)
R8: (6 sc, inc) x6 (48)
R9–11: sc around (48)
R12: FLO only, (sl st, 2 dc, sl st) in next st, repeat around to form a ruffled frosting rim
R13: BLO of R12, sc around (48)
R14: (6 sc, dec) x6 (42)
R15: sc around (42)
R16: (5 sc, dec) x6 (36)
R17: sc around (36)
Lightly stuff.
R18: (4 sc, dec) x6 (30)
R19: (3 sc, dec) x6 (24)
R20: (2 sc, dec) x6 (18)
Fasten off. Leave a 35 cm tail.
Whipped Cream Swirl Strip (Make 1)
Yarn: cream/white
Ch 36.
Row 1: Starting in 2nd ch from hook, 35 sc, ch 1, turn (35)
Row 2: BLO 35 sc, ch 1, turn (35)
Row 3: BLO 35 sc, ch 1, turn (35)
Fasten off. Roll into a loose spiral and stitch to the top center of the frosting cap.
Cherry (Make 1)
Yarn: red
R1: 6 sc in MR (6)
R2: inc x6 (12)
R3: (sc, inc) x6 (18)
R4–6: sc around (18)
R7: (sc, dec) x6 (12)
Stuff.
R8: dec x6 (6)
Fasten off. Leave a 20 cm tail.
Stem (Make 1)
Yarn: brown
Ch 8.
Row 1: Starting in 2nd ch from hook, 7 sl st.
Fasten off. Leave tails for sewing.
Cheek Patches (Make 2)
Yarn: pink
R1: 6 sc in MR (6)
R2: inc x6 (12)
Fasten off. Leave a 10 cm tail.
Sprinkles (Make as needed)
Yarn: pastel scraps
Cut short strands in yellow, blue, pink, and lavender. Stitch tiny satin-stitch dashes across the frosting cap. Keep them horizontal or slightly angled.
Assembly
- Sew the head to the front of the cupcake body core, centered slightly above the wrapper line.
- Attach the front flippers at the lower front sides, aligned just behind the head seam.
- Sew the back flippers near the rear lower sides.
- Attach the tail at the back center, between the back flippers.
- Slide the pink wrapper band around the lower body and stitch it in place at top and bottom edges.
- Sew the frosting shell cap over the upper half of the body, covering the join line like a shell.
- Add the whipped cream swirl to the frosting center.
- Sew the cherry on top of the swirl.
- Attach the stem at a slight backward angle, then sew on the cheek patches and embroider the smile and lashes.
- Add sprinkles last, spacing them so no two large colors sit side by side.
The finished piece should sit low at the body, with the head projecting forward and the frosting reading as the top shell.
7 Technical Tips
- Mark the first stitch of every round on the head and body. Missing one increase before the 42- or 48-stitch plateau shifts the face off center by the time you place the eyes.
- Stuff the head harder than the frosting cap. A soft head collapses under the visual weight of oversized eyes and makes the cheeks buckle inward.
- Use invisible decrease on R15 onward in the head. Standard decreases leave a laddered line that shows under chenille when the face turns toward light.
- Place the eyes before finishing R16 of the head. Waiting until the opening drops below 30 stitches makes washer placement harder and can distort the eye spacing.
- Keep chenille tension slightly tighter on the wrapper band than on the body. Loose ribbing flares outward and stops looking like a cupcake liner.
- Pin the frosting cap in four compass points before sewing. Without that step, the ruffle drifts and the cherry ends up off the center axis.
- Weave tails at least 4 cm through internal stuffing, then reverse direction once. Short tail burying is the exact failure mode that causes flippers to loosen after display handling.
Conclusion
This cupcake turtle amigurumi crochet pattern works because the silhouette is readable in three layers: turtle head, cupcake base, frosting shell. Keep the head round, the wrapper snug, and the topping centered. Next, crochet one sample in your photo colors, then note the exact row count you prefer for the frosting height before making a second for sale or gifting. Share the finished piece on Pinterest and Instagram with #CupcakeTurtlePattern. One detail matters most with this character: did your cherry sit upright, or did you angle it back to keep the turtle profile visible?









