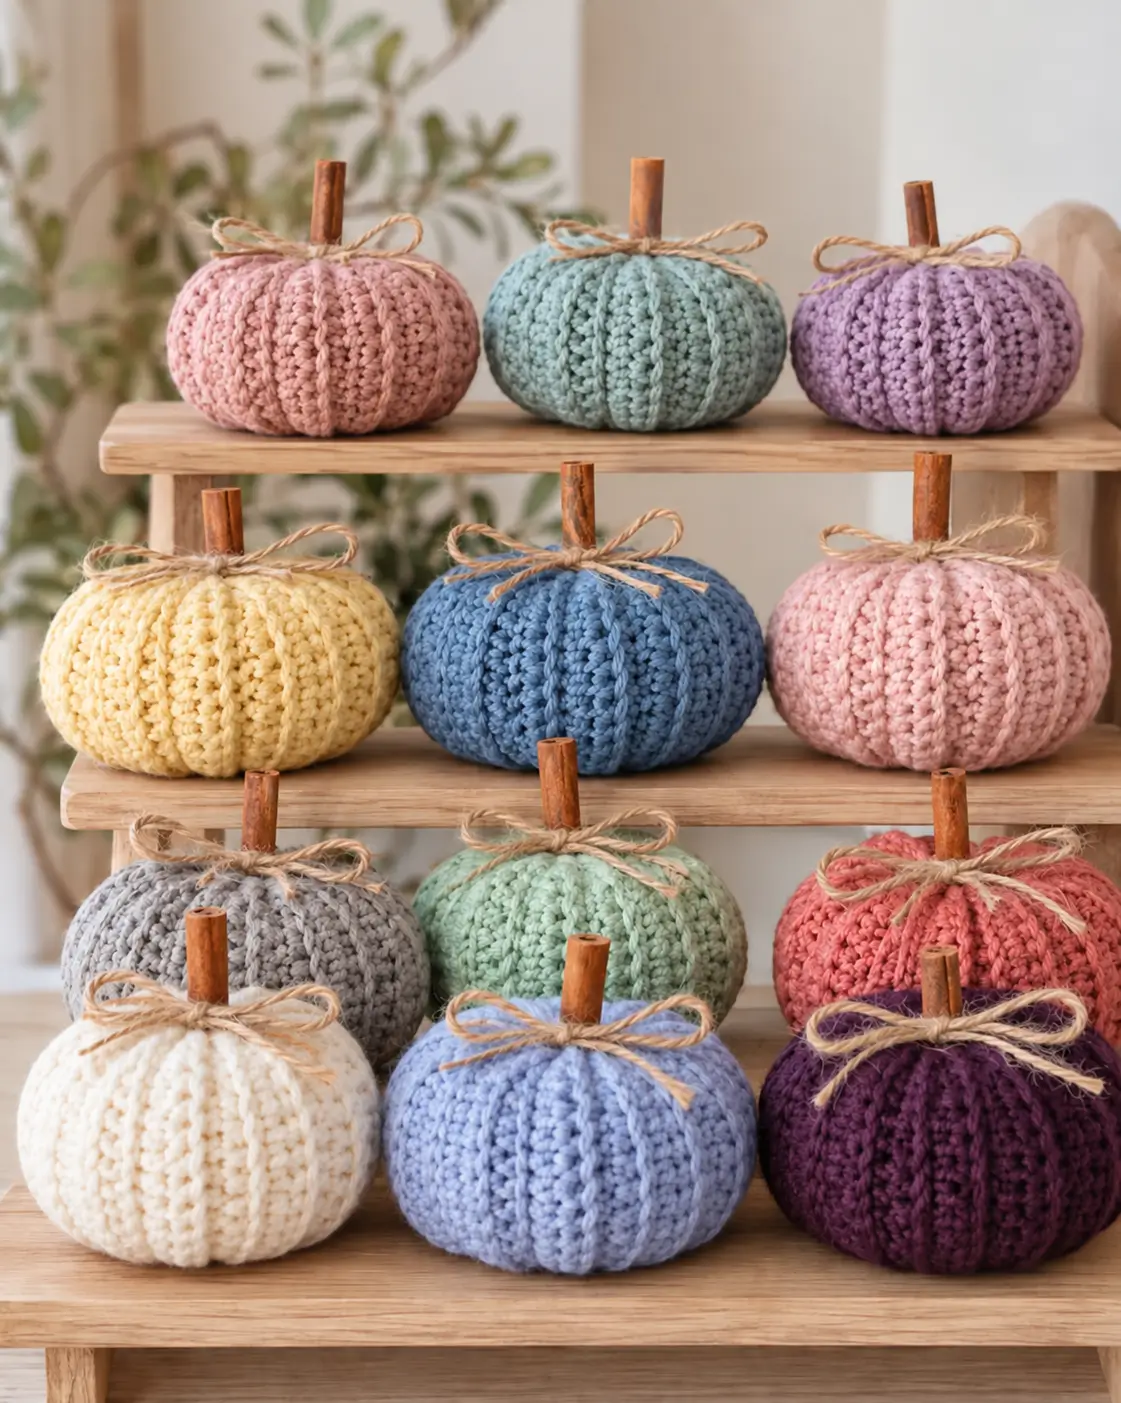
A pumpkin gets its recognizable shape from deep vertical ribs, and those ribs are the main construction feature of this design. This crochet pumpkin pattern creates soft stuffed pumpkins with pronounced ridges, a compact flattened profile, cinnamon-stick-style stems and jute bows. Make them in cream, dusty pink, sage, blue, plum, yellow, gray or traditional autumn colors for table, shelf and seasonal home décor.
About the Crochet Pumpkin Design
The pumpkins in the reference image use a simple rounded structure divided into prominent vertical sections. Instead of relying on color changes to define the shape, the design uses raised crochet ridges that run from the top opening to the base.
A relatively wide body combined with a shorter height creates the flattened pumpkin silhouette. Firm stuffing supports the outer wall, while shaping through the center pulls the top and bottom inward.
The decorative stem is intentionally different from the crocheted body. A short cinnamon stick or smooth wooden stem introduces a contrasting material, while natural jute twine conceals the attachment area.
This construction can be repeated in different yarn colors without changing the basic pattern. That makes it practical for creating an entire set of crochet pumpkins in coordinated seasonal palettes.
Project Info at a Glance
| Skill Level | Time | Finished Size | Hook | Construction |
|---|---|---|---|---|
| Easy–Intermediate | 1.5–3 hours each | Approx. 15–20 cm wide | 5 mm | Ribbed rectangle, seamed and stuffed |
The final dimensions depend on yarn weight, hook size, stuffing density and the number of rows worked. Make a smaller or larger pumpkin by adjusting the starting chain and the number of rows.
Materials and Tools
Yarn
- Dusty Pink: worsted or aran-weight yarn — approximately 70–100 g
- Sage Green: worsted or aran-weight yarn — approximately 70–100 g
- Lavender: worsted or aran-weight yarn — approximately 70–100 g
- Butter Yellow: worsted or aran-weight yarn — approximately 70–100 g
- Dusty Blue: worsted or aran-weight yarn — approximately 70–100 g
- Light Gray: worsted or aran-weight yarn — approximately 70–100 g
- Mint Green: worsted or aran-weight yarn — approximately 70–100 g
- Coral: worsted or aran-weight yarn — approximately 70–100 g
- Cream: worsted or aran-weight yarn — approximately 70–100 g
- Periwinkle Blue: worsted or aran-weight yarn — approximately 70–100 g
- Deep Plum: worsted or aran-weight yarn — approximately 70–100 g
Choose a yarn with enough body to hold the ribs after stuffing. Cotton, acrylic or a cotton-acrylic blend can all be used.
Tools
- 5 mm crochet hook
- Polyester fiberfill
- Yarn needle
- Stitch markers
- Scissors
- Cinnamon sticks or short wooden stems
- Natural jute twine
- Tape measure
Abbreviations
- ch — chain
- sc — single crochet
- hdc — half double crochet
- sl st — slip stitch
- st/sts — stitch/stitches
- BLO — back loop only
- rep — repeat
The back-loop-only technique creates the parallel ridges needed for the segmented pumpkin surface.
Crochet Pumpkin Pattern — Step by Step
Medium Ribbed Pumpkin Body
Use any main color from the palette.
Foundation: Ch 26.
Row 1: Hdc in second ch from hook and in every remaining ch. (25)
Row 2: Ch 1, turn. Hdc BLO in every st across. (25)
Rows 3–36: Repeat Row 2. (25)
Do not fasten off immediately. Fold the rectangle so the first and last rows meet.
The ridges must run vertically when the rectangle is formed into a cylinder. If the ribs run around the circumference instead, rotate the piece before joining.
Joining the Pumpkin Body
Place the first and final rows together.
Slip stitch through both layers from one end to the other, keeping the seam flexible. Fasten off and leave a long tail of approximately 50 cm.
Turn the cylinder so the preferred side faces outward.
Closing the Bottom
Thread the long yarn tail through a yarn needle.
Run the needle in and out around one open edge of the cylinder, catching approximately one stitch from each ridge.
Pull the yarn firmly until the opening closes.
Pass the needle across the center several times to reinforce the closure. Knot securely on the inside.
The bottom should remain relatively flat. A large knot or excess fabric concentrated at the center can make the finished pumpkin unstable on a table.
Stuffing the Pumpkin
Add polyester fiberfill in small sections.
Push stuffing toward the outer perimeter first. Continue filling until the ribs are supported but remain clearly visible.
Keep the center slightly less dense than the outer circumference. This makes it easier to pull the top and bottom toward each other during shaping.
Do not pack the fiberfill until the crochet stitches stretch apart. Overstuffing reduces the definition between the raised ribs.
Closing the Top
Cut approximately 70 cm of matching yarn and thread the yarn needle.
Weave around the open top edge in the same manner used for the bottom.
Pull until the opening measures approximately 1.5–2 cm across. Do not close it completely if a cinnamon stick or wooden stem will be inserted.
Secure the yarn temporarily but do not cut the tail.
Shaping the Pumpkin
Insert the yarn needle through the center opening at the top and push it through the stuffed body until it exits at the center of the bottom.
Pull the yarn firmly enough to draw the top and bottom toward each other.
Insert the needle back through the pumpkin from bottom to top.
Repeat this process two or three times.
The pumpkin should become wider and slightly flatter as tension increases. Stop before the center becomes deeply compressed.
Secure the shaping yarn near the top opening.
Optional Extra Pumpkin Sections
The BLO construction already produces multiple ribs, but additional shaping can make the sections more pronounced.
Cut a length of matching yarn approximately four times the circumference of the pumpkin.
Bring the yarn from the bottom center to the top center.
Run it down the outside of the pumpkin inside one natural groove between crochet ribs.
Pass through the bottom center and return through the middle to the top.
Move to the opposite groove and repeat.
Add four to eight shaping lines according to the amount of segmentation required.
Maintain equal tension on every line. One overly tight strand can pull the pumpkin into an asymmetrical shape.
Small Crochet Pumpkin
For a smaller version similar to the compact pumpkins visible in the collection, reduce both dimensions of the starting rectangle.
Foundation: Ch 20.
Row 1: Hdc in second ch from hook and across. (19)
Row 2: Ch 1, turn. Hdc BLO across. (19)
Rows 3–28: Repeat Row 2. (19)
Join, close, stuff and shape using the same method as the medium pumpkin.
This version should finish at approximately 11–14 cm wide depending on yarn and tension.
Large Crochet Pumpkin
Use a longer starting chain and additional rows for a larger centerpiece.
Foundation: Ch 32.
Row 1: Hdc in second ch from hook and across. (31)
Row 2: Ch 1, turn. Hdc BLO across. (31)
Rows 3–44: Repeat Row 2. (31)
Join the rectangle and complete the stuffing and shaping process as described above.
Depending on gauge, this version can finish approximately 20–25 cm wide.
Adding the Cinnamon Stick Stem
Cut or select a cinnamon stick approximately 5–8 cm long.
Insert roughly 2–3 cm of the stick into the top opening. The visible stem should remain proportional to the pumpkin rather than extending excessively above it.
Use the remaining yarn tail to tighten the crochet fabric around the base of the stem.
Pass the yarn through several opposite stitches around the opening, tighten and knot securely.
A wooden twig or short wooden dowel can replace the cinnamon stick if preferred.
Adding the Jute Bow
Cut approximately 35–45 cm of natural jute twine.
Wrap it once around the base of the stem and tie a secure knot.
Form two loops and make a small bow.
Trim the two tails to similar lengths. The bow should sit directly above the crochet surface without concealing a large portion of the pumpkin ribs.
Color Ideas for a Crochet Pumpkin Collection
The same construction can produce very different collections simply by changing the yarn palette. The reference design uses muted and pastel colors rather than restricting the pumpkins to orange.
- Neutral: cream, oatmeal, taupe, gray and soft brown
- Pastel: dusty pink, lavender, mint, pale yellow and powder blue
- Autumn: burnt orange, mustard, olive, rust and burgundy
- Cool Tones: sage, dusty blue, periwinkle, gray and plum
- Vintage: faded rose, muted green, cream, denim blue and dusty purple
Keep the cinnamon or wooden stems consistent across the set if the yarn colors vary widely. Repeating the same stem and jute treatment gives the collection a common visual structure.
Assembly
- Crochet the ribbed rectangle to the dimensions required for the selected pumpkin size.
- Join the first and last rows with slip stitches to create a cylinder.
- Gather one open edge tightly and secure it to create the bottom.
- Add fiberfill gradually, distributing most of the stuffing around the outer circumference.
- Gather the upper opening while leaving enough room for the decorative stem.
- Pass matching yarn through the center from top to bottom several times to flatten and shape the pumpkin.
- Add optional external shaping strands inside selected grooves if deeper pumpkin sections are required.
- Insert a 5–8 cm cinnamon stick or wooden stem into the top opening.
- Tighten the remaining crochet stitches around the stem and weave in every yarn tail.
- Tie natural jute around the stem and trim the bow ends evenly.
The completed pumpkin should sit on its flattened base without the stem leaning noticeably to either side.
7 Technical Tips for Better Crochet Pumpkins
- Weak rib definition: Work every body row through the back loop only. Accidentally working through both loops creates a flat section that remains visible after stuffing.
- Overstuffing: Stop adding fiberfill when the ribs are supported but the stitches have not begun to spread apart. Excess stuffing turns the flattened pumpkin into a nearly spherical shape.
- Uneven seam: Match the first and final rows stitch for stitch before slip-stitching them together. An offset seam produces a diagonal ridge.
- Open bottom: Make the gathering stitches approximately 5–8 mm apart. Large gaps between gathering points can leave a visible hole after the yarn is tightened.
- Insufficient center shaping: Pass the shaping yarn from top to bottom at least twice. One loose pass may not hold the flattened silhouette after the fiberfill settles.
- Crooked stem: Insert at least 2 cm of the cinnamon stick into the center opening. A stem sitting only on the surface can tilt or detach during handling.
- Unequal sections: When adding external shaping strands, divide the circumference visually before tightening any strand. Finish positioning all sections first, then adjust their tension.
How to Change the Pumpkin Size
Two measurements control this pattern. The starting chain affects the height of the finished pumpkin, while the number of rows controls its circumference.
For a flatter pumpkin, increase the number of rows without significantly increasing the starting chain. For a taller pumpkin, lengthen the foundation chain while keeping the circumference relatively moderate.
Make a test rectangle if using a substantially different yarn weight. Fold the rectangle into a cylinder before fastening off and check its proportions.
A useful target is for the rectangle’s length to measure approximately twice its height, although the exact ratio can be adjusted according to the desired pumpkin profile.
Choosing Yarn and Hook Size
Worsted or aran-weight yarn gives the ribs enough thickness to remain visible after stuffing. A 5 mm hook provides a practical starting point, but individual tension determines whether that size produces the required fabric.
If large openings appear between stitches after stuffing, move down by 0.5 mm. If the fabric becomes stiff and difficult to gather at the top and bottom, move up by 0.5 mm.
Chunky yarn can also be used. Increase the hook size according to the yarn label and reduce the starting chain and row count because each stitch will occupy more space.
How to Make the Ribs More Defined
Three factors determine the visibility of the pumpkin sections: stitch construction, stuffing density and shaping tension.
Back-loop-only half double crochet creates the initial raised lines. Moderate stuffing keeps those ridges from disappearing. Center shaping then compresses the height and pushes the circumference outward.
If deeper grooves are required, add separate shaping strands after stuffing. Position each strand directly between two existing raised ribs. Pull until the groove becomes visible, but stop before the yarn sinks completely into the crochet fabric.
Check the pumpkin from above after every strand. The sections should radiate evenly from the stem.
Finishing the Crochet Pumpkin
Check the bottom before cutting the final yarn tail. If the pumpkin rocks when placed on a flat surface, redistribute the stuffing and adjust the center shaping until the base sits evenly.
Rotate the stem so its most attractive side faces forward, then tighten the top opening around it. Trim loose jute fibers only after the bow has been positioned.
Repeat the same crochet pumpkin pattern in dusty pink, sage, lavender, yellow, blue, gray, cream, coral and plum to create a coordinated display without changing the construction. Save the finished set to Pinterest or share your color combination on Instagram with #RibbedCrochetPumpkins. Which three colors would you combine for your own pumpkin set?









