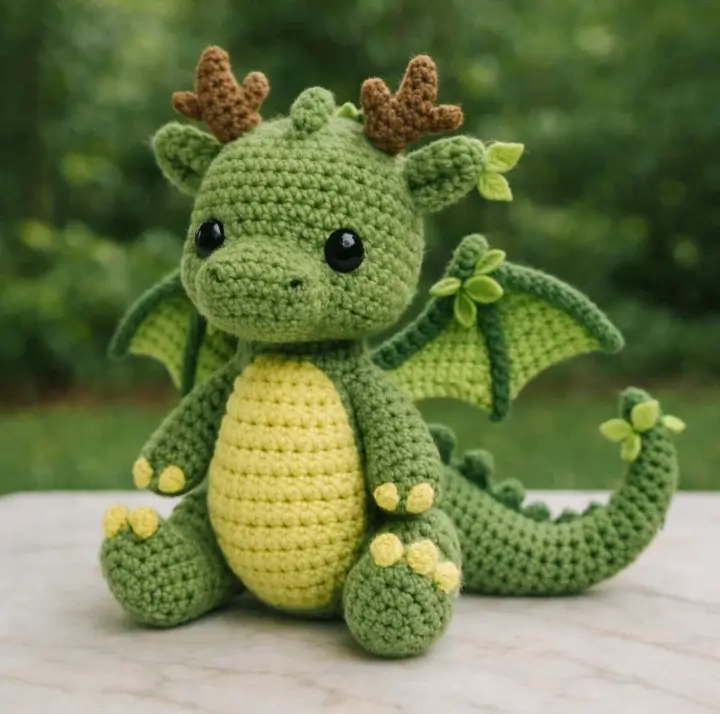
Wings change the center of gravity. That is the first engineering problem in this dragon amigurumi crochet pattern. You are making a seated dragon in worsted yarn with a 4 mm hook, 12 mm eyes, and a target height close to 18 cm, suitable for an intermediate maker who wants a display toy with stable posture and clear fantasy features.
The Design: What Makes This Dragon Different
This version is not built like a generic dinosaur with wings added later. The head stays broad, the snout projects forward, and the tail acts as a rear brace. That geometry matters because dragons tip backward once the wings and horns add mass above the shoulder line. You need the front view to read as dragon, but the side view has to keep the toy upright.
Two decisions define the silhouette. First, the antlers replace simple cones. That shifts the profile from reptile to woodland fantasy. Second, the pale belly insert runs long and oval instead of round. It lengthens the torso visually and keeps the seated dragon amigurumi from looking squat. A common mistake is undersizing the muzzle; then the eyes dominate and the face starts reading as frog instead of dragon. In most search results, the baby dragon crochet pattern category also skips leaf appliqués, which this photo clearly uses as secondary styling.
Project Info at a Glance
| Skill Level | Time | Finished Size | Hook | Best For |
|---|---|---|---|---|
| Intermediate | 8–10 hours | 18 cm seated | 4 mm | shelf display, gift make, fantasy collection |
Finished size is based on verified dragon references in the 18–20 cm range using similar hook and yarn classes; this article targets the lower end of that range to match the photo’s seated proportions.
Materials and Tools
Yarn
- Sage green — worsted — about 50 g — Stylecraft Special DK or any smooth worsted acrylic/cotton blend in a close shade
- Pale yellow — worsted — about 25 g — for belly, claws, paw pads, and wing membrane accents
- Brown — worsted — about 10 g — for antlers
- Leaf green — worsted scraps — small amount — for appliqué leaves
Tools
- Hook 4 mm
- 12 mm safety eyes
- Polyfill stuffing
- Tapestry needle
- Stitch markers
- Pins
Material choices align with larger dragon references that use worsted yarn and 4 mm hooks, while gram estimates follow a documented 50 g / 25 g / 10 g dragon kit split.
Abbreviations
MR / sc / inc / dec / sl st / ch / BLO / FLO / hdc / dc
Use invisible decrease for visible shaping rounds on the head and body. It keeps the fabric flatter and avoids a broken contour line across the face.
Pattern — Step by Step
Continuous spiral unless noted.
Head (Make 1)
Yarn: sage green — Standard amigurumi math informed by larger seated dragon proportions
R1: 6 sc in MR (6)
R2: inc x6 (12)
R3: (1 sc, inc) x6 (18)
R4: (2 sc, inc) x6 (24)
R5: (3 sc, inc) x6 (30)
R6: (4 sc, inc) x6 (36)
R7-R12: sc around (36)
R13: (4 sc, dec) x6 (30)
R14: (3 sc, dec) x6 (24)
R15: (2 sc, dec) x6 (18)
Insert eyes between R9 and R10, 8 stitches apart. Stuff firmly before closing.
R16: (1 sc, dec) x6 (12)
R17: dec x6 (6)
Fasten off. Leave 20 cm tail.
Snout (Make 1)
Yarn: sage green — photo-matched feature
R1: 6 sc in MR (6)
R2: inc x6 (12)
R3: (1 sc, inc) x6 (18)
R4-R5: sc around (18)
Fasten off. Leave 20 cm tail.
Embroider nostrils after sewing.
Body (Make 1)
Yarn: sage green with pale yellow belly panel — Standard amigurumi math; medium plateau 36
R1: 6 sc in MR (6)
R2: inc x6 (12)
R3: (1 sc, inc) x6 (18)
R4: (2 sc, inc) x6 (24)
R5: (3 sc, inc) x6 (30)
R6: (4 sc, inc) x6 (36)
R7-R13: sc around (36)
R14: (4 sc, dec) x6 (30)
R15: (3 sc, dec) x6 (24)
R16: (2 sc, dec) x6 (18)
Stuff lower body firmly. Keep upper body slightly softer for assembly.
R17: (1 sc, dec) x6 (12)
Fasten off. Leave 25 cm tail.
Belly Patch (Make 1)
Yarn: pale yellow — photo-specific insert
Ch 7.
R1: starting in 2nd ch from hook, 5 sc, 3 sc in last ch; work opposite side, 4 sc, inc (14)
R2: inc, 4 sc, 3 inc, 4 sc, 2 inc (20)
R3: sc around (20)
R4: inc, 8 sc, 2 inc, 8 sc, inc (24)
R5-R9: sc around (24)
Fasten off. Leave 25 cm tail.
Arms / Front Legs (Make 2)
Yarn: sage green with pale yellow claw pads — Standard amigurumi math
R1: 6 sc in MR (6)
R2: (1 sc, inc) x3 (9)
R3-R7: sc around (9)
Add three small claw pads in pale yellow after assembly.
Flatten top and sc through both layers 4 sts.
Fasten off. Leave 20 cm tail.
Back Legs (Make 2)
Yarn: sage green — photo shows larger seated feet
R1: 6 sc in MR (6)
R2: inc x6 (12)
R3: (1 sc, inc) x6 (18)
R4-R6: sc around (18)
R7: (1 sc, dec) x6 (12)
R8: sc around (12)
Stuff front half of foot more than heel. That keeps the seated angle.
Flatten top and sc through both layers 6 sts.
Fasten off. Leave 20 cm tail.
Ears (Make 2)
Yarn: sage green — tiny leaflike ears visible in photo
R1: 4 sc in MR (4)
R2: (1 sc, inc) x2 (6)
R3: (2 sc, inc) x2 (8)
R4: sc around (8)
Flatten lightly.
Fasten off. Leave 15 cm tail.
Wings (Make 2)
Yarn: sage green outer edge, pale yellow inner membrane — inspired by documented dragon wing row shaping
Ch 15.
R1: starting in 2nd ch from hook, 14 sc (14)
R2: ch 1, turn, dec, 10 sc, dec (12)
R3: ch 1, turn, sc across (12)
R4: ch 1, turn, dec, 8 sc, dec (10)
R5: ch 1, turn, sc across (10)
R6: ch 1, turn, dec, 6 sc, dec (8)
R7: ch 1, turn, sc across (8)
Fasten off. Leave 20 cm tail.
Surface-crochet or sew a pale yellow membrane panel inside if you want a closer match to the photo.
Antlers / Horns (Make 2)
Yarn: brown — photo-specific, deer-like rather than cone-shaped
Main stem:
R1: 6 sc in MR (6)
R2-R4: sc around (6)
Branch A:
R5: 3 sc, ch 4
R6: starting in 2nd ch from hook, sl st, sc, sl st back to stem, 3 sc around stem (6)
Branch B:
R7: 2 sc, ch 3
R8: starting in 2nd ch from hook, sl st, sc, sl st back to stem, 4 sc around stem (6)
R9: sc around (6)
Fasten off. Leave 20 cm tail.
Do not overstuff. Slightly soft antlers sit better on a rounded head.
Tail (Make 1)
Yarn: sage green — long curled support tail from the photo
R1: 6 sc in MR (6)
R2-R5: sc around (6)
R6: (2 sc, inc) x2 (8)
R7-R10: sc around (8)
R11: (3 sc, inc) x2 (10)
R12-R18: sc around (10)
R19: (4 sc, inc) x2 (12)
R20-R24: sc around (12)
Fasten off. Leave 25 cm tail.
Stuff lightly near tip, medium at base. Bend into a curve before sewing.
Back Spikes (Make 4)
Yarn: sage green — small dorsal bumps visible from neck to tail
For each spike:
R1: 4 sc in MR (4)
R2: sc around (4)
Fasten off. Leave 10 cm tail.
Cheek Patches (Make 2)
Yarn: sage green or a slightly lighter tint — flat circle pieces to support the rounded baby look
R1: 6 sc in MR (6)
R2: inc x6 (12)
Fasten off. Leave 12 cm tail.
Leaf Appliqués (Make 3 sets)
Yarn: leaf green — accessory visible on ear, wing, and tail
For one small leaf:
Ch 5, sl st in 2nd ch, sc, hdc, sl st in last ch.
Work opposite side: hdc, sc, sl st.
Fasten off. Leave 10 cm tail.
Make:
- 2 leaves for ear cluster
- 3 leaves for wing cluster
- 3 leaves for tail-tip cluster
Claw Pads (Make 12 small ovals)
Yarn: pale yellow — photo-specific paw detail
Ch 3, 2 sc in 2nd ch from hook, sc in next (3)
Fasten off. Leave 8 cm tail.
Assembly
- Sew the snout centered between the eyes, spanning roughly rounds 9 to 14 on the head.
- Add embroidered nostrils near the lower front of the snout.
- Attach the cheek patches low on each side of the snout to widen the baby-face profile.
- Sew the head to the body, slightly tilted forward so the snout projects over the belly.
- Stitch the belly patch to the body front, centered from neck base to lower abdomen.
- Sew the back legs at the lower sides of the body so the dragon sits with feet forward.
- Attach the arms just below the neck line, angled inward toward the belly.
- Sew the ears beside the antler positions, then attach the antlers on top of the head.
- Add wings to the upper back, tail to the rear base, then sew the four back spikes from neck to upper tail.
- Attach leaf clusters to one ear, one wing edge, and the tail tip, then sew the claw pads to hands and feet.
The piece is complete when the tail touches the surface lightly behind the body and the dragon stands without wing sag.
7 Technical Tips
- Mark the first stitch of every round. Losing the round start on a 36-stitch plateau shifts the snout and eyes off center by the time you reach the decrease section.
- Stuff the head firmer than the body. A soft head collapses around 12 mm eyes and makes the muzzle seam wrinkle under the face.
- Use invisible decreases on rounds 13 to 17 of the head. Standard decreases leave a ridge that becomes visible across the forehead under side lighting.
- Install the eyes before the head falls below 24 stitches. Waiting until 18 stitches makes washer placement awkward and can crack the fabric around the eye posts.
- Pin the wings before sewing. Even a 5 mm height mismatch is obvious because both wing tops sit near the shoulder line and frame the head.
- Keep the tail base more firmly stuffed than the tip. A limp base drops behind the toy and removes the third contact point that stabilizes the seated pose.
- Weave antler tails downward through the head, not sideways. Sideways anchoring twists the antlers outward after handling and breaks the clean front silhouette.
Conclusion
This dragon amigurumi crochet pattern works because the structure serves the silhouette: broad head, forward snout, upright belly, short arms, large feet, and a tail that doubles as support. The antlers and leaf accents shift it away from the standard fire-dragon look and into a woodland version that reads clearly from one photo. Next, swatch the sage green yarn with your 4 mm hook and check that the fabric closes tightly around the 12 mm eyes before starting the head. Share the finished piece on Pinterest and Instagram with #AntlerDragonPattern. One detail is worth comparing before you post: did you place the leaf cluster on the ear, wing, and tail in the same triangular balance as the original photo?









