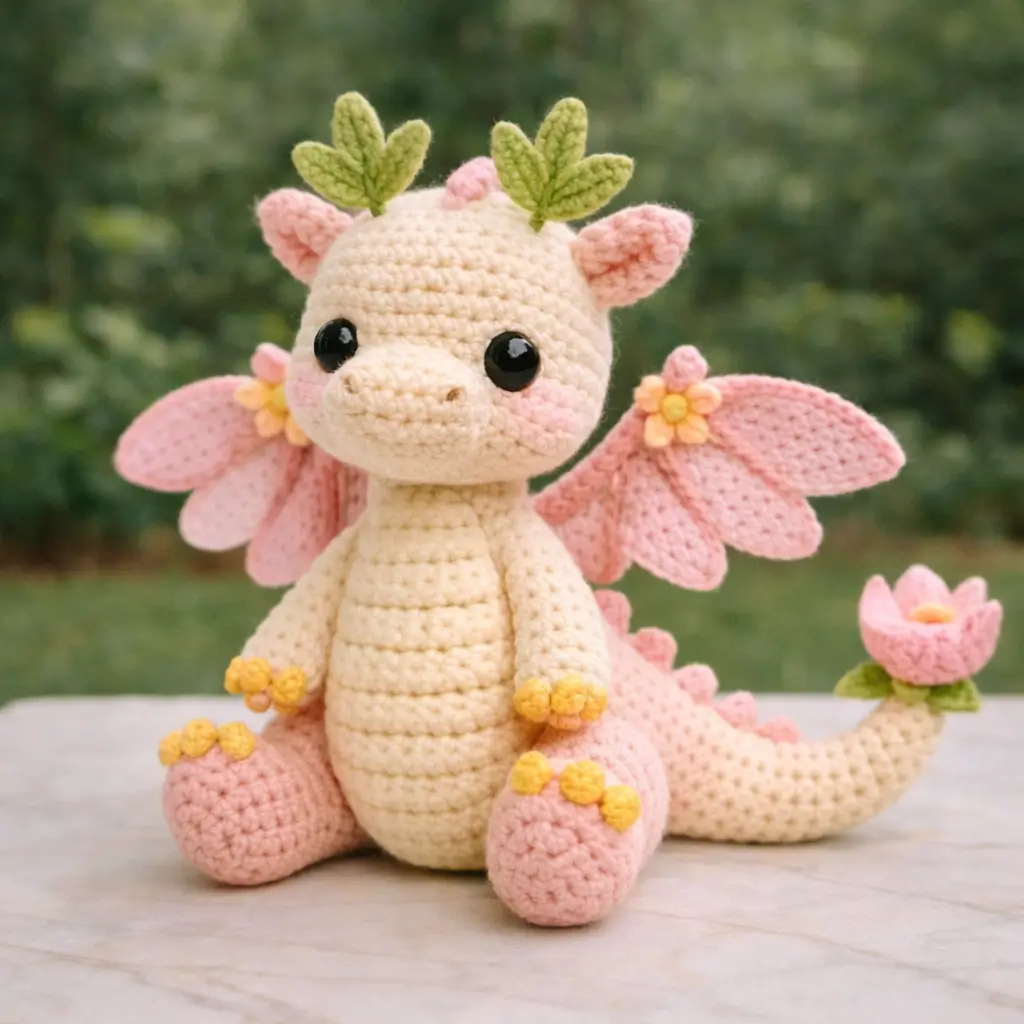
A flower-tipped tail changes the balance point on a seated dragon. This dragon amigurumi crochet pattern solves that with a broad belly, low legs, and light wings, giving you a stable 16 cm class project in aran yarn with a 4 mm hook and intermediate shaping. It works well for spring market stock because the flower details shift the theme without changing the base build.
The Design: What Makes This Dragon Different
This dragon is not built like a standard fire dragon. The snout projects forward in a short oval, not a pointed muzzle, because the photographed toy relies on a baby-animal face ratio rather than a reptile profile. The wings also sit high and shallow. That keeps the silhouette readable from the front, where the flower joints and pink membranes do most of the visual work. Comparable dragon patterns often use larger wing spans or dorsal emphasis instead.
The second structural choice is the tail. It curves around the side and finishes in a flower cup, so the tail cannot be treated as a narrow afterthought. It must start firm at the body and stay light at the tip. That matters in a fairy dragon amigurumi because too much stuffing at the end pulls the toy backward.
A common mistake with a dragon plush crochet pattern is overbuilding the head while underweighting the feet. Result: a forward slump and wings that twist off-axis. This version corrects that by keeping the body at a medium plateau and making the legs broad enough to act as front stabilizers.
Project Info at a Glance
| Skill Level | Time | Finished Size | Hook | Best For |
|---|---|---|---|---|
| Intermediate | 8–11 hours | approx. 16–20 cm seated | 4.0 mm | spring décor, market stock, gift plush |
Finished size, hook, and yarn class are based on verified comparable dragon patterns using aran/worsted yarn and 4.0 mm hooks.
Materials and Tools
Yarn
- Cream — worsted/aran — about 56 g — Rico Creative Cotton Aran or Red Heart Super Saver in a soft neutral range
- Blush pink — worsted/aran — about 12–20 g — for wings, feet, spikes, cheek patches, and inner ears
- Light yellow — worsted/aran — small amounts — for claws and flower centers
- Leaf green — worsted/aran — small amounts — for leaf horns and tail flower base
Tools
- Hook 4.0 mm
- Safety eyes 8–9 mm verified comparable size; 10–12 mm fits the photo by visual estimate
- Stuffing
- Tapestry needle
- Stitch markers
- Pins
- Black or taupe embroidery thread for nostrils
Comparable seated dragons in aran yarn commonly use a 4 mm hook and 8 mm eyes; small beginner dragon listings also use 9 mm eyes.
Abbreviations
MR / sc / inc / dec / sl st / ch / BLO / hdc / dc / FO
Use invisible decrease for all shaping rounds where noted. It keeps the muzzle, belly taper, and tail curve cleaner than a standard front-facing decrease.
Pattern — Step by Step
Continuous spiral unless noted.
Head (Make 1)
Yarn: cream — Source: Standard amigurumi math with medium 36-st plateau
R1: 6 sc in MR (6)
R2: inc x6 (12)
R3: (sc, inc) x6 (18)
R4: (2 sc, inc) x6 (24)
R5: (3 sc, inc) x6 (30)
R6: (4 sc, inc) x6 (36)
R7-R12: sc around (36)
R13: (4 sc, dec) x6 (30)
R14: (3 sc, dec) x6 (24)
Insert eyes between R9 and R10, 8 sts apart.
R15: (2 sc, dec) x6 (18)
Stuff firmly.
R16: (sc, dec) x6 (12)
R17: dec x6 (6)
Fasten off. Leave 20 cm tail.
Snout (Make 1)
Yarn: cream — Source: Standard oval shaping
Ch 5.
R1: inc in 2nd ch, 2 sc, 3 sc in last ch, 2 sc on opposite side, inc (10)
R2: inc, 2 sc, inc x3, 2 sc, inc x2 (16)
R3-R4: sc around (16)
Lightly stuff. Sew centered over lower head. Embroider nostrils 4 sts apart.
Fasten off. Leave 25 cm tail.
Body (Make 1)
Yarn: cream — Source: Standard amigurumi math with medium 36-st plateau
R1: 6 sc in MR (6)
R2: inc x6 (12)
R3: (sc, inc) x6 (18)
R4: (2 sc, inc) x6 (24)
R5: (3 sc, inc) x6 (30)
R6: (4 sc, inc) x6 (36)
R7-R12: sc around (36)
R13: (4 sc, dec) x6 (30)
R14-R16: sc around (30)
R17: (3 sc, dec) x6 (24)
R18: sc around (24)
Stuff firmly, with extra weight at lower front.
R19: (2 sc, dec) x6 (18)
Fasten off. Leave 30 cm tail.
Arms / Front Legs (Make 2)
Yarn: cream with yellow claws — Source: Standard amigurumi math
R1: 6 sc in MR (6)
R2: inc x6 (12)
R3: (sc, inc) x6 (18)
R4-R5: sc around (18)
Add 3 yellow bobbles or popcorn-style claw nubs across front of R5 if desired.
R6: (sc, dec) x6 (12)
R7-R10: sc around (12)
Stuff lower half only.
Fasten off. Leave 20 cm tail.
Back Legs (Make 2)
Yarn: blush pink with yellow claws — Source: Standard amigurumi math
R1: 6 sc in MR (6)
R2: inc x6 (12)
R3: (sc, inc) x6 (18)
R4: (2 sc, inc) x6 (24)
R5-R6: sc around (24)
R7: (2 sc, dec) x6 (18)
R8-R10: sc around (18)
Add 3 yellow claw nubs across top front edge. Stuff firmly so the foot holds shape.
Fasten off. Leave 25 cm tail.
Ears (Make 2)
Yarn: blush pink — Source: Standard tapered ear
R1: 6 sc in MR (6)
R2: (sc, inc) x3 (9)
R3: (2 sc, inc) x3 (12)
R4-R5: sc around (12)
R6: (2 sc, dec) x3 (9)
R7: sc around (9)
Flatten. Fasten off. Leave 18 cm tail.
Wings (Make 2)
Yarn: blush pink — Source: adapted from verified dragon wing ranges using 24–40 st wing structures
R1: 6 sc in MR (6)
R2: inc x6 (12)
R3: (sc, inc) x6 (18)
R4: (2 sc, inc) x6 (24)
R5-R6: sc around (24)
Flatten.
Edging row through both layers: (hdc, dc, dc, hdc, sl st) x2 across curved edge to form two scallops.
Fasten off. Leave 24 cm tail.
Tail (Make 1)
Yarn: cream — Source: Standard tapered tail with gentle build
R1: 6 sc in MR (6)
R2: (sc, inc) x3 (9)
R3: sc around (9)
R4: (2 sc, inc) x3 (12)
R5-R6: sc around (12)
R7: (3 sc, inc) x3 (15)
R8-R11: sc around (15)
R12: (4 sc, inc) x3 (18)
R13-R18: sc around (18)
Stuff lightly from base through mid-tail only. Bend into a curve while sewing.
Fasten off. Leave 35 cm tail.
Dorsal Spikes (Make 6)
Yarn: blush pink — Source: Standard cone math
R1: 6 sc in MR (6)
R2: sc around (6)
R3: (2 sc, inc) x2 (8)
R4: sc around (8)
Fasten off. Leave 10 cm tail.
Leaf Horns (Make 2 clusters)
Yarn: leaf green — Source: photo-derived embellishment
For each leaf:
Ch 6, sl st in 2nd ch, sc, hdc, sc, sl st.
Make 3 leaves and join at bases.
Fasten off. Leave 12 cm tail.
Cheek Patches (Make 2)
Yarn: blush pink — Source: Standard flat circle
R1: 6 sc in MR (6)
R2: inc x6 (12)
Fasten off. Leave 12 cm tail.
Wing Flowers (Make 2)
Yarn: blush pink and yellow — Source: photo-derived embellishment
Center in yellow:
R1: 6 sc in MR (6)
Petals in pink or peach:
(ch 2, 2 dc in next st, ch 2, sl st in same st) x5 around.
Fasten off. Leave 15 cm tail.
Tail Flower Cup (Make 1)
Yarn: blush pink with green base — Source: photo-derived embellishment
In pink:
R1: 6 sc in MR (6)
R2: inc x6 (12)
R3: (sc, inc) x6 (18)
R4: sc in BLO around (18)
R5: sc around (18)
Pinch three points lightly while sewing to tail tip. Add a small yellow center and green base leaves.
Fasten off. Leave 18 cm tail.
Assembly
- Sew the snout to the center front of the head, spanning roughly R8-R12.
- Attach the head to the body with the chin slightly forward of center.
- Sew the cheek patches under the eyes and embroider nostrils on the snout.
- Attach the front arms to the upper body, one round below the neck seam.
- Sew the back legs low and slightly forward so the dragon sits without rocking.
- Attach the ears between the side top of the head and the back curve.
- Sew the leaf horn clusters on top of the head, centered between ears.
- Attach the wings high on the back; add one flower at each wing joint.
- Sew the tail to the lower back, curve it sideways, then attach the pink spikes down the tail and lower back line.
- Sew the flower cup to the tail tip and weave in all tails securely.
The finished piece should sit upright with the tail acting as a visual counterbalance, not a weight-bearing prop.
7 Technical Tips
- Marker drift: The head is symmetrical, but the snout is not. Mark the first stitch of every round or the snout seam will twist off center by 1–2 stitches.
- Stuffing firmness: Pack the lower body harder than the upper body. A soft base makes the dragon collapse backward once the tail flower is attached.
- Invisible decreases: Use invisible dec on the head from the first closing round onward. Standard decreases leave notches that show clearly on pale yarn.
- Eye placement timing: Insert eyes before the head drops below 24 stitches. After that point, washers are harder to lock in place without distorting the face.
- Wing tension: Keep the scalloped edging one half-step looser than the wing base. Tight edging causes the wing to curl into a tube instead of a flat petal shape.
- Pinning order: Pin legs first, then body, then wings. Changing wing position before testing the sitting angle often hides a bad leg set.
- Tail weaving: After sewing the tail, run the yarn tail back through the body twice at different angles. One pass is not enough on a curved appendage that gets handled often.
Conclusion
This dragon amigurumi crochet pattern works because the structure stays restrained while the trim does the styling. The head remains round, the body stays medium, and the decorative load shifts to leaf horns, wing flowers, cheek circles, and the flower tail tip. Next step: crochet the body and one leg first, test the sitting angle on a flat surface, then finish the rest in assembly order. Share the result on Pinterest and Instagram with one front view and one profile shot so the tail flower reads clearly. Hashtag: #FloralDragonPattern. Which version would you change first on this dragon: the leaf horns, the wing flowers, or the tail bloom?









