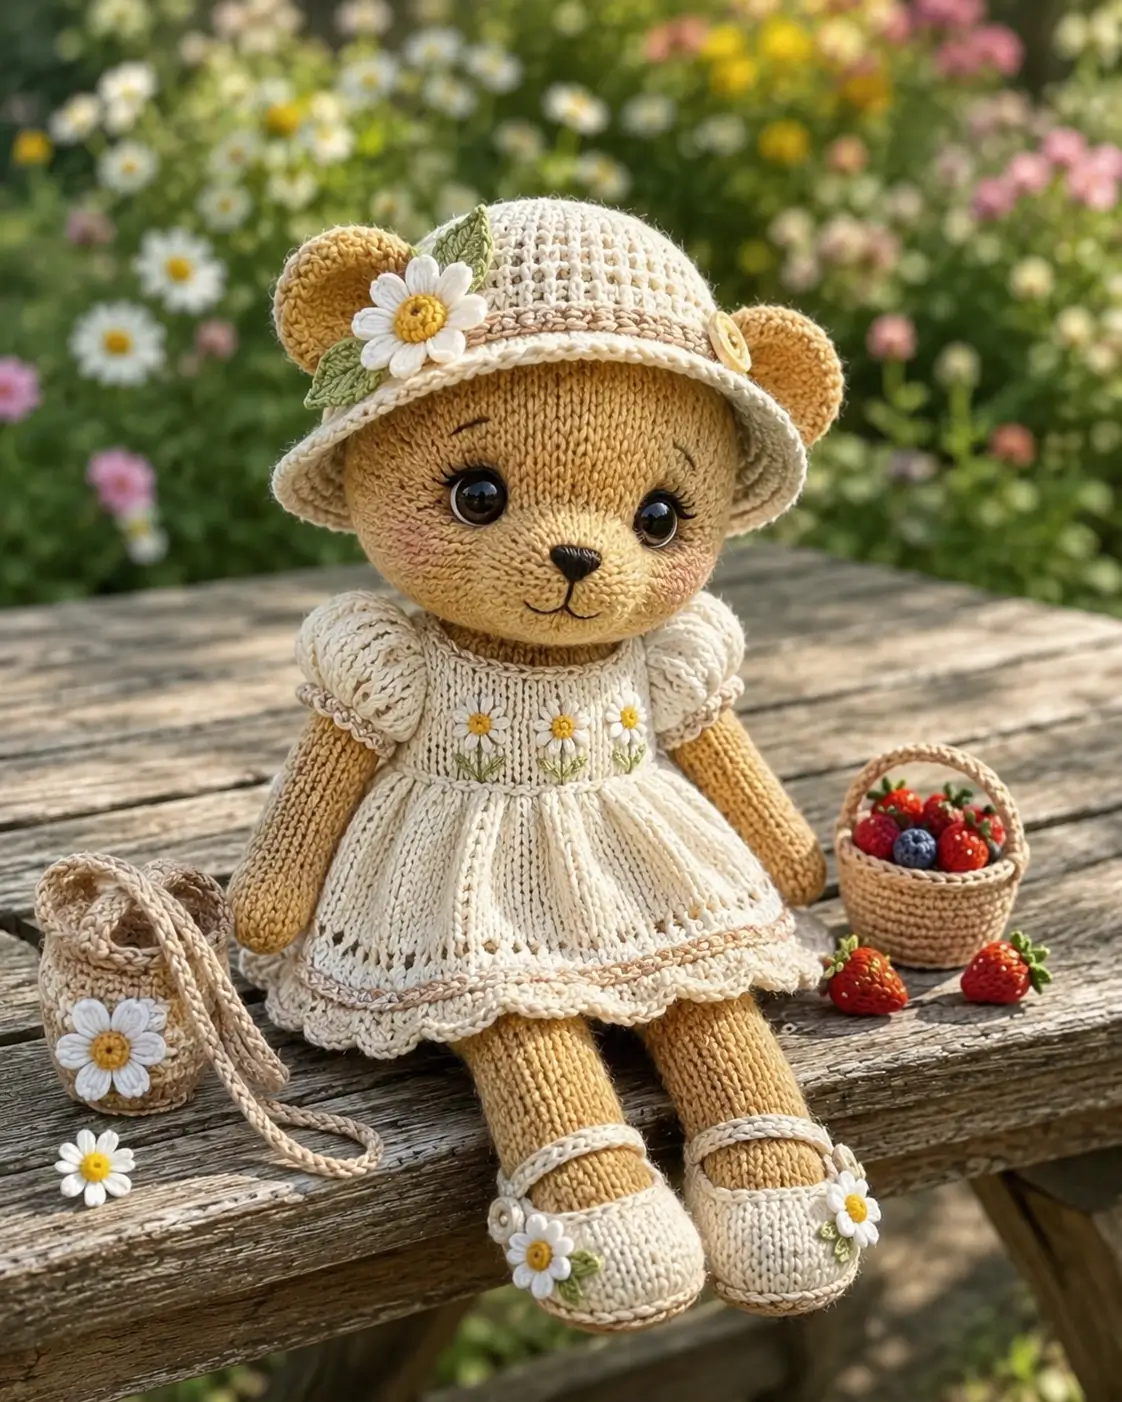
A teddy bear’s round ears are not optional; their placement decides whether the face reads as bear or plain doll. This teddy bear amigurumi crochet pattern builds a 25–27 cm garden bear with DK yarn, a 3.0 mm hook, safety eyes, a brimmed hat, dress, shoes, basket, bag, daisies, and strawberries. The skill level is intermediate because small accessories need firm joining. Make it when one display piece must carry a full seasonal scene.
The Design: What Makes Daisy Different
The head-to-body ratio sits high: 42 stitches for the head and 42 for the body, so the face stays broad enough for 10–12 mm eyes and a small embroidered snout. That scale also supports a crochet bear with dress without making the skirt drag under the legs. The amigurumi teddy bear hat is worked separately because a sewn brim frames the ears better than a built-in cap. Accessories stay light: the basket, bag, daisies, and strawberries are hollow or flat, so the seated doll does not tip forward. A common maker mistake with this character type is placing the ears too low. Move them down by even two rounds, and the teddy bear amigurumi crochet pattern begins to look like a mouse doll with a bear nose.
Project Info at a Glance
| Skill Level | Time | Finished Size | Hook | Best For |
|---|---|---|---|---|
| Intermediate | 10–14 hours | 25–27 cm | 3.0 mm | Display doll, gift table, spring market booth |
Size, hook, and DK yarn weight align with a Ravelry teddy reference using DK yarn and a 3.0 mm hook for a 25–27 cm toy.
Materials and Tools
Yarn
- Golden tan — DK — 60 g — Paintbox Cotton DK, YarnArt Jeans, or similar smooth cotton-blend
- Cream — DK — 55 g — dress, hat, shoes
- Straw beige — DK — 15 g — bag, basket, hat trim
- White — DK or sport — 8 g — daisy petals
- Yellow — DK or sport — 5 g — daisy centers
- Green — DK or sport — 5 g — leaves and strawberry tops
- Red — DK — 8 g — strawberries
- Peach — embroidery yarn — 1 g — cheek patches or blush stitches
- Black — embroidery floss — small amount — nose, mouth, brows, lashes
The total yarn estimate stays within the 100–150 g regular-yarn teddy range reported for amigurumi bear projects, with extra accent allocation for the clothing and props.
Tools
- Hook 3.0 mm
- Safety eyes 10–12 mm
- Polyester stuffing
- Yarn needle
- Stitch markers
- Pins
- Small scissors
- Embroidery needle
- Optional 12 mm flat button for hat side
Abbreviations
MR = magic ring; sc = single crochet; inc = 2 sc in next stitch; dec = invisible decrease; sl st = slip stitch; ch = chain; BLO = back loop only; FLO = front loop only; hdc = half double crochet; dc = double crochet. Invisible decrease is worked through the front loops of the next two stitches so the closing rounds keep a smooth surface.
Pattern — Step by Step
Continuous spiral unless noted. Counts appear in brackets. Main rounds follow the standard 6-stitch amigurumi base, then increase or decrease by 6 stitches per shaping round.
Head
Yarn: golden tan
R1: 6 sc in MR (6)
R2: inc ×6 (12)
R3: (sc, inc) ×6 (18)
R4: (2 sc, inc) ×6 (24)
R5: (3 sc, inc) ×6 (30)
R6: (4 sc, inc) ×6 (36)
R7: (5 sc, inc) ×6 (42)
R8–R14: sc around (42)
R15: (5 sc, dec) ×6 (36)
R16: (4 sc, dec) ×6 (30)
R17: (3 sc, dec) ×6 (24)
Insert eyes between R10 and R11, 8 stitches apart. Add firm stuffing before the opening drops below 18 stitches.
R18: (2 sc, dec) ×6 (18)
R19: (sc, dec) ×6 (12)
R20: dec ×6 (6)
Fasten off. Leave a 20 cm tail and close the final gap.
Body
Yarn: golden tan
R1: 6 sc in MR (6)
R2: inc ×6 (12)
R3: (sc, inc) ×6 (18)
R4: (2 sc, inc) ×6 (24)
R5: (3 sc, inc) ×6 (30)
R6: (4 sc, inc) ×6 (36)
R7: (5 sc, inc) ×6 (42)
R8–R13: sc around (42)
R14: (5 sc, dec) ×6 (36)
R15–R16: sc around (36)
R17: (4 sc, dec) ×6 (30)
R18: sc around (30)
R19: (3 sc, dec) ×6 (24)
R20: (2 sc, dec) ×6 (18)
R21: (sc, dec) ×6 (12)
R22: dec ×6 (6)
Stuff the base firmly, then soften the neck area slightly so the head can sit flat.
Fasten off. Leave a 30 cm tail for joining.
Arms / Front Legs
Yarn: golden tan
R1: 6 sc in MR (6)
R2: inc ×6 (12)
R3: (sc, inc) ×6 (18)
R4–R8: sc around (18)
R9: (sc, dec) ×6 (12)
R10–R16: sc around (12)
R17: dec ×6 (6)
Stuff the paw firmly and leave the upper arm lightly filled.
Fasten off. Leave a 25 cm tail on each arm.
Back Legs
Yarn: golden tan
R1: 6 sc in MR (6)
R2: inc ×6 (12)
R3: (sc, inc) ×6 (18)
R4–R6: sc around (18)
R7: (sc, dec) ×6 (12)
R8–R17: sc around (12)
R18: dec ×6 (6)
Stuff the lower foot and calf. Keep the top third flexible for a seated pose.
Fasten off. Leave a 25 cm tail on each leg.
Ears
Yarn: golden tan
R1: 6 sc in MR (6)
R2: inc ×6 (12)
R3: (sc, inc) ×6 (18)
R4: (2 sc, inc) ×6 (24)
R5–R6: sc around (24)
Do not stuff. Flatten each ear into a shallow cup.
Fasten off. Leave a 30 cm tail.
Snout
Yarn: golden tan or slightly lighter tan
R1: 6 sc in MR (6)
R2: inc ×6 (12)
R3: (sc, inc) ×6 (18)
R4: sc around (18)
Add light stuffing only in the center. Embroider a black triangle nose over R2–R3 and a short vertical mouth line below it.
Fasten off. Leave a 25 cm tail.
Tail
Yarn: golden tan
R1: 6 sc in MR (6)
R2: inc ×6 (12)
R3: sc around (12)
R4: dec ×6 (6)
Stuff with a pea-sized amount of fiberfill.
Fasten off. Leave a 20 cm tail.
Cheek Patches
Yarn: peach embroidery yarn or peach DK split into two plies
R1: 6 sc in MR (6)
R2: inc ×6 (12)
Sl st to finish.
Block flat. These may also be replaced with 6 straight blush stitches per cheek.
Fasten off. Leave a 15 cm tail.
Dress Bodice
Yarn: cream
R1: ch 42, join without twisting, sc around (42)
R2–R5: sc around (42)
R6: BLO sc around (42)
Test over the body before cutting yarn. The bodice should sit under the arms and above the widest belly round.
Fasten off. Leave a 30 cm tail for back seam shaping.
Dress Skirt
Yarn: cream
Join yarn in the front loops left from Bodice R6.
R1: sc around (42)
R2: (6 sc, inc) ×6 (48)
R3: sc around (48)
R4: (7 sc, inc) ×6 (54)
R5: sc around (54)
R6: (8 sc, inc) ×6 (60)
R7–R10: sc around (60)
R11: BLO sc around (60)
R12: sl st around (60)
For a scalloped lower edge, surface-crochet cream chains over R11 after assembly rather than changing the stitch count.
Fasten off. Weave in the end.
Puff Sleeves
Yarn: cream
R1: 6 sc in MR (6)
R2: inc ×6 (12)
R3: (sc, inc) ×6 (18)
R4–R5: sc around (18)
R6: (sc, dec) ×6 (12)
Flatten the opening. Do not stuff. Sew one sleeve cap over each shoulder seam.
Fasten off. Leave a 20 cm tail.
Brimmed Garden Hat
Yarn: cream with straw beige trim
R1: 6 sc in MR (6)
R2: inc ×6 (12)
R3: (sc, inc) ×6 (18)
R4: (2 sc, inc) ×6 (24)
R5: (3 sc, inc) ×6 (30)
R6: (4 sc, inc) ×6 (36)
R7: (5 sc, inc) ×6 (42)
R8–R11: sc around (42)
R12: FLO (6 sc, inc) ×6 (48)
R13: (7 sc, inc) ×6 (54)
R14: (8 sc, inc) ×6 (60)
R15: sc around (60)
R16: sl st around (60)
Add a straw beige surface-crochet band across R11. Sew one daisy and one leaf to the left front brim.
Fasten off. Weave in the end.
Shoes
Yarn: cream
R1: 6 sc in MR (6)
R2: inc ×6 (12)
R3: (sc, inc) ×6 (18)
R4–R6: sc around (18)
R7: (sc, dec) ×6 (12)
R8: sc around (12)
Slide shoe over the leg before final shoe sewing. Add a ch-14 strap across the ankle and tack both ends to the shoe sides.
Fasten off. Leave a 20 cm tail.
Shoulder Bag
Yarn: straw beige
R1: 6 sc in MR (6)
R2: inc ×6 (12)
R3: (sc, inc) ×6 (18)
R4: (2 sc, inc) ×6 (24)
R5–R9: sc around (24)
R10: sl st around (24)
Handle: ch 36, sl st to opposite side.
Flatten the bag slightly and sew one small daisy to the front.
Fasten off. Weave in the end.
Berry Basket
Yarn: straw beige
R1: 6 sc in MR (6)
R2: inc ×6 (12)
R3: (sc, inc) ×6 (18)
R4: (2 sc, inc) ×6 (24)
R5: (3 sc, inc) ×6 (30)
R6–R11: sc around (30)
R12: sl st around (30)
Handle: ch 28, sl st to opposite side.
Do not overstuff. The basket should sit upright beside the bear without rolling.
Fasten off. Weave in the end.
Strawberries
Yarn: red with green tops
R1: 6 sc in MR (6)
R2: inc ×6 (12)
R3: (sc, inc) ×6 (18)
R4–R5: sc around (18)
R6: (sc, dec) ×6 (12)
R7: dec ×6 (6)
Green cap: 6 sc in MR, then (ch 4, sl st in next stitch) ×6.
Embroider 6–8 tiny cream seed stitches before closing each berry.
Fasten off. Make 3–5.
Daisy Appliqués
Yarn: yellow center, white petals
Center R1: 6 sc in MR (6)
Center R2: inc ×6 (12)
Petals: join white, then (ch 4, sl st in next stitch) ×12.
Make 7 daisies: one for the hat, three for the dress, one for the bag, and one for each shoe.
Fasten off. Leave sewing tails.
Leaves
Yarn: green
Ch 7.
Row 1: sl st in second ch from hook, sc, hdc, dc, hdc, sc (6 stitches worked along chain)
Work down the other side: sc, hdc, dc, hdc, sc, sl st (12 total side stitches)
Pin leaves under daisies before sewing so the green edges show by 2–3 mm.
Fasten off. Make 6–8.
Hat Button
Yarn: yellow or cream
R1: 6 sc in MR (6)
R2: inc ×6 (12)
Sl st to finish.
Embroider two short beige bars across the center to mimic buttonholes.
Fasten off. Leave a 15 cm tail.
Assembly
- Sew the head to the body with the neck centered under Head R18 and Body R20; add stuffing before the final 2 cm of seam closes.
- Pin the ears between Head R5 and R10, with the inner edge angled toward the eyes, then sew through both layers of each flattened ear.
- Sew the snout over Head R11–R15, centered between the eyes, and pull the nose embroidery snug but not sunken.
- Attach cheek patches one round below the eyes and 2 stitches outside the snout edge.
- Sew the arms at Body R16–R18 so the paws rest along the dress side seams.
- Attach the legs to the lower front body at Body R5–R7 with a seated angle and a 4-stitch gap between inner thighs.
- Place the dress over the body, sew the back seam closed, and tack the bodice at both side seams.
- Sew the shoes to the feet, then add ankle straps and one daisy on each toe box.
- Position the hat with the brim touching the ears; stitch the back brim lightly to the head and add the hat daisy, leaves, trim, and button.
- Fill the basket with strawberries, place the shoulder bag at the left side, sew the tail at the back, and weave every remaining yarn end into dense fabric.
The finished bear should sit without hand support and hold the garden props at table-display scale.
7 Technical Tips
- Stitch marker drift: the start point can shift 1–2 stitches left by R10. Move the marker every round, not every few rounds, so the face line stays centered.
- Stuffing firmness: a 42-stitch head collapses under a hat if the crown is soft. Pack the head until it springs back after a 1 cm thumb press.
- Invisible decrease gaps: loose front-loop decreases leave six small holes near the closing round. Pull the working loop down to hook height before finishing each decrease.
- Eye placement timing: safety backs are hard to press on after R18. Insert and lock the 10–12 mm eyes after R17, before the opening narrows.
- Velvet tension warning: velvet or chenille can enlarge this pattern by 30–50 percent. Switch to cotton DK for the 25–27 cm size target.
- Pinning failure mode: unpinned ears often land at different heights after sewing. Pin both ears first, count rounds from the crown, then sew only after the front view matches.
- Tail weaving length: short tails can pop out through firm stuffing. Leave at least 20 cm on structural parts and bury the tail across two direction changes.
Conclusion
This garden bear works because the structure stays strict while the surface details stay small. The 42-stitch head gives enough face width for round ears, safety eyes, a snout, blush, and hat brim. The dress, shoes, bag, basket, strawberries, and daisies build the scene without changing the base teddy proportions. Before publishing or selling finished pieces, make one test bear in DK cotton and record the final seated height after stuffing. Share the finished teddy bear amigurumi crochet pattern result on Pinterest and Instagram with #DaisyGardenTeddy. Which detail changes the bear most: the daisy hat, the berry basket, or the mary-jane shoes?









